Making Mini Resin Frames

Resin Frame and Magnet 2788

I had this idea that I’d been wanting to try…

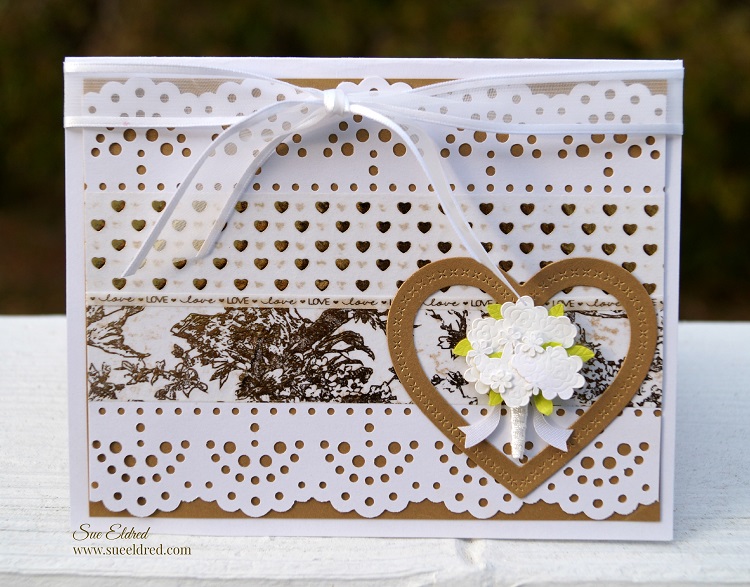
to create little dimensional framed artwork using miniature frames filled with resin.

It really is pretty easy to do.  The only hard part for me was waiting for the resin to cure.

They would be great for weddings or parties.

Customize the frames to use for table numbers, centerpieces, desert tables and more.

There’s a lot of possibilities.

Resin Magnet Supplies 916

To Create a Mini Frame…

Materials:

Directions:

  1. Remove the backing and glass from frame.
  2. Apply Rose Gold Metallic Lustre or paint of choice onto frame.
  3. Adhere decorative paper onto mat-board.   Cut mat-board to fit frame back and adhere.
  4. Embellish the inside of the frame with computer generated words or small embellishments. Make sure embellishments inside the frame is lower than frame top.
  5. Measure and mix resin following manufacturer’s instructions. Pour mix into frame to cover embellishments. Blow air onto the resin using a thin straw to help remove bubbles. Let dry completely.

Resin Frame 0957

The Mr. & Mrs. and LOVE table frames were featured in Craft Ideas Spring Issue. (page 36)

Make sure to check out Craft Ideas Magazine for Craft Ideas for Every Occasion, Every Skill Level.

Craft Ideas Magazine Spring 2016

This project was created for and sponsored by Craft Ideas Magazine.

*This post uses Amazon Affiliate Links.  I am an Amazon Affiliate.

Create a Simple Vase Centerpiece

Washi Tape Vase and Flowers 2

Want to make a great impression but don’t have a lot of time? 

Here’s a quick and easy centerpiece project for your next party or gathering?

Washi Tape and Vase

I put together this simple vase using Washi Tape I received from Little B LLC

and an inexpensive dollar store cylinder vase.

TIP:  I drew a line with a permanent marker halfway down the vase to use as a starting point to keep everything neat and all my lines straight.  Simply wrap the vase with the washi tape.  (it’s that easy)    It only takes a few minutes to create an elegant look.

Washi Tape Vase Close Up

Next…I filled it with fresh flowers cut from my garden.

Or pick up a bouquet at the grocery store.

It would be great centerpiece vase for Weddings, Showers or any special gatherings.

It’s a temporary idea with elegant results. 

Here’s the list of the Little B Decorative Tape Used:

  • 100435 Silver Foil Black Pin Stripe
  • 100562 Gold Foil Hearts
  • 100047 Blk w/Sm Wht Polka Dots
  • 100443 Gold Foil Toile
  • 100344 Black and White Stripe
  • 100011 Damask Black/White
  • 100563 Gold Foil Love

Design Challenge with Little B…

I played a little hooky from all the projects on my never ending “To Do” list…

and did a little card-making (just for fun).  Thanks in part to a wonderful box of goodies

that I received from the good people at Little B LLC, the sponsor of this month’s

Designer Craft Connection’s Manufacturer Challenge.

(make sure to check out the great giveaway prize at the bottom of this post)

Graphic 45 and Little B Butterfly Card 91

My Butterfly Card uses mini dimensional butterflies from Little B

and scrapbook paper from Graphic 45’s Rare Oddities Collection.

To create the division between the butterflies,

I used a really thin Black and White Striped Decorative Tape

Little B Wedding Card 082

This Simple little card uses all kinds of Little B goodies.

Directions:

  1. Using the Lace Doily Punch, punch both sides of a white cardstock layer.                        (Approx. 4 1/4″ x 5 1/4″)
  2. Add Gold Foil Hearts and Gold Foil Toile tapes to the center of the punched cardstock.
  3. Add a thin strip of Gold Foil Love on top of the seem between the two previous tapes.
  4. Layer white cardstock onto a piece of gold cardstock and adhere to a white card base.
  5. Using three of the smaller layering heart dies, cut and emboss a small heart frame.
  6. Adhere the heart frame onto the bottom right corner of the card.
  7. Using a small Wedding bouquet from the Bride and Groom stickers, stick bouquet onto the center of the heart frame.
  8. Tie white sheer ribbon around top of the card.

Finished Card Size:  4 1/2″ x 5 3/4″


Little B img-logo

♥ Thank You Little B LLC for generously providing the dies, punches, dimensional stickers,

and decorative tapes used on these cards.   (You are awesome!)


DCC Little B Giveaway

Little B LLC is so awesome they’re giving away this prize package to one lucky winner.

To enter to win leave a comment on this post and/on the other designers’ blogs

and “like” the Little B LLC Facebook page… that’s all there is to it.

The more you comment the better your chances are to win!  Open to residents of US and Canada only.

Contest ends 10-29-15.

Check out the Designer Craft Connection Blog for participating Designer projects.


My trip to CHA Paper Arts in Chicago

Last week, I got the opportunity to attend CHA Paper Arts in Schaumburg, IL.

I hadn’t been able to attend a CHA Show (Craft Hobby Association) since the last time

it was in Chicago a few years ago.

As you can imagine I was excited to go.  (any excuse for a get-a-way)

I knew going in that it was going to be a small show.

But…by being a small show, it gave me the opportunity to mix, mingle and really get to know people.

I got to meet, in person, a few online friends, was able to make a few more and make some really

great connections.  All in all I was satisfied.

Back in it’s hey day, when I had my store, I remember spending three days walking the show

and still not being able to see everything.  (those were the days…)

On the first day of the two day show, I did remember to take a few pictures.

I wish I had taken more.   Enjoy!

Stephanie Ackerman 2813

First off in the Sizzix Booth was dies from Stephanie Ackerman. 

I’ve been following Stephanie’s blog, Homegrown Hospitality, for years.

She’s a real Superstar in my books.

Tim Holtz 2809

 New House Dies from Tim Holtz and Sizzix

I love the little house dies from the always popular Tim Holtz.

Tim Holtz 2810

Tim Holtz Holiday Canvas

Ken Oliver and the Girls 2846

Ken Oliver of Ken Oliver Crafts

Ken’s another one of my Favorite Superstars.  Here I am with Ken and The Paper Forest girls.

They had just taken a picture with Ken and was rubbing it in my face.

So… I made them take another.

Ken Oliver's Color Burst

I finally got the opportunity to play with Ken’s Color Bursts. 

It only took a few minutes to create this masterpiece.

Eileen Hull 2845

Eileen Hull’s Vintage Camper, Scotty on The Paper Trail at CHA.

Eileen Hull 2840Eileen Hull 2841

Such a cute little camper.  You can read about Eileen and Scotty’s Adventure here.

Eileen Hull 2842

Eileen Hull’s Samples made using Sizzix Dies.

Eileen Hull 2843

More samples from Eileen.

I met Eileen a few years back and she’s such a sweet and personable lady.

You can’t help but love her.  And her dies… they are just too cute.

If I had her camper, I just might enjoy camping.  (well maybe)

Graphic 45 2823

Another picture with The Paper Forest girls at the Graphic 45 booth.

Graphic 45 2829

Graphic 45 World’s Fair

Graphic 45 2832

Graphic 45 Mon Amour

Kaisercraft 2861

Kaisercraft

Ready for Christmas Crafting?  I am!

Kaisercraft 2863

More Kaisercraft Christmas…

Kaisercraft 2862

Kaisercraft

Little B 2852

Little B LLC Christmas

Little B 2858  I fell in love with Little B’s New Christmas Washi Tape.

This is another one of those booths where I got talking and forgot to take more pictures.

Ikea

As a reward for all my work (aka…having fun).  

I ended my adventure with a trip to my favorite Big Blue Store, IKEA.


Favecrafts Best Blogger Craft 2015

Capture

Last Sunday, I shamelessly asked for your “vote” in the Best Blogger Craft 2015 Contest.

This Sunday, I decided not to do that.

Instead I’m just going to remind you that if you haven’t checked out all the awesome entries

into the contest that you really should.  http://www.favecrafts.com/voting/Blogger-Contest

And….. if you just happen to want to “vote” for my Precious Baby Girl DIY Gift Tag,

I’d be forever grateful.

Best-Blogger-Voting-Banner-2

You can only vote once.  Voting ends March 10th , 2015 at midnight CST.


Fave Crafts 2015 Best Blogger Contest: Baby Girl Tag

This sweet “Baby Girl” tag was made with the products I received after the

2015 Blogger Networking Event at the Craft and Hobby Association Show in January.

The tag is also my submission into Fave Crafts Best Craft Blogger Contest 2015.

(Needless to say, I’ll be shamelessly asking you for your vote at the end of the post.)

Little B Baby Tag 1488 2

Baby Girl Tag

Designed by Sue Eldred

Little B: (littlebllc.com)

  • 100366 Honeycomb Punch
  • 100434 Silver Foil Pink Harlequin Decorative Tape
  • 100418 Pull Flowers Chrysanthemum
  • 100146 Footprints Dimensional Sticker Embellishments
  • 100395 Party Dies

Additional Supplies:

  • Large White Tag 3 1/2” x 6 1/4”
  • Cardstock: White, Pink
  • Large White Button (Buttons Galore and More)
  • Fabri Tac Adhesive (Beacon Adhesives)
  • Tape Runner
  • Thin 3-D Foam Squares (Scrapbook Adhesives by 3L)
  • 5/16 Hole Punch
  • Silver Ribbon (Offray)
  • Computer Generated Font.

Directions:

  1. Punch a 3 1/2” pink cardstock border using the Honeycomb punch.
  2. Add a 3 1/2” strip of decorative tape onto a piece of white cardstock. Trim a very thin border on each side of the tape. Add decorative trim tape piece onto center of the Honeycomb border.
  3. Adhere border on the bottom of the tag.
  4. Cut 12” from the White Pull flowers trim. Fold trim in half and pull strings as directed to create flower.
  5. Add small pink feet stickers to a large white button. Glue embellished button to the center of the flower. Glue flower onto center of the tag.
  6. Create a pink banner from the Party Dies. Add to top of the top using thin foam mounting squares.
  7. Print out the letters: B A B Y using a computer and printer onto white cardstock.
  8. Punch out each letter using a 5/16th hole punch. Add the letters onto the banner with small thin mounting squares.
  9. Tie top of the tag with silver ribbon.

Little B LLC Baby Girl Tag

Confession:  I’m not sure if you noticed or not… 

I did not use a plain white strip under the washi tape on the first picture on this post.

You can see the honeycomb underneath.  I like it better with the white strip.  It’s a little crisper.

I tried retaking the picture of the tag over 100 times.  That one was my favorite.  (so I stuck with it)

Best Blogger Craft 2015

After the favecrafts 2015 Blogger Networking Event at the Craft and Hobby Association Show in January, bloggers received a sample of new products from participating sponsors of that party.  The projects created from these brands and samples are simply amazing! You’re getting the first look at these exclusive projects made with new products hot in the craft market.

They need your help determining which project to crown Best Blogger Craft of 2015! You can only vote once. Voting ends March 10th, 2015 midnight CST.

I submitted this tag as part of Fave Crafts Favorite Blogger Contest.

Please check out all the entries.  (feel free to “vote” for me, if you’d like)

DCC: Simple Little Valentine…

Little B Valentine's Card 1607

I really love this new border punch that I received last month from Little B LLC.

This Little B 100366 Trim Punch, Honeycomb,punches both sides of the paper at one

time leaving you with a great border strip to uses on all sorts of projects.

For my “Simple Little Valentine”, I punched four border strips from white cardstock.

I glued the strips onto another piece of white cardstock, butting up the ends to create

a continuous pattern.  An easy way to create a simple and elegant background.

Another great thing I love about this punch is it’s locking feature.

It has a button on the side of the punch so that you can lock it in the closed position for easy storage.

How great is that?

Disclosure:  This project was created for me and was sponsored by Little B.  The post uses Amazon Affiliate links.  I am a Amazon Affiliate.