The Bow Maker Die for Paper Crafters

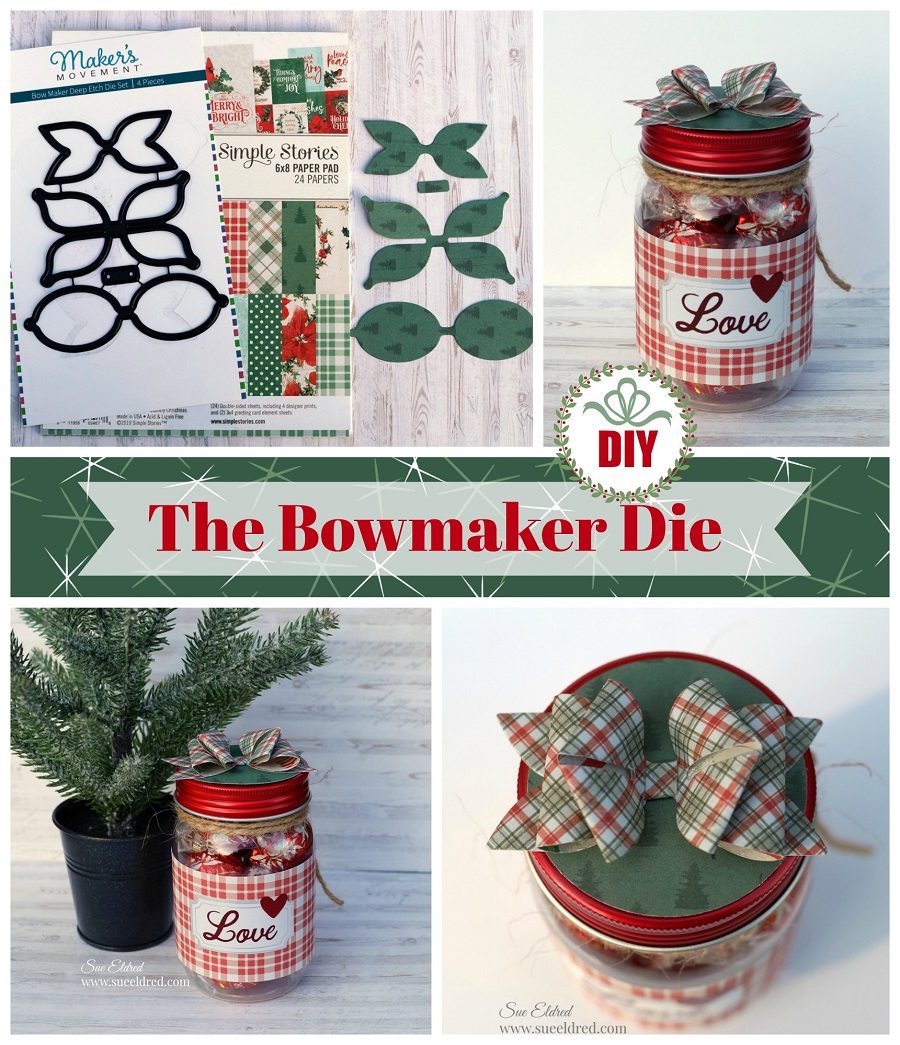
I recently got a chance to play with the Bow Maker Die from The Maker’s Movement.

While I will admit that I was confused for a brief moment on how it worked.

Once I figured out how easy it was to use, I wanted to share this simple project

and tutorial with you.

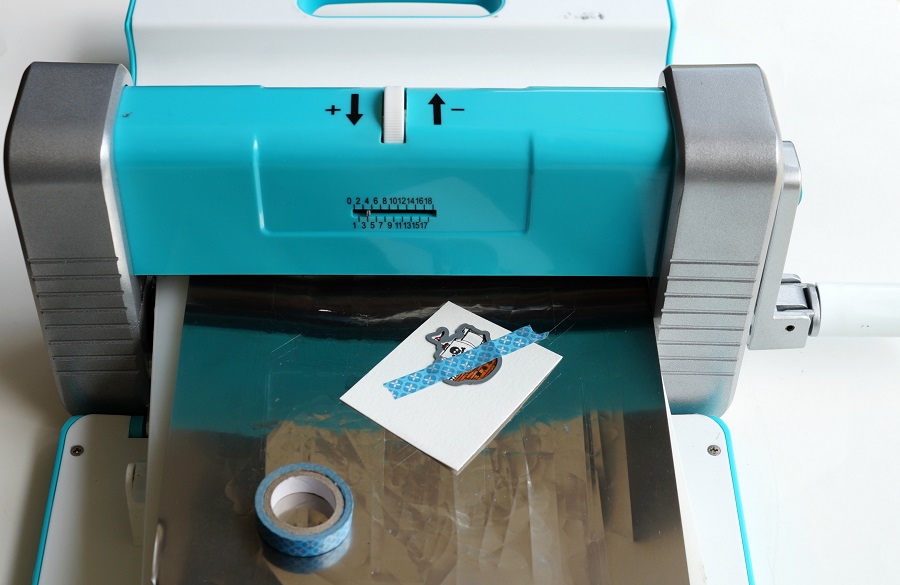
The Bow Maker is a four-piece die set that is deep etched, which makes it so easy to cut through cardstock, thick paper, and even fabric. They are great for greeting cards, birthday cards, scrapbooking, gift tags, and much more fun projects.

Disclosure:  This is a sponsored post  for the Maker’s Movement.  I have been provided product
and compensation in exchange for my creative ideas.  The view and opinions are my own.

I decorated a little jar I found at  Dollar Tree and topped it off with a cute little paper bow.

*Disclosure:  This blog uses affiliate links.  If you choose to make a purchase using one of the links, I receive a small commission (at no additional cost to you) that helps offset the costs of maintaining this blog.  Thanks for your support!

It makes a quick, simple, and inexpensive gift.

Materials Used:     (*affiliate link)

Directions:

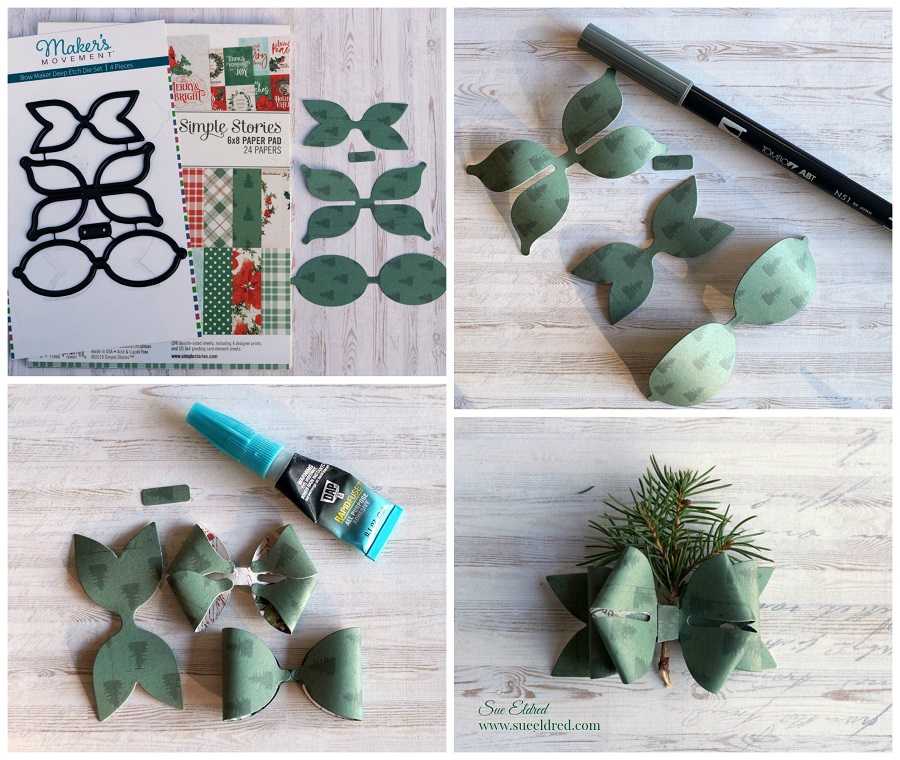
  1. Die-cut decorative scrapbook paper using the Bow Maker Die.  The dies cut four pieces, two bow loops, a center, and a bow base.
  2. Gently curl the paper on the two bow loops using your fingers or a small round marker to make the paper pliable for bending.
  3. Bend the ends over and glue to the underneath side of the paper using a quick setting glue like Rapid Fuse*.  (you could also use a small glue dot)
  4. Stack and glue the bow loops onto the bow base.
  5. Glue the center around the middle of the bow.

A Merry Little Christmas Tiny Book and Book Case

A Merry Little Christmas Tiny Book and Book Case

A Merry Little Christmas Tiny Book and Book Case

A perfect little album for adding small Holiday photos and writing special memories on the

pages.  The set would make a nice little gift or to use as an ornament to hang from your tree.

a-merry-little-christmas-tiny-book-sues-creative-workshop-www.sueeldred.com-7904

Materials Used to make the Merry Little Tiny Book and Book Case:    (*affiliate links)

*Disclosure:  This blog uses ads and affiliate links.  If you choose to make a purchase using one of the links, I receive a small commission (at no additional cost to you) that helps offset the costs of maintaining this blog.  Thanks for your support!

A Merry Little Christmas Tiny Book and Book Case

Directions:

  • Place a piece of white mat board over the Tiny Book Die and place between the two cutting plates on the Big Shot Die-Cut Machine*.  Crank the handle to run the die through the rollers of the machine to cut out the tiny book.
  • With the book base flat, adhere the scrapbook layers onto the front and back of the book.
  • Cut the words “merry” and “Christmas time” out of gold adhesive craft vinyl and the Silhouette Cameo Electronic Die Cutting Machine*.  You could also use small Christmas Word Stickers.
  • Cut a Small Scallop Square out of white cardstock and the Nested Scalloped Frame Die.
  •  Apply the vinyl word “merry” using a small piece of transfer paper onto the top left corner of the scallop frame.
  • Apply the words “Christmas time” on the spine of the tiny book.
  • Adhere adhesive craft foam under the small scalloped square.  This creates a small shadow box frame for the front of the tiny book.
  • Cut a small 1 1/4″ piece of coordinating scrapbook paper and place under the craft foam on the small frame and adhere to the front of the tiny book.
  • Glue the holly embellishment inside the frame.
  • Gently fold book along score lines.
  • Wrap twine several times around the front cover.
  • Cut two pieces of cardstock 2 3/4″ x 11″.  Score both pieces of cardstock every 2 1/8″ to create a long accordion piece.  You will end up with a small tab at the end of both strips.  Use the first tab to connect the strips.  Cut the second tab off.  Refold to make a long accordion strip.
  • Adhere both ends of the cardstock into the front and back cover.

A Merry Little Christmas Tiny Book and Book Case

Tiny Book Case Directions:

  • Cut two pieces of coordinating scrapbook paper 6″ x 8 1/2″.
  • Place the scrapbook paper design side up through the Xyron Creative Station*.  Crank the handle to run the paper through the machine.  The machine adds a complete layer of adhesive onto the entire piece of scrapbook paper.  Repeat with the second piece of scrapbook paper.

  • Cut a piece of mat board 6″ x 8 1/2″.  Adhere a piece of the scrapbook paper onto both sides of the matboard.
  • Place the covered mat board, outside pattern down, onto the Tiny Book Case Die sandwiched between two cutting plates onto the Big Shot Die-Cut Machine*.  Crank the handle to run the die through the machine.
  • Gently fold the Tiny Book Case along score lines.  Glue both sides of the bottom section of the case closed using Rapid Fuse Glue*.
  • Paint the Miniature Drawer Handle* with white acrylic paint, after the paint has dried, glue it onto the top of the book case.
  • Die-cut a small white handle (from the book case die).
  • Wrap elastic around the slots of the handle and glue onto the underneath side of the elastic.
  • Glue the wood snowflake embellishment onto the front of the handle and add an adhesive pearl to the center.

A Merry Little Christmas Tiny Book and Book Case

The Merry Little Christmas Time Book and Book case is one of the projects made in

Sue’s 2020 Virtual Holiday Workshop.  (There are still a few kits available.)

The cost of the kits are $25 plus shipping.  For more information or to order a kit click here.

Amazon FreeTime Unlimited Free Trial 

Handmade Holiday Paper Crafting Parade

Today I’m parading around with several talented designers on Instagram for Scrapbook.com’s

The Handmade Holiday Papercrafting Parade.

I recieved a great box of exclusive Scrapbook.com products to use for my projects.

Most of the items were the everyday type of products.

But, as you’ll see, you can easily use your regular products to make some very unique

holiday projects.

(Link for the Handmade Holiday Paper Crafting Parade at the bottom of this post. )

Sprig of Joy Tag

There’s something special about simple wrapped presents.

As Julie Andrews sang in the Sound of Music, “these are a few of my favorite things.”

Materials Used:          (*afiliate link)

*Disclosure:  This blog uses affiliate links.  If you choose to make a purchase using one of the links, I receive a small commission (at no additional cost to you) that helps offset the costs of maintaining this blog.  Thanks for your support!

The Gift of Joy.

I love using every day stickers to embellish this package.

This sticker set came with labels, alphabet stickers (including this lovely silver one) and fun

word stickers.  If you’re bold enough, add “you’re my favorite” to a present and see who notices.

Materials Used:

Happy Holidays Card

This simple card was easy to create.  I used the tall skinny alphabet dies to cut out the letters to

spell Happy Holidays.  To make assembly easy, I ran the paper through my Xyron Create A

Sticker before die-cutting the letters.

Draw a faint pencil line on the white cardstock to help line up the letters.

Erase the line after you’ve stuck on the letters.

Materials Used:

Click on the picture below to start on the Instagram Parade. 
And while you’re there, make sure to “Follow Me”.    (Thank You!!!)

Be Merry Poinsettia Card

How to Create a Beautiful Poinsettia Christmas Card using Distress Ink.

I like making clean and simple cards.

But everyone once in a while, a card just calls out to be inked.

This card was one of those projects.   (It’s still kind of clean and simple.)

Disclosure:  This is a sponsored post  for the Maker’s Movement.  I have been provided product
and compensation in exchange for my creative ideas.  The view and opinions are my own.

Materials Used:        (*affiliate link)

Directions:

  • Run several strips of 3″ cream cardstock through the Xyron Sticker Maker*. The sticker maker adds an even layer of adhesive to the back of the cardstock. Do this before die-cutting to make each small piece a sticker. (it makes assembly so much easier)
  • Using the Winter Foliage Die Set and the Crossover II Die-Cut Machine*, die-cut the pieces out of cream cardstock. You will need 8-smooth leaves for the flower, 4-pointed leaves for the foliage, 4-pine branches, and 2-small leaf die-cuts.

  • Ink the edges of the leaves using an Ink Blending Tool* and the Distress Inks.
  • For the base of the card, cut 4 3/4″ x 6 3/4″ piece of woodgrain scrapbook paper. Adhere the woodgrain paper onto a 5″ x 7″ gold cardstock layer. Adhere both layers onto a 5 1/4″ x 7 1/4″ cream card base.
  • Start with 4 of the smooth leaves inked with the Barn Door Red Ink and place onto the front of the top of the card. Place them so that they line up opposite of each other.
  • Place and stager the four additional red leaves on top of the first layer of leaves.
  • Adhere the leaves, foliage and, pine stem under the poinsettia flower.

  • Die-cut three small circles (from the Winter Foliage Die Set) out of gold cardstock and adhere to the center of the flower.
  • Die-cut the words “Be Merry” out of cream cardstock ran through the Xyron Sticker Maker* and place the stickered “Be Merry” onto the front of the card.

*Disclosure:  This blog uses affiliate links.  If you choose to make a purchase using one of the links, I receive a small commission (at no additional cost to you) that helps offset the costs of maintaining this blog.  Thanks for your support!

Sue’s 2020 Holiday Workshop Kits

Looking for a little extra Inspiration this Holiday Season?  
Sue’s Holiday Workshop is going Virtual with a fun Holiday Kit.

Here’s what we’ll be making:

  • Penguin Snow Globe Card
  • Snowy Winter Wonderland Snow Globe Card
  • Holiday Joy Christmas Card
  • Merry Christmas Time Tiny Book
  • Snowflake Book Case that holds the Tiny Book
  • Snowman Santa Wood Bead Ornament
  • 4″ Merry Christmas Snowflake Acrylic Tag Ornament
  • 4″ Buddy’s Coffee Acyrlic Tag Ornament

Included in the Kit:

  • Card layers and Stamped Pieces. Ribbon, 3D Foam Squares and Envelopes
  • Covered Chipboard Book Case, Painted Handle, Wood Snowflake Embellishment
  • Tiny Book Cover, Cut Pieces to Cover the Book, Small Frame, Holly Embellishment, Twine, Gold Vinyl Words
  • Beads, Santa Hat, Scarf pieces, Twine
  • Two 4″ Acrylic Circles, Metallic Vinyl Designs, Transfer Tape, Twine, Adhesive Pearl Rhinestones.

I will be creating a special Facebook Group where I will add additional photos and videos of how to make the projects and links to products used.  I will also have additional add on kits from previous Workshops to purchase at a greatly reduced price.

You will need to provide:  (not included in kit)

  • Art Markers or Colored Pencils
  • Scissors
  • Tape Runner
  • Craft Glue

The cost of the Kit is $25.00  
Shipping is $7.50 for Priority Mail.

There will be a limited amount of kits available, so reserve yours today.
Holiday Workshop Kits will be available November 7th to pick up or ship.

Email: suesholidayworkshop@yahoo.com to reserve your kit.

*Disclosure:  This blog uses affiliate links.  If you choose to make a purchase using one of the links,  I receive a small commission (at no additional cost to you) that helps offset the costs of maintaining this blog.  Thanks for your support!

Holiday Joy Christmas Card

A little Holiday Joy Christmas Card to brighten up your day.

If you like making your own Christmas cards and have a lot to make,

this quick and easy card might be a great choice.

I’m thinking, this simple little card is the one I’ll send this year.

Disclosure:  This is a sponsored post  for the Maker’s Movement.  I have been provided product
and compensation in exchange for my creative ideas.  The view and opinions are my own.

Supplies Used:             (*affiliate links)

*Disclosure:  This blog uses affiliate links.  If you choose to make a purchase using one of the links,  I receive a small commission (at no additional cost to you) that helps offset the costs of maintaining this blog.  Thanks for your support!

Card Details….

  • To make my snowflake stand out more. I took a small piece of white ultra metallic glitter vinyl and adhered it to a piece of cream cardstock before die-cutting the snowflake. You can’t tell by the picture, but the snowflake has a glittery shimmer.
  • I like to use the Xyron Create-A-Sticker*to add adhesive on the back of the gold cardstock before die-cutting the letters.  It makes assembling the card a breeze.
  • The finished card size is 4 1/4″ x 5 1/2″.

Toil & Trouble Halloween Shaker Card

Double, Double Toil & Trouble

I’m mixing up a little Halloween fun in the cauldron with this cute little shaker card.

The shaker card uses the “Witch, please” stamp and die set from the Maker’s Movement.

Disclosure:  This is a sponsored post.  I have been provided product and compensation in exchange for my creative ideas.  The view and opinions are my own.

Materials Used:            (*affiliate link)

*Disclosure:  This blog uses affiliate links.  If you choose to make a purchase using one of the links, I receive a small commission (at no additional cost to you) that helps offset the costs of maintaining this blog.  Thanks for your support!

How to Make a Toil and Trouble Halloween Shaker Card….

There are several different ways to make a shaker card.  (This is how I decided to make this one.)

Directions:

  • Cut a piece of double-sided adhesive craft foam approx. 3-1/4″ x 4-3/4″.
  • Using the caldron outline die, die-cut the caldron shape into the craft foam.
  • Cut a piece of scrapbook paper approx. 4″ x 5-1/2″.  Die-cut the cauldron shape into the scrapbook paper.
  • Cut a small piece of acetate to cover the opening of the caldron.
  • Remove protective coating off the acetate.
  • Remove the protective liner off the double-sided adhesive craft foam.
  • Stick the acetate over the opening.

  • Line up and stick the cauldron opening of the scrapbook paper over the cauldron opening of the craft foam and acetate.
  • Trim the excess paper using a cutting mat and craft knife.

  • Turn the craft foam over and fill the cauldron with Spooky Shaker Sprinkles.  Make sure not to overfill, you want to leave enough room for the sprinkles to shake.
  • Cut a second piece of acetate to cover the cauldron opening.
  • Pull back the protective liner on the craft foam and place the acetate over the opening.

  • This is a little pro tip…I used a black calligraphy paint pen marker to color the sides of my craft foam.  The white core would have just made the foam stand out and not in a good way.  I like to use a black marker to cover the edges of my darker colored paper that would have a white or light core.

  • When using small or thin die-cut shapes, I like to run the paper through the Xyron Create-A-Sticker Maker* before cutting out the shapes.  (It makes it so much easier to apply.)
  • Cut a cauldron outline from glossy copper cardstock and stick onto the acetate.
  • Cut the boiling pot shapes out of light green cardstock and stick on the top of the cauldron.

  • Die-cut small bubbles from the die set and mount using thin black adhesive 3D foam squares* over the various circles of the scrapbook paper.
  • Stamp words in black ink onto a small piece of aged parchment card-stock.  Mount onto the front of the card using thin black foam squares.
  • Remove the protective liner from the back of the craft foam and stick onto a glossy card-stock layer.
  • Add the additional layers onto a black card.

Save

Save

Save

Save

Save

Save

Fall Leaves Thank You Card

The Fall Leaves Thank You card…

is an easy to make card, with die-cut embossed leaves that were colorfully distressed with ink.

How to Make the Fall Leaves Thank You Card…

Materials Used:        (*affiliate links)

*Disclosure:  This blog uses affiliate links.  If you choose to make a purchase using one of the links, I receive a small commission (at no additional cost to you) that helps offset the costs of maintaining this blog.  Thanks for your support!

Directions:

  • Place the leaf dies on the cream-colored cardstock and layered on the cutting plates included with the Mini Maker.  Crank the handle of the Mini Maker to run the cutting plates through the machine.  The machine cuts and embosses the leaves as it goes through the Mini Maker.
  • To create a “thanks” word sticker, place a piece of cream card stock through the Xyron Create-A-Sticker Mini*.  The Xyron Create-A-Sticker Mini* puts an even coat of adhesive on the entire backside of the cardstock.  Place the cardstock with the “thanks” die through the Mini Maker to cut out the word.

FYI…The Mini Maker is perfect to use when working with small dies, and space is an issue.

  • Using the Ink Blending Tool, ink the leaves with the various colors of distress inks to create beautiful Fall colors.

  • Layer and overlap the leaves on a piece of fall scrapbook paper.
  • The top layer has a scalloped edge created using a border die from the Borders 1 Die Set from The Maker’s Movement.
  • Apply previously made thanks word sticker on top of the leaves.
  • Tie a piece of twine around the top of the card and add a small acorn embellishment.
  • Add three enamel dots on the bottom right corner of the card.
  • Finished Card Size 5 1/4″ x 6″.

The Fall Leaves Thank You card was created for and sponsored by The Maker’s Movement.  I have been provided product and compensation in exchange for my creative ideas.  The view and opinions are my own.

Palm Springs Junk Journal

How to make a small pocket-sized journal.

Whenever I travel to a new location, I like to keep memorabilia like brochures, maps, and ticket

stubs.  As a scrapbooker, I never know when I’ll want to reference the information for journaling

or even add it to a layout.

The Palm Springs Junk Journal uses a combination of memorabilia and a little bit of recycling.

To Make the Junk Journal I used:                  (*affiliate link)

*Disclosure:  This blog uses affiliate links.  If you choose to make a purchase using one of the links, I receive a small commission (at no additional cost to you) that helps offset the costs of maintaining this blog.  Thanks for your support!

Directions:

  • For the front and inside cover of the journal, cut two 6″ x 8-1/2″ pieces from the brochure.
  • Lay the paper (design side up) on the Xyron Creative Station* crank the handle to run the paper through the machine.  As it moves through the Xyron Creative Station, it adds adhesive to the backside of the paper.  Easy to use and it doesn’t need any electricity.
  • Cut a piece of a thin recycled box the same size.
  • Adhere the decorative paper on each side of the cut box.

I like using the Xyron Creative Station…
when making mini books because you get complete coverage, no wrinkling, no bubbles!

  • I thought I was “so smart” because I cut the map so, the words “Palm Springs Aerial Tramway” would be at the top of the journal.  Being a little too confident, I didn’t measure my placement and “oops” I cut it too short.
  • To “fix” my mistake, I cut out a small picture of the tram with the words and adhered it to the front of my journal.

The inside if the journal.

  • I used an ink applicator and Vintage Photo Distress Ink to age the edges of my Junk Journal.

  • Add a strip of washi tape around the spine of the album for added interest.
  • Cut 5 cardstock pages using the notebook die.
  • Crease the cardstock on the center score lines.

  • Wrap the twine around the inside creases and around the outside of the book cover to secure the pages.
  • I did one page at a time tying the twine in a knot on the outside after each page.

After I had all my pages together, I tied the pieces of twine together in one knot on the spine and added a small metal tag charm that says the word journey.

Album ready to be filled.

In January, after the Creativation Trade Show in Phoenix,

my husband and I took a few days to relax and explore in sunny Palms Springs.

On a whim, we decided to take the Aerial Tramway up the side of the mountain.

It was a lovely warm sunny day.

Of course, we didn’t think about the temperature change at the top of the mountain.

I had on jeans and a light sweater, and my husband had shorts and a light jacket.

(We had just been in the sunny desert a few minutes earlier.)

Upon arriving, I immediately went into the gift shop and bought an oversized hoodie,

while he braved the elements.

The 15-minute ride up the mountain to 8500 feet was stunning,

and the views left us breathless. (literally)

After a nice lunch, and a brisk walk around in the snow, we headed back down to the desert.

Where we warmed our feet at the hotel, around a firepit.

Message in a Bottle Shaker Tags

In continuing with the Beach Theme for July…

I’ve got a couple of cute projects using the Message in a Bottle Stamp and Die Set from

The Maker’s Movement to share with you.

MSD222 Message in a Bottle Stamp and Die Set  

*FTC Disclosure… “This is a sponsored post for The Maker’s Movement.  I have been provided product and compensation in exchange for my creative ideas.  The views and opinions are my own.”

Message in a Bottle Pirate Ship Shaker Tag Directions:

  • Stamp the ship on white watercolor cardstock.
  • Color the ship with Tombow Art Markers.

*Disclosure:  This blog uses ads and affiliate links.  If you choose to make a purchase using one of the links, I receive a small commission (at no additional cost to you) that helps offset the costs of maintaining this blog.  Thanks for your support!

  • Align the ship die over the ship image.  Place a piece of washi tape or removable tape over the die to keep it in place.  Run the die through the Crossover II Die Cutting Machine* to cut out the image.

Aren’t these the cutest little ships?

You can add a skull and crossbones to the sail, or a sweet little heart. (included in the set)

You will need to cut out several pieces to create the Message in a Bottle Shaker Tag.

  • Cut a bottle shape out of clear acetate and a wavy-look scrapbook paper.
  • Place a small piece of distressed woodgrain look scrapbook paper into the Xyron Create-A-Sticker, Sticker Maker* to add adhesive to the backside of the woodgrain paper. Die-cut the woodgrain paper using the Bottle Frame Die. Creating a paper bottle frame sticker makes it easier to use when it comes time to place on the acetate.
  • Cut a second Bottle Frame using the double-sided adhesive foam sheet.

  • Remove one side of the protective blue coating from the acetate bottle.
  • Align and stick bottle frame sticker onto the acetate.
  • Remove the second side of the protective blue coating from the acetate.
  • Use a dryer sheet and rub on the blue wavy bottle die-cut to eliminate static created from the acetate.
  • Align and stick craft foam bottle frame onto the blue bottle die-cut.
  • Adhere die-cut ship in the center of the bottle.

I found a paper that replicated the look of cork.  I used that paper and cut several layers using the cork shaped die and glued them together to create a thick dimensional cork. I made the cork the same thickness of the foam.

  • Cut a piece off the top of the craft foam bottle to make room to place the cork.
  • Add Ice Cube Sprinkles (from the mixed drinks shaker sprinkles) into the well of the bottle frame.
  • Remove the protective coating of the craft foam frame and carefully place the acetate frame over the bottle.

  • Stamp your message on a piece of white cardstock and cut out using the banner die.
  • Punch a small hole at the end. Tie the banner die cut around the neck of the bottle with a piece of red and white twine.

If you’re not into Pirates and Pirate Ships…

the Message in a Bottle Die also makes a perfect Congratulations tag.

Use it for a Wedding, Anniversary, New Home, or Retirement.