“Autumn Leaves & Pumpkin Please” Album

Autumn Leaves & Pumpkins Please Album

Autumn Leaves & Pumpkins Please

I love all the beautiful colors of Fall.

As the saying goes, Fall is my favorite color.

They make such a bright and cheery Fall album.

This simple album is the perfect place to add all your apple picking,

leaf peeping, trick-or-treating pictures this Fall.

The “Autumn Leaves & Pumpkins Please” album was made using

Eileen Hull’s Field Notes Journal Die by Sizzix*.

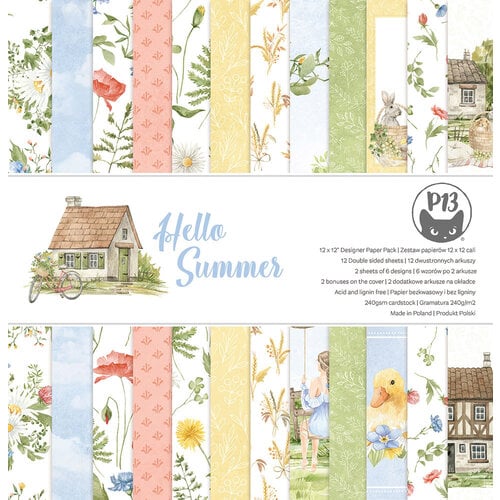
I used paper from Echo Parks “Fall Fever” Collection*.

Eileen Hull Educator Logo

Disclosure:  This is a sponsored post.  As a member of the Eileen Hull Educator Team, I have been provided product in exchange for my creative ideas.  The view and opinions are my own. 

Autumn Leaves & Pumpkins Please Album

Materials Used:  (*affiliate links)

*Disclosure:  This blog uses ads and affiliate links.  If you choose to make a purchase using one of the links, I receive a small commission (at no additional cost to you) that helps offset the costs of maintaining this blog.  Thanks for your support!

Autumn Leaves & Pumpkins Please Album

A few tidbits of information:

  • Before I die-cut the mat board, I like to use the Xyron Creative Station* to add adhesive to the back of the paper.  It gives the paper a complete layer of adhesive with no bubbles.  It really is easy to use.
  • The spine of the album comes with three sections.  I cut the first section off to make the album thinner.  It leaves two holes to add binding.
  • I wanted to try something different with how I added the pages to my album.  I inserted two mini book rings through the holes to hold my pages.
  • The mini book rings are approx. ¾” and with a little maneuvering they fit in the two side holes.
  • I used the cut off section to mark where I would need to punch the holes on my pages.

Autumn Leaves & Pumpkins Please Album

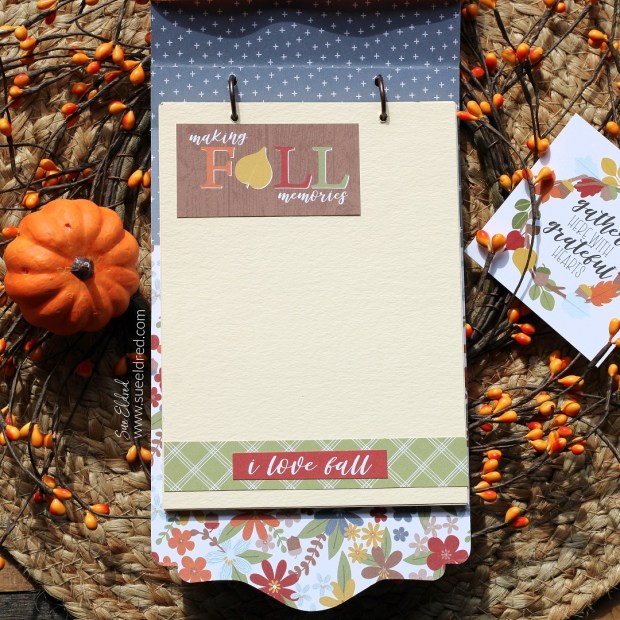
I wanted to make my album vertical instead of horizontal.

I love how versatile the Field Notes Die* is.

Autumn Leaves & Pumpkins Please Album

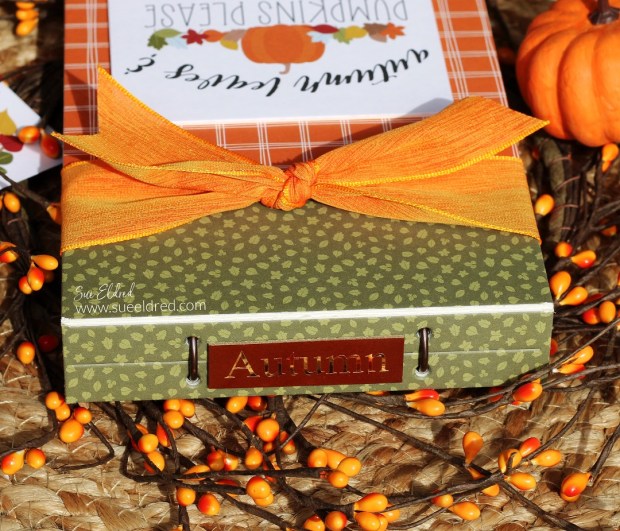
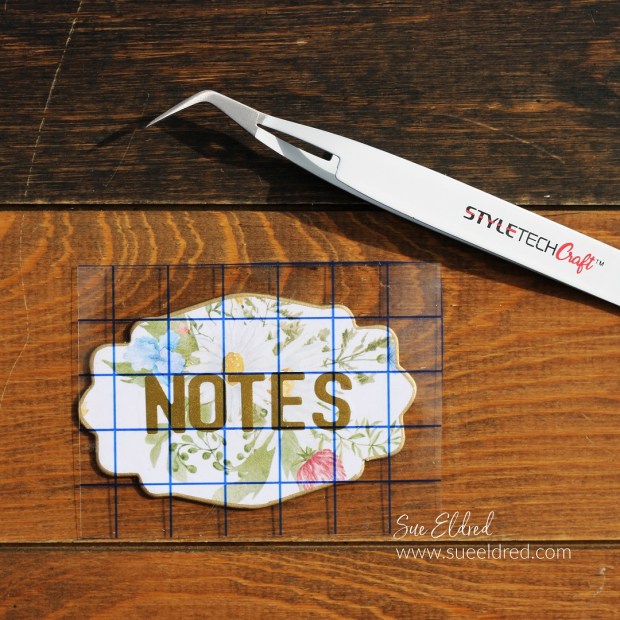
I created the word “autumn” using a Silhouette Cameo Electronic Die Cutting Machine*.

I cut it the letters out using StyleTechCraft Gold Chrome Vinyl*.

StyletechCraft products brought to you by ATSM Craft*


How to make a Shaker Tag

How to make a Shaker Tag

Make a Shaker Tag using the Specimen Card

from the Eileen Hull New Field Notes Die from Sizzix.

Last month, we shared projects using Eileen’s New Chapter 3 release dies.

Today I thought I’d share a simple tutorial on how to make a Shaker Tag

using the Field Notes & Specimen Card Die*.

Eileen Hull Educator Logo

Disclosure:  This is a sponsored post.  As a member of the Eileen Hull Educator Team, I have been provided product in exchange for my creative ideas.  The view and opinions are my own. 

How to make a Shaker Tag

Materials Used to make the Shaker Tag:  (*affiliate links)

*Disclosure:  This blog uses ads and affiliate links.  If you choose to make a purchase using one of the links, I receive a small commission (at no additional cost to you) that helps offset the costs of maintaining this blog.  Thanks for your support!

How to make a Shaker Tag

Directions:

  • I used the Life is Beautiful Collection Kit*.  It comes with beautiful papers, greetings, and stickers perfect for my tag.
  • Cut a 4″ x 5″ piece of scrapbook paper for the front of the tag.
  • For ease of assembly, I used the Xyron Creative Station* to add adhesive onto the back of the paper.  Place the paper in the machine, crank the handle to run the paper through.  As it goes through the machine it adds a complete layer of adhesive to the back of the paper.

How to make a Shaker Tag

  • Place the paper onto the Specimen Card* section of the die.  Sandwich the die between the cutting plates.  Crank the handle of the Big Shot Plus* to run it through to cut out the shape.

How to make a Shaker Tag

How to make a Shaker Tag

  • Place the paper for the inside of the tag onto the chipboard tag. Add adhesive to the small rectangle and place into the opening on the back.
  • Remove the protective coating from both sides of the small piece of acetate.
  • Remove the adhesive coating from the tag front. Place the acetate over the inside opening of the tag.
  • Remove the first protective coating from foam tag. Line up and place onto the tag front.
  • Place sequins in the small well the foam has created. Remove the second protective coating from the foam and place the back of the tag onto the foam.

How to make a Shaker Tag

  • Decorate the front of the tag using stickers from the collection kit.  Add 3D adhesive foam squares* to the back of the butterfly and watering can.
  • Tie a simple ribbon on the top of the tag.
  • Add the tag to a gift or bag for the perfect addition.

a little Pocket Full of Holiday Cheer

Mini Pocket of Cheer Christmas Ornament

How to make a Pocket Full of Holiday Cheer Christmas Ornament.

I’m Enveloping the Christmas in July Holiday Season with a Pocket Full of Holiday Cheer.

Mini Pocket of Cheer Christmas Ornament

Materials Used: (*affiliate links)

*Disclosure:  This blog uses ads and affiliate links.  If you choose to make a purchase using one of the links, I receive a small commission (at no additional cost to you) that helps offset the costs of maintaining this blog.  Thanks for your support!

Mini Pocket of Cheer Christmas Ornament

To make the Ornament:

  • Die cut two small envelopes using the Eileen Hull Envelope, Folder & Flowers Die Set* from Sizzix using red and green faux leather paper.  (you could also use scrapbook paper)
  • Cut the sides off the green envelope and glue it to the inside of the red envelope.  
  • Fold the envelope on the score lines and glue the bottom sides together.

Mini Pocket of Cheer Christmas Ornament

  • Punch two small holes on each side of the envelope flap.  Add a small piece of twine for hanging.
  • Hot glue small pieces of faux greenery and berries to the inside of the envelope. 
  • Place a small holiday greeting on the bottom of the envelope.  
  • Adhere a small holiday sticker to the greenery.  

Mini Pocket of Cheer Christmas Ornament

  • Add another Holiday Greeting Sticker to the back of the envelope.  I added 3D foam squares to the back of the sticker for added dimension.

Mini Pocket of Cheer Christmas Ornament

It is a quick and easy Holiday Ornament to add to the front of a package.

Or you could make several to hang on your Christmas Tree.  (you’ve got time)

Eileen Hull Educator Logo

Disclosure:  This is a sponsored post.  As a member of the Eileen Hull Educator Team, I have been provided product in exchange for my creative ideas.  The view and opinions are my own. 

DIY Floral Notepad Holder

DIY Floral Notepad Holder

Create a Handy Floral Notepad Holder using Sizzix Dies by Eileen Hull.

I am a list maker!

I usually have several lists going at one time.

And, if the list gets too messy, I’ll create a new one.

Lists are my way of keeping me organized.

Post-it notes* are another favorite of mine.

This Floral Notepad Holder is a great place to put my Post-it notes.

DIY Floral Notepad Holder

The theme for this month’s Eileen Hull Teams is Die Cut Mania.

The best part about Eileen’s dies is you can mix them with other Eileen dies to create one great project.

Eileen Hull Educator Logo

Disclosure:  This is a sponsored post.  As a member of the Eileen Hull Educator Team, I have been provided product in exchange for my creative ideas.  The view and opinions are my own. 

DIY Floral Notepad Holder using Eileen Hull & Sizzix Dies.

Materials Used:  (*affiliate links)

Directions: 

  • I used a piece of white mat board* as the base to create the pieces for the Notepad Holder. To adhere the paper to the mat board, I like to run the decorative paper through the Xyron Creative Station* to add a complete adhesive to the back. It makes everything lay wonderfully smooth with no peeling up corners.
  • Die Cut the pieces for the stand using the Phone Stand Die* for the base, Frame Pocket Journal Die* for the pocket, and the Journal Die* for the decorative plaque. (as shown in the picture above)

*Disclosure:  This blog uses ads and affiliate links.  If you choose to make a purchase using one of the links, I receive a small commission (at no additional cost to you) that helps offset the costs of maintaining this blog.  Thanks for your support!

DIY Floral Notepad Holder using Eileen Hull & Sizzix Dies.

  • Gently fold the die-cut pieces on their scorelines.
  • Adhere the pieces together using a strong adhesive. My favorite for adhering mat board is Dap Liquid Adhesive*.  All you need to do is hold the glued piece in place for 30 seconds, and it stays secure.

DIY Floral Notepad Holder using Eileen Hull & Sizzix Dies.

  • To add a decorative element to the edge of the center plaque, use the flat end of a gold calligraphy pen* to add a gold edging.  (It may take a little practice to make your lines smooth.)

DIY Floral Notepad Holder using Eileen Hull & Sizzix Dies.

  • Cut the letters “NOTES” for the front of the pocket using the Alpha Numeric Die* and StyleTechCraft Gold Craft Vinyl*.
  • Want a matching gold pen for the notepad holder? Measure the length of the barrel. Cut the vinyl 1 1/4″ wide. Carefully adhere the gold vinyl to the barrel. It adds personality to a simple everyday pen.

DIY Floral Notepad Holder

  •  Place the letters on the back of a small piece of gridded transfer tape* to line them up straight.
  • Place the transfer paper onto the small plaque and rub over the transfer paper to transfer the letters.

StyletechCraft products brought to you by ATSM Craft*

DIY Floral Notepad Holder

  • Add a decorative strip of coordinating paper onto the front of the pocket and adhere the floral plaque using Rapid Fuse Adhesive*.

DIY Floral Notepad Holder

The Floral Notepad Holder looks great on my desk and now I’m even more organized.

Amazon prime

Life is Beautiful Mini Card & Envelope Stationery Caddy

Mini Card and Envelope Stationery Caddy

The Life is Beautiful Mini Card & Envelope Stationery Caddy

is a great gift idea for anyone who loves to send cards.

It would also make a sweet and thoughtful Mother’s Day Gift Idea.

Echo Park's Life is Beautiful Collection Kit.

I used the “Life is Beautiful” Collection Kit from Echo Park*.

I also used a few Eileen Hull dies by Sizzix to make the caddy.

Eileen Hull Educator Logo

Disclosure:  This is a sponsored post.  As a member of the Eileen Hull Educator Team, I have been provided product in exchange for my creative ideas.  The view and opinions are my own. 

Materials Used:    (*affiliate links)

*Disclosure:  This blog uses ads and affiliate links.  If you choose to make a purchase using one of the links, I receive a small commission (at no additional cost to you) that helps offset the costs of maintaining this blog.  Thanks for your support!

Mini Card and Envelope Stationery Caddy

Directions:

  • For the base of the stationery caddy, cut two coordinating 6″ x 10½” pieces of scrapbook paper. (One is for the front, and one is for the inside.)
  • Cut a 6″ x 10½” piece of Sizzix Mat Board*.
  • Place the paper design side up into the Xyron Creative Station*. Crank the handle to run the paper through the machine. As the paper runs through the Xyron Creative Station*, it adds a complete layer of adhesive to the backside of the paper.
  • Adhere the paper onto the front and back of the Mat Board*.

Mini Card and Envelope Stationery Caddy

  • Place the mat board with the outside design face down on the Card Caddy Die*.
  • Sandwich the die between the two cutting places and run the die through the Big Shot Die-Cutting Machine*.
  • Die-cut the two caddy sides using mat board and paper.
  • Gently fold the caddy base along the outer score lines and glue the caddy sides to the caddy base using Rapid Fuse Adhesive*.

Life is Beautiful Mini Card and Envelope Stationery Caddy

Life is Beautiful Journaling Cards by Echo Park

Mini Card and Envelope Stationery Caddy

  • I trimmed and layered the Journaling Cards* onto cardstock to create mini cards to fit into the envelopes.
  • The finished cards are 3¼” x 4¼”.

Life is Beautiful Sticker Sheet from Echo Park

Mini Card and Envelope Stationery Caddy

  • I added a piece of 1″ pink grosgrain ribbon around the middle of the caddy case.
  • I cut apart the Life is Beautiful 4″ x 4″ journal cards* and adhered the “basket card” onto the matboard for sturdiness. I trimmed the matboard to 3½” x 3½” and adhered it to the front of the caddy.
  • I added stickers to the front of the caddy and popped them up with foam squares for added dimension.
  • To complete the caddy, add a fun set of colorful pens and a coordinating faux flower stem.

Purchase scrapbooking supplies from Scrapbook.com!

Spring Paper Crafting with Sizzix and Eileen Hull

New Chapter 2 New Release Dies by Sizzix and Eileen Hull

Today, I’m excited to share several Paper Crafting Projects using the New Eileen Hull Dies

by Sizzix.  This is another fun collection with so many possibilities.

Our Life Our Story Folio Album

Our Life Story Mini Album 

My first project is a Mini Album made with Eileen’s New Card Case Die by Sizzix*.

I love creating an album with dimension and a lot of moving parts.

I used the sweet Botanical Garden Paper Collection from Carta Bella*.

Eileen Hull Educator Logo

Disclosure:  This is a sponsored post.  As a member of the Eileen Hull Educator Team, I have been provided product in exchange for my creative ideas.  The view and opinions are my own. 

Our Life Our Story Folio Album

Materials Used:  (*affiliate links)

*Disclosure:  This blog uses ads and affiliate links.  If you choose to make a purchase using one of the links, I receive a small commission (at no additional cost to you) that helps offset the costs of maintaining this blog.  Thanks for your support!

Our Life Our Story Folio Album made with the Sizzix Card Album Die by Eileen Hull.

It is a fun little album with sturdy chipboard pockets perfect for inserting small notebooks or cards.

Congrats Patchwork Slimline Card

The Congrats Quilt Card was made with Eileen’s New Mini Slimline & Tickets Die*.

The Mini Slimline & Tickets Die* comes with four coordinating thin metal dies.

For the card, I die-cut the base using cream cardstock.

I then cut small squares to fit inside the tickets using the Flora No. 5 Paper Collection from Carta Bella*.

I embellished the front of the card with stickers mounted up with 3D adhesive foam squares*.

Mini Slimline Ticket Bookmark

Bloom Laminated Bookmark

The Slimline & Tickets Die Set* comes with one die that is a thin strip of tickets.

I used that to make a simple bookmark.

I laminated the bookmark using a Xyron Creative Station Mini* with a Laminate Cartridge*.

Congrats Patchwork Slimline Card

Materials Used:  (*affiliate links)

Happy Together Envelope Book

Happy Together Envelope Mini Album

Another one of Eileen’s New Dies is the New Journaling Card, Envelope & Window Die*.

I used the Envelope Die with Eileen’s Folio Journal Die* to create a Mini Album.

Did you know you can cut down the albums after they’ve been die-cut from the mat board

to adapt the album?  I revised the Folio Journal* for the perfect fit.

Happy Together Envelope Book

I created an accordion fold for the inside of the spine to hold all the envelopes in place.

I used Rapid Fuse Adhesive* to hold the accordion fold securely in place.

Gather at Home 6 x 6 Paper Pad by Carta Bella Paper Company

Materials Used:  (*affiliate links)

Happy Together Envelope Book

For the pages of the album, I created six small envelopes.  (Four shown)

I decorated each envelope with coordinating paper and stickers.

I added a small piece of Velcro under the flap to keep it closed.

Happy Together Envelope Book

I adhered the envelopes onto the accordion flaps using Rapid Fuse Adhesive*.

After I finished the album, I decided to add a small button closure

to the front and back of the album. (not shown)

Eileen Hull Sizzix Chapter 2 New Release Dies

Click on picture for more inspiration and Blog Hop Information.

LIST OF HOP STOPS:

Eileen Hull Designs 
Pam Bray
Jennie Atkinson
Sarah Lizzie
Lisa Hoel
Susie Bentz
Tonya Trantham
Jenny Marples
Maggi Harding
Karen Bearse
Sue Eldred  (you are here)
Sharon Curtis
Teresita Arvelo
Madeline Arendt
Cheryl Bodkin-Waters

Simple Embossed Greeting Cards

Embossed Greeting Cards

Simple but Extraordinary Embossed Greeting Cards.

If you haven’t noticed, I love making cards.

Even though I’m mainly a “Clean and Simple” cardmaker,

I do enjoy adding a little texture from time to time.

Texture adds dimension.

And there’s no better way to add texture than to use an Sizzix Embossing Folder by Eileen Hull.

Embossed Greeting Cards

Embossed Birthday Card

Eileen’s New 3D Tablecloth Embossing Folder* creates an elegant textured background

for this Simple Birthday Card.  The words “Happy Birthday were die-cut using

Eileen’s New Alphanumeric Die* and Ultra Metallic Gold Adhesive Craft Vinyl* 

from StyleTechCraft.

Embossed Greeting Cards

Materials Used:   (*affiliate links)

*Disclosure:  This blog uses ads and affiliate links.  If you choose to make a purchase using one of the links, I receive a small commission (at no additional cost to you) that helps offset the costs of maintaining this blog.  Thanks for your support!

Embossed Greeting Cards

For this simple Birthday Card, I used the Woven Leather Embossing Folder*.

  • To use an embossing folder, place a piece of paper inside the folder.
  • Place the embossing folder into the Sizzix Big Shot Die Cutting Machine*.  You’ll need to adjust the layers on the plate for the thickness of the folder.  Crank the handle to run the embossing folder through the machine.
  • Open the folder for a beautifully embossed piece of paper.

Materials Used:   (*affiliate links)

Embossed Greeting Cards

I got my Sewing Machine* out for the next two cards.

I’ve wanted to make a quilt card for a while.

A quilt card is a great way to use up small scraps of paper.

Materials Used on the Quilt Cards:  (*affiliate links)

Embossed Greeting Cards

Quilt Card Directions:

  • I put my paper through a Xyron 3″ Disposable Sticker Maker* to make the paper into sticker paper.
  • Cut them into 1″ squares.  I laid the squares out first to play with the quilt pattern.
  • To make a 4″ square quilt, cut a 4″ base to lay the squares on.
  • Stick the squares onto the base and trim if necessary to even up the edges.
  • Sew in between the squares using a sewing machine.
  • Adhere the quilt onto paper layers and a 5″ x 5″ card.

Embossed Greeting Cards

This pink quilt card is one of my new favorites. 

It reminds me of an old quilt I used to have on my bed.

It’s soft, sweet, and feminine.

It makes me want to curl up with a good book on a lazy day.

Eileen Hull Educator Logo

Disclosure:  This is a sponsored post.  As a member of the Eileen Hull Educator Team, I have been provided product in exchange for my creative ideas.  The view and opinions are my own. 

Mae’s Sweet Little Photo Frame Stand

Mae's Sweet Little Frame Stand

How to make “Mae’s Sweet Little Photo Frame Stand”…

Last Fall, we had family pictures taken.

I especially love this sweet picture of my granddaughter Mae.

I wanted to make a photo stand for her picture to put on my desk.

Mae's Sweet Little Frame Stand

For Mae’s Frame…

I used the frame from the New Sizzix Frame Pocket Journal Die by Eileen Hull*

and the Phone Stand Die by Eileen Hull* for a quick and easy project.

I “Crafted my Stash” using an old Authentique Scrapbook Paper Collection.

Mae's Sweet Little Frame Stand

Materials Used:   (*affiliate links)

*Disclosure:  This blog uses ads and affiliate links.  If you choose to make a purchase using one of the links, I receive a small commission (at no additional cost to you) that helps offset the costs of maintaining this blog.  Thanks for your support!

Mae's Sweet Little Frame Stand

How to make the Photo Frame Stand:

Mae's Sweet Little Frame Stand

  • Carefully fold the phone stand on the scored lines and adhere the phone stand with a strong adhesive.
  • My favorite is Rapid Fuse Adhesive*.  It dries quickly and holds strong.
  • I glued a piece of clear acetate onto the inside of the frame to protect the photo before adhering it to the front of the phone stand.
  • I added green trim on the bottom to give it a little “vintage granny chic vibe”.

Mae's Sweet Little Frame Stand

Mae's Sweet Little Frame Stand

  • For added detail, I painted a brass heart with White Birch DecoArt Multi-Media Paint.
  • I rubbed a little of the paint off to show the details in the brass charm.

Mae's Sweet Little Frame Stand

  • Tie the brass charm onto the top of the frame with a simple cream-colored satin ribbon.

Mae's Sweet Little Frame Stand

I’m so in love with this sweet baby girl.  She’s been such a great addition to our family.

Would you believe she got my blue eyes?  (None of my kids has them.)

Eileen Hull Educator Logo

Disclosure:  This is a sponsored post.  As a member of the Eileen Hull Educator Team, I have been provided product in exchange for my creative ideas.  The view and opinions are my own. 

Love Notes Tag Album

Love Notes Tag Album

Creating a Love Notes Tag Album for Valentine’s Day.

My husband and I are not particularly gushy or romantic people.

But we have, on a rare occasion, left a love note or two.

One year for Valentine’s Day, he declared he would write me a love letter

for each day of the week. I think he made it to day #3.

Love Notes Tag Album for Valentine's Day

For Valentine’s Day this year…

I thought I would pull out my Valentine’s Stash and create a small Love Notes

Tag Album using the Sizzix Library Pocket Die by Eileen Hull*.

I think I need to “Craft My Stash” more often.

It’s amazing the misc. things I found in my Valentine’s drawer and how well

they all went together.

Love Notes Tag Album for Valentine's Day

Materials Used for the Love Notes Tag Album:  (*affiliate links)

*Disclosure:  This blog uses ads and affiliate links.  If you choose to make a purchase using one of the links, I receive a small commission (at no additional cost to you) that helps offset the costs of maintaining this blog.  Thanks for your support!

Love Notes Tag Album for Valentine's Day

To create the Mini Tag Album:

  • I used the Library Pocket Die* and a variety of double-sided paper to create several pocket pages.
  • I decorated the pockets with Valentine stickers, ephemera, and hearts.
  • On the front cover, I used a library pocket cut from red cardstock and two from scrapbook paper.  I cut off the pocket portion of each one to make them into tags.  For quick assembly, I used a Xyron 3″ Disposable Sticker Maker* to add adhesive to the back of the scrapbook paper tags.  I adhered the scrapbook paper to the front and back of the cardstock tag.  I created a second layered tag for the back cover.
  • I added a gold edge to the sides of the front and back cover using a DecoColor Chisel Point Gold Leaf Pen*.
  • I created letter stickers using the inside letters of the Tile Alphanumeric Die, and white cardstock ran through the Xyron Sticker Maker.

Love Notes Tag Album for Valentine's Day

  • The Mini Tag Album is bound together using a ¾” Mini Book Ring*.
  • The little Valentine’s coupons are from a very old “Authentique Papers” scrapbooking paper.

Love Notes Tag Album for Valentine's Day

  • To finish my album, I might add a few sweet love notes.
  • And I may even fill out those Valentine’s Day coupons.

Eileen Hull Educator Logo

Disclosure:  This is a sponsored post.  As a member of the Eileen Hull Educator Team, I have been provided product in exchange for my creative ideas.  The view and opinions are my own. 

Celebrating Winter with a Little Paper Crafting

Winter Memories Album

Now that the Holidays are over, I’m embracing the quiet of the Winter Season

by creating a few things with Eileen Hull’s and Sizzix’s New Release Chapt. One Dies

and the Simple Winter Woods Scrapbook Collection Kit from Simple Stories*.

Look at this beautiful New Scrapbook Paper Collection from Simple Stories.

I fell in love with the soft, muted colors of the Simple Winter Woods Collection*

and knew I had to have it.  (It was perfect for these projects.)

Winter Memories Album

Supplies Used to make the Projects:    (*affiliate links)

*Disclosure:  This blog uses ads and affiliate links.  If you choose to make a purchase using one of the links, I receive a small commission (at no additional cost to you) that helps offset the costs of maintaining this blog.  Thanks for your support!

Winter Memories Album

First, I must show you the new toy I got for Christmas this year.

After many years of use and abuse, I finally upgraded my old Big Shot Machine with a Newer, Bigger model.

Behold the Sizzix Big Shot Plus Die-Cutting Machine*.

I needed it to die-cut the larger dies like the NEW Sizzix Frame Pocket Journal Die by Eileen Hull*.

Winter Memories Album

Winter Memories Album

The Journal measures 4 1/2” x 6 1/2” x 1 1/4” with an adjustable spine.

What makes this die special are the additional pieces on the die, a pocket to hold ephemera, a frame and flap!

Winter Memories Album

There are several ways to make the inside of your album.  

Winter Memories Album

I created a pocket on the inside of the album using the die and covered matboard.

Winter Memories Album

The pocket is great for adding a small skinny notebook or several little notecards.

I used the 3″ x 4″ journal cards from the Winter Woods Paper Collection for the front of the cards.

Winter Memories Album

I used twine and the holes on the spine to hold a small notebook in place.  

I covered the Small Kraft Notebook* using a paper and stickers from the collection.

Hello Winter 2023 Framed Picture

Continuing with the Winter Theme…

I created a framed picture using the NEW Sizzix Thinlets Tile Alphanumeric Die by Eileen Hull*.

The Tile Alphanumeric is very versatile because you can use both the positive and negative shapes.

Each letter is perforated which makes it easy to create and line up words.

Hello Winter 2023 Frame Picture

It’s so easy to create a little dimensional piece of art using the supplies you have around you.

Simple Vintage Winter Woods Card

And last but not least, I created a 5″ x 7″ card using Eileen’s NEW Sizzix 3D Tablecloth Embossing Folder

as the background for my card.

Eileen Hull 2023 Chapter One New Release Dies

For more projects using the NEW Eileen Hull Chapter One Release Dies…

Please join us for the Ch. 1 2023 Release Party on Tuesday, January 3 at 12:00 ET when Eileen will be joined by team members sharing their projects. We will also have a blog hop that day so we hope you will hop along with the team and be inspired!

LIST OF HOP STOPS:

Eileen Hull Designs  
Pam Bray
Jennie Atkinson
Sarah Lizzie
Lisa Hoel
Susie Bentz
Tonya Trantham
Elizabeth Robinson
Jenny Marples
Maggi Harding
Karen Bearse
Sue Eldred   (you are here!)

Eileen Hull Educator Logo

Disclosure:  This is a sponsored post.  As a member of the Eileen Hull Educator Team, I have been provided product in exchange for my creative ideas.  The view and opinions are my own.