Creating Backgrounds with Gel Press

Creating Backgrounds with Gel Press

I was recently reintroduced to the Gel Press, a reusable gel printing plate.

I’d seen the Gel Press in action a few years ago and even briefly tried my hand at it.

The Gel Press is a fun and creative way to make backgrounds.

This month, the Eileen Hull Teams collaborated with Gel Press

to create some awesome samples.  Check out Eileen’s Blog Here.

gel-press-logo

Disclosure:  This is a sponsored post for Gel Press.  I have been provided product in exchange for my creative ideas.  The view and opinions are my own. 

Creating Backgrounds with Gel Press

Materials Used:  (*affiliate links)

*Disclosure:  This blog uses ads and affiliate links.  If you choose to make a purchase using one of the links, I receive a small commission (at no additional cost to you) that helps offset the costs of maintaining this blog.  Thanks for your support!

Creating Backgrounds with Gel Press

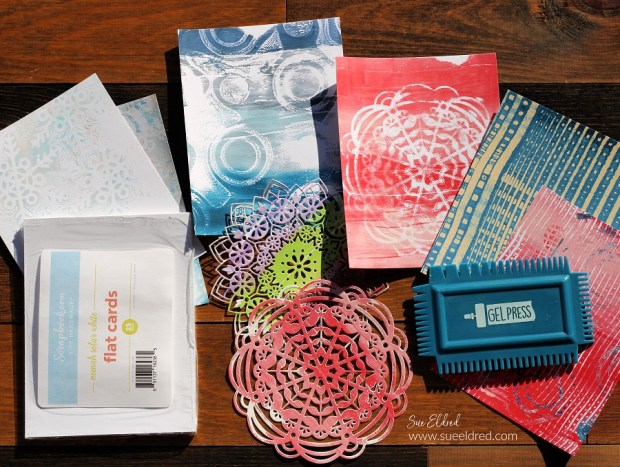
I watched several Gel Press videos online before jumping right in.

I was impressed with the idea of using die-cuts to make backgrounds

and used a few of Eileen’s Dies to make mine.

Creating Backgrounds with Gel Press

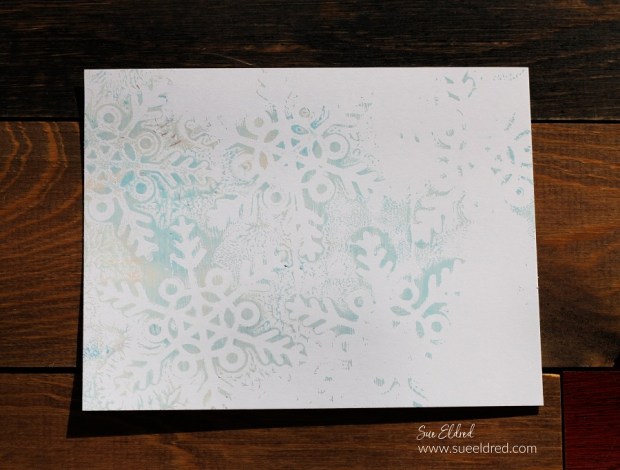
Here’s how I made the Snowflake Background:

  • Start with several colors of acrylic paint and use a Brayer* to blend the paint onto the gel press.
  • Place the Snowflake die-cuts (cut using the Wreath & Snowflake Thinlet Die Set*) directly onto the paint.
  • Place a white piece of paper onto the gel press and press over the cardstock to remove the excess paint.
  • Remove the snowflake die-cuts.  Place another piece of cardstock over the Gel Press to pick up the remaining paint and patterns.

Creating Backgrounds with Gel Press

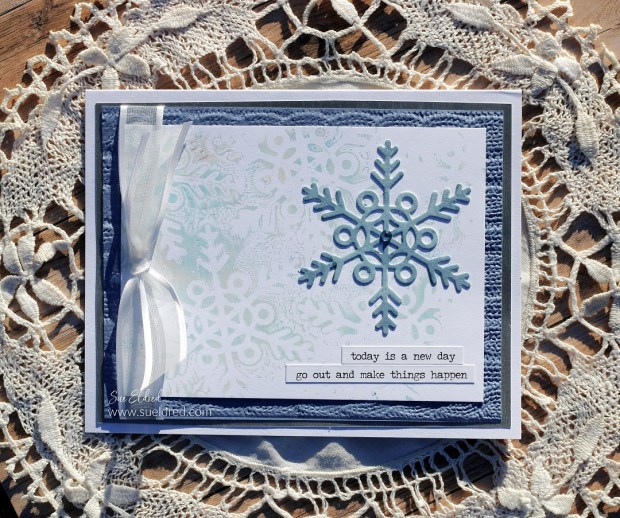
I die-cut another snowflake in blue and adhered it to the background to create this card.

I used the Eileen Hull Sweater Embossing Folder* to create the background layer.

Creating Backgrounds with Gel Press

I also tried the same technique using dye inkpads instead of paint.  

I used small inkpads and dabbed them all over the gel press.

Use a Brayer* to blend the inks before adding the snowflake die-cuts.

Creating Backgrounds with Gel Press

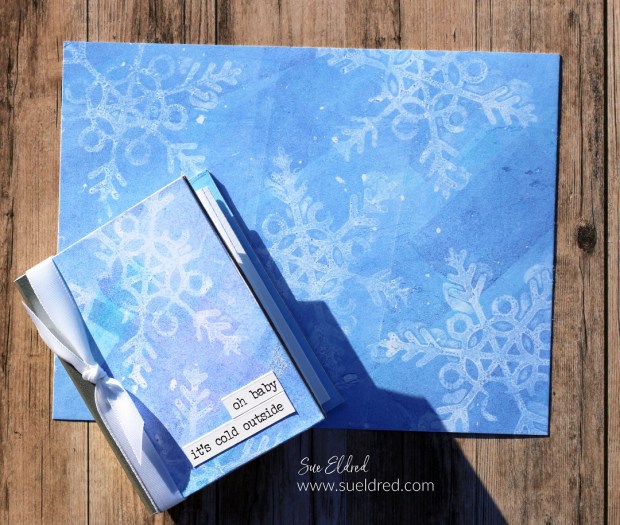
Use the Xyron Creative Station* to adhere the snowflake background paper

to Mat Board*. Die-cut the mat board using the Tiny Book Die to create

this sweet little album.  (This tiny album measures 2 1/4″ x 3″.)

Creating Backgrounds with Gel Press

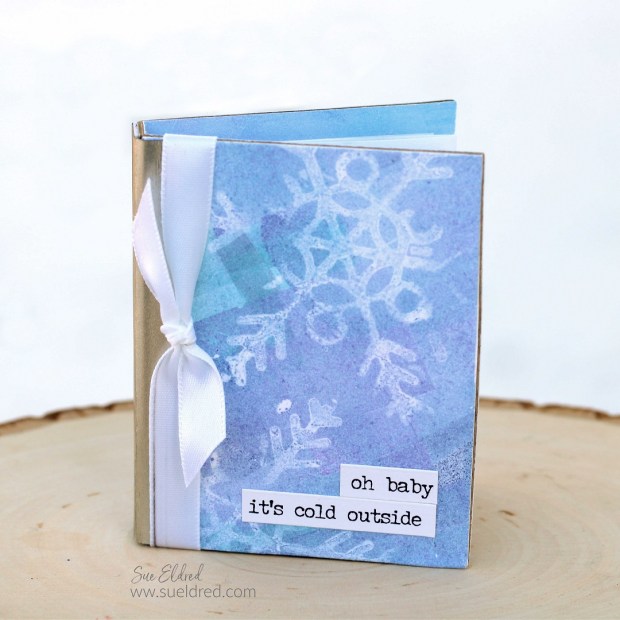
The perfect mini-album to add those snowy day pictures.

Creating Backgrounds with Gel Press

Create a simple accordion out cardstock for the inside pages of the album.

Interested in learning more about using the Gel Press?  Check out this video.

How to make a Holiday Door Hanger

How to make a Holiday Door Hanger

Welcome your guests this Winter Season with a Snowflake Door Hanger

that you can leave up until Spring.

How to make a Holiday Door Hanger

The White Snowflake Welcome Door Hanger measures 10″ and is happy hanging as a

Holiday Welcome on your front door or just hanging out on the wall.

Add it to the center of a wreath for even more pizazz.

How to make a Holiday Door Hanger

Materials Used:      (*affiliate link)

*Disclosure:  This blog uses ads and affiliate links.  If you choose to make a purchase using one of the links, I receive a small commission (at no additional cost to you) that helps offset the costs of maintaining this blog.  Thanks for your support!

How to make a Holiday Door Hanger

Directions:

  • Cut the Welcome Snowflake out of StyleTechCraft White Ultra Metallic Vinyl* using the Welcome Snowflake SVG file and a Silhouette Cameo Electronic Die Cutting Machine*.
  • Remove the excess vinyl from in and around the snowflake and cut letters.
  • Paint the 10” Unfinished Wood Circle* with one or two coats of black acrylic paint.
  • Lightly sand over the painted area with a Sanding Block* to smooth the grain.
  • Drill a small hole in the top of the wood circle for hanging.
  • Trim the paper around the vinyl snowflake and lay it onto the wood circle to determine the placement of the red stripe. Line the tip of the snowflake with the top hole.
  • Place a pencil mark on each side of the first double line. Draw a line between the two pencil marks.  Measure two inches down from the first pencil marks and draw a second line.
  • Place Removable Painters Tape* above and below the pencil lines.
  • Paint the area within the two-inch strip with red acrylic paint.
  • Lightly sand over the red paint to smooth.

How to make a Holiday Door Hanger

  • Cut a 10” x 10” piece of gridded vinyl transfer paper*. Remove the backing from the transfer paper and place it over the vinyl snowflake welcome.  Rub over the transfer paper* with a vinyl scraper tool to make sure that the vinyl has transferred.  (You can use a bone folder or credit card to rub over it if necessary.)  Remove transfer paper.
  • Add the piece of natural twine through the top hole for hanging.

How to make a Holiday Door Hanger

  • To make the bow, you’ll need approximately 24” of ribbon.
  • Fold the ribbon in thirds.

How to make a Holiday Door Hanger

  • Gather and wrap red twine around the center of the ribbon a couple of times and tie tightly. Add jingle bell to the twine and tie again.
  • Using a hot glue gun, glue the bow to the top of the wood sign, glue greenery under the bow.

Red Snowflake Welcome 10" Wood Door Hanger

The Red Snowflake Welcome is another example of what you can make.

I used a walnut stain on the wood base and a dark red metallic snowflake for a completely different look.

“This is a sponsored post.  As a member of the StyleTechCraft Design Team I have been provided product and compensation in exchange for my creative ideas.  The views and opinions are my own.

Glittered Snowflake Ornament

How to Create a Glittered Snowflake Ornament 

Glittered Snowflake Ornament Supplies:                         (*affiliate link)

*Disclosure:  This blog uses ads and affiliate links.  If you choose to make a purchase using one of the links, I receive a small commission (at no additional cost to you) that helps offset the costs of maintaining this blog.  Thanks for your support!

StyleTechCraft Christmas Colors Bundle on Amazon*


How to make a Glittered Snowflake Ornament

  1. Pour Mod Podge* in small bowl and mix in glitter.
  2. If needed…You can add a few drops of water to the mixture to thin it out.
  3. Create a funnel from a piece of cardstock.  Pour glitter mixture into ornament.
  4. Swirl the mixture around the ornament until all the sides are covered.
  5. Turn ornament over and allow excess mixture to drain out.
  6. Allow overnight to let the inside of your ornament to fully dry.
  7. Die-cut a snowflake from the polished metal vinyl.
  8. Apply transfer tape to the front of the snowflake die and removed protective backing.
  9. Lay transfer onto the ornament and smooth from the center out.
  10. Decorate ornament with greenery, berries and bow.


“This is a sponsored post.  As a member of the StyleTechCraft Design Team I have been provided product and compensation in exchange for my creative ideas.  The views and opinions are my own. 

You can now find the full line of StyletechCraft online at ATSM.

How to Make a Snowflake Hair Bow

Snowflake Bow 2047

To make my Snowflake Hair Bow you’ll need:

Snowflake Box Supplies

Supplies Needed:

Putting together the pieces 2070

Directions:

  1. Cut four 4″ pieces of 7/8″ Tranquil Blue Ribbon and four 4″ pieces of the Arabesque Ribbon.
  2. Remove wire from the Arabesque ribbon.  (white sheer)
  3. Cut four 3 1/2″ pieces of 3/8″ Tranquil Blue Ribbon and four 3 1/2″ pieces of Navy Satin.
  4. Thread needle and thread, tie with a knot leaving a long tail.
  5. Lay the 4″ white sheer ribbon over the 7/8″ Tranquil Blue Ribbon, fold the ribbon in half and stitch together with a simple running stitch.
  6. Lay the 3 1/2″ Navy Ribbon over the 3/8″ Tranquil Blue ribbon, fold the ribbon in half and add with a simple running stitch to the first section of ribbon.
  7. Continue stitching ribbon sections together.  (as shown in the picture above)
  8. Gather both ends of the thread, pull the ribbon together and tie with a knot.
  9. Cut eight 4″ of Arabesque sheer ribbon.  Remove wire from ribbon.
  10. Stitch ribbon together like in previous steps.  (see steps 6-8)
  11. Glue the two ribbon sections together with Fabri Tac glue.  (see picture below)
  12. Lightly apply blue ink onto white snowflake brad.  Wipe off excess ink.
  13. Remove prongs from the back of the snowflake brad and glue onto the white button.
  14. Glue button to the center of the bow.
  15. Glue or sew bow onto the metal barrette base.

Putting the pieces together 2038

Offray Logo

I would like to thank Offray Ribbon for generously providing the ribbon used in this project.

This project uses Amazon Affiliate links.  If you choose to purchase an item from Amazon from this link, I receive a small commission that helps defray the cost of running this blog.