I Love You more than Donuts.

I Love You More than Donuts Card

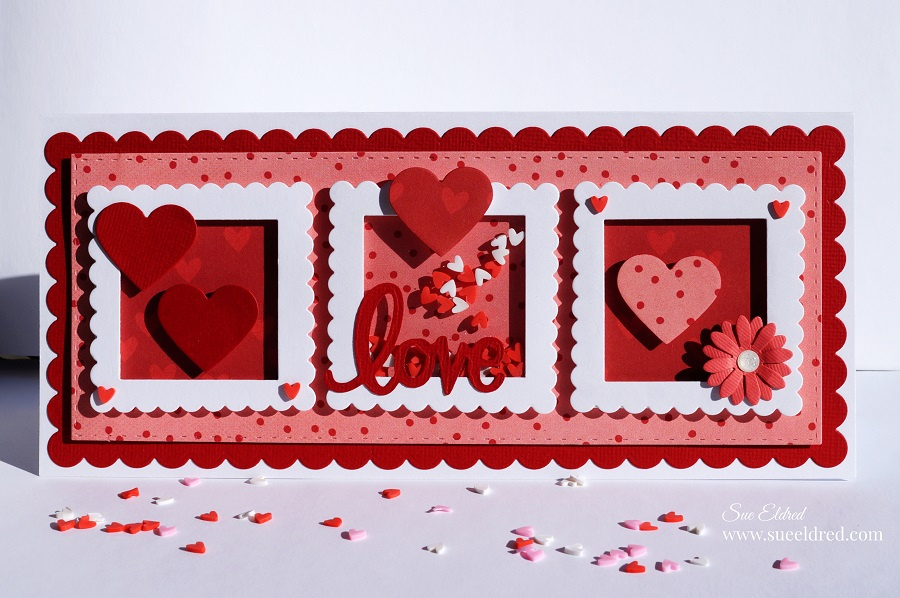
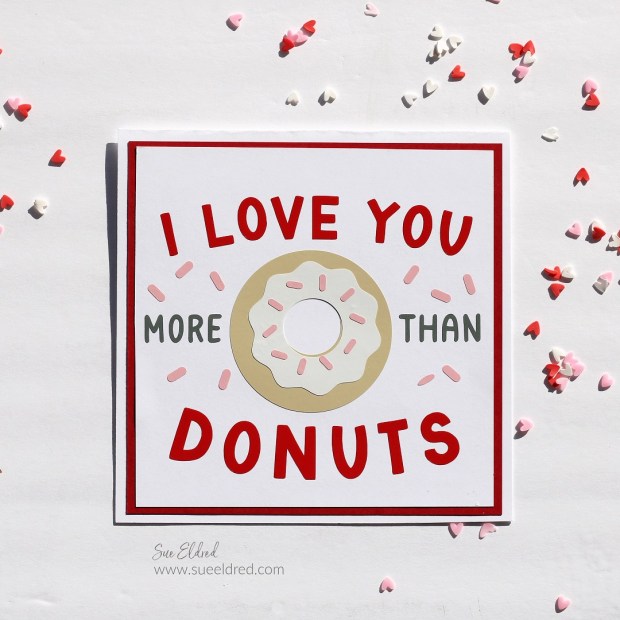
“I Love You More than Donuts” Valentine’s Day Card.

As I mentioned in my last post, my husband and I aren’t that gushy romantic couple.

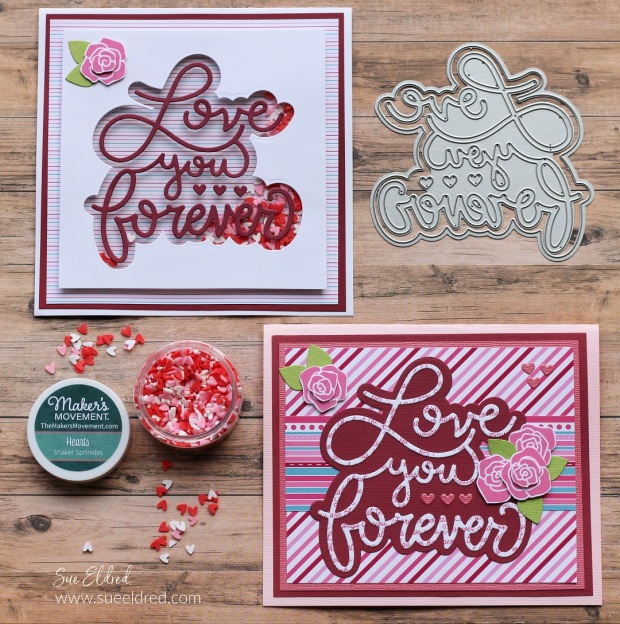
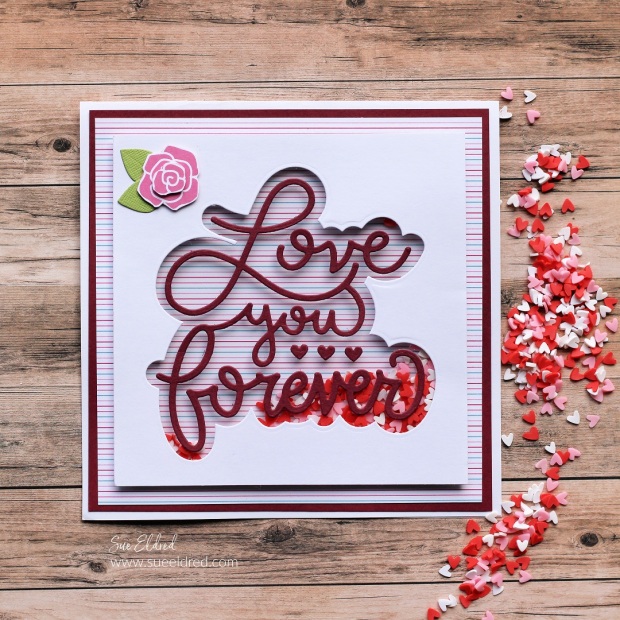
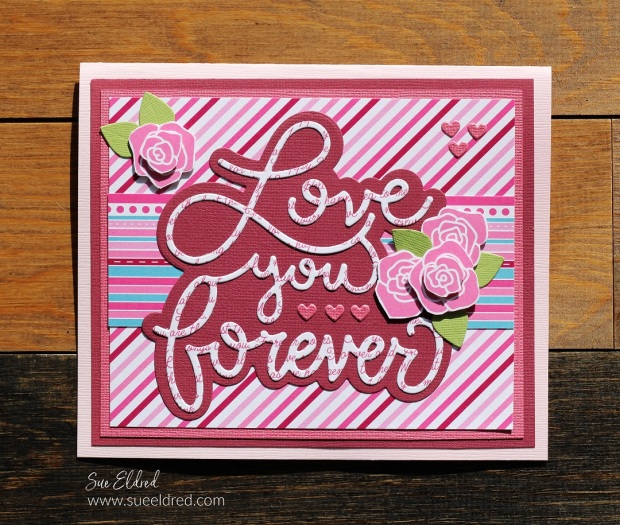
This card is the Valentine’s Day card that I made for him.

I Love You More than Donuts Card

He really is a sweetie…

In the early years of our marriage, my husband would buy me a donut every weekend morning.

It was one of the sweet little things he would do for me.

That lasted until I told him I couldn’t eat another donut. (I know, I’m an ungrateful wife.)

But recently, my husband has been on a donut kick again.

And sometimes, if I ask nicely, he’ll buy one for me.

So technically, this should have been his Valentine’s card to me. (I hope!)

Happy Valentine’s Day Everyone!

I Love You More than Donuts Card

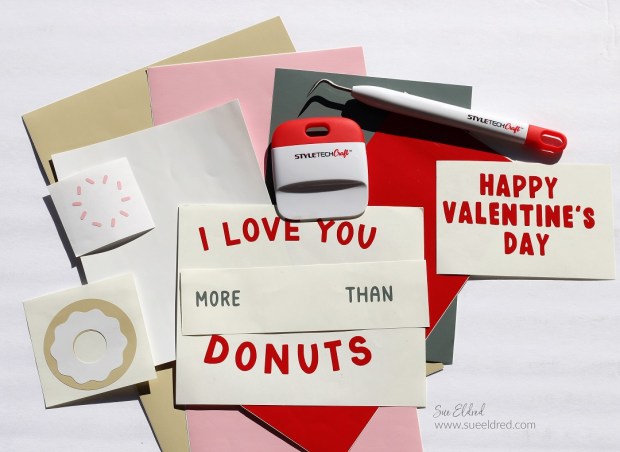
Here’s What I Used to make the Donuts Valentine’s Card:  (*affiliate links)

StyletechCraft products brought to you by ATSM Craft*

*Disclosure:  This is a sponsored post.  This blog uses ads and affiliate links.  If you choose to make a purchase using one of the links, I receive a small commission (at no additional cost to you) that helps offset the costs of maintaining this blog.  Thanks for your support!

Simple Heart Shaker Card

Simple Heart Shaker Card

Shake things up this Valentine’s Day with a cute Simple Heart Shaker Card

made with the Simple Heart Shaker Die Set from The Maker’s Movement.

Maker's Movement

Disclosure:  This is a sponsored post for The Maker’s Movement.  I have been provided product and compensation in exchange for my creative ideas.  The view and opinions are my own. 

Simple Heart Shaker Card

Materials Used:     (*affiliate link)

*Disclosure:  This blog uses ads and affiliate links.  If you choose to make a purchase using one of the links, I receive a small commission (at no additional cost to you) that helps offset the costs of maintaining this blog.  Thanks for your support!

Simple Heart Shaker Card

How to make a Simple Heart Shaker Card

  • Start with a 5″ x 5″ white card base.
  • Die-cut the pieces for the shaker element using the Always & Forever paper pad.

Simple Heart Shaker Card

  • Cut 3¼” x 3¼” piece of striped paper, die-cut the heart shape in the center of the striped paper.
  • Cut a 3¼” x 3¼” piece of Valentine’s words.
  • Die-cut a silver heart border using silver adhesive vinyl or silver cardstock.
  • Die-cut a pink gingham frame using the scalloped frame die.

Love You Forever Valentine's Day Card

  • To create the dimensional rose on the front of the card, “fussy cut” a large and small rose from the rose background paper found in the paper pad.
  • Place a small a thin 3D foam square* under both roses and adhere the smaller rose to the top of the larger rose.

Simple Heart Shaker Card

  • Adhere the scalloped gingham frame to the front of the striped paper with the heart cut-out.
  • Cut a 3¼” x 3¼” piece of clear acetate.  Remove the protective coating off of the acetate and adhere to the back of the heart-opening.
  • Adhere the silver heart border to the front of the acetate inside the heart-opening.
  • Die-cut the adhesive craft foam using the square foam cutter die.  You’ll need to use one that is larger than the heart-opening.
  • Adhere the craft foam square to the back of the acetate.
  • Cut a 4½” x 4½” rose background layer and adhere to the center of the white card.
  • Adhere the Valentine words layer to the center of the rose background layer.
  • The easiest way to add the shaker sprinkles is to place the sprinkles onto the middle of the valentine words layer.  Remove the protective coating from the back of the foam square frame and place the layers over the shaker sprinkles and onto the white card.

Simple Heart Shaker Card

  • Adhere the dimensional rose to the front of the card at the top of the heart.
  • Cut the tiny words “You are the best” using the Valentine’s word paper and adhere to the bottom of the gingham frame.
  • Add valentine’s greeting (found in the Always & Forever paper pad) to the inside of the card.

Love You Forever Valentine Cards

Love You Forever Valentine's Day Cards

Spread the Love this year with handmade Valentines.

The Love You Forever Valentine’s Day cards were created two different ways

using the “Love You Forever” Die Set from the Maker’s Movement.

Maker's Movement

Disclosure:  This is a sponsored post for The Maker’s Movement.  I have been provided product and compensation in exchange for my creative ideas.  The view and opinions are my own. 

Love You Forever Valentine's Day Cards

The first card is a clean and simple shaker card,

and the other is more of a traditionally decorated Valentine’s Card.

Love You Forever Valentine's Day Cards

Materials Used: (affiliate links)

*Disclosure:  This blog uses ads and affiliate links.  If you choose to make a purchase using one of the links, I receive a small commission (at no additional cost to you) that helps offset the costs of maintaining this blog.  Thanks for your support!

Love You Forever Valentine's Day Card

Directions:

  • This card measures 6″ x 6″.
  • Cut a 5″ x 5″ piece of white cardstock.
  • The die set comes with two different dies, the outline, and the words. Place the “outline die” onto the white cardstock and die-cut using a die-cut machine.

Love You Forever Valentine's Day Card

  •  Turn the cardstock over and adhere a piece of clear acetate onto the cardstock.
  • Cut the double-sided adhesive foam into thin strips and place it around the edges of the cardstock.
  • One of my favorite tips for die-cutting small pieces is to run the paper through the Xyron Creative Station* to add a layer of adhesive to the back before I die-cut. The paper pieces become stickers which make adhering them to cards very easy.
  • Die-cut the words “Love you forever” using cranberry paper ran through the Xyron Creative Station*.
  • Adhere the words onto the front of the acetate.
  • For the card base, cut a 5 1/2″ x 5 1/2″ piece of striped paper (found in the Always & Forever Paper Pad) and adhere it onto a 5 3/4″ x 5 3/4″ cranberry cardstock layer.
  • Adhere layers onto a 6″ x 6″ card.
  • Place shaker sprinkles onto the middle of the card base.
  • Remove the paper backing from the foam strips and place the white acetate layer centered on the card base.

Love You Forever Valentine's Day Card

  • To create the dimensional rose on the front of the card, “fussy cut” a large and small rose from the rose background paper found in the paper pad.
  • Place a small thin foam square under both roses and adhere the smaller rose to the top of the larger rose.  Adhere to the front of the card.

Love You Forever Valentine's Day Card

Shaker Cards are both fun to make and fun to receive. 

And I think this one is my new favorite.

Love You Forever Valentine's Day Card

A completely different look using the same Valentine die set and paper pad. 

  • I used the Xyron Creative Station* to add adhesive to the back of the “Valentine Sayings” paper, from the “Forever & Always” paper pad, before die-cutting the words.
  • This card has a lot of different layers and several dimensional flowers that help make this card special.

Making Valentines with New Slimline Essentials

Happy Valentine’s Day Slimline Card

I’m jumping on the Slimline Card Craze with the help of the New Slimline Essentials Die Set

from The Maker’s Movement.

What’s a Slimline Card? 

Basically, a Slimline Card is a tall card that fits into a business-size envelope.

The Slimline Essentials Die Set takes all the guesswork out of cutting the layers and makes

assembling your card a breeze.

Disclosure:  This is a sponsored post  for the Maker’s Movement.  I have been provided product
and compensation in exchange for my creative ideas.  The view and opinions are my own.

Materials Used:   (*affiliate link)

*Disclosure:  This blog uses affiliate links.  If you choose to make a purchase using one of the links, I receive a small commission (at no additional cost to you) that helps offset the costs of maintaining this blog.  Thanks for your support!


Directions:

  • Die-cut all the layers for the card using the Slimline Essentials Die.
  • Cut three white scalloped squares.
  • Center the small square die in the middle of the scallop square.  Put a small piece of washi tape over the die to keep it in place.  Die-cut to create a small scalloped frame.

  • Place a piece of double-sided craft foam onto the square foam cutter die to cut small foam squares to use under the scallop frames.

To Create a Center Shaker Element.

  • Adhere a small piece of clear acetate to fit over the opening of the frame.
  • Because the foam frames didn’t match the frame I created, I cut the foam frames on the corners and placed them over the acetate.
  • Using only red and white heart sprinkles, fill the inside of the frame with the sprinkles. Be careful not to overfill so that there is room to shake.
  • Remove the protective lining on the foam and place a small piece of scrapbook paper over the foam.

  • Embellish the front of the card using hearts popped up with double-sided adhesive foam and the word “love” die-cut using the “Special Delivery” die set.

I love a clean and simple monochromatic card.  (and so much fun to make)

You’re my Jam Valentine Shaker Card

Don’t you just love cheesy Valentines?

The “You’re My Jam” stamp and die set from The Maker’s Movement is one of the cutest sets

from the New Spring Release.  And it makes the perfect Cheesy Valentine’s Day Shaker Card.

Disclosure:  This is a sponsored post  for the Maker’s Movement.  I have been provided product
and compensation in exchange for my creative ideas.  The view and opinions are my own.

Materials Used:        (*affiliate link)

Shop Tombow

*Disclosure:  This blog uses affiliate links.  If you choose to make a purchase using one of the links, I receive a small commission (at no additional cost to you) that helps offset the costs of maintaining this blog.  Thanks for your support!

Directions:

  • Cut a piece of double-sided craft foam approx. 4″ x 5.
  • Using the jar outline die, die-cut the jar shape into the lower section of the craft foam.
  • Cut a piece of the wood grain scrapbook paper approx. 4 1/2″ x 5 1/2″.  Die-cut the jar shape into the lower section of the scrapbook paper.
  • Cut a small piece of acetate to cover the opening of the jar.
  • Remove protective coating off the acetate.
  • Remove the protective liner off the top side of the adhesive craft foam.  Stick the acetate over the opening.
  • Line up and stick the scrapbook paper over the jar opening of the craft foam and acetate.
  • Center a round rectangle die over the jar and craft foam and die-cut using the Crossover II die cutting machine.

TIP...I like to do when working with small die-cut pieces, is to run the paper through the Xyron Sticker Maker before die-cutting. It makes all the pieces stickers and makes assembling a breeze.

  • Die-cut all the jar pieces and assemble them onto the front of the foam.
  • Cut a piece of heart scrapbook paper slightly larger than the opening.
  • Turn the foam over and fill the opening with heart shaker sprinkles. Make sure not to overfill. You need to leave enough room for the Sprinkles to shake.
  • Remove the protective coating from the back of the foam and place the heart paper over the opening.
  • Cut a large layer using the round rectangle dies and stick onto an off white cardstock base.
  • Adhere the die-cut foam layer onto the front of the card.
  • Randomly glue a few heart sprinkles to the front of the card.


Washi Tape Heart

Washi Tape Heart Card

I love a clean and simple card, and this Washi Tape Heart Card is so simple to make.

To make the Washi Tape Heart Card…

  • Create the cut-out heart layer by cutting various sizes of hearts on a 4 3/4″ x 6 3/4″ piece of white cardstock.  I used a  Silhouette Cameo Electronic Die Cutting Machine*.  (You can also use punches or dies to create the hearts.)
  • Center the cut-out heart layer onto a white 5″ x 7″ card and lightly traced the hearts with a pencil.
  • Cover the heart outlines with several different strips of coordinating washi tape pieces.
  • Use a tape runner to adhere to the cut-out heart layer onto the front of the card, aligning it with the washi tape.

*Disclosure:  This blog uses affiliate links.  If you choose to make a purchase using one of the links, I receive a small commission (at no additional cost to you) that helps offset the costs of maintaining this blog.  Thanks for your support!

A Clean and Simple Valentines Day Card.  

Just stamp a simple greeting onto the front of the card,

or you could cut the words out of red glossy craft vinyl as I did. 

I’m glad my husband doesn’t read my blog.  

This card will make a perfect Valentine’s Day card for him.

I want to share with you the perfect organizer for holding washi tape.

The small three-drawer organizer* from Deflecto was made with washi tape in mind.

Each of the three drawers are divided and can hold a lot of washi tape.

The small three-drawer organizer* is also great for holding small ink pads and paintbrushes.

“This is a sponsored post. As a member of the Deflecto Design Team I have been provided product in exchange for my creative ideas, views and opinions.”