As I finished up my Christmas Cards for the season,
I thought I’d make one last card that isn’t traditionally Christmas.
I wanted to make a Winter card that would work for a Winter Birthday
or Valentine’s Day. (but could also work for a Christmas card)

Disclosure: This is a sponsored post for The Maker’s Movement. I have been provided product and compensation in exchange for my creative ideas. The view and opinions are my own.
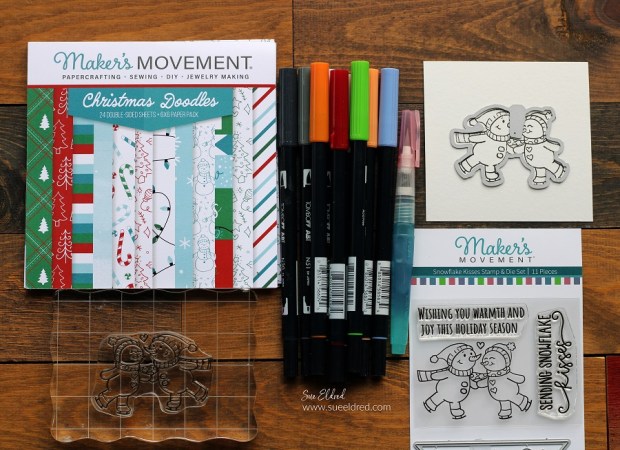
Materials Used: (*affiliate link)
- M12753 Snowflake Kisses Stamp & Die Set
- M12210 Alphabet Die Set
- MOD203 Stitched Rectangles Nested Essentials Die Set
- Crossover II Fabric & Paper Cutting System*
- M12593 Christmas Doodles 6″ x 6″ Paper Pack
- Xyron Creative Station®*
- Black Versafine Ink pad*
- Watercolor Cardstock*
- Tombow Art Markers*
- Pentel – Aquash Water Brush*
- Xyron Tape Runner*
- Scrapbook Adhesives by 3L Thin 3D Foam Squares*
- Cardstock: White and Turquoise
*Disclosure: This blog uses ads and affiliate links. If you choose to make a purchase using one of the links, I receive a small commission (at no additional cost to you) that helps offset the costs of maintaining this blog. Thanks for your support.

Directions:
- Stamp the Snowman Couple onto watercolor cardstock using the Black Versafine Inkpad. (the Black Versafine Ink is the perfect ink to use when water coloring because the ink doesn’t run.)
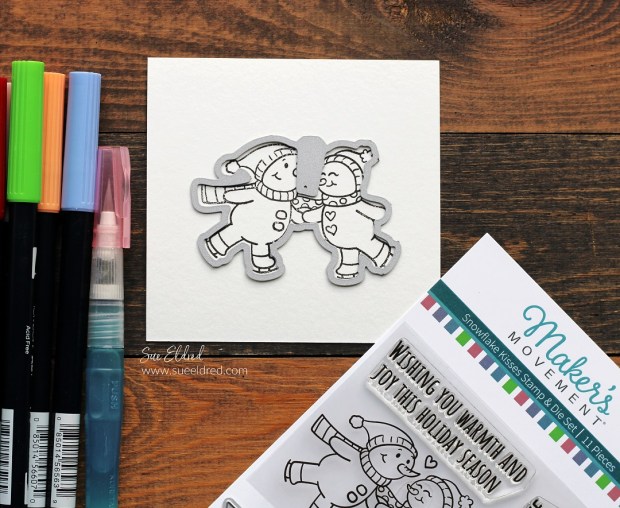
- Line up the “Snow Couple Die” over the stamped image. Place a small piece of tape over the edge of the die to keep it in place.
- Die-cut the Snow Couple out.
- Use the Tombow Markers* to watercolor and color the stamped image.

- For the frame: Cut a 5″ x 6″ piece of “Christmas Lights” paper from the Christmas Doodles Paper Pad.
- Place the paper into the Xyron Creative Station®* design side up. Crank the handle to move it through the machine. As it moves through, it adds a complete layer of adhesive to the back of the paper.
- Die-cut the paper using dies from the Nested Rectangle Die Set. Adhere the frame onto a piece of “snowflake paper” from the Doodles Pad.


- For the Card Front: Cut a small strip of striped paper from the Christmas Doodles Paper Pad, run it through the Xyron Creative Station®* to add adhesive to the back. Die-cut the word “LOVE” using the Alphabet Dies.
- Add thin 3D foam squares* on the back of the snowman couple and adhere inside the frame. Adhere the word LOVE over the snowman couple.
- Adhere the frame onto a turquoise cardstock layer and a white cardstock base.
- Finished Card Measures 5″ x 6 1/4″.