How to create a Shabby Floral Decoupaged Heart…
As a midwestern girl, I always thought southern women to be some of the most polite
and kindest women with their sweet southern drawl.
I mean, they go around saying “bless your heart” all the time.
It wasn’t until last year, that I learned that “bless your heart” can also be an insult by some
southern women. Kind of like a giant “eye roll”.
Don’t get me wrong.
Bless your heart can still be an expression of sincere sympathy or genuine concern.
Call me naive, but that’s what I’m going to think. (especially for this project)
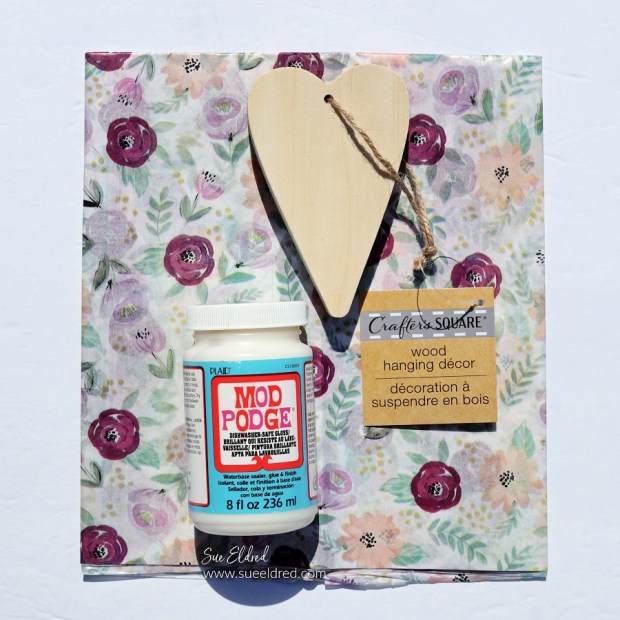
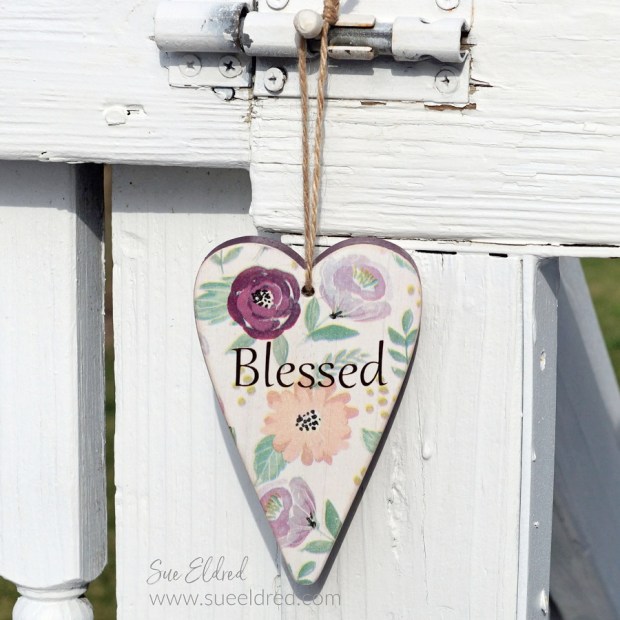
My blessed shabby heart was made using an inexpensive wood heart from Dollar Tree*,
floral tissue paper, decoupage medium, and StyleTechCraft Gold Chrome Adhesive Vinyl*.

Materials Used: (*affiliate links)
- Wood Heart*
- Floral Tissue Paper (Hobby Lobby)
- Mod Podge Water-based Sealer*
- Paintbrush
- Acrylic Paint
- Extra Fine Sand Paper or Sanding Block*
- StyleTechCraft Gold Chrome Vinyl*
- StyleTechCraft Vinyl Tool Kit*
- StyleTechCraft Clear Transfer Tape*
- Silhouette Cameo Electronic Die Cutting Machine*
*Disclosure: This blog uses affiliate links. If you choose to make a purchase using one of the links, I receive a small commission (at no additional cost to you) that helps offset the costs of maintaining this blog. Thanks for your support!

Directions:
- Remove the twine tag and sand both sides of the wood heart.
- Paint the front and back of the heart with white paint.
- My wood heart is a “chunky” heart and is 3/4″ thick. I painted the sides of my heart a coordinating color of the darkest flower.
- Cut two pieces of floral tissue paper to cover the front and back of the heart.
- Apply Mod Podge to the front of the heart. While wet, lay the tissue onto the front of the heart. Gently smooth tissue paper onto the surface.
- Allow time for the paper to dry. Using fine-grit sandpaper, lightly sand the edges of the heart to remove the excess tissue paper.
- Repeat on the other side of the heart.
- Add a second coat of Mod Podge sealer over both the front, back, and sides of the wood heart.
- The tissue paper gives the appearance of a softly painted water-colored floral background.

- I used my Silhouette Cameo Electronic Die Cutting Machine* to create and cut the word “blessed” out of Gold Chrome vinyl.
- I used the vinyl tools to remove the excess vinyl in and around the letters.

- Cut a piece of Clear Transfer Tape* slightly larger than the word.
- Using the vinyl scraper tool, gently rub over the letters to make sure they have transferred.
- Lift the word off the white backer paper.
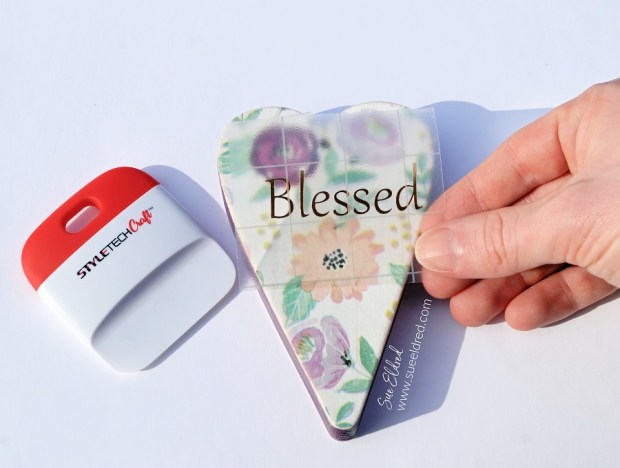
- Position the words over your heart to decide where you want it to go.
- Lay the transfer paper onto the heart and gently rub over the transfer paper with the vinyl scraper tool.
- Gently remove transfer paper from the heart.

Add twine or ribbon and use a decorative knob hanger. And always remember how blessed you truly are.
![]()
“This is a sponsored post. As a member of the StyleTechCraft Design Team I have been provided product and compensation in exchange for my creative ideas. The views and opinions are my own.

