Em’s Softball Frame

Emily's Softball Frame 7885

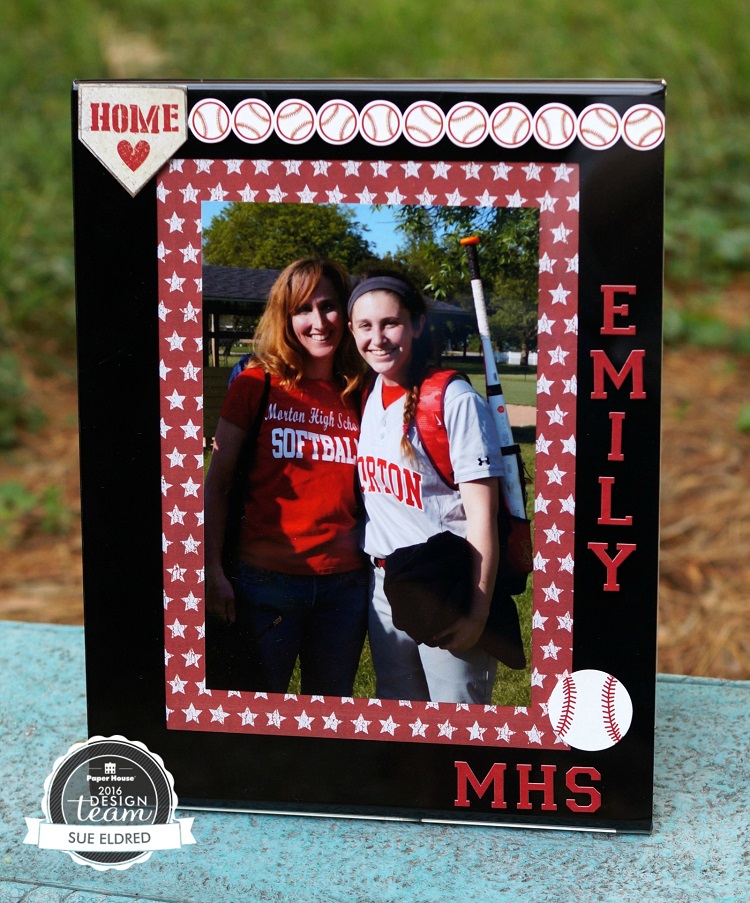
This is my niece Emily and her no#1 fan.  (her mom)

I recently went to one of Emily’s High School Softball games to watch her pitch and take pictures.

I asked Emily if it would be ok to use one of her pictures for one my Design Team Projects.

I’ve used Paper House Productions “Sports Collections” for Guys but it’s also great for girls too.

Em's Softball Frame

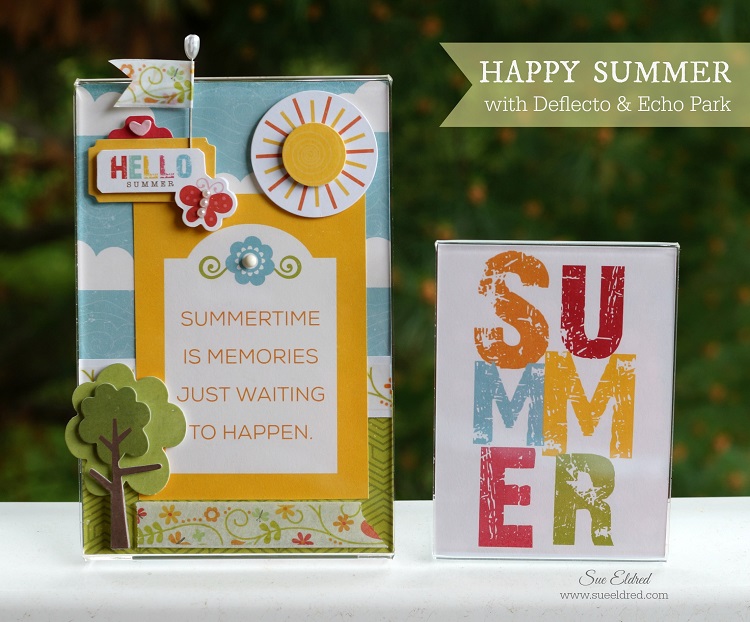
For Emily’s frame I used a 5 x 7 Black Border Acrylic Frame from Deflecto Craft Solutions.


Deflecto Craft Frame, 5 x 7 Inches, Black Border (69575CR)

I embellished the frame with Paper and Stickers from Paper House Productions:


“This is a sponsored post. As a member of the Paper House Productions and Deflecto Design Team I have been provided product in exchange for my creative ideas, views and opinions.”

*This post uses Amazon Affiliate links.  I am an Amazon Affiliate.

Craft Sticks… not just for Kids!

Stenciled Chalkboard Sign

Craft Sticks for Grown-ups?  

Who knew the craft medium we used as kids could produce a grown-up look.

I was messing around one day, looking for something different to stencil on.

Inspired by my favorite “Fixer Upper” show, I decided to create my own mini shiplap.

The projects below are the result of my “playtime”.

Learn More

Americana Sign

This one’s for anyone who loves Americana, old signs, topography and the look of old shiplap.

Or for anyone who loves playing with wood craft sticks.

How to make the Americana Sign:              (*Amazon Affiliate Links)

Finished Size: 6” x 6”

*Disclosure:  This blog uses ads and affiliate links.  If you choose to make a purchase using one of the links, I receive a small commission (at no additional cost to you) that helps offset the costs of maintaining this blog.  Thanks for your support!

Americana Sign Collage

Directions:

  1. Create a sign by gluing together 8 tongue depressors on the front and 4 tongue depressors on the back.
  2. Paint both sides of the sign with blue paint.
  3. Using select sections of the stencil, tape stencil in place using removable painters tape.
  4. Using a stencil brush, dip just the tip of your brush into the paint. Tap off excess paint before applying to prevent the paint from seeping under the edges of the stencil.
  5. Apply paint with stencil brush in a straight up and down motion called stippling.
  6. Drill small hole in the top corners and insert red twine to use as a hanger.
  7. Optional Step: For a distressed look, lightly sand the edges of the sign with extra fine sand paper.

Here’s a project I did a few years ago using a product called sticky sticks. 

Deck the Halls with Sticky Sticks  Sticky Stick Frame Basic Construction

The paint and stencils used in these projects were sponsored by DecoArts.

Shop Amazon Scrapbooking Supplies*

Happy Summer Frame

Happy Summer 8047

I’m really starting to love this new summer schedule.

Everything seems a little more laid back.

I feel like I’m getting lazier by the minute.

But honestly, I’ve been busier this week than I have in a while.

This week has been full of gardening, cooking out, a couple of really cold dips in the pool,

movies, shopping, a soft ball game and to end out the week…

dance recitals and a retirement party.

And… I don’t want to miss a thing.

Summertime really is Memories just waiting to happen.

Hello Summer Frame 8046

In case your wondering…

The Happy Summer Frame was made using clear acrylic frames from Deflecto Craft Solutions

and the “Echo Park Collection Kit 12″”X12″”-Happy Summer”*.

  (affiliate link)

“This is a sponsored post. As a member of the Deflecto Design Team I have been
provided product in exchange for my creative ideas, views and opinions.”

Join Amazon Kindle Unlimited 30-Day Free Trial

Disclaimer:  This blog uses ads and affiliate links.  If you choose to make a purchase using one of the links, I receive a small commission (at no additional cost to you) that helps offset the costs of maintaining this blog.  Thanks for your support!

A little Americana for your front porch swing

The quickest way to spruce up the front porch swing for summer is with new pillows.

And if your a little bit handy and have a sewing machine why not try making a few of your own.

When it comes to sewing I’m very simple and it doesn’t get much easier than this.

A simple stenciled and stitched pillow.

Deco Arts has so many 12″ stencils in a variety of patterns, you’re sure to find one you’d love.

Supplies 270 2

DecoArts® Products Used:                           (*affiliate link)

  • ADS16 American Tribute Stencil*
  • Americana® Multi-Surface Satin Acrylics: Dark Scarlet, Cotton Ball, Night Sky
  • Splendid Gold Dazzling Metallics® Acrylic Paint

Additional Products:

Directions:

  1. Lay paper under muslin fabric before stenciling.
  2. Center and tape stencil onto muslin with removable painter’s tape so that the stencil won’t move.
  3. Work one color at a time and mask off with painter’s tape the areas that won’t be painted.
  4. Remove the “star section” of the flag using a craft knife and set aside.
  5. Stenciling is a “dry” brush technique. Using a stencil brush, dip just the tip of your brush into the paint. Tap off excess paint before applying to prevent the paint from seeping under the edges of the stencil.
  6. Apply paint with stencil brush in a straight up and down motion called stippling.
  7. Once you’ve added the red, blue and gold colors. Replace the star section of the flag back onto the stencil and stencil the stars with white paint.
  8. Create a simple pillow by sewing the muslin onto the red and cream ticking fabric.
  9. Stuff pillow with Poly-fil®.

God Bless America Pillow 572 2

This project was sponsored by DecoArts.

Disclosure:  This blog uses ads and affiliate links.  If you choose to make a purchase using one of the links, I receive a small commission (at no additional cost to you) that helps offset the costs of maintaining this blog.  Thanks for your support!

Pretty Pink Rose Card

Pretty Pink Rose Card 7594

The challenge, this week, for the Paper House Production Design Team

was to create something using their 3D stickers.  They have so many beautiful dimensional stickers

it was hard to choose.

white frame 7560

The inspiration for this card came from a small picture frame picked up at Michael’s one spot.

The frame spoke to my soft feminine “girly” side.

Pretty Pink Rose Card Close Up 7591

The pretty pink rose used on my card comes from the Sisters 3D sticker sheet.

Finished Card Size:  4 1/2″ x 4 1/2″

Paper House Productions Products Used on the Card:

Additional Product Used:


“This is a sponsored post. As a member of the Paper House Productions Design Team I have been
provided product in exchange for my creative ideas, views and opinions.”

Americana Ribbon Wreath

How to Create a Americana Ribbon Wreath…

I’ve been concentrating a lot on sprucing up my front porch for Summer.

To complete the look, my front door needed a fresh fun new wreath.

I created a Summer themed Americana Wreath using one of the ruled wreaths* from Smoothfoam.             (*affiliate link)

Smoothfoam Ruled Wreaths make design and layout easy. 

They molded lines and numbers into the foam to make design and layout simple.

Even on one side, odd on the other.

The wreaths come in several sizes… 8″, 10″, 12″, 14″.

Proudly Made in the USA 

wrapped wreath 7502

How to make the Americana Ribbon Wreath

  • I used the 14″ ruled wreath.
  • Glue one end of the ribbon down onto the foam wreath and wrap the ribbon tightly around the first section.  Glue second end of the ribbon in place before starting second color. (I used Beacon Fabri-Tac Permanent Adhesive* to glue my ribbon in place.)
  • Using a thin floral wire, wire the small floral stems onto the base of the wreath.
  • Glue larger flowers and leaves onto the wreath over the wire.
  • Add large stemmed butterfly and ribbon to hang.

So many possibilities.

Close Up 7505

The Americana Wreath was sponsored by Smoothfoam™, the crafter’s foam.

Shop Your Fav Brands at Scrapbook.com

*Disclosure:  This blog uses ads and affiliate links.  If you choose to make a purchase using one of the links, I receive a small commission (at no additional cost to you) that helps offset the costs of maintaining this blog.  Thanks for your support!

Join Amazon Kindle Unlimited 30-Day Free Trial

New Use for an Old Basket

On the Porch 2

Need a quick front porch project…

Got any old baskets lying around the house?

Old Basket Before 7232

I’m a total sucker when it comes to baskets.  (a basket case one might say)

I’ve got quite the collection, I use them all over the house.

During my Spring Cleaning…this basket was headed for the trash when I decided to

repurpose it.  I love the look of flowers in baskets.  I had nothing to lose.

I can always throw it away later if it doesn’t wear well this summer.  (look at how rough it is)

quick fix 7242

I gave the handle of the basket a quick fix with some craft glue held together with a binder clip.

plastic bag and adding potting soil 7244

I used a thin grocery store bag to line the basket and keep the dirt in place.

You might want to poke a few small holes in the bag for drainage.

ready to plant 7251

Once you’ve filled the basket with dirt, tuck the remaining bag neatly around the sides

of the basket.

flowers 7250

My basket will be on a shaded front porch. 

I chose flowers that will grow well in shade.

I started with a couple larger pink geraniums and filled with smaller pink impatiens

and purple violas.

Shop Your Fav Brands at Scrapbook.com

TIP:  Don’t pack the basket so full that the flowers don’t have room to grow.

New Look for an Old Basket

Now that Garage Sale season is upon us.

You may want to keep a look out for a cheap basket or two.

That is… if you don’t have any old baskets lying around waiting to be rescued.

Join Amazon Kindle Unlimited 30-Day Free Trial

*Disclosure:  This blog uses ads and affiliate links.  If you choose to make a purchase using one of the links, I receive a small commission (at no additional cost to you) that helps offset the costs of maintaining this blog.  Thanks for your support!

Mini Floral Wreath

Mini Floral Wreath 7122

I get some of my best creative inspiration late at night…

I was planning on making a card using these 3-D puffy stickers from Paper House Productions

when a light bulb moment happened and I decided to make a wreath instead.

I’m really happy with the way it turned out, a little different and very easy to make.

Tip:  Use a good craft glue to adhere the stickers to the ribbon.

Mini Floral Wreath Collage

Paper House Productions Stickers Used:

Additional Supplies:

How to make a Mini Floral Wreath using 3D Puffy Stickers:

  1. Wrap wreath with satin ribbon.
  2. Start with the large pansy flowers and glue evenly around wreath.
  3. Fill in wreath by gluing on the smaller flowers, butterflies and leaves. (The leaves are from the lady bug sticker sheet.)
  4. Tie a thin silver ribbon around wreath to use as a hanger.
  5. Make a bow from the sheer ribbon and glue onto the top of the wreath.

This is a sponsored post. As a member of the Paper House Productions Design Team.

Join Amazon Kindle Unlimited 30-Day Free Trial

Disclaimer:  This blog uses ads and affiliate links.  If you choose to make a purchase using one of the links, I receive a small commission (at no additional cost to you) that helps offset the costs of maintaining this blog.  Thanks for your support!

Making Mini Resin Frames

Resin Frame and Magnet 2788

I had this idea that I’d been wanting to try…

to create little dimensional framed artwork using miniature frames filled with resin.

It really is pretty easy to do.  The only hard part for me was waiting for the resin to cure.

They would be great for weddings or parties.

Customize the frames to use for table numbers, centerpieces, desert tables and more.

There’s a lot of possibilities.

Resin Magnet Supplies 916

To Create a Mini Frame…

Materials:

Directions:

  1. Remove the backing and glass from frame.
  2. Apply Rose Gold Metallic Lustre or paint of choice onto frame.
  3. Adhere decorative paper onto mat-board.   Cut mat-board to fit frame back and adhere.
  4. Embellish the inside of the frame with computer generated words or small embellishments. Make sure embellishments inside the frame is lower than frame top.
  5. Measure and mix resin following manufacturer’s instructions. Pour mix into frame to cover embellishments. Blow air onto the resin using a thin straw to help remove bubbles. Let dry completely.

Resin Frame 0957

The Mr. & Mrs. and LOVE table frames were featured in Craft Ideas Spring Issue. (page 36)

Make sure to check out Craft Ideas Magazine for Craft Ideas for Every Occasion, Every Skill Level.

Craft Ideas Magazine Spring 2016

This project was created for and sponsored by Craft Ideas Magazine.

*This post uses Amazon Affiliate Links.  I am an Amazon Affiliate.

DIY Up-cycled Jar…a little trash to treasure

Ikea Toothbrush Holder

I was about to throw away this inexpensive toothbrush holder

(from IKEA) while cleaning my bathroom, when I got the idea.  I’m always looking for items

to use as a base on repurposed projects and thought this was perfect for a quick project.

Inspiration and ideas can be found anytime, anywhere…

even while cleaning your bathroom.
Upcycled Jar and Toothbrush Holder 3964Upcycled Jar and Toothbrush Holder 3988
Great Storage or Gift Idea.  So many ways to customize using items destined for the trash.

How to make an Up-Cycled Jar…

Materials Used:                                            (affiliate links)

Upcycled Jar Collage

Directions:
  1. Disassemble toothbrush holder.  Set aside the top portion of the holder for future projects.
  2. Paint the bottom of the holder, the lid of the jar and the cabinet knob with black semi-gloss spray paint.
  3. Glue the bottom of the jar to the painted base.
  4. Cut a circle from the decorative paper and adhere it to the top of the lid.
  5. Glue knob onto the center of the lid.
  6. Add chalkboard label to front of the jar.

craft-ideas-garden-2016

The DIY Up-cycled Jar was featured in  2016 Craft Ideas Garden Issue. (page 72)

This project was created for and sponsored by Craft Ideas Magazine.

Check out Craft Ideas Magazine for Craft Ideas for Every Occasion, Every Skill Level.

Join Amazon Kindle Unlimited 30-Day Free Trial*

Disclaimer:  This blog uses ads and affiliate links.  If you choose to make a purchase using one of the links, I receive a small commission (at no additional cost to you) that helps offset the costs of maintaining this blog.  Thanks for your support!