How to Etch a Mason Jar…

I love the look of daisies in old blue canning jars.  It just says summertime.

It’s simple, beautiful and it makes me happy.

I recently got the opportunity to work with a new product, etching crème from Etchall®.

While looking around for something to etch, I noticed the daisies sitting on the table.

Hmmm…Wouldn’t that look great with a etched flower and a greeting?

It’s a super simple project.  (just how I like it)

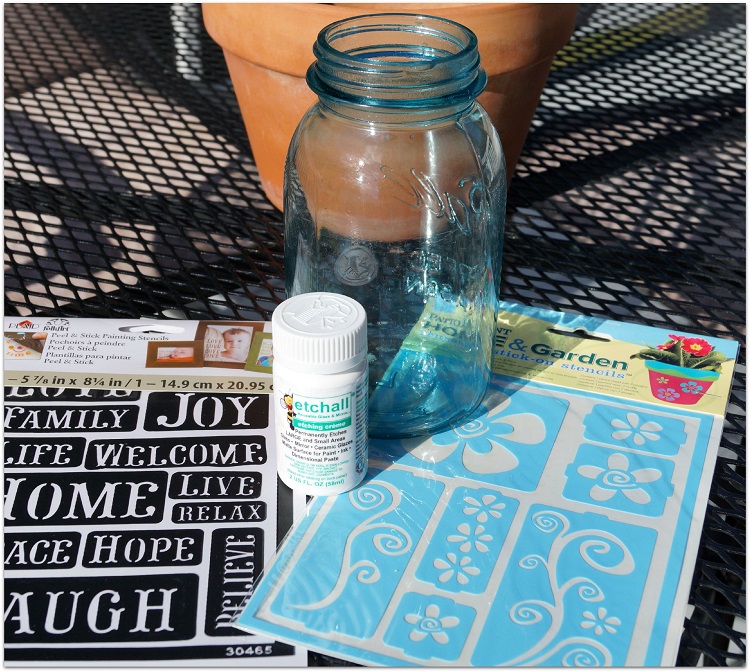
Here’s what you’ll need:                                   (*affiliate link)

Shop Your Fav Brands at Scrapbook.com

Directions:

  1. Clean jar to remove all dirt, fingerprints and oil.  Dry with a coffee filter, paper towel, or lint-free cloth.
  2. Apply Stencils to jar.  Burnish the edges of the stencil.  You’ll want to make sure no edges are coming up.
  3. Mask around the stencil with removable painters tape for extra surface protection.
  4. Apply a heavy coat of etchall® etching crème to the masked area of the stencil.
  5. Leave etching crème on design for 15 minutes.  After etching time has elapsed, use the squeegee to return the crème back into the original container for later re-use.
  6. Rinse etched surface with hot water to remove any remaining crème. Remember to keep crème away from porcelain sinks or ceramic tiles.

Mason Jar with Stencils 8839Mason Jar with Stencils and Masks 08841Mason Jar with Etching Creme 8842

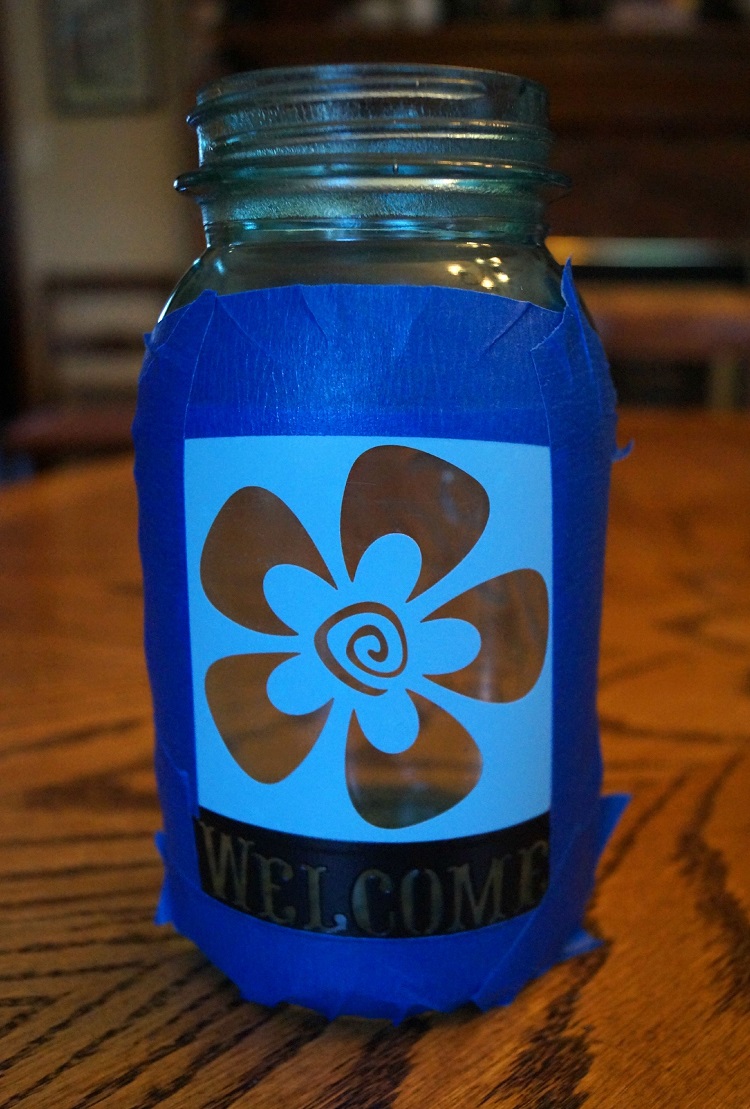
             Step #2                                        Step #3                                      Step #4

The etched flower looks subtle against the water in the blue jar.   

“This is a sponsored post.  As a member of the Etchall Design Team I have been provided product and compensation in exchange for my creative ideas.  The views and opinions are my own.”

Join Amazon Kindle Unlimited 30-Day Free Trial

Disclosure:  This blog uses ads and affiliate links.  If you choose to make a purchase using one of the links, I receive a small commission (at no additional cost to you) that helps offset the costs of maintaining this blog.  Thanks for your support!


Don’t Miss a Thing…Make Sure to Follow me.

Colorful Chalkboard Frame for Kids and grownups

Funky Pallet Frame 8798

A simple paint and stencil project, fun for kids or grown ups.

I decided to finish painting this colorful Rustic Pallet Frame* that I started working on

yesterday evening.  As the name suggests, the frame is rustic and somewhat rough.

Because I was planning on stenciling on it…  I sanded the front of the frame to make it smoother.

I wasn’t worried about making it completely smooth.

The Colorful Chalkboard Frame would be a great project to make with the kiddos.

Funky Pallet Frame painted 8792

Directions to make the Colorful Chalkboard Frame:

  1. Sand the front of the frame.
  2. Paint the frame with white acrylic paint.
  3. Paint the top of each pallet section with different acrylic colors.  Sort of a modified rainbow.
  4. Because the stencil had four unique patterns, I decided each color needed its own pattern.
  5. Mask off each section of the wood before stenciling.
  6. Stencil using a stipple brush and white acrylic paint.
  7. Allow to dry completely
  8. To mute to colors:  Lightly sand the frame with a sanding block.  (optional)
  9. For an added sheen:  Apply clear crème wax to front of frame, allow to sit for one hour and buff.
  10. I added a small chalkboard to the inside of the frame.

Funky Pallet Frame Supplies

Supplies Used:                                          (*affiliate link)

*Thanks to Walnut Hollow and DecoArt for providing the materials used on this frame.

For more Summer fun with the kids…click on SIime Ad below.

Slimer

Disclaimer:  This blog uses ads and affiliate links.  If you choose to make a purchase using one of the links, I receive a small commission (at no additional cost to you) that helps offset the costs of maintaining this blog.  Thanks for your support!

Join Amazon Kindle Unlimited 30-Day Free Trial

My Fabulous Thrift Store Make-Over

I almost passed on this plain 8 drawer cabinet last April while visiting my daughter in Madison.

I didn’t really need it, I have too much stuff, would there be room in the car?  (geez!)

It was sitting there in the Thrift Store for only $8.  They had just put it out that day.

I had to take it home.  (I just had too.)

Stenciling the drawer 8355

As soon as I got it home, I painted it with a couple coats of black paint and gave

it a clear wax coat.  It sat in my office that way for the next four months.

(I’m starting to notice a pattern here.)  Anyway…. I decided that the cabinet needed more.

After receiving these cool number stencil,

Deco Art Americana Decor Stencil, Old World Numbers*    (*affiliate link)

and Whisper Chalky Finish Paint* from DecoArt as part of their Blogger Outreach Program,

I stenciled each drawer 1-8.

To keep the numbers from looking too new or bright, I lightly sanded over the letters with a

extra fine sanding block and applied another coat of clear wax.

Drawer Close Up 8446

My hubby helped me put on these vintage looking drawer pulls I’d found on Etsy.

I spent more than twice as much on the drawer pulls than I did the cabinet.

Black Cabinet 8444

I’m so happy with the way it turned out.  Doesn’t it look beautiful?

Join Amazon Kindle Unlimited 30-Day Free Trial

Disclaimer:  This blog uses ads and affiliate links.  If you choose to make a purchase using one of the links, I receive a small commission (at no additional cost to you) that helps offset the costs of maintaining this blog.  Thanks for your support!

DIY No Sew Pillows to Dye for…

A Pillow to Dye For

Recently, I participated with a group of Designers in a Manufacturer Challenge sponsored by

Fairfield World the makers of Pillow Forms, Batting, Poly-fil®… and a whole lot more.

After a little good natured trash talking between the designers, the challenge was dubbed the

“Pillow Fight” and with that it was game on.

Not being much of a seamstress I knew I had to take it in another direction.

Hopefully, what I lack in sewing skills I’m making up for in quantity and possibly inspiration

for other non-sowers like me.

If you happened to see my post, “Tie-Dying with Nick” then you’ll know I’m on a little bit

of a tie-dying kick.  (why stop now?   oh… and make sure to check out the bonus project at the end.)

Nick's Tie Dye Pillow 6430Warren's Pillow

Here are a couple of pillows I made for my grandsons using a one-step tie-dye kit

and the Ombre Technique.  (see instructions below)

It was such a fun and easy project that I let my grandson in on the fun.

Thanks to canvas pillow squares and pillow forms there is no sewing involved.

(The red pillow above also uses the ombre Technique only with one color of dye.)

Iron-On embroidered letters allowed me to easily personalize the pillows for the boys.

Nick and the Ombre Technique

For my No Sew Pillows I used:                                                                  (*amazon affiliate links)

These are the instructions included with the Tulip dye kit.

  1. Apply dye.
  2. Dip brush into dye and apply.
  3. Dip brush into water and apply.
  4. Cover dyed fabric with plastic wrap to keep damp.
  5. Let set for 6-8 hours or longer for intense colors.
  6. Rinse well with water until excess dye is removed.
  7. Fill washer to “large load” setting with hottest water suitable for fabric and a small amount of laundry soap.  Wash and dry separately.  Wash separately for the first few washes.

Directions for Stenciling:

The pattern on the Red Pillow was made using the 12″ Doily Stencil*.

  1. Lay protective paper layer inside the canvas pillow square before stenciling.
  2. Center and tape stencil onto pillow with removable painter’s tape so that the stencil won’t move.
  3. Stenciling is a “dry” brush technique. Using a stencil brush, dip just the tip of your brush into the paint. Tap off excess paint before applying to prevent the paint from seeping under the edges of the stencil.
  4. Apply paint with stencil brush in a straight up and down motion called stippling.
  5. Stuff pillow with pillow form or Poly-fil®.

And for an added bonus… Tie Dyed Socks!!!  (Someone stop me)

Tie Dyed Socks

This project was sponsored by Fairfield World, Canvas Corp Brand, Tulip Brand and DecoArt.

*DisclaimerThis post uses ads and affiliate links.  If you choose to make a purchase using one of the links, I receive a small commission (at no additional cost to you) that helps offset the costs of maintaining this blog.  Thanks for your support!

Join Amazon Kindle Unlimited 30-Day Free Trial*