A little Americana for your front porch swing

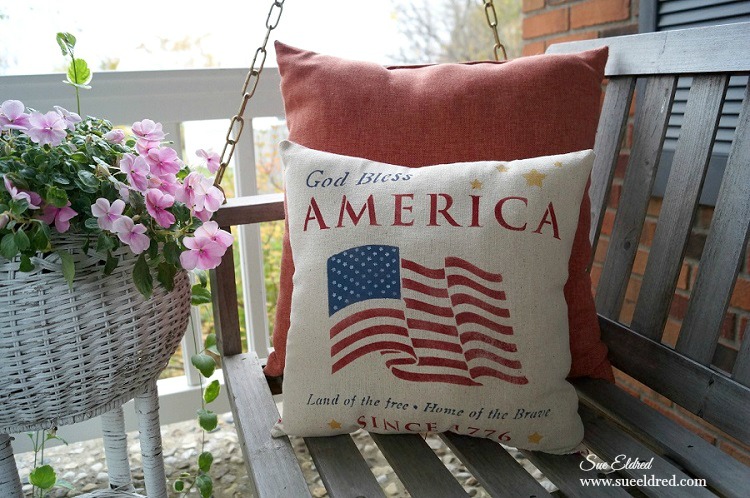
The quickest way to spruce up the front porch swing for summer is with new pillows.

And if your a little bit handy and have a sewing machine why not try making a few of your own.

When it comes to sewing I’m very simple and it doesn’t get much easier than this.

A simple stenciled and stitched pillow.

Deco Arts has so many 12″ stencils in a variety of patterns, you’re sure to find one you’d love.

Supplies 270 2

DecoArts® Products Used:                           (*affiliate link)

  • ADS16 American Tribute Stencil*
  • Americana® Multi-Surface Satin Acrylics: Dark Scarlet, Cotton Ball, Night Sky
  • Splendid Gold Dazzling Metallics® Acrylic Paint

Additional Products:

Directions:

  1. Lay paper under muslin fabric before stenciling.
  2. Center and tape stencil onto muslin with removable painter’s tape so that the stencil won’t move.
  3. Work one color at a time and mask off with painter’s tape the areas that won’t be painted.
  4. Remove the “star section” of the flag using a craft knife and set aside.
  5. Stenciling is a “dry” brush technique. Using a stencil brush, dip just the tip of your brush into the paint. Tap off excess paint before applying to prevent the paint from seeping under the edges of the stencil.
  6. Apply paint with stencil brush in a straight up and down motion called stippling.
  7. Once you’ve added the red, blue and gold colors. Replace the star section of the flag back onto the stencil and stencil the stars with white paint.
  8. Create a simple pillow by sewing the muslin onto the red and cream ticking fabric.
  9. Stuff pillow with Poly-fil®.

God Bless America Pillow 572 2

This project was sponsored by DecoArts.

Disclosure:  This blog uses ads and affiliate links.  If you choose to make a purchase using one of the links, I receive a small commission (at no additional cost to you) that helps offset the costs of maintaining this blog.  Thanks for your support!

Americana Ribbon Wreath

How to Create a Americana Ribbon Wreath…

I’ve been concentrating a lot on sprucing up my front porch for Summer.

To complete the look, my front door needed a fresh fun new wreath.

I created a Summer themed Americana Wreath using one of the ruled wreaths* from Smoothfoam.             (*affiliate link)

Smoothfoam Ruled Wreaths make design and layout easy. 

They molded lines and numbers into the foam to make design and layout simple.

Even on one side, odd on the other.

The wreaths come in several sizes… 8″, 10″, 12″, 14″.

Proudly Made in the USA 

wrapped wreath 7502

How to make the Americana Ribbon Wreath

  • I used the 14″ ruled wreath.
  • Glue one end of the ribbon down onto the foam wreath and wrap the ribbon tightly around the first section.  Glue second end of the ribbon in place before starting second color. (I used Beacon Fabri-Tac Permanent Adhesive* to glue my ribbon in place.)
  • Using a thin floral wire, wire the small floral stems onto the base of the wreath.
  • Glue larger flowers and leaves onto the wreath over the wire.
  • Add large stemmed butterfly and ribbon to hang.

So many possibilities.

Close Up 7505

The Americana Wreath was sponsored by Smoothfoam™, the crafter’s foam.

Shop Your Fav Brands at Scrapbook.com

*Disclosure:  This blog uses ads and affiliate links.  If you choose to make a purchase using one of the links, I receive a small commission (at no additional cost to you) that helps offset the costs of maintaining this blog.  Thanks for your support!

Join Amazon Kindle Unlimited 30-Day Free Trial

Nick’s Garden Caddy (for Easter)

Nick's Garden Caddy 5510

As soon I walked into Target, a few weeks ago, I was stopped in my tracks by their adorable gardening

supplies for kids.  (in the one spot area)  I am a sucker for cute little things.

Sweet little metal tools and polka dot gardening gloves (oh my) and when I found the plain wood

caddy…  I knew exactly what I wanted to use for Nicholas’ Easter basket.

Nicholas, as you may know, is my gardening buddy.

Wood Caddy 5459 2

Instead of leaving the caddy plain (what fun would that be), I decided to paint and personalize the

caddy with a chalkboard on one side and his name on the other.

(I used Deco Art Urban Ink Stencil, 6″ by 9″, Sea Dogto stencil on his name.)

Back of Nick's Garden Caddy 5538

I went back to Target last week to see if I could find another wood caddy but sadly they were all out.

If you happen to spy one at your Target make sure to grab one, they make wonderful paint caddies.

Wood Caddy with Paint 5462

Along with the Gardening supplies, I added tie-dye chalk (for the chalkboard), jelly bellys, a light up

ball and of course marshmallow peeps.

Nick's Garden Caddy Haul 5493

And… I didn’t forget little brother Warren.  (I picked up all these goodies at Target)

Warren's Easter Bucket 5545

In case your wondering… No this isn’t a sponsored post for Target.  (but I wish it was)


*This post uses Amazon Affiliate links.  I am a Amazon affiliate.

Speckled Eggs for Spring

Speckled Eggs for Spring 4927

Now that I only have a teen-ager at home, we don’t do the dyed eggs anymore.  (he’s no fun)

But… I still needed some soft pastel hued Speckled Eggs for Spring.

Putting my eggs in one basket 4847

So… I grabbed a few of my Smoothfoam Eggs.

I gave the eggs a light sanding to remove the ridge and painted them with a soft chalky finish.

Like the name suggests, these eggs have a smooth finish making them perfect for painting.

The best way to paint an egg 4895

The best way to paint an egg…

Use a small glass or candle votive to hold the egg.  Paint one half of the egg at a time.

Speckled Eggs Close Up 4943

I especially like the look of speckled eggs, so I grabbed an old toothbrush for speckling.

  • Speckled the eggs by lightly rubbing the old toothbrush into brown paint and gently flicking the paint onto the eggs.
  • Make sure to wear an apron to protect your clothing.  Flicking can be quite messy.

This project was created for and sponsored by Smoothfoam™, The Crafters Foam.

How to Make a Mini Rose Topiary

How to Make a Mini Rose Topiary 04034

Maybe it has something to do with my short stature, but, I have always had a thing for

miniatures.  My momma always told me “Good things come in small packages”.

(which I whole-heartily believed)

The Mini Rose Topiary is a project that can be easily adapted to make larger topiaries.

I just happen to like mine mini.

How to make a Mini Rose Topiary

How to make a Mini Rose Topiary

Here’s what I used:                                                                    (*affiliate link)


Directions:

  1. Spray Roses and small wood heart with the Mistable Paint.   Allow plenty of time to dry.
  2. Paint the 2″ Smoothfoam Ball  and the wood dowel with the green acrylic paint.
  3. Poke hole into the end of the 2″ ball.  Squirt a little glue in the hole and insert the painted dowel.
  4. Starting at the top of the ball.  Glue roses, one by one, onto the ball with a fast drying glue until covered.  After the rose ball is formed, you may want to go back and re-mist the flowers for additional coverage.
  5. Cover the wood spool with the ticking material and glue the end in place.  Tie a small piece of crinkle ribbon around the ticking and glue the wood heart on top.
  6. Insert rose topiary into the small wood spool.

TIP:  Try making a topiary using larger Smoothfoam balls and silk flowers inserted into a pail, vase or containers.

The Mini Rose Topiary was created for and sponsored by Smoothfoam™ The Crafter’s Foam.

"Painting

*Disclaimer:  This post uses ads and affiliate links.  If you choose to make a purchase using one of the links, I receive a small commission (at no additional cost to you) that helps offset the costs of maintaining this blog.  Thanks for your support!


You & Me Valentine’s Frame

Valentine's Frame

With Valentine’s Day right around the corner…

I wanted to share a simple little project that’s really quick and easy to put together.

A Valentine’s Frame using the You & Me Collection from Simple Stories.

This cute little frame, from Canvas Corp Brands, is only 6″ x 6″ and I love how versatile

it is to decorate.  The larger section is perfect for a 4″ x 6″ picture and if white’s not your

style it’s available in wood stained.  I added dimension to the frame by adding

cubes made from cardstock behind the “love you lots” and “pail of flowers”.

I dressed it up by gluing on metal corners from Tim Holtz.

Click on the pictures below for ordering information.  (affiliate links)


Disclaimer:   This post uses affiliate links.  If you choose to place an order using one of the links, I will get a small commission that helps maintain the cost of running this blog.  Thanks!

After Christmas Family Fun Day

Christmas 2015 3109

I love getting the chance to be with the family on Christmas.  That in itself is a gift.

But… after all the Christmas Craziness is over, we like to take a day and have a little family fun.

I almost enjoy it more than Christmas.  (it’s more relaxed)

Stephanie and Zach Close Up

In my hometown we have a small town square and parked in the square was this cute decorated

wagon.  I knew it was the perfect spot for a family picture.  I just had to wait until everyone was home.

Nick and Bonnie Close Up

The weather was good.  (a little sunshine and a light snow would of been perfect)

It didn’t take much coaxing for me to get them to go.

They’re all good sports.  (they knew I’d pout if they didn’t.)

Stephanie and Zach 3106

Nativity on the Square

After a few pictures, we headed to the local bowling alley for a Family Bowling Night.

It’d been exactly a year since I’d bowled.

Warren Bowling

The kids even got in on the action.

Nicholas Bowling

Justin Stephanie and Zach Bowling

Bonnie and Warren Bowling

After spending such a nice and perfect day with the family, we woke to a winter ice and sleet storm.

So… today I will be staying in, relaxing and hopefully reading the new book I picked up.

Wishing you all a wonderful and relaxing start to the New Year.


Homespun Rag Ball Ornaments

This year, I wanted to do a small little tree for the dining room.

A simple homespun tree with strung cranberries and hand-made ornaments.

I had grand ideas and a galvanized pail.

But reality hit, a long with the cold and flu, which knocked me out for a week.

It took my creativity level down to a one.

And sad to say… My small little tree didn’t get done.

I did string the cranberries…  (a first for me)

They were so bright and colorful.  I loved the look and took lots of pictures.

After a week or so, the cranberries started getting a mushy.

So… I put them out on the tree in the front yard for the birds to eat.

It looks pretty out there too.

Next time, I’ll make them last minute.

For the Rag Ball Ornaments…

Instead of just wrapping the strips of fabric until it formed a ball,

I made the rag ball using a Smoothfoam 2-Inch ball*.

Supplies used:                     (*affiliate link)

Shop Your Fav Brands at Scrapbook.com

Directions:

  1. Lightly sand the ridge around the ball.
  2. Cut the fabric into 3/4″ strips.
  3. Apply Mod Podge onto the back of the fabric and adhere to the ball.
  4. Continue until the ball is fully covered.
  5. Add an additional coat of Mod Podge over the ball to finish and seal.
  6. Poke a hole on the top of the ball and add a dab or glue into the hole.
  7. Insert twine into the hole to use as the ornament hanger.
  8. Embellish ornament by gluing a bow on top.

Wouldn’t a whole bowl of rag balls would be cute?  (maybe next year)

Shop Amazon Scrapbooking Supplies*

*Disclosure:  This post is sponsored by Smoothfoam and uses ads and affiliate links.  If you choose to make a purchase using one of the links, I receive a small commission (at no additional cost to you) that helps offset the costs of maintaining this blog.  Thanks for your support!

Merry Christmas Gift Bag

Merry Christmas Gift Bag 1186

Make your Christmas Gift Bags a little more special with iron-on letters from Joy.

Merry Christmas Gift Bag Supplies

Start with a plain drawstring bag.  (Mine was from Canvas Corp.)

Replace the drawstring cording on the bag with red and white gingham ribbon and add iron-on

letters in red and neon yellow.  (in person the neon yellow looked lime to me)

Merry Christmas Gift Bag Flat 1140

Glue white lace, rick rack, buttons and a small wreath to the front of the bag.

For a truly personalized gift add a name instead of Merry Christmas.


This project was created for and sponsored by Joy SA.

Simple Felt Christmas Tree Ornament

Felt Christmas Tree

Every year I make a new Christmas Ornament or two.

As I was putting up the Christmas Decorations, I ran across this one.

The simple little felt Christmas Tree was one I made several years ago.

Still one of my favorites.

Put together using fabric glue.  (with a little stuffing inside)

Simple, Simple, Simple…