Spring Watercolor Bouquet Card

Spring Watercolor Bouquet

I love the soft look of a handmade water-colored card.

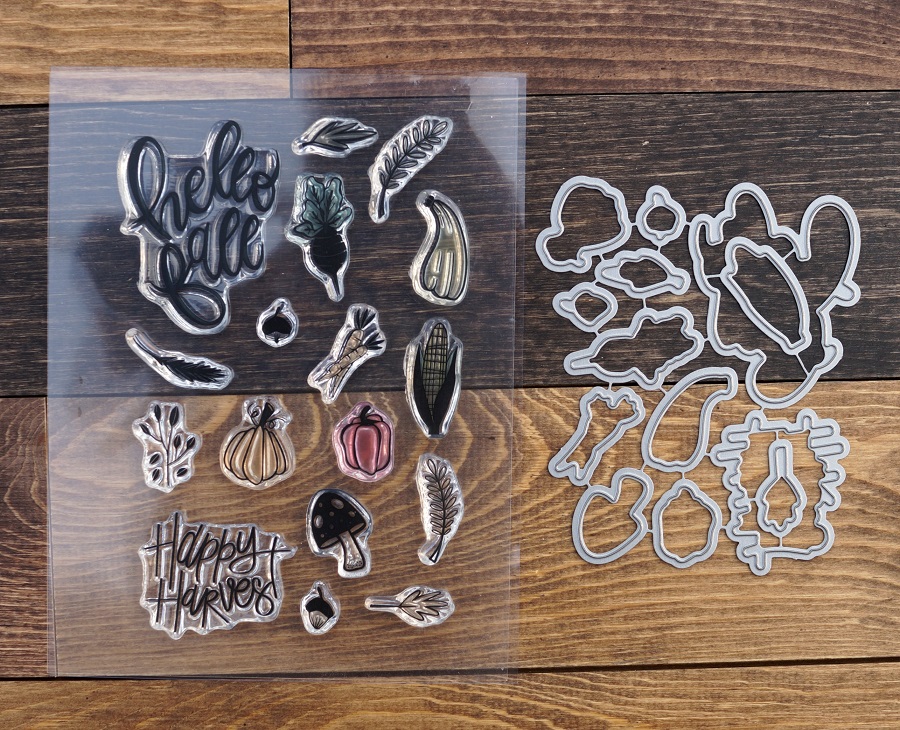
This card was made using the Hello Spring Stamp and Die Set from the Maker’s Movement.

Just for you…I’ve created simple step by step instructions on how to make the card.

How to make a Spring Watercolor Bouquet Card

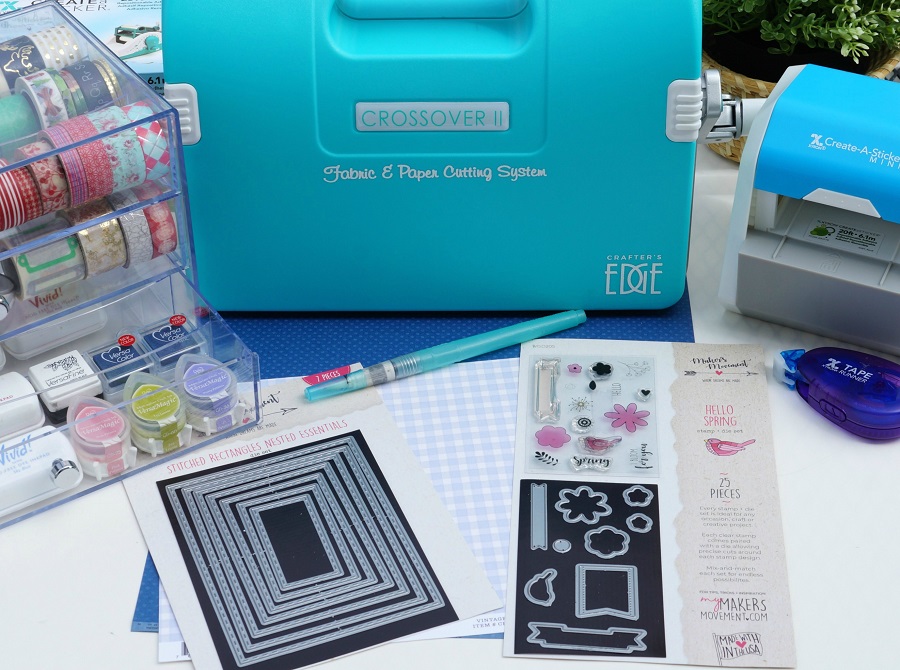
Materials Used:                (*affiliate link)

*Disclosure:  This blog uses ads and affiliate links.  If you choose to make a purchase using one of the links, I receive a small commission (at no additional cost to you) that helps offset the costs of maintaining this blog.  Thanks for your support!

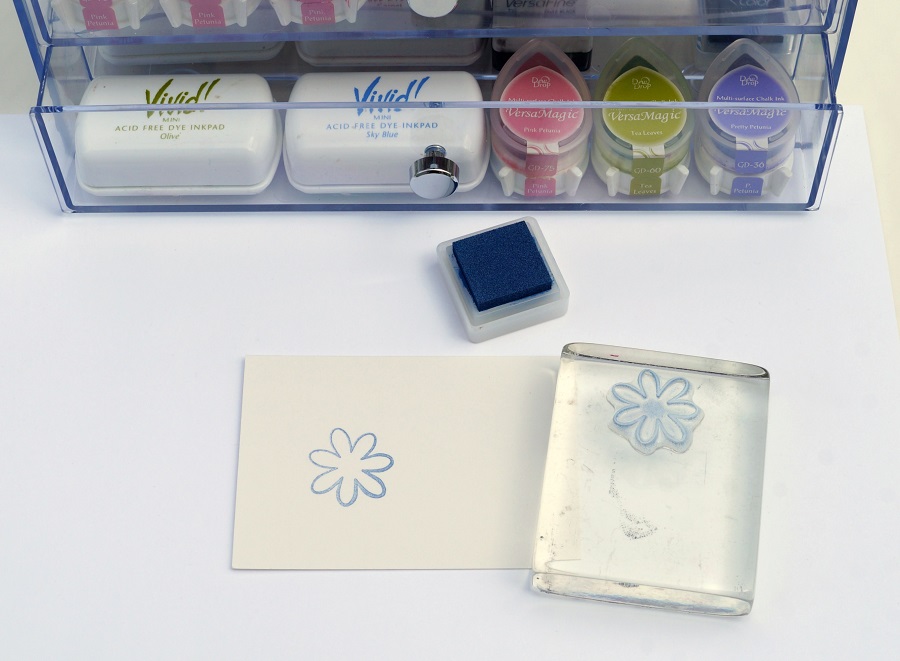
  • In the Hello Spring Stamp and Die Set, there are several stamps that have a coordinating die that matches the stamp.
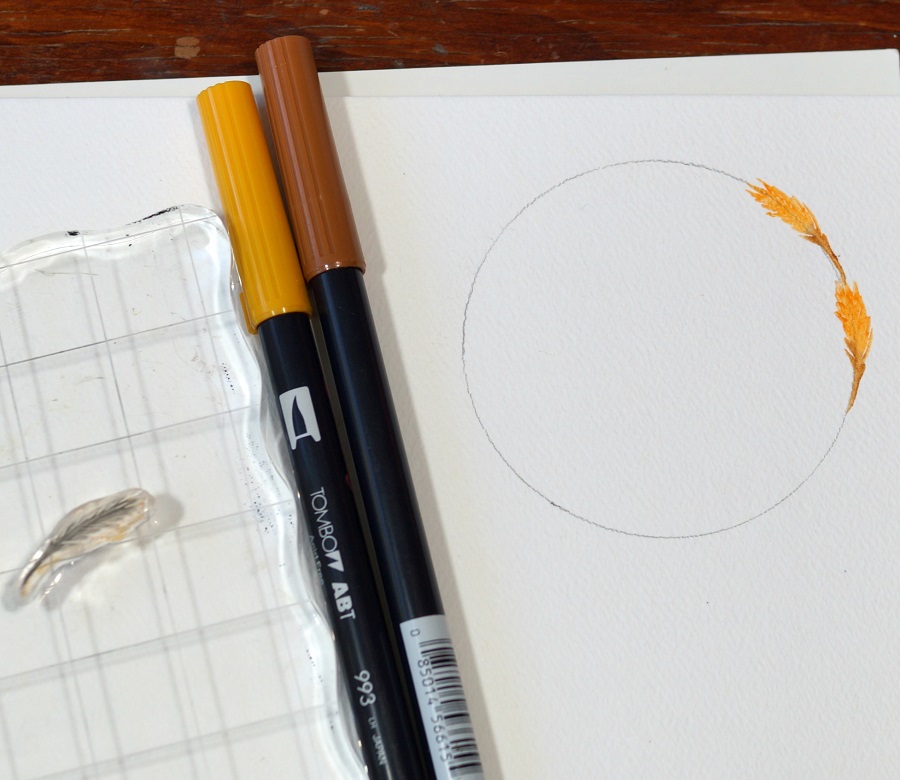
  • Stamp a flower using blue ink onto a piece of watercolor paper.
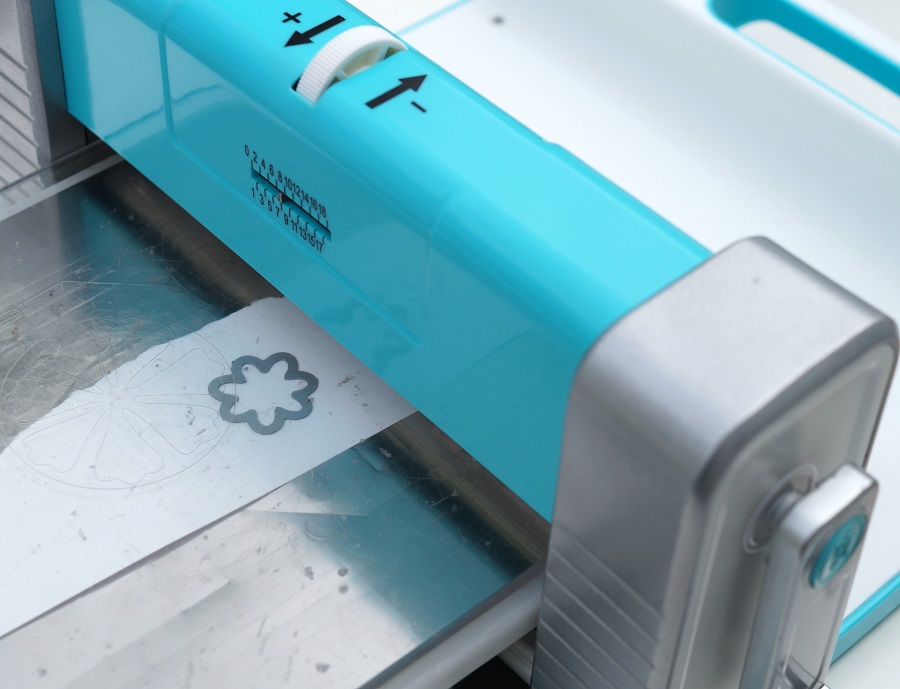
  • Place the mask onto the stamped flower image and stamp a second flower image slightly overlapping the first flower.

  • By using the mask, you create the look of one flower behind the other.

  • Place masks on both of the stamped flower image.  Start adding the background images by stamping small pink flowers, ferns, and leaves.

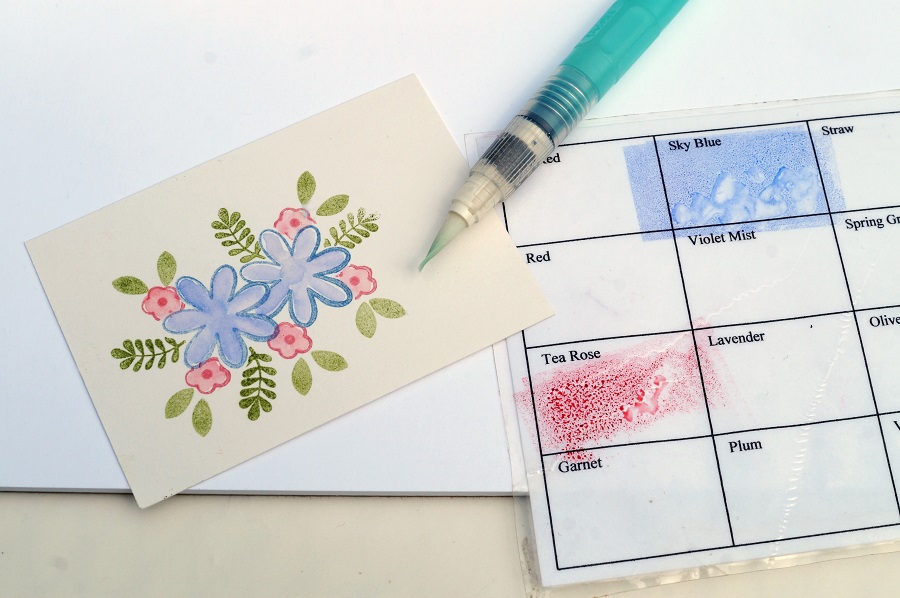
  • Remove masks and watercolor the stamped flowers using a water-brush*.
  • I like to use dye ink to watercolor.  I apply the ink to a simple grid that I printed onto copy paper and laminated.   Dip the wet tip of the water-brush* into the ink and paint your images.  (You can also use a small paintbrush and water.)

  • After the painted images have dried, stamp the center of the flowers using small stamps from the Hello Spring Stamp and Die Set.

  • Cut frames using the Nested Stitched Rectangles Dies.
  • Adhere water-colored image, frames, and layers onto a 4 ½” x 5 ½” blue dot card.
  • Stamp another flower with blue ink onto watercolor paper.  Watercolor the flower as before.  Cut the flower out using the coordinating die and the Crossover II Fabric & Paper Cutting System*.
  • Mount onto the lower right corner of the card using a thin foam mounting square.
  • Stamp “Hello” onto a small white banner cut from the small banner die found in the Hello Spring set.  Trim banner to size and adhere under the raised flower.
  • Add a simple sheer ribbon to the top of the card to finish.

*FTC Disclosure… “This is a sponsored post for The Maker’s Movement.  I have been provided product and compensation in exchange for my creative ideas.  The views and opinions are my own.”

Save

A Welcome Home Card

Home is the place where you belong.

As we stay home and shelter in place, home becomes such so much more.

A safe haven, a place to work, a place to play, and a place to be.

I can’t wait until the day when I can welcome friends and family back into my home.

I can’t wait to hug my kids and grandsons.

Whatever your meaning of home, I hope you like this Welcome Home card made with

the Welcome Home Stamp and Die Set from the Maker’s Movement.

This heartfelt set is perfect for a new baby, housewarming, homecoming, and more.

The Welcome Home Card was made using the Gingham Garden paper collection from My Mind’s Eye and various metal dies from The Maker’s Movement.

Crafter Tip:  The metal dies in the kit are all connected when you get them. One of the first things I do when I start snipping the dies apart is to cut a piece of thin Magnetic Craft Sheet* and adhere it to the packaging.  It’s a great place to put your small dies so you won’t lose them.

Supplies Used:           (*affiliate link)

*Disclosure:  This blog uses ads and affiliate links.  If you choose to make a purchase using one of the links, I receive a small commission (at no additional cost to you) that helps offset the costs of maintaining this blog.  Thanks for your support!

This is a breakdown of all the die cut and stamped pieces used to create the house.

  • The shutters were made by stamping two additional doors and cutting the bottom panel from the left side of the door.  (the right side has the door knob, and I didn’t want to include that)

  • The bushes were made using the small cloud die.
  • For added dimension, the clouds were popped up using thin foam mounting squares.

*FTC Disclosure… “This is a sponsored post for The Maker’s Movement.  I have been provided product and compensation in exchange for my creative ideas.  The views and opinions are my own.”

Bloom with Grace Card

How to Make Soft and Delicate Looking Paper Roses…

Bloom with Grace…A sweet and simple card using the In Full Bloom Stamp & Die Set

from the Maker’s Movement and the Spring Farmhouse paper from Simple Stories.

A great card for feminine Birthdays or Graduations

or anytime you want to send a little encouragement.

Bloom with Grace Products Used:                                  (*affiliate link)

*Disclosure:  This blog uses ads and affiliate links.  If you choose to make a purchase using one of the links, I receive a small commission (at no additional cost to you) that helps offset the costs of maintaining this blog.  Thanks for your support!

To Create a Soft Realistic Looking Tea Rose…

  • Place the flower cut out on the craft molding mat*.  (approximately the thickness of a computer mouse pad)
  • Using a large ball stylus tool*, press down on the center of the shape until the paper starts to bow.  This helps the paper when you start to manipulate the shape.

  • Start at the outside end of the flower and use the reverse grip tweezers* to start slowly rolling the spiral.

  • When your finished rolling, glue the bottom tab to the rose shape to hold the flower in place.

  • Use the reverse grip tweezers* to grasp the side of the flower and roll it back to form the natural curve of a petal.

It’s really quick and easy to make these delicate looking roses.  

To finish the card…

  • Die-cut a  vase using the Spring Farmhouse scrapbook paper.
  • Assemble a card base using  coordinating decorative scrapbook paper.
  • Glue the small roses over the top of the vase.
  • Add stamped leaves and the die-cut words “bloom” .
  • Finish with a small cream tag with the words “with grace” stamped in green.

Maker's Movement

*FTC Disclosure… “This is a sponsored post.  I have been provided product and compensation in exchange for my creative ideas.  The views and opinions are my own.”

Save

Save

How to make an Egg-stra Special Shaker Tag

An Eggstra Special Shaker Tag-Sue's Creative Workshop www.sueeldred.com 8718

How to make a Egg-stra Special Shaker Tag

An Eggstra Special Shaker Tag-Sue's Creative Workshop www.sueeldred.com 8494

Supplies Used on the Egg-stra Special Shaker Tag:                   (*affiliate link)

Disclosure:  This blog uses affiliate links.  If you choose to make a purchase using one of the links, I receive a small commission (at no additional cost to you) that helps offset the costs of maintaining this blog.  Thanks for your support!

An Eggstra Special Shaker Tag-Sue's Creative Workshop www.sueeldred.com 8599

  • Stamp the chick image with black ink onto white cardstock.
  • Stamping on non-porous white cardstock helps the markers blend easier.

An Eggstra Special Shaker Tag-Sue's Creative Workshop www.sueeldred.com 8631

  • Color in the edge of the chick with the light ochre marker.  Use the pale yellow marker to blend and fill in the rest of the chick.

An Eggstra Special Shaker Tag-Sue's Creative Workshop www.sueeldred.com 8637

An Eggstra Special Shaker Tag-Sue's Creative Workshop www.sueeldred.com 8648

An Eggstra Special Shaker Tag-Sue's Creative Workshop www.sueeldred.com 8649

Counting the Nesting Tag dies as 6 being the largest and 1 being the smallest…

  • Using the largest (#6) Nesting Tag Die, and the 4th largest Nesting Tag Die, center and tape the two dies together to create a tag frame.

An Eggstra Special Shaker Tag-Sue's Creative Workshop www.sueeldred.com 8685

Shaker Tag pieces:

  • Cut a large (#6) “blue skies” tag from the largest nested tag die.
  • Cut a large (#6) green dot tag.  Cut a wavy line die on the bottom of the tag using a wavy line die.  (From the MSD209  Some Bunny Loves You Stamp and Die Set.)
  • Adhere bottom of the wavy cut tag onto the blue skies tag.
  • Cut a acetate tag from the 5th largest nesting tag die.
  • Cut a large purple gingham egg, a floral cracked egg and several small eggs from coordinating scrapbook paper.

An Eggstra Special Shaker Tag-Sue's Creative Workshop www.sueeldred.com 8695

  • On the back of the tag frame, add a thin line of adhesive around the inside opening of the tag.
  • Remove the protective coating from both sides of the acetate and place it on top of the adhesive.
  • Cut thin strips from the double-sided foam sheets.  Remove one side of the protective layer from the foam strips and place around the inside edges of the tag.
  • Add shaker bits inside tag.
  • Remove the second side of the protective layer from the foam strips and adhere to the blue skies layer on the inside of the tag.

An Eggstra Special Shaker Tag-Sue's Creative Workshop www.sueeldred.com 8739

  • Glue the small floral cracked half egg onto purple gingham egg.
  • Add foam to the back of chick and egg and add to front of the card.
  • Punch a hole on the top of the tag using the crop-a-dile, add purple and white twine.
  • Adhere ribbon bow to top of the tag.

Maker's Movement

*FTC Disclosure… “This is a sponsored post.  I have been provided product and compensation in exchange for my creative ideas.  The views and opinions are my own.”

Some Bunny Loves You Spring Card

How to make a “Some Bunny Loves You” Spring Card

Send a little Love and Encouragement to someone special using the Some Bunny Loves You

Stamp and Die Set from The Maker’s Movement.

*FTC Disclosure… “This is a sponsored post.  I have been provided product and compensation in exchange for my creative ideas.  The views and opinions are my own.”

Supplies used to make the card:                                     (*affiliate links)

Disclosure:  This blog uses affiliate links.  If you choose to make a purchase using one of the links, I receive a small commission (at no additional cost to you) that helps offset the costs of maintaining this blog.  Thanks for your support!

Directions:

  • Stamp the bunny image onto a 2″ x 3″ piece of white heavyweight acrylic paper.
  • Start coloring the edges of the bunny with the saddle brown marker and blend the colors together using the light sand marker.  ( Stamping on non-porous white card-stock helps the markers blend easier.)
  • Highlight the bunny cheeks and inside of the ears with the baby pink marker.

  • Stamp a “heart balloon” and “small banner” onto a piece of  “Sunday dress” (purple) scrapbook paper.  Stamp the word “hugs” in the center of the balloon.  Stamp the words “hopping you all the best” centered inside the banner.
  • Align stamped heart image with the heart die and cut using the Crossover II*.
  • Cut the banner image using scissors.
  • Cut a 2 ½” x 3 ½” piece of “baby bunnies” (small flowers) scrapbook paper.  Cut the top of the paper with the wavy die and the Crossover II*
  • Adhere the small flowers layer onto  a 3 ½” x 4 ¾” piece of “blue skies” scrapbook paper.

  • Cut a 2 ¾” x 3 ¾”striped layer and round the corners of the layer using a rounded corner punch*.  Adhere onto the small layer onto the previous layers.
  • Add 3-D foam mounting squares onto the back of the bunny and balloon and adhere to the front of the striped layer.  Adhere the small banner using the tape runner to the lower right section of the striped layer (overhanging the edge).
  • Glue small hearts onto the front of the card using craft glue.

  • Adhere the layers onto a thin turquoise layer and then onto a 4″ x 5 ¼” piece of “Sunday dress” (purple gingham) scrapbook paper.  Adhere onto a 4 ¼” x 5 ½” white card-stock card folded vertically.  Tie a sheer ribbon around the top of the card.


Special Delivery Envelope

Christmas Special Delivery Envelope

As promised, I want to share with you a few more samples made with the NEW RELEASE

Tammy Tutterow Stamps and Dies from The Maker’s Movement.

The first thing that came to mind when I looked at the Special Delivery Card Kit was Valentines.

It also makes a super cute Christmas Envelope perfect for stuffing a Holiday gift card.

Who doesn’t want a little extra “love”?

MOD274 Special Delivery Card Kit

Special Delivery Love Envelope for Valentine’s Day

The top flap is creased to fold.  It makes the cutest little envelope to tuck in a sweet note.

The journaling card die that fits inside the envelope makes it the perfect embellishment

for Scrapbooking or Cardmaking.

When open the envelope measures 3 3/4″ x 4 3/4″.

The back of the Special Delivery Love Envelope.

How cute is the postage stamp die?

A little more LOVE…

I made a couple tags using the Nested Rounded Tags and the Sweet Petites Sentiment Stamps.

I love both of these sets.  Great for any time of the year!


MOD279 Nested Round Tags       MSD213 Sweet Petites Stamps

*FTC Disclosure… “This is a sponsored post.  I have been provided product and compensation in exchange for my creative ideas.  The views and opinions are my own.”

New Release Stamps and Dies from the Maker’s Movement

I’m taking a break from my usual Christmas crafting craziness to share with you a few

of the New Release dies and stamps by Tammy Tutterow and The Maker’s Movement.

I recently got the opportunity to play with these new dies and stamps and I’m in love.

First up… The Library Card Die Set

This was a fun set to play with.  The Library Card Set makes into a great tag or

journaling embellishment for a scrapbook page.

I think the pull-out card would look cute with a small picture.


  • MOD277 Library Card Set

I love that the Library Card set has three sizes of labels that nest perfectly.

Square Nested Tag Die Set and Sweet Petite Posey Set

Look at all the details of the Square Nested Tag Die Set.  (love the hole reinforcement covers)

Used along with the Petite Posey Die Set, you have the making of some sweet little tags.

I inked the petals and added dimension to the flowers using a large ball stylus and a foam mat.


Used on the tags:

  • MOD278 Nested Box Tags
  • MOD275 Petite Posey Set
  • MSD213 Sweet Petite Sentiment Stamps

Sweet Petite Stamp and Die Set

If I had to pick a favorite from Tammy Tutterow’s New Release Collection, the

MSD213 Sweet Petite Stamp and Die Set might be my favorite.


So easy to put together a quick card or tag with this set.

Mini File Folder Die Set

The set was created with memory keeping and planners in mind.

I like to be different.  I used the mini folders as the inside of a mini album.

  • MOS222 Planner Dates Stamp Set

I used the days of the week stamps from the Planner Dates Stamp Set on the file labels.

The mini album cover was made from mat board that I covered with scrapbook paper.

I added the folders to the inside of the album with twine wrapped around the outside of

the spine.

    ← Look at the cute torn page.

  • MOD276 Mini File Folder Die Set

Next week I’ll have a few more samples from the collection to share with you.

Make sure to check out all the dies and stamps from the Maker’s Movement.

*FTC Disclosure… “This is a sponsored post.  I have been provided product and compensation in exchange for my creative ideas.  The views and opinions are my own.”

Happy Harvest Wreath Card

Happy Harvest Wreath Card

Sometimes when I’m creating a card…the process is easy and it works out the first time.

Most of the time it takes a couple of tries to get the look I want.

Yesterday, was no exception.

I was playing with my new Hello Fall Stamp and Die Set from Maker’s Movement,

trying to come up with a quick and simple card to share.

I’ll be honest, It took me all afternoon to come up with this one card.

I had an image in my mind of what I wanted the card to look like and I wasn’t quite getting it.

Usually when it comes to creating fall cards, I use traditional Autumn colors.

After setting the finish card down and coming back to it a couple times…

I decided to change the background to something softer.

Not my usual fall colors, but, I like it much better.  (I hope you do too.)

Happy Harvest Wreath Card Supplies Used:

Shop Your Fav Brands at Scrapbook.com

*Disclosure… This blog uses ads and affiliate links.  If you choose to make a purchase using one of the links, I receive a small commission (at no additional cost to you) that helps offset the costs of maintaining this blog.  Thanks for your support!

  • Draw a light circle using a pencil on a piece of watercolor paper.
  • Using my tombow markers I colored directly onto the clear acrylic stamp.
  • Center the small wheat stamp on the circle line and stamp.
  • Continue until the circle is complete.
  • Cut wreath out with a bigger circle.

  • Stamp the words “Happy Harvest” and cut out using the matching die.  Using thin foam mounting squares to raise the words, mount “Happy Harvest” onto the corner of the wreath.
  • Create greenery by coloring onto the small leaf stamp using a darker green marker and coloring in with a lighter marker.  Cut around image and layer under the “Happy Harvest” words.
  • Add additional soft layers and ribbon to complete the look.

*FTC Disclosure… “This is a sponsored post.  I have been provided product and compensation in exchange for my creative ideas.  The views and opinions are my own.”

Creepin’ it Real Halloween Card

Creepin’ it Real…

When it comes to Halloween, I’m not into scary and gore.  (I’m too big of a chicken.)

I’m all about the C-A-N-D-Y!

I love Halloween Parades and seeing the little kids in their cute costumes.

I’m into “Halloween cute”.

The Trick or Treat Stamp Set and Die Set from Maker’s Movement is “Halloween Cute”.  

Sweet little Halloween characters with just the right amount of attitude.

*Disclosure… “This is a sponsored post.  I have been provided product and compensation in exchange for my creative ideas.  The views and opinions are my own.”

Trick of Treat Yo’self Treat Box

I made a couple extra of the Halloween cut outs to make a few treat boxes.

FYI…the Kraft Paper Window Boxes are from Clear Bags.

Shop Your Fav Brands at Scrapbook.com

*Disclosure… This blog uses ads and affiliate links.  If you choose to make a purchase using one of the links, I receive a small commission (at no additional cost to you) that helps offset the costs of maintaining this blog.  Thanks for your support!

How to make a Happy Haunts Pop Up Card

Happy Haunts Pop-Up Card

Add a little dimension to your Halloween season with this sweet and simple pop up card.

The Happy Haunts stamp and die set from Maker’s Movement.

The stamp set comes with three adorable pumpkin stamps and 12 spooky and sweet faces

to match any Halloween mood.  The die set comes with a whimsical Halloween neighborhood,

a cute little bat and three perfect pumpkin dies to cut out your stamped pumpkins.

A HALLOWEEN STAMP AND DIE SET THIS FUN DESERVES A PLAYFUL CARD. 

*Disclosure… “This is a sponsored post.  I have been provided product and compensation in exchange for my creative ideas.  The views and opinions are my own.”

Happy Haunts Pop-Up Supplies Used:

Shop Your Fav Brands at Scrapbook.com

*Disclosure… This blog uses ads and affiliate links.  If you choose to make a purchase using one of the links, I receive a small commission (at no additional cost to you) that helps offset the costs of maintaining this blog.  Thanks for your support!

How to make a Happy Haunts Pop Up Card:

  • First, pick out some fun patterned paper.  There are so many cute patterns available to choose from it really doesn’t matter if it’s the same as mine.
  • Stamp your pumpkins on orange patterned paper.  If your paper is thin, run the strip of orange paper through the Xyron Create a Sticker Mini* and place it onto black cardstock.

  • One pumpkin stamp has a hole in the center with space to add a face.  Perfect for stamping multiples.
  • You’ll need to stamp 7 pumpkins.

  • Cut two 2 1/2″ x 6 strips of black patterned paper.
  • Tip:  Run both pieces of paper, pattern side up, through the Xyron Create a Sticker Mini*  to add adhesive to the back of the paper.  This is really helpful when die-cutting intricate shapes.
  • Adhere one strip onto a piece of black cardstock before die-cutting.  (this will be used for the inside of card.)
  • Die-cut both strips of paper using the house die.  (one is a sticker for the front of the card.)
  • Add thin foam mounting squares* to the back of the die-cut houses with the black cardstock.  (Tip:  cut a few foam mounting squares in half before applying.)

I couldn’t find the perfect night sky background for my card so I created my own.  

  • Cut a 3 3/4″ x 5 3/4″ piece of watercolor paper.
  • Using an ink applicator, rub blue dye ink onto the surface of the paper.
  • Add a few swirls of white ink onto the paper.
  • Using a mini spray bottle, lightly mist the paper with water.  The water will allow the inks to blend leaving a soft speckled appearance on the paper.
  • Dry with hair dryer.

If you have the perfect background paper, you can eliminate these steps.↑

  • Cut a piece of green patterned paper 5 3/4″ x 7 1/2″ and fold in half lengthwise.
  • Cut a piece of patterned paper (mine was woodgrain) 3 3/4″ x 5 3/4″.  Adhere this paper onto one half of the green patterned paper.
  • On the outside folded edge, make a pencil mark at 1 1/4″ and 4 1/2″.  (see diagram)
  • Cut a 3/4″ line up on each measurement.
  • Score and fold paper between cuts.  (Use a bone folder for crisper folds.)

  • Open card and push folded and scored section into middle of the card.

  • Lay the neighborhood die-cut onto your blue background.  Use a pencil to trace the bottom swirl of the die-cut.
  • Cut paper along pencil line.
  • Adhere the cut top of the blue background paper onto the top of the brown woodgrain paper on the inside of your card.
  • Using the house die-cut with the black cardstock and foam mounting squares, adhere the neighborhood over the edge of the blue background paper.

  • Add three pumpkins to the front of the center pop-up.  On the middle pumpkin add a foam mounting square for extra dimension.
  • Adhere a couple pumpkins to the background.

  • Add black die-cut bat with a foam mounting square to the sky background.
  • Add an extra pumpkin or two and stamp the words “Trick or Treat” to finish off the inside.
  • Cut a piece of black cardstock 6″ x 7 3/4″.  Fold in half to create outside card.
  • Center and adhere the pop-up section into the center of the black card.  Adhere one half section at a time.)

  • Decorate front of the card similar to the inside of the card.

For a completely different look, a simple water colored card made with the same pumpkins.

Shop Amazon Scrapbooking Supplies*