Lucky Day Frame

St. Patricks Day Frame 2722

There’s something about turning the calendar page to March that makes me feel happy.

Even though we got snow on March 1rst and ice on March 3rd, I can’t help but feel

that Spring’s just right around the corner.  And… that really makes me happy!

I don’t usually decorate for St. Patrick’s Day…

but after getting this green bordered frame from Deflecto and seeing this “Lucky Day”

collection from Authentique Paper, I was inspired.

Lucky Frame Corner 3118  Flower Close up

I did a little fussy cutting with the hat and shamrocks and adhered them directly onto the front of

the frame.  I also water-colored directly onto the cream paper flower to make it match the flowers

on the scrapbook paper.

“This is a sponsored post. As a member of the Deflecto Design Team I have been provided product in exchange for my creative ideas, views and opinions.”

Fave Crafts 2015 Best Blogger Contest: Baby Girl Tag

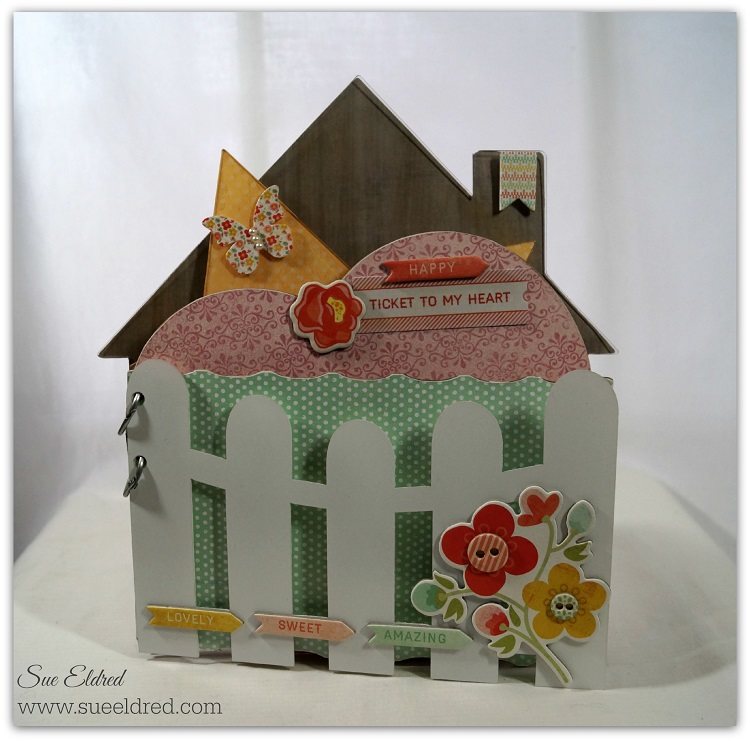
This sweet “Baby Girl” tag was made with the products I received after the

2015 Blogger Networking Event at the Craft and Hobby Association Show in January.

The tag is also my submission into Fave Crafts Best Craft Blogger Contest 2015.

(Needless to say, I’ll be shamelessly asking you for your vote at the end of the post.)

Little B Baby Tag 1488 2

Baby Girl Tag

Designed by Sue Eldred

Little B: (littlebllc.com)

  • 100366 Honeycomb Punch
  • 100434 Silver Foil Pink Harlequin Decorative Tape
  • 100418 Pull Flowers Chrysanthemum
  • 100146 Footprints Dimensional Sticker Embellishments
  • 100395 Party Dies

Additional Supplies:

  • Large White Tag 3 1/2” x 6 1/4”
  • Cardstock: White, Pink
  • Large White Button (Buttons Galore and More)
  • Fabri Tac Adhesive (Beacon Adhesives)
  • Tape Runner
  • Thin 3-D Foam Squares (Scrapbook Adhesives by 3L)
  • 5/16 Hole Punch
  • Silver Ribbon (Offray)
  • Computer Generated Font.

Directions:

  1. Punch a 3 1/2” pink cardstock border using the Honeycomb punch.
  2. Add a 3 1/2” strip of decorative tape onto a piece of white cardstock. Trim a very thin border on each side of the tape. Add decorative trim tape piece onto center of the Honeycomb border.
  3. Adhere border on the bottom of the tag.
  4. Cut 12” from the White Pull flowers trim. Fold trim in half and pull strings as directed to create flower.
  5. Add small pink feet stickers to a large white button. Glue embellished button to the center of the flower. Glue flower onto center of the tag.
  6. Create a pink banner from the Party Dies. Add to top of the top using thin foam mounting squares.
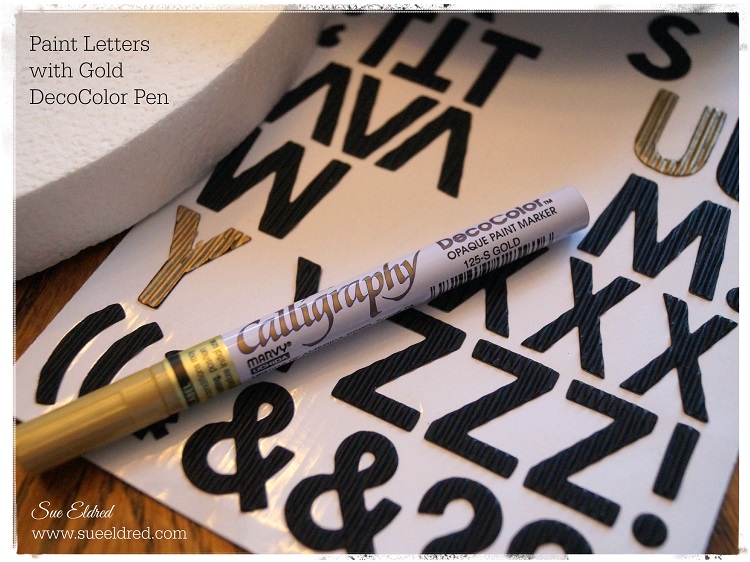
  7. Print out the letters: B A B Y using a computer and printer onto white cardstock.
  8. Punch out each letter using a 5/16th hole punch. Add the letters onto the banner with small thin mounting squares.
  9. Tie top of the tag with silver ribbon.

Little B LLC Baby Girl Tag

Confession:  I’m not sure if you noticed or not… 

I did not use a plain white strip under the washi tape on the first picture on this post.

You can see the honeycomb underneath.  I like it better with the white strip.  It’s a little crisper.

I tried retaking the picture of the tag over 100 times.  That one was my favorite.  (so I stuck with it)

Best Blogger Craft 2015

After the favecrafts 2015 Blogger Networking Event at the Craft and Hobby Association Show in January, bloggers received a sample of new products from participating sponsors of that party.  The projects created from these brands and samples are simply amazing! You’re getting the first look at these exclusive projects made with new products hot in the craft market.

They need your help determining which project to crown Best Blogger Craft of 2015! You can only vote once. Voting ends March 10th, 2015 midnight CST.

I submitted this tag as part of Fave Crafts Favorite Blogger Contest.

Please check out all the entries.  (feel free to “vote” for me, if you’d like)

Make a Lucky Hat for St. Patrick’s Day

Feeling a little Irish? 

Need a Lucky Hat for St. Paddy’s Day?

Using only a few Smoothfoam shapes you can make yourself a Lucky Hat centerpiece

in no time.  A fun centerpiece for all your “GREEN” celebrations.

Here’s what you’ll need:                                                                                    (*affiliate link)

Directions:

  1. Paint 8″ Half Ball and 10″ Disc with English Ivy paint.
  2. Repaint Disc and Half Ball with Kelly Green paint, allowing some of the darker paint to show through.
  3. Paint sides of 8″ Disc with Black paint.
  4. Glue 8″ Disc onto the 8″ Half Ball.
  5. Center and glue onto the  10″ Disc.
  6. For a shiny finish, paint the entire piece with Mod Podge.
  7. To create gold letters, paint the chipboard letters with a gold paint pen.

Have a great day and may the “Luck of the Irish” be with you!

 
Click on the pictures for product ordering through Amazon*.

Disclosure:  This post uses affiliate links.  If you choose to make a purchase using one of the links, I receive a small commission that helps offset the cost of maintain this site.  Thanks for your Support!

This project was created for and sponsored by Smoothfoam.

Shop Amazon Scrapbooking Supplies*


Little Black Dress Mixable Medley Album

Clear Scraps LBD new album

When it comes to scrapbooking, I have a lot of stuff.

I have so much stuff… I should never buy another sheet of scrapbook paper.  (but I will )

I love paper.  I love pretty patterns.  I love mini albums.  (so much to love)

Lately, I’ve been on a quest to use more of the stuff I have on hand.

So, when it came to making this Mixable Medley Album for Clear Scraps, I pulled

from one of my favorite collections, the “Little Black Dress” collection from Basic Grey.

The album also uses Clear Scraps New Oval Fancy Mirror Frame.

To make the mirror stand out and give the album a vintage feel, I sponged “Spiced Chai”

Stazon Ink onto the back of the acrylic cover leaving the center of the mirror clear.

LBD Album 2457   LBD Album 2458

This project was created for and sponsored by Clear Scraps.

Captivating Squares

Captivating Squares 1682

I will be teaching a new card class in April at The Paper Forest called Captivating Squares.

In the class we will be using Spellbinders dies and Kaisercraft’s Rustic Harmony Collection

to make these four cards.

The Paper Forest in Washington, IL

Saturday, April 18th from 1:00-3:00 p.m.

Cost of the Class:  $22.00

Students Bring:  tape runner, scissors, foam mounting squares, Vintage Photo Ink, Ink Applicator

Contact The Paper Forest at 309-745-3440 to sign up.

Live Laugh Love 1714 Live a Beautiful Life 1706

Enjoy The Little Things in Life 1718 Love Card 2085

I used Spellbinders Captivating Squares* on these cards.

Click on picture for ordering information from Amazon.*

Disclosure:  I am a Amazon Affiliate.

Home Sweet Home

House Mixable 1580

A quick share today to show you the Mini Album I made using Clear Scraps New Mixable Home Album.

My “Home Sweet Home” album is a 8″ x 9″ Acrylic & Chipboard mixed Album.

I used chipboard stickers from My Mind’s Eye “Sweetest Thing” collection and various scrapbook papers

to decorate my album.

House Mixable Close Up 1582

My favorite part of the album is the fence.

I love the look of a white picket fence so I sprayed the clear acrylic with white spray

paint.  Now I have a white picket fence.

(This project was created for and sponsored by Clear Scraps.)

Don’t Forget to SMILE Today!

Don't forget to smile 2243

A fun little project to brighten your day.

Along with the Art Play Paintables that I used for the ADORNit Blog Hog,

I also received some great wood pieces, a pad of Blender Basics and some fun Art Play Prints.

Adorn It Blender Basics 2139

Shop Your Fav Brands at Scrapbook.com

To make the project:

  1. Paint the edges of the wood pieces with black acrylic paint.
  2. Glue paper from the Blender Basics pad onto the wood pieces using Mono Adhesive glue.
  3. Trim around the shapes with a craft knife and lightly sand the edges with a sanding block.
  4. Distress the edges with Vintage Photo Distress Ink and a Ink Applicator.
  5. Glue the two pieces together.
  6. Cut around the inner circle from the “Smile” Art Play Prints and glue to the center.

Have a great day and don’t forget to SMILE!

This project was created by me, materials provided by ADORNit. 

*Disclaimer:  This blog uses ads and affiliate links.  If you choose to make a purchase using one of the links, I receive a small commission (at no additional cost to you) that helps offset the costs of maintaining this blog.  Thanks for your support!

Shop Amazon Scrapbooking Supplies*

ADORNit Blog Hop and Giveaway

Have you seen ADORNit’s Art Play Paintables Collection by Lindsay Ostrom?

These papers are a card makers dream.

All these wonderful images without having to buy a ton of stamps.

The papers are perfect for coloring with color pencils, markers or painting

with water colors or inks.

I like to watercolor with my inks and markers and a waterbrush.

If my inks have a flexible lid, I squeeze color into the lid and use that as my palette.

If not, I dab the ink onto a non-porous surface and paint away.

(These cards were created for and sponsored by Adorn It.)

How to Make a Snowflake Hair Bow

Snowflake Bow 2047

To make my Snowflake Hair Bow you’ll need:

Snowflake Box Supplies

Supplies Needed:

Putting together the pieces 2070

Directions:

  1. Cut four 4″ pieces of 7/8″ Tranquil Blue Ribbon and four 4″ pieces of the Arabesque Ribbon.
  2. Remove wire from the Arabesque ribbon.  (white sheer)
  3. Cut four 3 1/2″ pieces of 3/8″ Tranquil Blue Ribbon and four 3 1/2″ pieces of Navy Satin.
  4. Thread needle and thread, tie with a knot leaving a long tail.
  5. Lay the 4″ white sheer ribbon over the 7/8″ Tranquil Blue Ribbon, fold the ribbon in half and stitch together with a simple running stitch.
  6. Lay the 3 1/2″ Navy Ribbon over the 3/8″ Tranquil Blue ribbon, fold the ribbon in half and add with a simple running stitch to the first section of ribbon.
  7. Continue stitching ribbon sections together.  (as shown in the picture above)
  8. Gather both ends of the thread, pull the ribbon together and tie with a knot.
  9. Cut eight 4″ of Arabesque sheer ribbon.  Remove wire from ribbon.
  10. Stitch ribbon together like in previous steps.  (see steps 6-8)
  11. Glue the two ribbon sections together with Fabri Tac glue.  (see picture below)
  12. Lightly apply blue ink onto white snowflake brad.  Wipe off excess ink.
  13. Remove prongs from the back of the snowflake brad and glue onto the white button.
  14. Glue button to the center of the bow.
  15. Glue or sew bow onto the metal barrette base.

Putting the pieces together 2038

Offray Logo

I would like to thank Offray Ribbon for generously providing the ribbon used in this project.

This project uses Amazon Affiliate links.  If you choose to purchase an item from Amazon from this link, I receive a small commission that helps defray the cost of running this blog.

Valentine’s Challenge

CCB Valentine's Challenge 1862

I’m taking part in a special Valentine’s Challenge to make a Valentine and send it

to someone as an unexpected surprise.  (Hmmm… Who should I send it too?)

My Valentine is a simple card that uses product from Canvas Corps Brands and Spellbinders.

Have a great day!   I’m off to make more Valentine’s.

Disclosure:  This project was created for and sponsored by Canvas Corp Brands.