How to Make a Snowflake Hair Bow

Snowflake Bow 2047

To make my Snowflake Hair Bow you’ll need:

Snowflake Box Supplies

Supplies Needed:

Putting together the pieces 2070

Directions:

  1. Cut four 4″ pieces of 7/8″ Tranquil Blue Ribbon and four 4″ pieces of the Arabesque Ribbon.
  2. Remove wire from the Arabesque ribbon.  (white sheer)
  3. Cut four 3 1/2″ pieces of 3/8″ Tranquil Blue Ribbon and four 3 1/2″ pieces of Navy Satin.
  4. Thread needle and thread, tie with a knot leaving a long tail.
  5. Lay the 4″ white sheer ribbon over the 7/8″ Tranquil Blue Ribbon, fold the ribbon in half and stitch together with a simple running stitch.
  6. Lay the 3 1/2″ Navy Ribbon over the 3/8″ Tranquil Blue ribbon, fold the ribbon in half and add with a simple running stitch to the first section of ribbon.
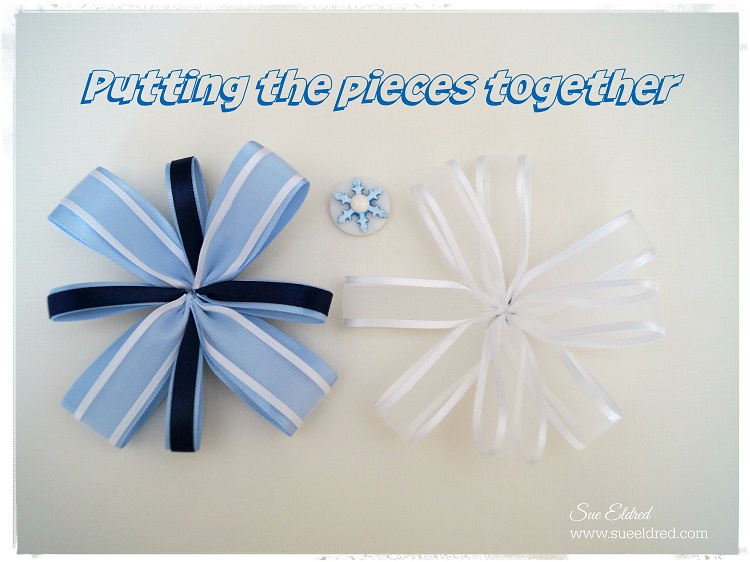
  7. Continue stitching ribbon sections together.  (as shown in the picture above)
  8. Gather both ends of the thread, pull the ribbon together and tie with a knot.
  9. Cut eight 4″ of Arabesque sheer ribbon.  Remove wire from ribbon.
  10. Stitch ribbon together like in previous steps.  (see steps 6-8)
  11. Glue the two ribbon sections together with Fabri Tac glue.  (see picture below)
  12. Lightly apply blue ink onto white snowflake brad.  Wipe off excess ink.
  13. Remove prongs from the back of the snowflake brad and glue onto the white button.
  14. Glue button to the center of the bow.
  15. Glue or sew bow onto the metal barrette base.

Putting the pieces together 2038

Offray Logo

I would like to thank Offray Ribbon for generously providing the ribbon used in this project.

This project uses Amazon Affiliate links.  If you choose to purchase an item from Amazon from this link, I receive a small commission that helps defray the cost of running this blog.

Valentine’s Challenge

CCB Valentine's Challenge 1862

I’m taking part in a special Valentine’s Challenge to make a Valentine and send it

to someone as an unexpected surprise.  (Hmmm… Who should I send it too?)

My Valentine is a simple card that uses product from Canvas Corps Brands and Spellbinders.

Have a great day!   I’m off to make more Valentine’s.

Disclosure:  This project was created for and sponsored by Canvas Corp Brands.

Pretty in Pink

Little Miss Serenity, so Pretty in Pink.

I was shopping with my sister the day she/we found this pretty pink outfit.

As any good sister would, I helped her justify why she really needed it.

I’m good at that sort of thing.

I told her “just think of how cute it’ll look in pictures”.

I was right, wasn’t I?

It’s hard to believe my sweet little niece will be four in just a couple of weeks.

Such a Sweetie!

“This is a sponsored post. As a member of the Deflecto Design Team I have been provided product in exchange for my creative ideas, views and opinions.”

DCC: Simple Little Valentine…

Little B Valentine's Card 1607

I really love this new border punch that I received last month from Little B LLC.

This Little B 100366 Trim Punch, Honeycomb,punches both sides of the paper at one

time leaving you with a great border strip to uses on all sorts of projects.

For my “Simple Little Valentine”, I punched four border strips from white cardstock.

I glued the strips onto another piece of white cardstock, butting up the ends to create

a continuous pattern.  An easy way to create a simple and elegant background.

Another great thing I love about this punch is it’s locking feature.

It has a button on the side of the punch so that you can lock it in the closed position for easy storage.

How great is that?

Disclosure:  This project was created for me and was sponsored by Little B.  The post uses Amazon Affiliate links.  I am a Amazon Affiliate.

“Love with all my heart”

Deflecto Mini Album 1557

I was supposed to be crawling into bed last night, when inspiration struck.

Happens to me all the time.   Does that ever happen to you?

So….In about a 1/2 hour time, I whipped up this cute little Mini Album using a couple of

Flexible Pouches from Deflecto Craft Solutions.

These pouches made the perfect cover for my mini album.

I used two pouches for my cover and inserted older left over Valentine scrapbook paper from

Authentique Paper.  I cut several inside pages and bound it together with my Bind It All and 1/2″ coil.

Fun, Simple and Cute.  (if I say so myself)

“This is a sponsored post. As a member of the Deflecto Design Team I have been provided product in exchange for my creative ideas, views and opinions.”

Vintage Inspired Hearts

 When we think Valentine’s Day we think hearts, right?

These DIY vintage hearts would also make a sweet gift for a special friend

or they could be used as a decoration in a vintage inspired wedding centerpiece.

Hearts are not just for Valentine’s Day.  

 How to make Vintage Inspired Hearts                    (*affiliate link)

*Disclosure:  This blog uses affiliate links.  If you choose to make a purchase using one of the links, I receive a small commission (at no additional cost to you) that helps offset the costs of maintaining this blog.  Thanks for your support!


Directions:

  1. Cover Smoothfoam Heart with Newsprint paper using glue stick.
  2. Apply a thin coat of cream acrylic paint over heart.  Wipe off excess.
  3. Add Fired Brick Ink to heart using the ink applicator.  Accent the edges of the heart with the Vintage Photo Ink.
  4. Stick small word stickers onto center of heart.
  5. Apply mod podge over heart for added shine.

To make the heart an ornament:

  1. Poke a small hole into the top of the heart.
  2. Fold a 6″ piece of twine in half, thread bead onto twine.  Knot on both sides of the bead to keep in place.
  3. Add small dab of craft glue into hole and insert loose ends of twine.

“This is a sponsored post.  As a member of the Smoothfoam Design Team, I have been provided product and compensation in exchange for my creative ideas.  The views and opinions are my own.


Shabby Vintage Clipboard

Shabby Clipboard 2509

More new products today from Clear Scraps.

This was a fun project.

When I first got this new acrylic clipboard I wasn’t sure how I was going to use it.

Once I got a clearer vision on how I wanted it to look, inspiration soon followed.

Now, I can’t wait to make another one.

Here’s the link to all of the NEW PRODUCTS from Clear Scraps.

Shabby Vintage Clipboard

Supplies Used:

  1. Spray the back of the clipboard with the IrRESISTible Texture Spray to give it a soft lacey look and dab the edges with White Picket Fence paint.  (Both paints work great on acrylic.)
  2. Adhere collage papers and vintage photo into place or allow the clip to hold them.
  3. Adhere mirror embellishment to corner of clipboard
  4. Embellish Clipboard with Vintage Trim and Lace.
  5. Add small adhesive rhinestones and a vintage style button to the clip and tie a crinkle ribbon bow.

DSCN2510

This project was created for and sponsored by Clear Scraps.

Getting Cozy…and a update

Mini Album watermarked

NEW PRODUCT From Clear Scrap…

Stay Warm and Cozy this winter while you play with one of the “New” Mini Mixable Albums

from Clear Scraps.  My Mini Mixable Little Bits 3.5 x 5 Album, made with soft blues and tans,

uses the “Cozy” scrapbook collection from Authentique Papers.

A perfect little album for those snowy winter pictures.

Now that the CHA (craft and hobby assoc.) Trade Show is right around the corner,

I can start showing some of the new projects I made for Clear Scraps.

They have a lot of new albums, stencils and more.  You can check out all of their “New” items here.

It’s a cold one today… So Stay Warm.

mantle onemantle two

Update on Winter decorating:  My Newly Decorated Mantle  (what do you think?)

Deflecto December Design Team Goodies

Deflecto Shelf 825

Now that Christmas is over, I’m starting to think organizing again.

For a quick solution for a constant problem, I used a couple of Wall Mount Supply Organizers

from Deflecto Craft Solutions as a place to gather supplies for upcoming projects.

I added them onto the side of my IKEA shelving unit next to my desk.

Deflecto Shelves 829

Because I have commitment issues when it comes to screwing things into furniture.

I used Small Removable Hooks from Command.

Worked great.  Now, I can move the wall shelves to a different place if my needs change.

Command Clear Mini Hooks

As I’ve mentioned before, one of the high light each month is when I get my Design Team Goodies

from Deflecto.  I love how much care they use when packing each box.

This month, before I tore into the boxes, I remembered to take a few pictures of how they arrived.

Deflecto Packaging 2638

This was on the front of the box.  Every month a different personalized label.

Deflecto Packaging 2642

Each package comes packed with tissue paper and seal.  Just like a Christmas gift.

Deflecto Packaging 2645

This month’s box actually came with a wrapped Christmas present.

This company knows how to make a girl feel special.

Along with the wall files we also received additional wall pockets, desk file holders, various

goodies and a large office floor mat.  As the new year progresses and I dig out from all my

Christmas and CHA crafting, I’ll be doing more organizing with my Deflecto goodies.

Can’t wait to get started.

“This is a sponsored post. As a member of the Deflecto Design Team I have been provided product in exchange for my creative ideas, views and opinions.”

Living Well Spending Less

I follow a blog called Living Well Spending Less.

You may have noticed the link on the side of this blog.

The owner of this blog, Ruth Soukup, has written a new book, available Dec. 30th, called:

Living Well, Spending Less: 12 Secrets of the Good Life

Recently, I joined the launch team to help promote Ruth’s new book about the secrets of the Good Life.

In this book, Ruth mixes faith, scriptures and good practical knowledge to make you rethink your

spending habits.  (Check out the video below)

In my marriage, it has always been my job to keep track of our finances and the monthly budget.

Honestly… during the first 25 years, it was more of just making sure everything got paid.

Raising a family is not for the faint of heart.  Kids are expensive.  Life moves fast.

A few years ago, I challenged my husband to a 30 Day Spending Budget.

I asked him to tell me how much he spent each week.  We had to be completely honest.

At first his amount was real low.  (I had to assure him it wasn’t a trick question.)

Because… what ever amount he said was the amount he was going to get.

We were able to save $500 that month.  (that surprised us both)

It was a good exercise that made us rethink our spending habits and priorities.

While we have relaxed from the original 30 day challenge,

we now have a mutual goal of saving towards our retirement.

(Call us cheap or call us old, we love it when we have a good restaurant coupon.)

With the New Year right around the corner, it might be a good time to consider

your own 30 Day Challenge.