Believe in the Magic of the Holidays

Believe in the Magic of the Holidays

Are you taking time to enjoy the magic?

I’m doing my very best to relax and enjoy every moment.

Believe Wreath

I decided to add the large Believe on a Wreath on the front door.

The large Believe was made using Expressions Large Believe from Clear Scraps.  It measures 5″ x 15″.

On the back I adhered “nestled” scrapbook paper from Authentique Paper’s Cozy Collection.

You can’t really see it from the picture, but, it has a great sweater pattern.

After I trimmed around the letters using a craft knife, I used a gold paint pen to accent each letter.

Make sure to check out all the Expressions Large Clear Word Titles from Clear Scraps.

Joy Tag with a Cool Metal Foil Technique

Impress your friends with an Easy and Elegant Metal Foil Tape project.

I love this technique and thought you might as well.

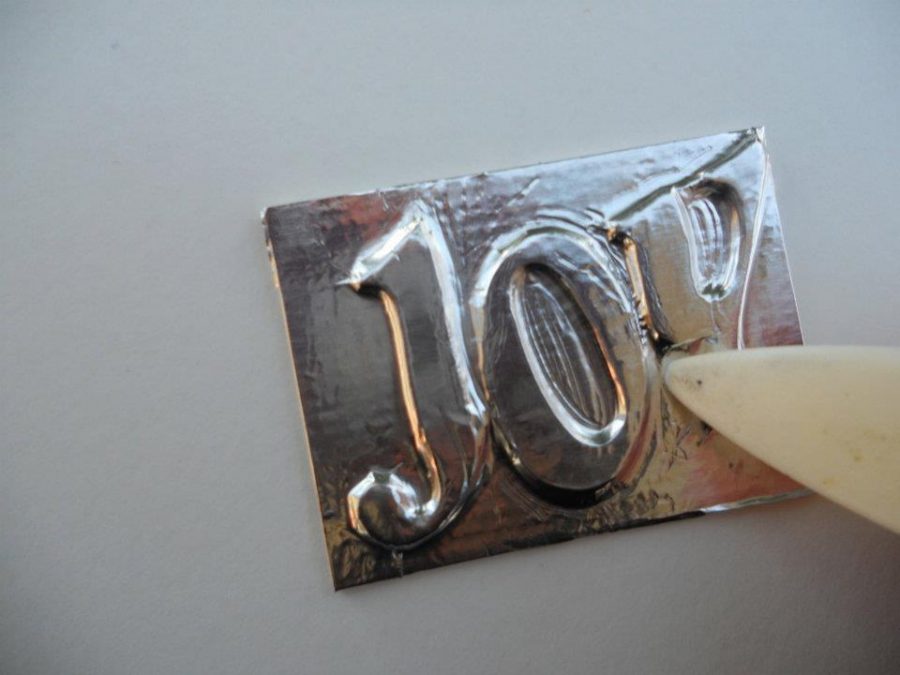
Start with a small piece of matboard or chipboard approx. 2″ x 2 1/2″ and chipboard letters spelling the word “Joy”.

Joy Tag products used:            (*amazon affiliate link)

*Disclosure:  This blog uses affiliate links.  If you choose to make a purchase using one of the links, I receive a small commission (at no additional cost to you) that helps offset the costs of maintaining this blog.  Thanks for your support!

Shop Your Fav Brands at Scrapbook.com

Directions:

1. Glue letters onto the small chipboard with Beacon Adhesives Zip Dry Paper Glue*.
2. Apply Aluminum Foil Tape* over chipboard. I make the chipboard slightly smaller than the tape so that I don’t have any seams.
3. Using the bone folder, gently go around each letter to bring out the detail.

4. Paint the background with the paint pen. To give it a snowy affect, when
giving a second coat of paint, dot the paint with the tip instead of brushing.
5. Use the pale blue pen to color the letters. Allow both colors to thoroughly
dry.
6. Using a sanding block, lightly sand the letters and edges of the chipboard.
7. For a finishing touch, paint the letters with stickles glitter glue.

The tag also uses:
Prima Flowers (Holiday Celebration Snow Drop)
Vivid Ink: Aqua
Ink Blending Tool*
Scrapbook Paper
Cardstock
Corner Punch, Rounded*
1/8 Inch Round Hole Punch*
Lace, Silver Ribbon and Small Flat Snowflake Ornament
Silver Greenery

Shop Amazon Scrapbooking Supplies*

Snowflake Wreath

Smoothfoam Snowflake Wreath 2535

When it comes to Holiday Decorating, I love anything with a Snowflake on it.

Make it a Red or Cream Snowflake and I’m a happy girl.

So when I found these Large Snowflakes from Smoothfoam, I fell in love.

Smoothfoam Snowflake

To make my Snowflake Wreath you’ll need:

  1. Paint 6″ Snowflake cream and the 12″ Snowflake red; let both dry.
  2. Glue the two snowflakes together using craft glue.
  3. Glue red button onto the center of the cream snowflake.
  4. Poke a hole on the side of the top of the snowflake with needle and thread.  Pull thread through and tie snowflake onto wreath.
  5. Hang wreath with large piece of ribbon.

This project was created for and sponsored by Smoothfoam.

a little Christmas Home Décor

Stenciled Burlap Outside

This Christmas has been the year of Holiday Stenciling for me.  (I just can’t seem to get enough)

This time I’m making a Quick & Easy Home Décor piece for a Blog Hop with Fairfield World

using Foamology Stickybase Tiles™.

What’s Foamology?

Well…. I could try to explain this cool product to you, but. this video explains it much better.

For my project, I decided to try my hand at stenciling on Burlap.

I used a large piece of burlap about 14″ wide and the 12″ Christmas Bulbs stencil

and the 12″ Word Xmas Tree stencil from Clear Scraps.

After I stenciled on the burlap, I wrapped it around the 12″ foam square as shown in the

video and inserted it into a shadow box frame.

Stenciled Burlap

Some of the products used on this project were generously donated by Fairfield World and Clear Scraps.

Holiday Joy

I love using the word “JOY” in my holiday decorating.
It’s one of my favorite words.  Who doesn’t need a little more “JOY” in their life.
The Joy Frame is a Quick and Easy Holiday Home Décor Project.


Supplies Needed:                                           (*affiliate link)

Directions:

  1. Remove the backing and glass from an old frame and spray paint it black.  My frame holds an 8 1/2 x 11 picture.
  2. Cut the scrapbook paper to size and add to frame.
  3. Paint the chipboard letters red.
  4. Stencil Snowflake design onto the red letters with cream paint.
  5. Apply a light coat of red paint over the snowflakes.
  6. Antique the letters with Vintage Photo ink and ink applicator.
  7. Glue inside of frame.
  8. Embellish frame with some greenery and a red and cream gingham bow.
Craft Confession:
My original plan was to have cream snowflakes on red letters.  After I got through with the stenciling, I thought the snowflakes looked too bright so I decided to re-paint the letters.   As soon as I put on the first thin layer of paint, I loved the tone on tone result.  Happy Accident!
This project was created for and sponsored by Clear Scraps.

Join Amazon Kindle Unlimited 30-Day Free Trial

Disclaimer:  This blog uses ads and affiliate links.  If you choose to make a purchase using one of the links, I receive a small commission (at no additional cost to you) that helps offset the costs of maintaining this blog.  Thanks for your support!

a little Holiday Stenciling

Stenciled Linen Bag

One of my new found obsessions this Holiday Season is stenciling on Linen.

This stenciled linen bag is one of the projects that we made in my Holiday Workshop.

We used Clear Scraps 6″ Word Xmas Tree stencil, acrylic paint and a stencil brush.

Tip:  I like to use removable tape to keep the stencil from moving and to mask off

any areas where I may go over the stencil with my paint.

The linen bag measures 6″ x 10″ and is available through Nashville Wraps.

Clear Scraps Stenciled Holiday Pillow

I loved using this stencil so much that I also bought the 12″ Word Xmas Tree.

These are Quick and easy Holiday projects to make.

They would also make a great Christmas gifts.

Tip:  I stenciled on a 13″ x 13″ piece of linen.  The next pillow I make would be a little larger so that the entire image shows.  My pillow measures 12″ x 12″.

This project was created for and sponsored by Clear Scraps.

Give Thanks with a Grateful Heart

Deflecto Give Thanks Acrylic Frame

Give Thanks with a Grateful Heart. 

Powerful Words, Great Advice.

Words I need to be reminded of everyday, not just at Thanksgiving time.

As a gift for you, I created the below graphic using a free photo editing site,

with no watermark so that you can save it onto your computer.

I printed the below image out as a 5″ x 7″ photo and put it in one of the Beveled Edged Craft Frames

that I received from Deflecto Craft Solutions.

Enjoy!

Give Thanks 2

“This is a sponsored post. As a member of the Deflecto Design Team I have been provided product in exchange for my creative ideas, views and opinions.”

Upcycled Jewelry, Bags, Belts and more.

I was recently asked by Linda Peterson and Cisco Books to review Linda’s latest book

Upcycled Jewelry, Bags, Belts and More.

As soon as I received the book, I immediately sat down and thumbed through all the pages.

I was amazed at the unique and creative ways that Linda uses everyday found objects.

Have you figured out what she used to make the belt on the front cover?

Soda Can Tabs!

Linda has added beautiful, detailed pictures with easy to follow instructions that makes

recreating these projects a breeze.  If you enjoy Indie crafts and up-cycling everyday

found objects then I highly recommend this book.

Frosty Winter Wonderland

Smoothfoam Snowman and Tree

Create your own Frosty Winter Wonderland using Smoothfoam’s Snowman and Tree Shapes and a 6″ Smoothfoam Disc.

Supplies Used:

  • Snowman Body
  • 2″ x 3 1/2″ Tree
  • 6″ x 1″ Disc
  • Textured Embossing Paste
  • Acrylic Paints:  White, Green and Brown
  • Paintbrush
  • Stickles Glitter Glues:  Frosted Lace, Diamond
  • Micro Brads:  Black, Red
  • Bamboo Skewer
  • Orange Marker
  • Brown Ink-pad
  • Ribbon, Buttons and Christmas Embellishments
  • Small Red Doll Sock
  • Craft Glue
  • Old Toothbrush

Directions:

  1. Cover the Snowman, Tree and Disc with the textured embossing paste using your finger.  Allow to thoroughly dry.
  2. Gently dust the Snowman and Disc with brown ink using the paintbrush to accent the texture of the paste.
  3. Paint the Snowman with Frosted Lace Glitter Glue.
  4. Paint the Tree with Green Acrylic Paint, speckle white paint onto tree using an old toothbrush.
  5. Paint the Tree and Disc with Diamond Glitter Glue.
  6. Decorate the Snowman with Small Micro Brads for the eyes, the tip of a bamboo skewer colored orange for the nose, small red doll sock with the tip tied with twine for his hat, teeny tiny red buttons and a red and cream gingham bow.
  7. Insert Red Micro Brads into the tree for the Christmas Lights.
  8. Assemble onto 6″ base and glue into place.