TBT: Serendipity Stamps Heart Scroll Card

Heart Scroll Card

This morning I was going through my Pinterest Made by Me Board and changing the

web address on several of my old pins.

The Heart Scroll Card was one of my first pins from a few years ago and I thought I’d share again.

The card uses the Heart Scroll Stamp from Serendipity Stamps.

The heart image was embossed with white embossing powder and shaded after embossed

with pink ink.  Simple and Elegant.

Serendipity Stamps also has a thin metal die that matches the heart stamp.

If you’re a stamper and you’ve never checked out their stamps and dies you really should.

A great company to work with.  www.serendipitystamps.com.

Simple Decorated Linen Bag and Burlap Utensil Holder


Burlap Pouches

I recently got the opportunity to play along with a group of Designers using some fun burlap products.

I really love working with burlap.  So many ideas, too little time.  Here’s a few of the many things you can make using burlap.

Decorated Muslin Bag w vase

My first project is a simple and elegant idea for decorating a plain muslin bag.

muslin pouch and stencil tools

  1. Start with a plain muslin bag.
  2. Lay diamond stencil over the bag and secure in place with removable tape.
  3. Stipple over the stencil with white acrylic paint.
  4. Adhere a 1 1/2″ strip of burlap around center of bag.
  5. Glue a thin piece of white lace around the bottom of the burlap strip.
  6. For the heart:  Paint a small piece of red burlap with several coats of white acrylic paint, creating the nice soft pink color.
  7. Cut burlap with heart die.
  8. Adhere sheer pink rosette ribbon onto pink heart and glue onto front of muslin bag.
  9. Cut and Decorate a small tag.

Burlap Utensil Holder 2

The Burlap Utensil Holder uses the 3 1/2″ navy striped burlap ribbon.

  1. Cut a 12″ strip of burlap ribbon.
  2. Fold over one end of the ribbon approx. 1/2 end and glue using a good Fabri Tac glue.  I used small metal binder clips to secure the ribbon in place while drying.
  3. Create a 4″ pouch by folding and gluing ribbon.  (love those binder clips)Glue a piece of 1 1/2″ burlap ribbon around pouch.
  4. Glue lace over burlap ribbon and tie with a piece of cream crinkle ribbon.
  5. Embellish with a flower and stick pin.
  6. Add a napkin and utensil and your ready to go.

Beach Party Dessert

A perfect little Beach Themed Dessert for your Summertime Parties.

Beach Party Dessert

I decided to make this fun little treat for our 4th of July cook-out last Friday night.

I didn’t come up with this cute idea.   I found it online.  (I wish I could give proper credit.)

It’s really fast and easy to make.

  1. Add a few drops of blue food coloring to vanilla pudding for the water.
  2. Crush up vanilla cookies for the sand.
  3. Add a piece of flattened candy for the beach towel.
  4. Place a Teddy Graham sunning on the towel
  5. Add a drink umbrella for shade.

I had the hardest time finding little drink umbrellas.  After trying two stores, I decided

that I’d just make my own.  For my umbrellas, I used a 3″ scalloped circle punch and cut a

notch half way up into the circle.  Just glue the ends together.

For the pole, I used approximately half of a bamboo skewer.

Happy 4th of July

Happy 4th of July

This Spring I planted one of my pots with a red white and blue theme.

I thought it was a fitting prop for my Patriotic Star.

What a perfectly beautiful day.

Today’s Plans: 

Relaxing, Cook-out with family and then off to the Fireworks tonight.

Happy Birthday America!

Baby Birds

Look who I saw peeking out of my hanging basket this morning.

Almost ready to leave the nest.

Sometimes in life a little H20 must fall?

I like my blog to be light-hearted, a positive creative place where you can go to

get a little creative inspiration and maybe even a little chuckle from time to time.

I like to keep it light.

I try to be a positive person and most of the time I think I am.

But… today since I’m not feeling quite as inspired or as positive I thought I’d share the

reason why.  (I’m still trying to look at all the positives)

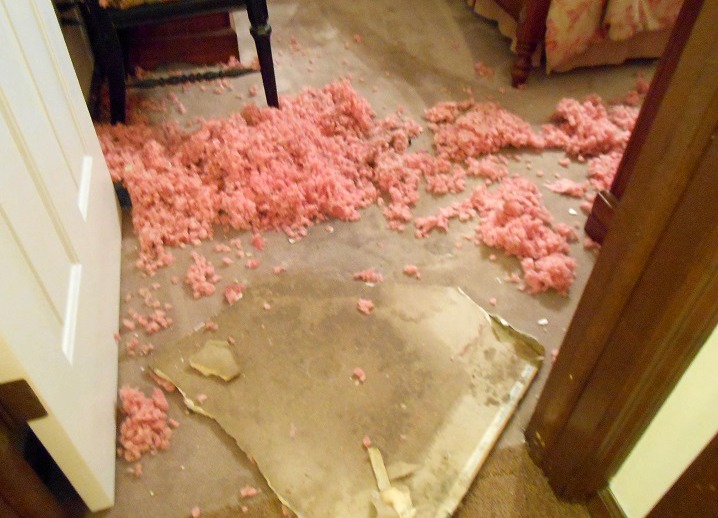
Tuesday night after returning from a baseball game.

DSCN0654

I went upstairs to find this.

DSCN0656

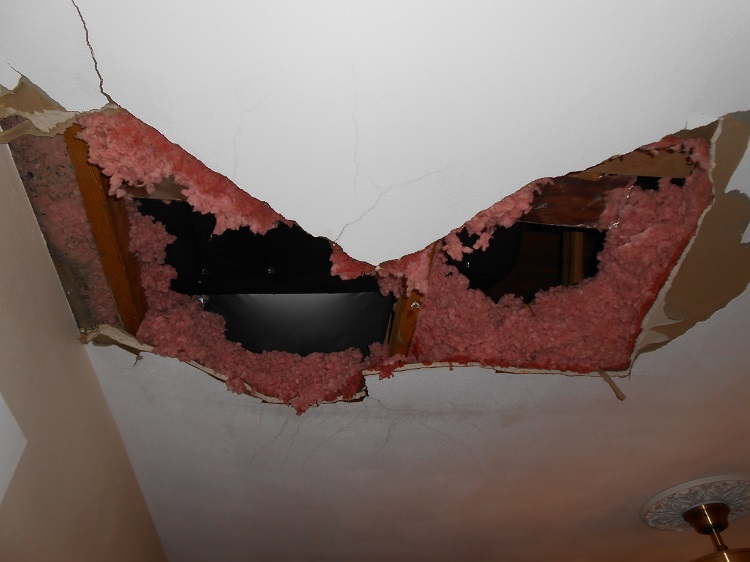
Three weeks ago, we broke down and finally decided to replace the 25 plus year old

air conditioner for the upper level of the house.  (not an inexpensive purchase)

Something on the unit malfunctioned causing a leak, the pan underneath the unit which has

the safety that should have shut the machine off didn’t work.  (insert long technical explanation)

Of course, the company is extremely apologetic and are doing everything they can to make it right.

But currently, the unit malfunctioned again last night.  There is more water and they are

cutting more ceiling as I type.  Still I’m trying to remain positive.

Here are the reasons I’m trying to stay positive:

  1. No one was in the room at the time.
  2. No one got hurt.
  3. We weren’t asleep in the bed.  (which would have gave me a heart attack, I’m sure)
  4. We weren’t on a weeks long summer vacation. (can you imagine that scenario?)
  5. They had someone come out right away.
  6. They started the restoration process the same night.
  7. I have a spare bedroom that I can sleep in.
  8. I have a separate air conditioning unit in the lower level.
  9. We still have a home and a roof over our head.  (In my community that’s a big deal!)
  10. Things could always be worse.

Life Happens, Crap Happens!

DSCN0676

(Here is my bedroom as of yesterday)

I’m just trying not to let it get to me.  Even though it’s going to get real hot today and I can’t work in my studio.  Still, I have every confidence that the problem will get fixed and everything will work out fine.  I’m just a little sleep deprived with all those giant fans blowing constantly in the next room.

So stay cool out there today and try to have a great day.  (I may just float in the pool)

Thanks for letting me vent.

Make sure to tell your story.

As the Mom and a Scrapbooker I’m the one who’s telling my family’s story.

I’m also usually the one taking all the pictures.  Sometimes I’m even in the pictures.

As a scrapbooker, one of the things I’ve never done before was to do a layout on “ME”.

I know it feels a little vain, but, it’s important.  (Don’t you think?)

Hopefully one day, my kids or grandkids might enjoy reading a little bit about me.

Isn’t that why we do it?  To tell our “story”.

My 10 Things Layout

Last month on my blog I did a post on “10 things you may or may not know about me.”

I used that post as the starting point for this layout.

I like to use things in ways other than how their supposed to be used.

For this layout I used one of the scalloped shapes from the Send it Clear card kit from Clear Scraps.

Once I glued the scrapbook paper to the clear scallop, I edged around it with a gold paint pen.

I love how it’s a subtle enhancement for my page.  I glued a small medallion onto the tip of the scallop.

The paper is from the “Americana” collection from Pebbles Inc.

I also used Tim Holtz’ “Chit Chat” stickers to emphasize certain words in my story.

It’s simple and it’s me!

Craft Ideas Magazine

Craft ideas magazine cover

The other day I received this magazine in the mail.

At first, it stumped me.  Why am I getting this magazine?

When I finally got the chance to sit down and look at it I noticed the name had changed.

Craft Ideas was formerly Crafts n’ Things.

Fall Addition!!!  I immediately knew what I was looking for.

Craft ideas Magazine Everyday Moments

Ta Da!!!  Here I am on pages 56 & 57.

My “Everyday Moments” accordion album with all the instructions so you can make one too.

Another thing that makes me happy:   they used the photographs I took for the article.

Pinterest Inspiration

One of the places I go when I need a little creative inspiration is Pinterest.

So many wonderful photo’s to look at.  So many wonderful ideas.

I have to make sure I have an hour or so to kill when I do.

I thought I’d share with you one of my FAVORITE layouts I found on Pinterest.

I asked permission from Kay Miller of Kay Millers Designs if I could share.

(It’s always a good idea to ask first.)

Berry Layout

I love everything about this layout. Everything’s so well thought out.

Thanks Kay for letting me share your wonderful layout.

Make sure to check out Kay’s site www.kaymillerdesigns.com for more creative inspiration.

And… if you’re on Pinterest and you’d like to check out my pins you can find me here.