Upcycled Vintage Paint Palette

Upcycled Vintage Paint Palette

Last year, going through my parents house, we found my mom’s old boards, brushes

and paints.   We also found both of my grandmother’s paints and supplies as well.

In all those treasures my brother found this paint palette.

Old and Cool.  Just my style.

This month the StyletechCraft Design Team was challenged to create an upcycled project

using vinyl.  Because my paint palette is vintage (and special) and I like to change my mind,

I decided to use Matte Removable Vinyl*.   (I’ll have the option to change it out.)

*Disclosure:  This blog uses ads and affiliate links.  If you choose to make a purchase using one of the links, I receive a small commission (at no additional cost to you) that helps offset the costs of maintaining this blog.  Thanks for your support!

  • For my Vintage Paint Palette Upcycled Project…I used an SVG file and my Silhouette Cameo Wireless Cutting Machine* to cut and create the words “Be Creative”.
  • Using the weeding tool, I carefully removed the negative spaces in and around the letters.

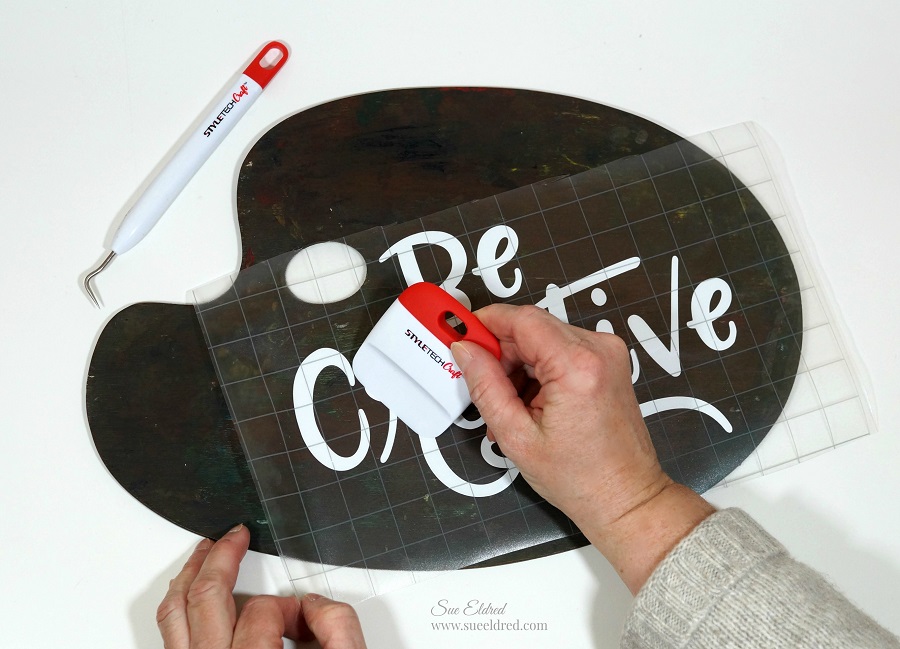
  • Place a piece of Vinyl Transfer Tape* over the letters.  Rub over the letters using a vinyl scraper tool to help the vinyl cling.
  • Apply words onto the paint palette.
  • Remove transfer tape.

With Grandma’s paint supplies, I found this calendar page from 1939

that she used for inspiration.  (80 years ago, WOW!)

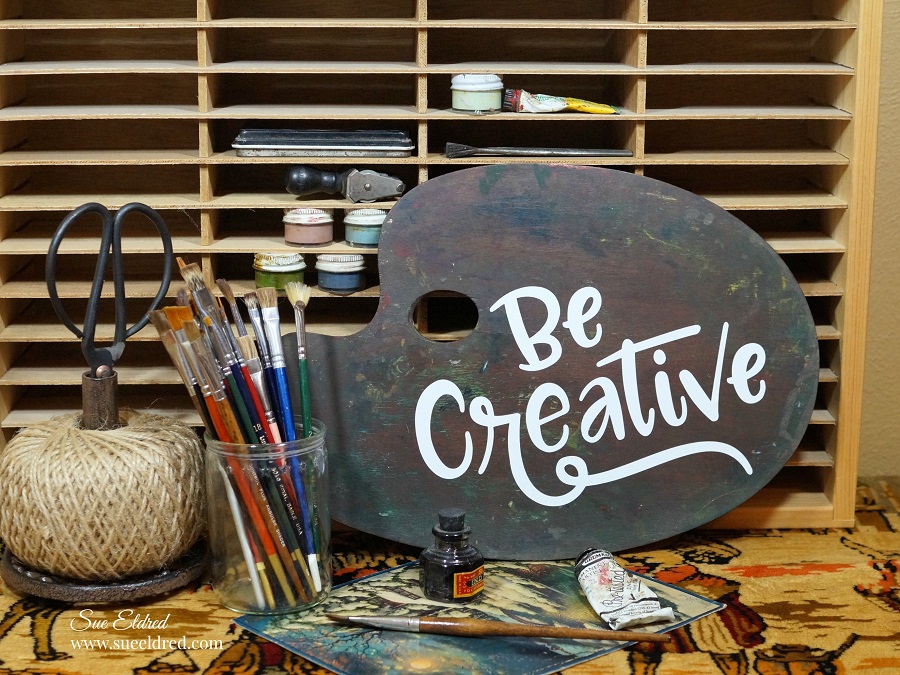
I’m currently in the process of turning my son’s old bedroom into a larger craft workshop.

I want to incorporate a little past into that space as well.

I want it to be a warm, inviting, eclectic space.  (Kind of like me)

I think this palette will fit in just fine.

“This is a sponsored post.  As a member of the StyleTechCraft Design Team I have been provided product and compensation in exchange for my creative ideas.  The views and opinions are my own.

You can now find the full line of StyletechCraft online at ATSM.

Let’s Go Fly a Kite

Let’s Go Fly a Kite…

I’m so happy that Spring is finally here.

I’m ready to celebrate Spring with beautiful sunny skies and just enough breeze to fly a kite.

If you’re not into flying kites, you could always make a fabric one to hang up on the wall.

Kite Wall Hanging                                   (*affiliate link)

*Disclosure:  This blog uses ads and affiliate links.  If you choose to make a purchase using one of the links, I receive a small commission (at no additional cost to you) that helps offset the costs of maintaining this blog.  Thanks for your support!

How to make a Kite Wall Hanging:

  • Creating a kite pattern… Cut the white cardstock to 9″ x 12″.  Fold the cardstock in 1/2 lengthways.  On the two long sides make a mark at 4″.
  • For the top of the kite, draw a line from the top middle fold to the 4″ mark on each side.  For the bottom of the kite, draw a line from the 4″ mark to the bottom middle folds.
  • Cut out Kite pattern.
  • Trace and cut out the kite pattern on the backsides of both of the printed fabrics and the white felt.

  • Sandwich the white felt between the two patterned pieces.  Pin into place and top stitch around the kite.
  • Arrange the words “Let’s go fly a kite” onto the front of the kite with the shiny side down.
  • Cover with soft, clean cloth and iron on cotton settings for 30 seconds.  Turn kite over and repeat for an additional 30 seconds.

  • Cut the top flower and leaves off the floral applique.
  • Arrange the flowers on the kite and iron onto the kite the same way as the letters.
  • Glue rick rack around the edge of the kite.

  • Cut strips of fabric and tie onto a 14″ piece of twine.  Glue one end of the twine to the backside of the kite.
  • Make a small loop with a second piece of twine and glue to the top of the kite.

“This is a sponsored post.  As a member of the Joy® Design Team I have been provided product and compensation in exchange for my creative ideas.  The views and opinions are my own.


Don’t Miss a Thing…Make Sure to Follow me

Shine from Within Mini Tag Album

Shine from within Mini Tag Album…

I love the sweet pastels of Graphic 45’s Garden Goddess Collection*, it just screams Spring.

So…after using the Garden Goddess paper pad on a special project (coming soon),

I decided to make a Mini Tag Album with the remaining paper.

When it comes to making Mini Albums I like using the Xyron Creative Station* 

because you get complete coverage, no wrinkling, no bubbles!

And…your album stays together!!!

Products Used on the Shine Within Mini Tag Album:         (*Amazon Affiliate Link)

Shop Your Fav Brands at Scrapbook.com

*Disclosure:  This blog uses ads and affiliate links.  If you choose to make a purchase using one of the links, I receive a small commission (at no additional cost to you) that helps offset the costs of maintaining this blog.  Thanks for your support!

How to make the Mini Tag Album                                 (*amazon affiliate link)

  • Lay decorative scrapbook paper (design side up) on the  *Xyron Creative Station* crank the handle to run the paper through the machine.  As it moves through the Xyron Creative Station it adds adhesive to the back side of the paper.  Easy to use and it doesn’t need electricity.
  •  Cut two pieces of chipboard to use as the front and back of the mini album.  Cover the front and back of both pieces of chipboard with the decorative scrapbook paper.
  • Cut covered chipboard using a Tag die-cut or cut into a simple rectangle tag shape.
  • Because the chipboard is tan and the core of the paper is white, I inked the edges of the pages with  Vintage Photo Distress Ink*and a ink blending tool*.  

  • Adhere the smaller graphic in the center of the tag front to a piece of chipboard for added dimension.
  • Cut two small circles and adhere to the metal rim tag.  Cut a new hole on the top of the tag.
  • Embellish the front of the tag album using bits and pieces from the Garden Goddess Paper Pad.
  • Glue flower embellishment to front of mini tag album cover using craft glue.

  • Cut extra tag pages and small tags for the inside of the mini tag album.
  • Assemble the mini tag album using a small book ring.

“This is a sponsored post.  As a member of the Xyron Makers Program I have been provided product in exchange for my creative ideas.  The views and opinions are my own.

Glittered with Mod Podge Ultra

Rainbow Glittered Monogram with Mod Podge Ultra

I have used Mod Podge for years…

So, when Plaid gave me the opportunity to try out Mod Podge Ultra, I thought why not.

I always love trying something new.

What makes Mod Podge Ultra different?

America’s favorite decoupage medium is now available as a spray!  Mod Podge Ultra  is a super strong, non-toxic spray formula that works as all-in-one glue and sealer with a high adhesion level.  Perfect for adding dimensional design embellishments to your projects.  This versatile, water-based formula dries quickly and naturally self-levels, leaving no brush marks.  It cleans up easily with soap and water and is available in both matte or gloss finishes.

For my Framed Rainbow Glitter Monogram I used:                         (*affiliate links)

Directions:

  • Protect your work area with newspaper or drop cloth.
  • Shake Bottle for 15 seconds.
  • Prime the nozzle with a few test pumps.
  • Spray the chipboard letter with Mod Podge Ultra using short even strokes.
  • Add various colors of glitter over the letter.
  • Pour excess glitter off.  Allow project to dry for 30 minutes.
  • Seal letter with 1-2 coats of Mod Podge Ultra.
  • Allow  the letter to fully dry.
  • Accent the outside edge of the letter  using the silver leaf paint pen with a chisel point.
  • Spray or paint the back of the letter with Mod Podge Ultra and add to a piece of black chipboard.
  • Place inside frame for fun and funky framed art.
  • Just like a paint brush, Mod Podge Ultra Spray tops need to be cleaned after every use. If they aren’t they will clog and become unusable.

Shop Your Fav Brands at Scrapbook.com

*Disclosure:  This blog uses ads and affiliate links.  If you choose to make a purchase using one of the links, I receive a small commission (at no additional cost to you) that helps offset the costs of maintaining this blog.  Thanks for your support!

With most glittered projects… if you touch the glittered area you leave a little bit of glitter everywhere you go.  Once I sealed the glittered “S” the glitter does not rub off.  How cool is that.

A special Thank You goes out to Plaid the makers of Mod Podge Ultra*.   

My project is part of a Blog Hop put on the Designer Crafts Connection Blog.

For more fun projects using Mod Podge Ultra and the list of participating blogs click here.

How to Create a Vintage Inspired Memento Box

Vintage Inspired Memento Box

This Vintage Inspired Box is the perfect place to store special mementos for years to come.

For this project,  I started with a Unfinished Cornice Box from Walnut Hollow*

which I lightly white washed with a soft gray chalky finish, stenciled and slightly distressed,

for a warm vintage-feel home décor piece with a soft timeless finish.

The Vintage Inspired Memento Box was sponsored by Walnut Hollow and DecoArts.

*Disclosure:  This blog uses ads and affiliate links.  If you choose to make a purchase using one of the links, I receive a small commission (at no additional cost to you) that helps offset the costs of maintaining this blog.  Thanks for your support!

Supplies Used on the Vintage Inspired Memento Box…           (*affiliate links)

How to Create a Vintage Inspired Memento Box…

Directions:

    1. Paint the Cornice Box* with Relic Chalky Finish Paint* (inside and out).
    2. Lightly sand the box to smooth out the finish.
    3. Add a small bit of water to Everlasting* paint and give the box a quick white wash.
    4. Rub excess paint off the box with a clean soft rag for a slightly distressed look.

5.  Position The French Inn stencil over the top of the box.  Secure the stencil in place with the     painters tape to prevent slipping.  Use stipple brush to apply a mix of Relic, Romance & Everlasting paint to the decorative element in the center of the stencil.
6.  Stencil the remaining open stencil areas with “Relic” paint.
7.  Position and stencil Old French Script pattern onto the sides of box.
8.  Allow paint to dry for a few hours and lightly sand over the stenciled area to give a slightly worn look.
9.  Apply Clear Crème Wax onto the inside and outside of the box.  Wait one hour and buff box using a soft clean rag.

10.  Spray the brass knobs with black spray paint.
11.  Rub the knobs with Champagne Metallic Lustre Wax and buff.
12.  Glue or Screw knobs in place.

13.  Measure decorative scrapbook paper or wallpaper scraps to fit inside the box.
14.  Apply a thin layer of craft glue on the back of the paper and stick to the sides and bottom of the box.

Shop Your Fav Brands at Scrapbook.com

Eileen Hull Educator Team

Every now and again an opportunity comes along that you just have to seize…

Being part of the Eileen Hull Educator Team was one of those opportunities.

Personally, I have known Eileen for several years and have always admired her

innovative design talents and can do spirit

And…she’s not afraid of driving cross country alone pulling a trailer to share

her awesome talents with everyone.  (The Paper Trail)

Eileen has been an inspiration to me for quite some time.

Eileen Hull Educator Team

What an amazing opportunity to work with all these amazing designers.

Eileen Hull products…

I love all her products and can’t wait to share them all with you.

*Disclosure:  This blog uses ads and affiliate links.  If you choose to make a purchase using one of the links, I receive a small commission (at no additional cost to you) that helps offset the costs of maintaining this blog.  Thanks for your support!

Embroidery Hoop Art

Loving the new Home Décor trend using Embroidery Hoops. 

I really love the new Home Décor trend using embroidery hoops and was so excited

when I saw the new Mix the Media Embroidery Hoop Art from Jillibean Soup at Creativation.

The embroidery hoop comes plain with an embroidered word inside in 8″ and 10″.

So many opportunities for embellishments.  (I couldn’t wait to get my hands on one.)

At the show, the Jillibean Soup crew were doing make and takes using the embroidery hoops.

I loved the project, but once I got home, I decided to make-over the embroidery hoop

to better fit my style and décor.  (for me…it needed a little red)

Here’s what I added to my Embroidery Hoop…

Directions:

  1. Glue vintage flower trim around the edge of the embroidery hoop using Beacon Adhesives 3 in 1 glue.
  2. Create a banner using twine and 3″ strips of ribbon.  I added vinyl letters to spell the word “welcome”.
  3. Glue off white flowers from Prima Marketing onto the bottom of the hoop and add a couple heart stick pins.
  4.  Make a 1 1/2″ red and cream ribbon bow and glue it to the top of the embroidery hoop.

Shop Your Fav Brands at Scrapbook.com

*Disclosure:  This blog uses ads and affiliate links.  If you choose to make a purchase using one of the links, I receive a small commission (at no additional cost to you) that helps offset the costs of maintaining this blog.  Thanks for your support

Diamond Art…a new trend in crafting

Diamond Art by Leisure Arts 

This past week-end was a stormy, nasty, stay indoors kind of week-end.

The perfect time for crafting and learning/trying something different.

I’d been wanting to start the new Rose Diamond Art kit that I received from Leisure Arts.

I knew the kit was going to take a little time and I was just waiting for the perfect opportunity

to give it my full attention.

What is Diamond Arts?

It is a new trend in crafting.

It’s similar to cross stitching and paint by numbers.

“A little bit tedious, curiously addicting and extremely satisfying.”

It was so addicting that I didn’t want to stop…

I had to bring it down onto the kitchen counter so I could work on the it while cooking dinner.

Leisure Arts makes kits for beginners, intermediate and advanced.

They have a great selection of Diamond Arts Kits for both kids and adults.

The Rose Diamond Art kit includes:

  • One High Quality Printed Fabric
  • Gems Pre-sorted by Color
  • Stylus
  • Craft Tray
  • Wax Piece
  • Comfort Grip
  • Instructions

*Disclosure:  This blog uses affiliate links.  If you choose to make a purchase using one of the links, I receive a small commission (at no additional cost to you) that helps offset the costs of maintaining this blog.  Thanks for your support!

The rose design is pre-printed on the fabric with the symbols for the Diamond Art gems and

is coated with a special adhesive.  You pick the gem up using the stylus and place the gem

onto the corresponding symbol on the printed fabric.

It really is that easy.  Great for kids age 8 and up.

The kits comes with photos and great instructions.

If you’re a visual learner like me, check out the video below.

LeisureArts.com has a great selection of Diamond Arts kits that you can purchase online.

If you sign up for email updates you can get 15% off your first order.

THANK YOU Leisure Arts for providing this awesome Rose Diamond Art kit.

When your favorite cashmere sweater has a hole…

When your favorite Cashmere Sweater has a hole, you make it into something new.

I was pretty bummed when I found out my favorite sweater had a hole in it.

My first instinct was to throw it in the garbage.

After retrieving my sweater from the throw-away pile…

I decided to make it into a super soft pillow instead.

To make the DIY Sweater Pillow I used:                                  (*affiliate link)

*Disclosure:  This blog uses ads and affiliate links.  If you choose to make a purchase using one of the links, I receive a small commission (at no additional cost to you) that helps offset the costs of maintaining this blog.  Thanks for your support.

DIY Upcycled Sweater Pillow

Directions:

  • Turn the sweater inside out. Line up the pillow form with the sweater to determine the best placement to hide the holes.
  • For my sweater, since the holes were on one side…I decided to sew the bottom of the sweater together first and insert the pillow to determine how much I needed to cut off the other side.
  • Cut the sweater slightly larger than the pillow form.
  • Remove pillow form and sew the second side together.

  • To Personalize my pillow, Turn the sweater back to the right sides and iron the Joy Iron-On Embroidered Letters. Cover letters with a clean, soft cloth and iron the letters for 30 seconds. Turn sweater pillow cover inside out, cover with cloth and iron for an additional 30 seconds. Allow the letters to cool before finishing the pillow.  

  • Because there is a lot of give with the sweater material.  I was able to sew the 4th side halfway and stuff the pillow form inside.  I hand stitched the pillow closed.

  • To dress up the pillow…I created a sash to go around the pillow by sewing together flannel scraps.

  • Secure the sash around the pillow using a couple of big black buttons.

The pillow is perfect for marking my spot on my favorite comfy chair.

Creativation 2019

These are the moments that remind me how lucky I am to work in the Creative Industry.

Opening Day…waiting for the show to open

Last month, I got the opportunity to fly to Phoenix to work and attend the Creativation Show.

For those of you that don’t know what Creativation is, it is the annual trade show for everyone

involved in the Hobby and Creative Industry.

Manufacturers, Distributors, Retailers, Designers, Bloggers.

For me, as a designer, it’s also the opportunity to reconnect face to face with friends

that I only get to see once a year.  (you know…”my tribe”)

Oh… and the chance to see what’s new and the latest and greatest in the industry.

Make and Takes in the Deflecto Booth

I always have great intentions of taking tons of pictures and possibly a video or two.

But in Reality…I also have to work.  (or play)

Each day, I taught a different “make and take” in the Deflecto Booth.

Deflecto is one of the great companies I have the honor of working with.

Deflecto is known for their awesome craft storage.

The Great Wall of Deflecto Stack ‘N Go Caddy Wheel Base, Craft Organizers*

At Creativation we like to have a little fun.

Each day in the Deflecto Booth they host a Stack ‘N Go Caddy Challenge,

attendees compete to see who can fill and stack the caddies with the fastest time.

(The one with the best time each day wins a American Express Gift Card.)

It’s a big hit and can get quite competitive at times.  At the end of the show, if you’ve got

your special postcard stamped, they give away all caddies used to build the great wall.

It’s a fun booth to work in.

Another company I have the privilege of working with is StyleTechCraft.

They have the best adhesive vinyl to work with.  (and they treat me like a queen)

As you can see…I had a three hour demo on Saturday.

Graphic 45 Booth

I love all their new paper collections.

The Graphic 45 booth is always one of my favorites because their samples are always

so beautiful and inspiring.

Bloom where you are planted…(I need this collection)

Another one of my favorite booths is the Jillibean Soup booth.

Besides being know for their fun paper collections they also have a wonderful line called

Mixed the Media.  I love everything about this collection.

I NEED these windows.  (just saying)

I also took a little “me time” and did a make and take in the Jillibean booth.  

This is from their Embroidery Hoop Art collection.

Simple Stories Booth

This is embarrassing.  As much as I LOVE Simple Stories, this is is the only picture I took.

Sometimes…I get to talking too much (and drooling) to take pictures.

Tim Holtz ideal-olgy Booth

As a “vintage lover” this booth always stops me in my tracks.

Shop Your Fav Brands at Scrapbook.com

*Disclaimer:  This post uses ads and affiliate links.  If you choose to make a purchase using one of the links, I receive a small commission (at no additional cost to you) that helps offset the costs of maintaining this blog.  Thanks for your support!

Idea-ology Booth Make and Take

Look what I made.  Isn’t he cute?

 At Creativation there is a large variety of classes that attendees can take.  

Business classes, workshops.  This is from the Waffleflower class I took.

I got to use their new “Water Media Mat” that will be available next month.

I always wish I would have taken more pictures. 

My pictures are only a super small sample of all the wonderful and creative things

to see and do at the Creativation Show.

If you’d like to see more…

Check out the Creativation Round Up on the Designer Craft Connection Blog.


Don’t Miss a Thing…Make Sure and Follow me

Shop Amazon Scrapbooking Supplies*