Cute Valentine/Spring Décor with Vinyl

Creating Cute Valentine/Spring Décor with StyleTechCraft Vinyl.

Did you ever get a song stuck in your head while working on a project?

I’m showing my age here, but this Karen Carpenter song kept going through my mind while

I was putting together the Bird on the Branch and, I just had to create the words to go with it.

“This is a sponsored post.  As a member of the StyleTechCraft Design Team I have been provided product and compensation in exchange for my creative ideas.  The views and opinions are my own.

I love creating projects for my home using vinyl. 

My favorite vinyl is the Glossy Craft Vinyl from StyleTechCraft.

There are so many great color choices to choose from.

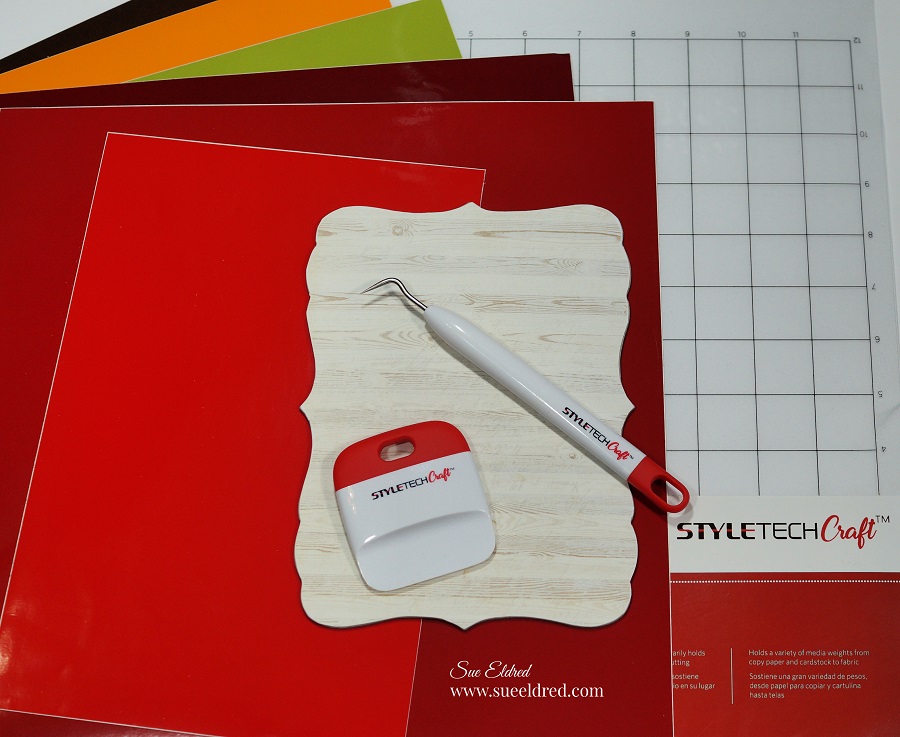
Materials Used to make the Valentine Projects:              (*affiliate links)

*Disclosure:  This blog uses affiliate links.  If you choose to make a purchase using one of the links, I receive a small commission (at no additional cost to you) that helps offset the costs of maintaining this blog.  Thanks for your support!

Project Details:

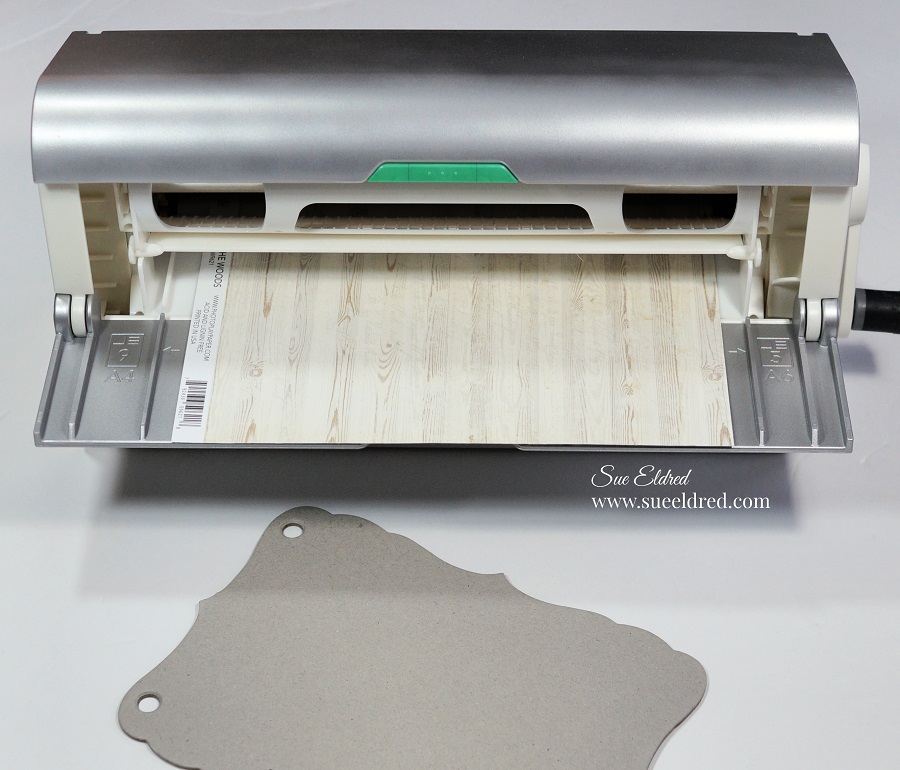
  • I used a 5″ x 7″ decorative piece of chipboard that I’d had around for a while.
  • I cut a piece of woodgrain paper a little larger than the chipboard.  
  • Place the paper in the Xyron Creative Station* design side up through. As you turn the handle, it runs through the machine and adds a complete layer of adhesive onto the back of the paper.

  • Adhere the paper to the chipboard and cut away the excess using a craft knife and cutting mat.
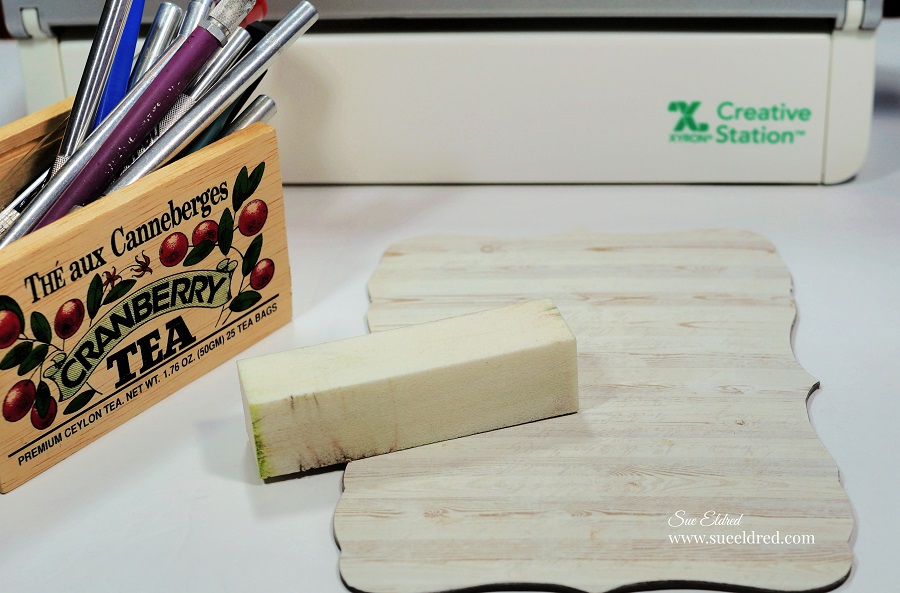
  • Use a fine Sanding Block* to smooth out the edges of the chipboard.

  • I used my Silhouette Cameo Electronic Die Cutting Machine* and the “Bird on the Branch” SVG file to create my design.
  • I sized the image to fit onto my chipboard and cut the various layers of the red in three shades to make a cardinal.  
  • After weeding the excess vinyl from around my images, I transferred them onto the chipboard using the Clear Transfer Tape*.
  • After having the song stuck in my head, I decided to create a few words for my sign.
  • For added detail, I went around the edge of my sign with a Silver Leafing Pen*.

  • I cut an extra little cardinal to fit inside a small circle frame and added small red hearts on the top and bottom.
  • To complete my decorations, I added my small faux heart topiary to a reddish metal and added the words “choose happy” in Olive vinyl.

I have Cute Valentines Decorations that will take me into Spring.  (and maybe longer)

Personalize your Christmas Stocking with Joy

Taking a simple stocking from plain to personality is easy with Joy embroidered letters…

I picked up a simple linen stocking at my local craft store.

It was nice enough, but it needed some personality.

I decided to embellish the stocking with Joy iron-on letters, ribbons and trim.

Here’s what I used on my stocking:                (*amazon affiliate link)

Directions:

  • Depending on the fabric and lining content of your stocking, you can either iron on the letters or glue them onto the stocking with craft glue.
  • Make a simple bow by folding the ribbon over and tying the center tight with the twine.
  • Add a jingle bell and a small piece of pine craft stem to the center of the bow and tie again with the twine.
  • Add button to both ends of the twine and tie to the center of the bow.
  • Trim the ends of the bow.
  • I switched out the plain wood button on the center of the button for one that better fits my style.
  • Glue trim and bow onto the front of the stocking with craft glue.
  • Embellish with a Christmas pin.
  • Add presents or greenery and berries to the inside of the stocking.

You could hang that stocking from the mantel or….

Doesn’t it make a great addition in the center of my Christmas Wreath.

You can find Joy® iron-on, embroidered letters and number sheets in a variety of sizes, colors, and fonts at your local craft stores.

“This is a sponsored post.  As a member of the Joy® Design Team I have been provided product and compensation in exchange for my creative ideas.  The views and opinions are my own.

Shop Your Fav Brands at Scrapbook.com

*Disclosure:  This blog uses ads and affiliate links.  If you choose to make a purchase using one of the links, I receive a small commission (at no additional cost to you) that helps offset the costs of maintaining this blog.  Thanks for your support!

DIY Christmas Blocks from Wood Scraps

Quick and Easy Christmas Decorations using Wood Scraps, Vinyl and Stencils.

Got any old wood scraps lying around?

My Dad used to keep a box of old wood scraps for the kids to build and play with.

I grabbed a few of the worn out blocks for my holiday projects.

To make the Holiday Blocks…

Shop Your Fav Brands at Scrapbook.com

*Disclosure:  This blog uses ads and affiliate links.  If you choose to make a purchase using one of the links, I receive a small commission (at no additional cost to you) that helps offset the costs of maintaining this blog.  Thanks for your support!

  • Use Vinyl Transfer Tape* to pick up and apply the word directly onto the block of wood.
  • Rub over the letters using a vinyl scraper tool to remove bubbles and help the vinyl cling to the wood surface better.
  • Remove transfer tape.

  • Tie a simple ribbon around holiday berries and glue it to the top of the painted wood block using a quick dry glue*.
  • I placed the block onto an old vintage metal base scrounged and saved from my Dad’s garage.  (I love reusing cool old vintage junk.)
  • The Stag and Merry Christmas images were also created using my Silhouette Cameo and applied the same way as the Believe block.)

really simple Holiday Décor.

StyleTechCraft Christmas Colors Bundle on Amazon*

If you don’t have access to an electronic die cutter you might want to try a little DIY stenciling.

  • The “Believe” wood block was painted with red acrylic paint and stenciled using the Believe stencil from DecoArts and a stencil brush*  

Another quick and easy Holiday DIY.

Need Stencils?  I have several DecoArts Stencils in my Etsy Shop.

“This is a sponsored post.  As a member of the StyleTechCraft Design Team I have been provided product and compensation in exchange for my creative ideas.  The views and opinions are my own.


Don’t Miss a Thing…Make Sure to Follow me

Sparkle your 4th…

Sparkle your 4th…

For the 4th of July, I decided to create a round-up of my past 4 favorite patriotic projects.

Enjoy!

Recycle your old blue wine bottle into a festive display.

Enjoy the party with friends.  (maybe even empty another blue wine bottle)

To make the project… read here.

Red White and Blue Table Top Decoration

White picket fences, fireworks and the good old red white and blue. 

A 4th of July Celebration Centerpiece with Fireworks, Flags, Banners and Pinwheels all

rolled into one.     To see how I made it… read more.

Welcome your visitors with an Americana Wreath for your front door.

How to make the Americana Ribbon Wreath

  • I used a 14″ ruled wreath from Smoothfoam.
  • Glue one end of the ribbon down onto the foam wreath and wrap the ribbon tightly around the first section.  Glue second end of the ribbon in place before starting second color. (I used Beacon Fabri-Tac Permanent Adhesive* to glue my ribbon in place.)
  • Using a thin floral wire, wire the small floral stems onto the base of the wreath.
  • Glue larger flowers and leaves onto the wreath over the wire.
  • Add large stemmed butterfly and ribbon to hang.

So many possibilities.

For more information… read more.

Deck out the deck with a fun denim banner made from old jeans.

Got any old worn blue jeans ready to be thrown out?

I started with my old blue jeans and 3″ Iron-on Embroidered Varsity Letters from Joy

in red and blue.

For more pictures and instructions read here.

Shop Dollar Tree for Red White & Blue Party Supplies*                      (*affiliate link)

*Disclosure:  This blog uses affiliate links.  If you choose to make a purchase using one of the links, I receive a small commission (at no additional cost to you) that helps offset the costs of maintaining this blog.  Thanks for your support!


For Creative inspiraton…Make Sure to Follow me.

Shop Your Fav Brands at Scrapbook.com

Happy New Year 2018

Happy New Year 1249

By the time we get through all the Christmas Festivities and Parties….

I’m ready to stay in and eat pizza by the time New Year’s Eve comes along.

Relaxing and low key is the answer.

We may even toast the New Year, that is if he’s still awake.

Happy New Years-Sue's Creative Workshop-www.sueeldred.com 1198

Even though we’re not having a big party, Party Hats are always fun.

I must have been really good this year…

because Santa brought me a new Silhouette CAMEO 3 Wireless Cutting Machine*

I used my new present to whip up some simple party hats

Happy New Years-Sue's Creative Workshop-www.sueeldred.com 1203

I used two strips of Ultra FX Glitter Vinyl from Styletech and laid them side by side.

I made sure my fonts lined up so that I could cut both colors at the same time.

Happy New Years-Sue's Creative Workshop-www.sueeldred.com 1208

  • I also cut a large mat shape from black cardstock and a slightly smaller mat shape using silver metallic vinyl.
  • I used the transfer paper to remove all the letters at once and laid them onto my shiny mat to create my hat.
  • I cut the bottom section of the mat shape and added a small strip of vinyl for extra decoration.  I created a band for my hat from two strips of cardstock and stuck the “happy new year” mat on the front.  (pretty simple)

Happy New Years Hat-Sue's Creative Workshop-www.sueeldred.com 1241

Now it’s a party.  (well sort of)

Shop Amazon Scrapbooking Supplies*

*Disclaimer:  This post is sponsored by Tape Technologies and uses ads and affiliate links.  If you choose to make a purchase using one of the links, I receive a small commission (at no additional cost to you) that helps offset the costs of maintaining this blog.  Thanks for your support!

a little Valentine Love

valentines-frame-sues-creative-workshop-4136

When I flipped over the calendar this morning it hit me.

Less than 2 weeks until Valentine’s Day.

After all these years…

it’s still fun to throw a few hearts around to make sure he doesn’t forget.

I created this cute little Valentine’s decoration using a clear 4″ x 6″

acrylic craft frame from Deflecto Craft Solutions, scrapbook paper and stickers.

The sticker in the middle says “I belong with you & you belong with me”.

I think he’ll get the hint.


“This is a sponsored post. As a member of the Deflecto Design Team I have been provided product in exchange for my creative ideas, views and opinions.”