A little Holiday Sparkle…

Sue Eldred's Holiday Sparkle Frame

Thinking of adding a little Holiday Sparkle this year?

Adding a little Holiday Sparkle doesn’t get much easier than this.

Holiday Sparkle Bow 2007

Gather up a few sparkly holiday sprigs…

tie them together with a jingle bell and satin ribbon and then glue them onto

your favorite frame.  Your frame will be dressed to impress.

Holiday Sparkle Frame in the Snow

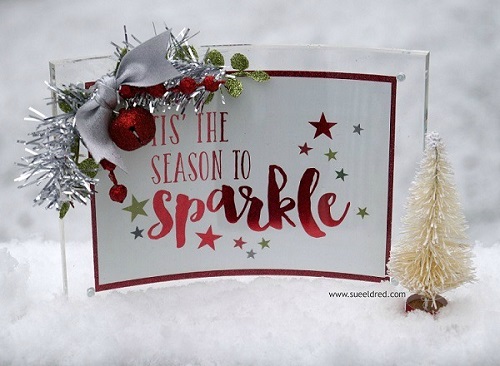
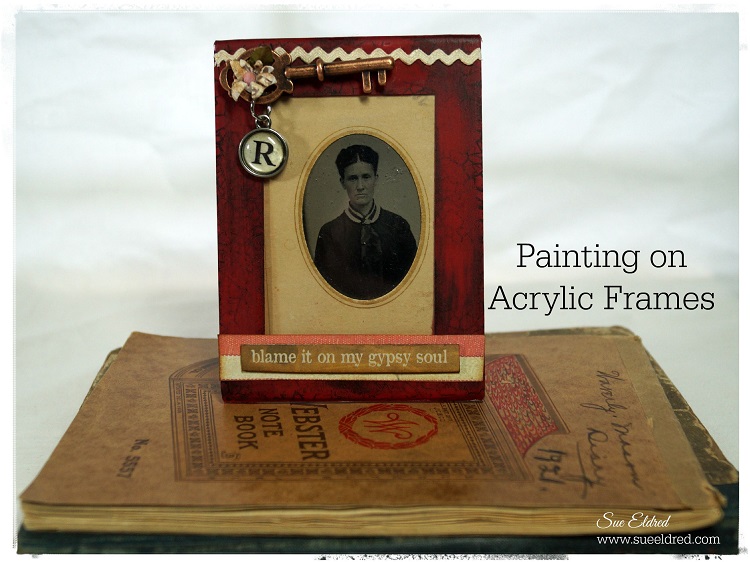
I loved the way this frame turned out, so sweet and simple. 

But let me tell you… I really struggled trying to get a good picture to show you.

Taking good pictures of clear acrylic frames is really hard.

I took over 150 pictures of this frame.  (no joke)

When it started snowing yesterday morning, I decided to try again.

It was such a beautiful snow, I didn’t even mind getting cold.

Holiday Sparkle Supplies 1808

For my Holiday Sparkle Frame I used the NEW Clear Magnetic Curved frame

that will be available from Deflecto Craft Solutions in January 2016.

I love the original curved magnetic frame* and I am so happy that they decided to

make it in a smaller size without a border.  (can’t wait to get my hands on a few more)

This new frame measures 5″ x 7″ and is perfect for a 4″ x 6″ picture or graphic.

(you can find the larger size here*)

“Tis the Season to Sparkle” comes from the 4×6 Horizontal Journaling Card Elements

from Simple Stories “Claus & Co.” collection layered on red glitter cardstock.

*Disclaimer: “This is a sponsored post. As a member of the Deflecto Design Team I have been provided product in exchange for my creative ideas, views and opinions.” This post uses Affiliate links if you choose to make a purchase, I receive a very small commission that helps maintain this site.  Thank You for your support!

Crafting with Office Supplies

crafting with office supplies 2 07793

When you think of crafting do you ever think office supplies?

Would you believe…

the “be happy” sign, which is now sitting happily on my fireplace mantel,

started out as a office name plate holder

A few stickers, chipboard letters, washi tape and voila a happy little reminder.

There are surfaces everywhere just waiting to be embellished.

Name plate 2

Deflecto Interior Image Sign Holder, 8.5 x 2 Inches, Nameplate (89105) (affiliate link)

“This is a sponsored post. As a member of the Deflecto Design Team I have been provided product in exchange for my creative ideas, views and opinions.”

Join Amazon Kindle Unlimited 30-Day Free Trial

Disclaimer:  This blog uses ads and affiliate links.  If you choose to make a purchase using one of the links, I receive a small commission (at no additional cost to you) that helps offset the costs of maintaining this blog.  Thanks for your support!

Painting on Acrylic Frames

Painting on Acrylic Frames

With all this new Home Décor chalk paint out on the market…

with it’s claims of being able to paint on most anything.  I decided to give it a test.

I’ve used it on wood, old frames, stuff like that.

Acrylic frames?  It was worth a try.

Creating a mask 5889

I created a mask using blue painters tape and applied it onto the front of a

Mini 3″ x 4″ Sign Holder* (*affiliate link) from Deflecto Craft Solutions.

Make sure to burnish the edges of the tape.

adding red paint 5890

I painted the surface of the frame with:

FolkArt Home Decor Chalk Furniture & Craft Paint in Imperial*

I used 3 coats of paint.  Make sure to allow good drying time in between coats.

adding black paint 5897

After allowing plenty of time for the red paint to dry and cure.

I gave the frame an aged look by applying a layer of Tattered Angels Decor and DIY Paint*

I wiped it off with a damp paper towel.  Leaving bits of the black streaks.

Crackle Stamp 5899

I stamped around the edges of the frame with a crackle background stamp

and  Tsukineko StazOn Ink Pad, Jet Black*

Carefully remove the blue painter’s tape mask.

At this point, I stopped and admired my frame for almost a month.

Just waiting for inspiration….

Rachael Cunningham Parr 7560

Meet Rachael Cunningham Parr. 

I found Rachel, a tin type, years ago while hunting for treasures.

If Rachael is your relative, I’m pretty sure she wasn’t really a gypsy.

(She really is a beautiful woman.)

I embellished the frame with some vintage rickrack, key, and a tiny flower.

“R is for Racheal” was made with Metal Type Charms by Tim Holtz*

Once inspired…  I created a couple more frames.

The frames uses charms and hardware from Canvas Corps Brands 

and Chitchat Word Stickers by Tim Holtz*.

Now to try this on a bigger frame!

 “This is a sponsored post. As a member of the Deflecto Design Team I have been provided product in exchange for my creative ideas, views and opinions.”

*Disclaimer:  This blog uses ads and affiliate links.  If you choose to make a purchase using one of the links, I receive a small commission (at no additional cost to you) that helps offset the costs of maintaining this blog.  Thanks for your support!

Creating a Decorative Display Board for all my Little Pretties

Smoothfoam Display Board 07114

My project started as a Memo Board and… 

While I was looking for some push pins I stumbled across a collection of little pretties.

Tucked away in a cabinet along with a lot of other embellishments were these little

metal frames.  Something that I’d been hoarding since my K & Company days.

I added those frames along with some other little pretties onto my board.  (Love!)

Memo Board Products

To make my Memo/Display Board I used:            (*amazon affiliate link)

Directions:

  1. Paint wood frame with cream acrylic paint.
  2. Cut the Smoothfoam sheet a 1/4″ larger than the center opening of the frame.
  3. Apply spray adhesive to the front of the Smoothfoam and lay onto the fabric.
  4. Wrap and glue the fabric around the back of the Smoothfoam.
  5. Glue the frame onto the front of the covered Smoothfoam.
  6. Decorate the top and bottom of the frame with dimensional flowers.

*My little pretties are stuck into the display board with decorative garment pins.

A really fast and easy project.

This project was created for and sponsored by Smoothfoam.

Shop Amazon Scrapbooking Supplies*

Disclaimer:  This blog uses ads and affiliate links.  If you choose to make a purchase using one of the links, I receive a small commission (at no additional cost to you) that helps offset the costs of maintaining this blog.  Thanks for your support!

Make a Lucky Hat for St. Patrick’s Day

Feeling a little Irish? 

Need a Lucky Hat for St. Paddy’s Day?

Using only a few Smoothfoam shapes you can make yourself a Lucky Hat centerpiece

in no time.  A fun centerpiece for all your “GREEN” celebrations.

Here’s what you’ll need:                                                                                    (*affiliate link)

Directions:

  1. Paint 8″ Half Ball and 10″ Disc with English Ivy paint.
  2. Repaint Disc and Half Ball with Kelly Green paint, allowing some of the darker paint to show through.
  3. Paint sides of 8″ Disc with Black paint.
  4. Glue 8″ Disc onto the 8″ Half Ball.
  5. Center and glue onto the  10″ Disc.
  6. For a shiny finish, paint the entire piece with Mod Podge.
  7. To create gold letters, paint the chipboard letters with a gold paint pen.

Have a great day and may the “Luck of the Irish” be with you!

 
Click on the pictures for product ordering through Amazon*.

Disclosure:  This post uses affiliate links.  If you choose to make a purchase using one of the links, I receive a small commission that helps offset the cost of maintain this site.  Thanks for your Support!

This project was created for and sponsored by Smoothfoam.

Shop Amazon Scrapbooking Supplies*


Don’t Forget to SMILE Today!

Don't forget to smile 2243

A fun little project to brighten your day.

Along with the Art Play Paintables that I used for the ADORNit Blog Hog,

I also received some great wood pieces, a pad of Blender Basics and some fun Art Play Prints.

Adorn It Blender Basics 2139

Shop Your Fav Brands at Scrapbook.com

To make the project:

  1. Paint the edges of the wood pieces with black acrylic paint.
  2. Glue paper from the Blender Basics pad onto the wood pieces using Mono Adhesive glue.
  3. Trim around the shapes with a craft knife and lightly sand the edges with a sanding block.
  4. Distress the edges with Vintage Photo Distress Ink and a Ink Applicator.
  5. Glue the two pieces together.
  6. Cut around the inner circle from the “Smile” Art Play Prints and glue to the center.

Have a great day and don’t forget to SMILE!

This project was created by me, materials provided by ADORNit. 

*Disclaimer:  This blog uses ads and affiliate links.  If you choose to make a purchase using one of the links, I receive a small commission (at no additional cost to you) that helps offset the costs of maintaining this blog.  Thanks for your support!

Shop Amazon Scrapbooking Supplies*

Shabby Vintage Clipboard

Shabby Clipboard 2509

More new products today from Clear Scraps.

This was a fun project.

When I first got this new acrylic clipboard I wasn’t sure how I was going to use it.

Once I got a clearer vision on how I wanted it to look, inspiration soon followed.

Now, I can’t wait to make another one.

Here’s the link to all of the NEW PRODUCTS from Clear Scraps.

Shabby Vintage Clipboard

Supplies Used:

  1. Spray the back of the clipboard with the IrRESISTible Texture Spray to give it a soft lacey look and dab the edges with White Picket Fence paint.  (Both paints work great on acrylic.)
  2. Adhere collage papers and vintage photo into place or allow the clip to hold them.
  3. Adhere mirror embellishment to corner of clipboard
  4. Embellish Clipboard with Vintage Trim and Lace.
  5. Add small adhesive rhinestones and a vintage style button to the clip and tie a crinkle ribbon bow.

DSCN2510

This project was created for and sponsored by Clear Scraps.

Basic Grey’s: Herbs & Honey Home Decor

Herbs & Honey Home Decor

One of the things I look for when I go treasure hunting are picture frames.   Square ones in particular.  I am just drawn to square frames.  Doesn’t matter how ugly the picture is inside.

Herbs & Honey Home Decor before

I gave the gold frame a white wash look with Tim Holtz Distress Paint in Antique Linen. (frame cost .50)

Herbs n Honey Home Deco close up

I made a simple 3″ pinwheel using two different pinks from the “Herbs & Honey” Collection.  The middle of the pinwheel was made using “bottle cap” stickers from the same collection.

What do you look for when you go treasure hunting?  (I think that sounds better than garage sales)