Gel Press and the Colors of Autumn

the-colors-of-autumn-print-using-gel-press

The first time I watched a video of someone using a Gel Press I was completely intrigued.

The project they were making was artsy, colorful, very cool and it looked like so much fun.

When I got the chance to participate in the Designer Craft Connection monthly design challenge

and receive a Gel Press plate for “free”… I was more than excited.

gel-press-supplies-sues-creative-workshop

Never heard of a Gel Press?    (Well…It’s just about the coolest thing.)

The Gel Press is a reusable Gel Printing Plate.

Gelatin printing is a form of mono-printing in which a gelatin slab is used as a printing plate to create a variety of images and backgrounds using acrylic paint.  Simple to use.  Ready for Printing.

the-colors-of-autumn

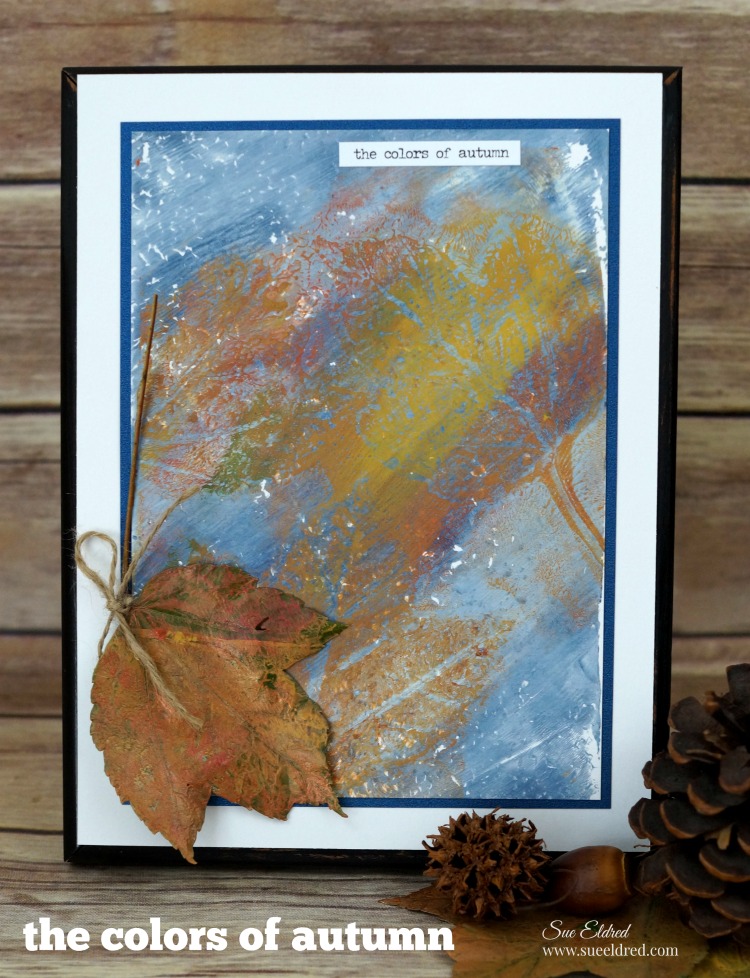
Here’s how I created “The Colors of Autumn Print”…

Supplies Needed:

Directions:

making-a-gel-press-background

  • Remove clear protective film from your gel press.  Apply paint to the exposed Gel Plate.
  • Roll paint on as a thin layer with brayer.
  • Create design by pressing textured item into wet paint.
  • Lay paper onto painted surface.
  • Gently rub paper with hands to create a transfer image onto the paper.
  • I traced guidelines around the paper onto my scratch paper to make it easier to line up the second printing.
  • Pull paper away from printing plate to reveal your background.

creating-the-leaf-background-on-the-gel-press-sues-creative-workshop

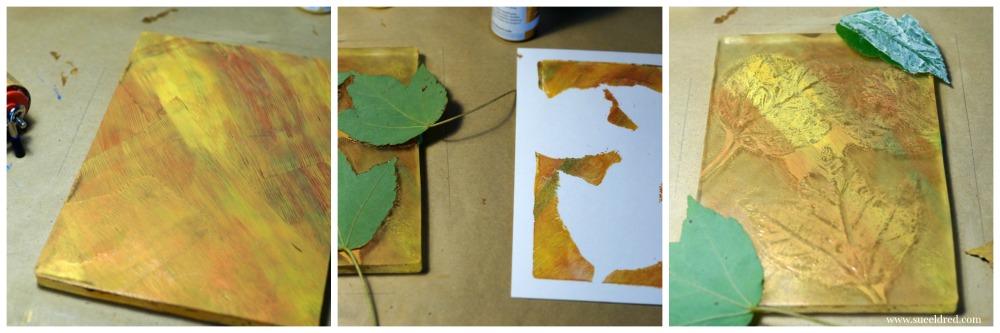
  • I created a second background just like the first by using fall colors.
  • I placed 3 leaves into the paint.
  • I place a second piece of white paper over the gel press and pressed.  This removes most of the paint from the background.  Leaving the paint underneath the leaves.
  • Remove leaves from the gel press.  I masked the corners with a couple of additional leaves.
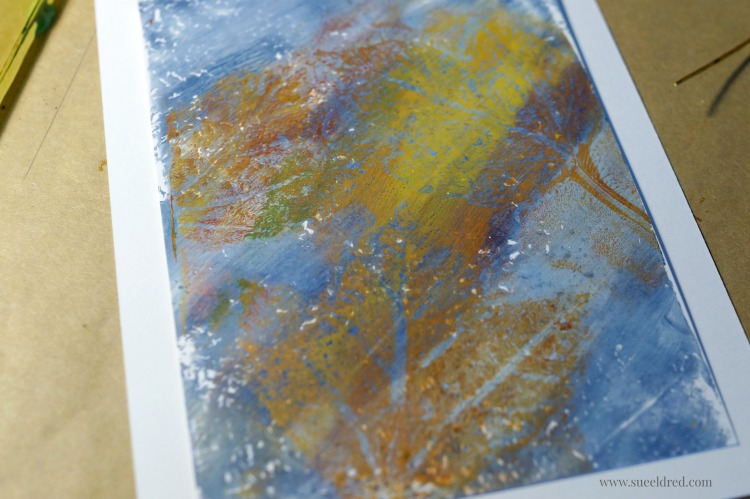
  • Lay the first blue background paper over the press.  Lining the paper up with the guidelines.
  • Gently rub paper with hands to create a transfer image onto the paper.
  • Pull paper away from printing plate to reveal your leaf prints.

autumn-background

  • Mat print and embellish with “the colors of autumn” chit chat sticker.

the-colors-of-autumn-sneak-peek-815

The “Colors of Autumn Print” was created for and sponsored by Gel Press.

gel-press-logo

Make sure to check out the video on the Gel Press site.


*This post uses Amazon Affiliate links.  I am a Amazon Affiliate.  If you choose to purchase an item from Amazon by clinking on the product link, I will receive a small commission that helps offset the cost of running this blog.


Paper Sculpting made easy…

Another Fun Blog Hop!

As a Deflecto Design Team member, I am super excited this week to play with our friends over at Stampendous.  With two amazing teams joining in the fun you will want to check in everyday of the hop.  There will be some fabulous projects and we’re going to be showing them off all week long.

Make sure to scroll all the way to the bottom for a chance to win some awesome prizes.

Deflecto Stampendous Blog Hop Logo 2

 Paper Sculpting made easy…

Deflecto Stampendous Blog Hop 5022 1

Years ago, when I still had my store, we had a Paper Sculpting Card Class

using of all things a sunflower stamp.  (oh, my…cutting all those petals!!!)

While the end look was beautiful, I thought the ladies were going to revolt.

They held that card over my head for years.  (it was not for the faint of heart)

Matter of fact, I was reminded of that card not that long ago.


Do you love the look of paper sculpting but hate all that fussy cutting?

With this stamp and die set from Stampendous, there is minimal cutting and the flower assembly

goes together very quickly.

The Cling Rose Bouquet Rubber Stamp Set from Stampendous comes with various sizes

of flowers each meant to be used separately or layered together to create one large dimensional flower.

When used with the matching die set, you get amazing results.

Flower Close Up 5015

Here’s what I used on my frame:

Paper Sculpting made easy

Directions:

  1. Stamp the flowers and leaves onto the patterned paper.  (see above image)
  2. Die-cut the shapes using the thin dies and big shot die-cutting machine.
  3. Cut the leaves off the rosebud and the bottom portion of the second stamped rose image.
  4. Use a gray marker to go around the outside edge of each image to hide the white core of the patterned paper.
  5. Using a foam mat or mouse pad and a large ball stylus, turn the shapes over onto the mat and gently rub the shapes with medium pressure on the back of the shapes.  This will give the shapes added dimension.
  6. Using thin foam mounting squares, adhere the flower sections together in this order: large rose, medium rose, rosebud and bottom section of medium rose to create one large rose.
  7. Cut out the 4″ x 6″ What a Wonderful World section and adhere onto a 5″ x 7″ polka dot paper layer.
  8. Add layers inside the clear acrylic beveled frame from Deflecto.
  9. Mount dimensional flowers and leaves onto the front of the frame using thin foam mounting squares.

You’ll want to get your commenting fingers ready!  Each comment on a post this week will enter you to win a fabulous prize package! (one comment per post, per person)  Contest open to USA residents only.  We have three prizes, and each will have a 3 Tiered Cake Stand from Deflecto AND the Stamp and Die Sets from Stampendous.

Cupcake StandCRS5087_DCS5087_SSH57

Now click on the links below and get to hoppin’!  Remember to comment on each blog and then return to the Deflecto Blog and leave a comment there for your chance to win.

Are you social? We are too! Please check us out at the following locations…


This is a sponsored post. As a member of the Deflecto Design Team I have been
provided product in exchange for my creative ideas, views and opinions.”

*This post uses Amazon Affiliate links.  I am an Amazon Affiliate

all things are possible if you believe…

EasterBlogHop

Today, I’m joining the Paper House Design Team for a Easter Blog Hop.

For this hop, we were all given adorable Easter stickers along with the Faith Paper Crafting Kit.

Easter Card materials 5225

I was racking my brain trying to come up with a cute Easter Bunny layout

(ready to steal pictures from my daughter-in-laws Facebook page) when it hit me.

Why not make a card instead.

Easter Card 5237

Easter’s so much more than candy and eggs.

Easter Card Close Up 5243

The Faith kit came with lovely white puffy words that wasn’t quite right for this card.

So…. I used my Tsukineko StazOn Midi Ink Pad, Spiced Chai(which is permanent)

along with an ink applicator and rubbed brown ink onto the white letters.

I used the “HOPE anchors the soul” sticker and stuck it onto a small scalloped

circle.  I mounted the circle onto the corner of the card.

A simple card of encouragement.  (who doesn’t need that?)

PH_25_Gift_Card

Would you like a chance to win a $25 gift certificate to Paper House?

EasterBlogHopTOENTER2

Good Luck and Happy Hopping!


*This project was created for and sponsored by Paper House Productions.


Christmas in a Pickle Jar

Christmas in a Pickle Jar 1127

Christmas Crafting with Repurposed and Recycled Items…

Sometimes you have to find and save something for awhile before their purpose is revealed.

Like the base used on my Christmas in a pickle jar.  (the inspiration for this project)

This past summer we had a new ceiling fan installed in my son’s room.

It was flush mounted to the ceiling, so, they didn’t use all of the parts that came with the kit.

I came across the unused parts in the garbage and decided to save them.

FYI…It’s not hoarding if you use them.  (I’m just saying.)

Because I wanted to be informative when writing this post,

I emailed my brother for the correct name of the part.  I am told it is called a canopy.

I glued the canopy onto the jar using Beacon Glass, Metal & More Premium Glue*.

Here’s what I used for my Christmas in a Pickle Jar:  

*Disclaimer:  This post uses ads and affiliate links.  If you choose to make a purchase using one of the links, I receive a small commission (at no additional cost to you) that helps offset the costs of maintaining this blog.  Thanks for your support!

I painted the pickle jar lid and the old knob with semi gloss black spray paint.

I added a circle cut from a decorative scrapbooking paper and glued it onto my lid before

gluing on the knob.  (I could have added a hole and screwed on the knob, this was easier.)

I spruced up the plain little wreath by adding a new bow and jingle bell and a small holly

berry embellishment.  I added the ribbon to the neck of the jar before gluing on the wreath.

The little wood deer would of looked fine just as it came.

Instead, I decided to rub brown ink onto the deer to give it a stained look.

I used Vintage Photo Distress Inkpad* with a Ink Applicator & Blending Tool* (*affiliate link)

To make installing the deer a little easier, I glued the finished deer onto the front of one

of the trees before I placed it in the jar.

The Cream Bottle Brush Trees* come with a little wood base.

I added a super sticky craft glue dot under the base of each Cream Bottle Brush Tree*

before adding to my jar.

You can use a liquid glue instead of the sticky glue dots.  (this was just faster and easier for me)

Next, I added Epson Salts into my jar for snow.

A great Holiday Gift Idea.   

Shop Your Fav Brands at Scrapbook.com

Join Amazon Kindle Unlimited 30-Day Free Trial

Design Challenge with Little B…

I played a little hooky from all the projects on my never ending “To Do” list…

and did a little card-making (just for fun).  Thanks in part to a wonderful box of goodies

that I received from the good people at Little B LLC, the sponsor of this month’s

Designer Craft Connection’s Manufacturer Challenge.

(make sure to check out the great giveaway prize at the bottom of this post)

Graphic 45 and Little B Butterfly Card 91

My Butterfly Card uses mini dimensional butterflies from Little B

and scrapbook paper from Graphic 45’s Rare Oddities Collection.

To create the division between the butterflies,

I used a really thin Black and White Striped Decorative Tape

Little B Wedding Card 082

This Simple little card uses all kinds of Little B goodies.

Directions:

  1. Using the Lace Doily Punch, punch both sides of a white cardstock layer.                        (Approx. 4 1/4″ x 5 1/4″)
  2. Add Gold Foil Hearts and Gold Foil Toile tapes to the center of the punched cardstock.
  3. Add a thin strip of Gold Foil Love on top of the seem between the two previous tapes.
  4. Layer white cardstock onto a piece of gold cardstock and adhere to a white card base.
  5. Using three of the smaller layering heart dies, cut and emboss a small heart frame.
  6. Adhere the heart frame onto the bottom right corner of the card.
  7. Using a small Wedding bouquet from the Bride and Groom stickers, stick bouquet onto the center of the heart frame.
  8. Tie white sheer ribbon around top of the card.

Finished Card Size:  4 1/2″ x 5 3/4″


Little B img-logo

♥ Thank You Little B LLC for generously providing the dies, punches, dimensional stickers,

and decorative tapes used on these cards.   (You are awesome!)


DCC Little B Giveaway

Little B LLC is so awesome they’re giving away this prize package to one lucky winner.

To enter to win leave a comment on this post and/on the other designers’ blogs

and “like” the Little B LLC Facebook page… that’s all there is to it.

The more you comment the better your chances are to win!  Open to residents of US and Canada only.

Contest ends 10-29-15.

Check out the Designer Craft Connection Blog for participating Designer projects.


Making a Playhouse Banner with oly*fun

Making a Playhouse Banner with Oly Fun 9634
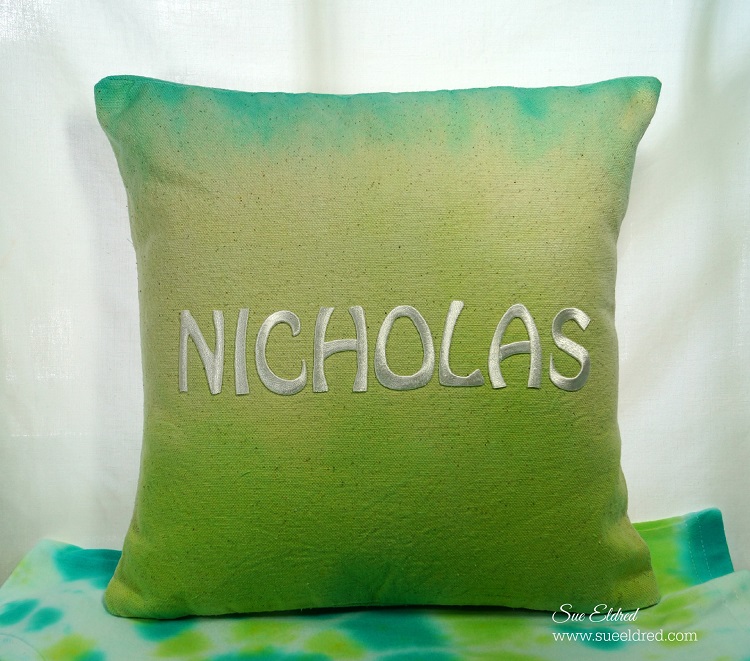
My grandson Nicholas is celebrating his 5th birthday in just a few days.  (but who’s counting?)

He’s having two parties this Saturday.  One for the kids and the other for family.

Such a lucky little guy.  (Born on his Daddy’s birthday.)

Since the family party is at his house, I had an idea to make a bright colorful banner to decorate

the new playhouse.

I had recently received a selection of oly*fun to work with and thought it would be perfect to use.

It was super easy to put together.

Playhouse 9651

What exactly IS oly*fun? 

oly*fun is a specially engineered material that features some of the best things about fabrics AND

papers.  Easy to cut or die-cut and it will not fray.  It is great for outdoors

Supplies 9625

 Here’s what I used:

Supplies 9631

Directions:

  1. Stencil the check pattern using the black acrylic paint on the orange oly*fun.
  2. Create a banner pattern on cardstock.
  3. Cut out the banner pattern and trace onto the stenciled oly*fun.
  4. Trace and cut several banners out of the black and green oly*fun.
  5. Cut strips and circles to decorate the banners.  Glue onto banner with Fabri Tac Glue.
  6. Fold top of the banner and staple onto the piece of twine.
  7. Tie the banner onto the top of the playhouse and watch the kids play.

Playhouse 9644

A Special Thanks to Fairfield World for generously providing the oly*fun for this project.


Crafting with Office Supplies

crafting with office supplies 2 07793

When you think of crafting do you ever think office supplies?

Would you believe…

the “be happy” sign, which is now sitting happily on my fireplace mantel,

started out as a office name plate holder

A few stickers, chipboard letters, washi tape and voila a happy little reminder.

There are surfaces everywhere just waiting to be embellished.

Name plate 2

Deflecto Interior Image Sign Holder, 8.5 x 2 Inches, Nameplate (89105) (affiliate link)

“This is a sponsored post. As a member of the Deflecto Design Team I have been provided product in exchange for my creative ideas, views and opinions.”

Join Amazon Kindle Unlimited 30-Day Free Trial

Disclaimer:  This blog uses ads and affiliate links.  If you choose to make a purchase using one of the links, I receive a small commission (at no additional cost to you) that helps offset the costs of maintaining this blog.  Thanks for your support!

Getting Creative with Resin

Getting Creative with Resin 8181

I’ve always wanted to use resin in a project but have always felt somewhat intimidated.

Thanks to an opportunity with Environmental Technology Inc., the makers of

jewelry resin and much more, I finally got my chance.


EnviroTex Jewelry Resin

And… after watching this video.  I felt confident to start.

I couldn’t believe how easy it was and how happy I was with the results.

The hardest part was deciding what to make and what to fill.

Halloween before the resin 2880 Creative before the resin 2883

For my Projects:

  • I started with some over-sized bottle caps from Maya Road which I spray painted black.
  • I used a circle punch to make a background from scrapbook paper.
  • I used dimensional stickers, metal pieces, regular stickers and glued everything in place using  white craft glue.
  • I measured and mixed the resin according to the instructions and filled the bottle caps.
  • Then it was time to wait for the resin to cure.

waiting for the resin to cure

The original plan was to add a hanger on the back, and use them as a decoration.

But… I had a better idea and decided to add a magnet to the back instead.

I really, really like them.

Resin Work in Progress 2908

Now that I’ve seen how easy it is, I’ve got a few more things in the works.

Shop Amazon Scrapbooking Supplies*

*Disclaimer:  This post uses ads and affiliate links.  If you choose to make a purchase using one of the links, I receive a small commission (at no additional cost to you) that helps offset the costs of maintaining this blog.  Thanks for your support!

Frosted Holly Wreath Ornament

Frosted Holly Wreath Ornament

While most of you are outside basking in the Summer’s warmth…

some of us are inside thinking “cool” thoughts.


robins nest smoothfoam blog hop


As you know… I love participating in the Designer Craft Connection’s Monthly Design Challenges.

The theme for the Challenge was Christmas in July.

This month’s Manufacturer Design Challenge was sponsored by Robin’s Nest and Smoothfoam.


Holly Wreath 7192

My project for the challenge is a simple ornament using a small Smoothfoam Wreath

and a variety of dew drops, tear drops, diamond drops and trim from Robin’s Nest.


To Make the Wreath:

  1. Apply a layer of embossing paste or Snowtex to cover the front and sides of the wreath.
  2. Allow time for the paste to fully dry before continuing.
  3. Glue tear drops and dew drops on the front of the wreath with a good liquid craft glue.
  4. Glue trim around outside of the wreath.  I originally had no trim on the outside of the wreath.  By adding the decorative trim around the outside it gave me the pop of green that I needed to accent the wreath.
  5. Next…Punch or cut a 3″ circle from red glitter cardstock.  Find the center of the circle and start forming the snowflake pattern using 12 diamond drops.  Glue small metallic dew drop in the center of the snowflake.
  6. Glue hanger on the back of the wreath before adding the red snowflake circle.


Wreath Close Up Side 7217

A Big Thanks to Smoothfoam and Robin’s Nest for providing the products to work with.


DCC image

To see what the other designers have come up with. 

Click on the Designer Craft Connection Logo on my right sidebar to start hopping.


DIY No Sew Pillows to Dye for…

A Pillow to Dye For

Recently, I participated with a group of Designers in a Manufacturer Challenge sponsored by

Fairfield World the makers of Pillow Forms, Batting, Poly-fil®… and a whole lot more.

After a little good natured trash talking between the designers, the challenge was dubbed the

“Pillow Fight” and with that it was game on.

Not being much of a seamstress I knew I had to take it in another direction.

Hopefully, what I lack in sewing skills I’m making up for in quantity and possibly inspiration

for other non-sowers like me.

If you happened to see my post, “Tie-Dying with Nick” then you’ll know I’m on a little bit

of a tie-dying kick.  (why stop now?   oh… and make sure to check out the bonus project at the end.)

Nick's Tie Dye Pillow 6430Warren's Pillow

Here are a couple of pillows I made for my grandsons using a one-step tie-dye kit

and the Ombre Technique.  (see instructions below)

It was such a fun and easy project that I let my grandson in on the fun.

Thanks to canvas pillow squares and pillow forms there is no sewing involved.

(The red pillow above also uses the ombre Technique only with one color of dye.)

Iron-On embroidered letters allowed me to easily personalize the pillows for the boys.

Nick and the Ombre Technique

For my No Sew Pillows I used:                                                                  (*amazon affiliate links)

These are the instructions included with the Tulip dye kit.

  1. Apply dye.
  2. Dip brush into dye and apply.
  3. Dip brush into water and apply.
  4. Cover dyed fabric with plastic wrap to keep damp.
  5. Let set for 6-8 hours or longer for intense colors.
  6. Rinse well with water until excess dye is removed.
  7. Fill washer to “large load” setting with hottest water suitable for fabric and a small amount of laundry soap.  Wash and dry separately.  Wash separately for the first few washes.

Directions for Stenciling:

The pattern on the Red Pillow was made using the 12″ Doily Stencil*.

  1. Lay protective paper layer inside the canvas pillow square before stenciling.
  2. Center and tape stencil onto pillow with removable painter’s tape so that the stencil won’t move.
  3. Stenciling is a “dry” brush technique. Using a stencil brush, dip just the tip of your brush into the paint. Tap off excess paint before applying to prevent the paint from seeping under the edges of the stencil.
  4. Apply paint with stencil brush in a straight up and down motion called stippling.
  5. Stuff pillow with pillow form or Poly-fil®.

And for an added bonus… Tie Dyed Socks!!!  (Someone stop me)

Tie Dyed Socks

This project was sponsored by Fairfield World, Canvas Corp Brand, Tulip Brand and DecoArt.

*DisclaimerThis post uses ads and affiliate links.  If you choose to make a purchase using one of the links, I receive a small commission (at no additional cost to you) that helps offset the costs of maintaining this blog.  Thanks for your support!

Join Amazon Kindle Unlimited 30-Day Free Trial*