Shared Kindness…

 (project tutorial at Bottom of Post)

Blessings are the Harvest of Kindness

When I create, I create projects for a variety of reasons. 

Sometimes the project helps me tell a story. 

This particular project reminded me of a sweet exchange that happened between

my mom and a stranger several years ago. 

Just a reminder… World Kindness Day is November 13th. 

Please take a moment to spread a little kindness.

Shared kindness…

After eating lunch with my parents and sister at the local Steak and Shake,

Dad got up to pay the bill at the counter.  I stayed back to help Mom. 

When Mom got up, she noticed a lady sitting at a nearby table and said, “I know her”. 

Mom was in later stages of dementia, so I questioned her, “I don’t think we do Mom” I said. 

As I was trying to get her to leave, she said:  “I want to talk to her, I know her.” 

The lady must have heard us and looked up.  I quietly asked, “Does she know you?” 

Mom had worked at a school for many years, and she knew a lot of people that I didn’t.

The lady shook her head no.

Then without missing a beat, the lady got up, put my mom’s hand in hers and said:

“So, you think you know me?” and introduced herself.

After Mom struggled to get her name out, the woman smiled and said, “so nice to meet you”.

And with that, my mom was happy and left the restaurant with a smile on her face.

It only took a minute for this sweet woman to make a difference.

Mom’s been gone for a while now, but It’s something I’ve never forgotten.

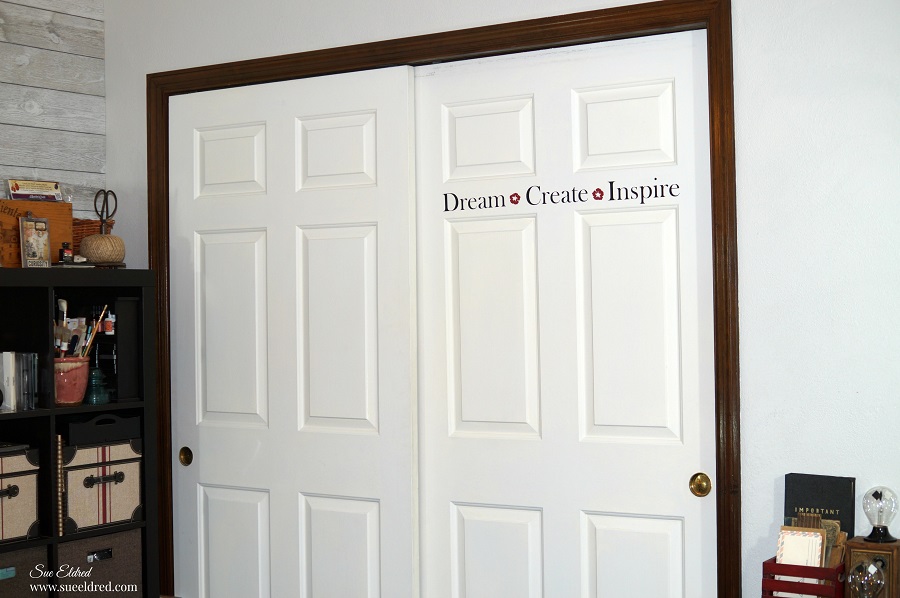
To create the Wood Plaque…

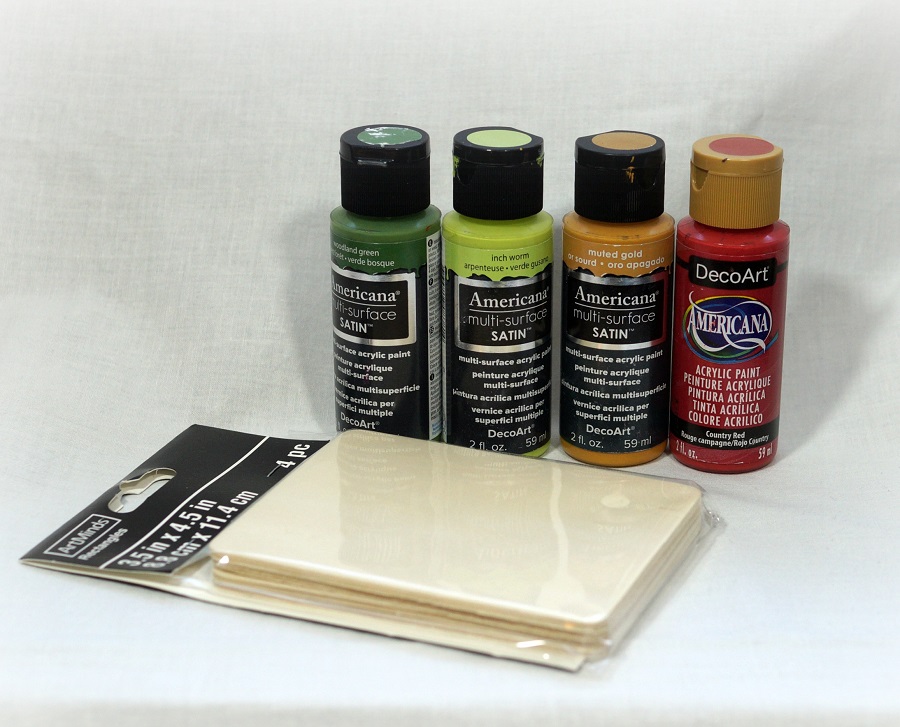
Supplies used:                                  (*affiliate link)

*Disclosure:  This blog uses ads and affiliate links.  If you choose to make a purchase using one of the links, I receive a small commission (at no additional cost to you) that helps offset the costs of maintaining this blog.  Thanks for your support!

Directions:

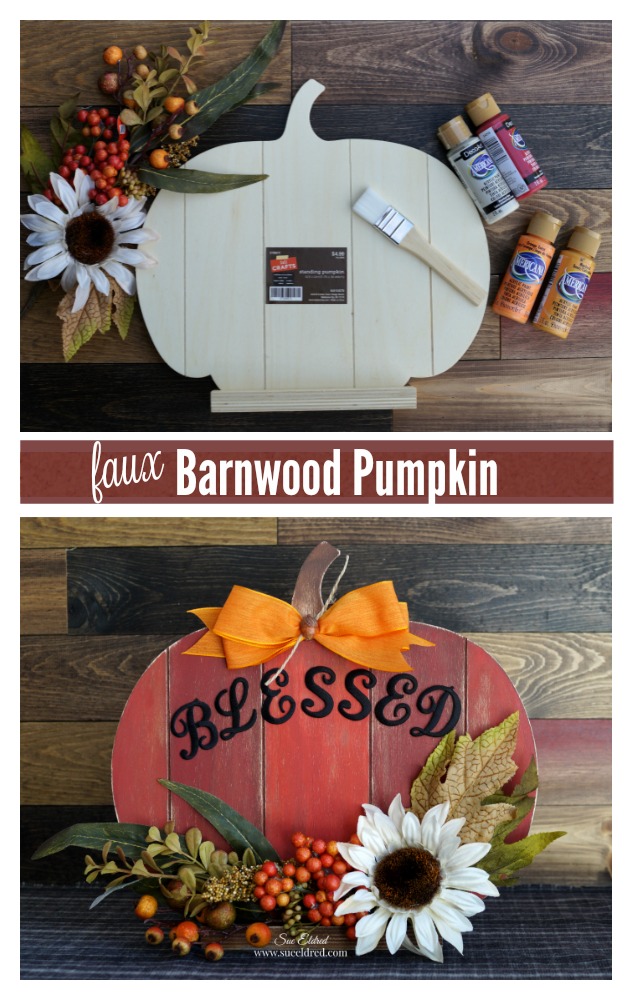
  • Lightly sand the wooden rectangle with the sanding block to prepare the surface for paint.
  • Paint four horizontal autumn hued stripes on the wood.
  • With a flat dry brush blend the colors together to create a “Fall Rainbow”.
  • Lightly sand over the painted surface to smooth the grain of the wood.

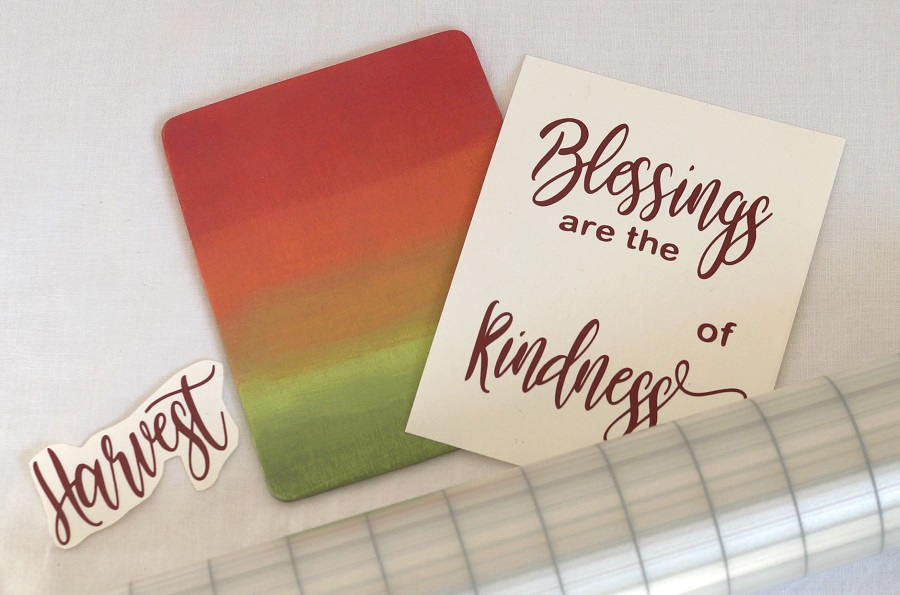
  • Using an electronic die cutting machine, I cut the words.
  • Using a weeding tool carefully remove the negative spaces in and around the letters.
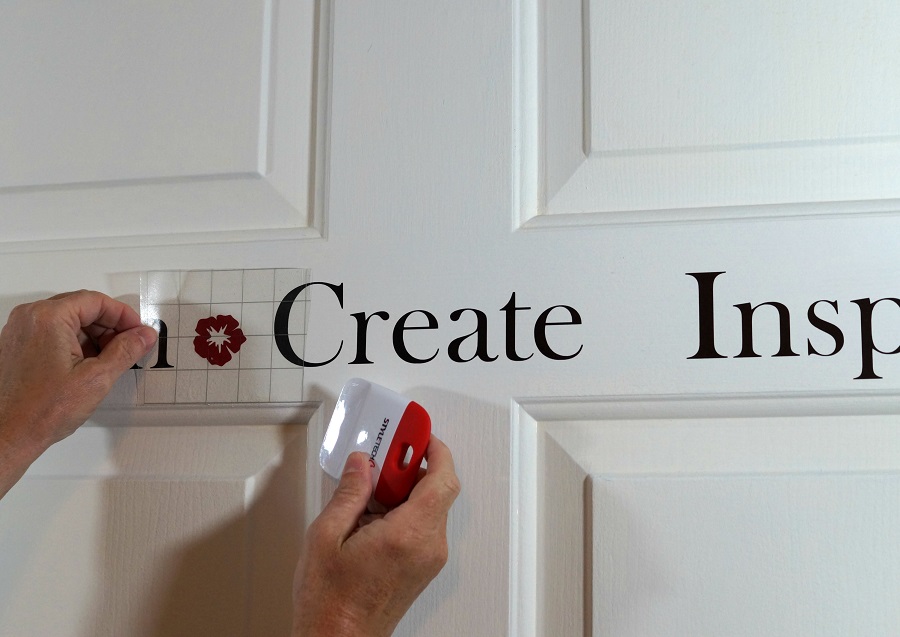
  • Place a piece of Vinyl Transfer Tape* over the letters.  Rub over the letters using a vinyl scraper tool to help the vinyl cling
  • Apply words onto a small wood rectangle.


“This is a sponsored post.  As a member of the StyleTechCraft Design Team I have been provided product and compensation in exchange for my creative ideas.  The views and opinions are my own.

You can now find the full line of StyletechCraft online at ATSM.

Faux Barn Wood Pumpkin

Add a little Joy to your Fall Home Décor with this quick and easy Fall Centerpiece.

I wanted to make something new to decorate my mantel for fall this year.

So…I made a quick (or not so quick) trip to my local Hobby Lobby.

While there, I found this unfinished wood pumpkin and a fall floral pick (among other things).

It went together really quick.   I had it painted and put together in no time.

To be honest, the project didn’t turn out exactly how I envisioned in my head,

I think it turned out better.  (my original thought was to paint it in soft muted fall colors)

The best part of the whole process was…

this simple wood painted pumpkin inspired my son to spend the next few hours arranging

and rearranging my mantels until he got them just perfect.  (and that makes me happy!)

Faux Barn Wood Pumpkin Supplies Needed:

Shop Your Fav Brands at Scrapbook.com

*Disclosure… This blog uses ads and affiliate links.  If you choose to make a purchase using one of the links, I receive a small commission (at no additional cost to you) that helps offset the costs of maintaining this blog.  Thanks for your support!

Create the look of old barn wood using a wood pumpkin cut-out and acyrlic paint.

Directions:

  • Paint the wood pumpkin with brown acrylic paint.  Make sure to get down into the grooves.
  • After the brown paint has dried paint the sections of the pumpkin with alternating colors.
  • Sand the pumpkin with a fine grit sandpaper* to distress and smooth the wood.

Glue the embroidered letters and floral pick onto the wood pumpkin with Beacon 3 in 1 Glue*.

Faux Barn Wood Pumpkin

  • Create a bow with sheer ribbon tied in the center with twine and glue onto the top of the pumpkin for the finishing touch.

A quick and easy Fall Centerpiece for my mantel.  

You can find a wide selection of Joy® embroidered iron-on letters 

and alphabet sheets in different sizes at your local craft stores.  

“This is a sponsored post.  As a member of the Joy® Design Team I have been provided product and compensation in exchange for my creative ideas.  The views and opinions are my own.

Pin Me

Barn Art

If you had a newly remodeled little red barn…

would you make Barn Art for its newly painted walls?

Our newly remodeled little red barn is finally done and it’s looking really good. 

(maybe even cute)

So…I decided to make it some art using my Silhouette Cameo Electronic Die Cutting

Machine* and luster vinyl from StyleTechCraft.  A simple little project and fun sign that’ll

adorn the barn walls along with the old personalized license plates that I found.

*Disclosure:  This blog uses affiliate links.  If you choose to make a purchase using one of the links, I receive a small commission (at no additional cost to you) that helps offset the costs of maintaining this blog.  Thanks for your support!

I will be posting the complete barn remodel in the next week or two.

Here’s a sneak peek until I do.

Don’t you just love this old weathervane?

It had been sitting in the barn for years just waiting to be polished up good as new.

“This is a sponsored post.  As a member of the StyleTechCraft Design Team I have been provided product and compensation in exchange for my creative ideas.  The views and opinions are my own.

Shop Your Fav Brands at Scrapbook.com

Indigo Shibori Dyeing

Indigo Shibori Dyeing

We had a little fun this past week-end and tried something new….

My daughter asked me to purchase a Indigo Dye Kit* for her birthday.

She wanted to use it when she came home.  (I’m always up for trying something different.)

Shibori is a Japanese term for methods of dyeing cloth.  Similar to tie-dyeing you create patterns by binding, stitching, folding, twisting, and compressing.  In Japan, the earliest known example of cloth dyed with the shibori technique dates back to the 8th century where indigo was the main dye used.

Shibori Indigo Dye Kit from Made Kits by One-OneThousand*

The kit came with everything we would need:

  • Thiox
  • Soda Ash
  • Pre-reduced Indigo
  • Rubber Gloves
  • Rubber Bands
  • Acrylic Plates
  • Great Instructions

Everything except a very large bucket and items to dye.

It said right on the front of the box…”no chemistry degree needed”.

*Disclosure:  This blog uses ads and affiliate links.  If you choose to make a purchase using one of the links, I receive a small commission (at no additional cost to you) that helps offset the costs of maintaining this blog.  Thanks for your support!

My daughter had purchased a few new items to dye and we quickly added other items like…

pillowcases, old doilies, vintage linens, old jeans and other miscellaneous items.

The kit comes with great instructions on how to mix the Thiox, Indigo and Soda Ash with water.

It is recommended to use a 5 gallon bucket with lid.

After everything is mixed cover the bucket tightly with the lid and let it rest for one hour.

When you are ready to start dyeing, remove the cover.

The liquid will be a greenish-yellow in color and you will see a cluster of bubbles called

“the flower” and a film on top.  (It will have a smell, that’s normal, they said)

Carefully scoop out the bubbles “the flower” and set aside with a little of the dye liquid.

The instructions say that you can put “the flower” back in the bucket after your done

dyeing to keep the dye bucket going for future dye projects.  (hmmm.)

The dye can be used for several dye sessions if carefully stored.

It’s always a good idea to pre-wash new items with a mild detergent.

We used several different twisting and rubber banding techniques on the fabric.

FYI…The dye reacts best if your item is wet first.

When you lift your item out of the dye mixture it will be a yellow greenish color.  

As the air hits the dyed item, the indigo will gradually oxidize and the dyed item will turn blue.

The longer the item is in the dye, the darker it becomes once it hits the air.

They suggest ringing the item and letting it sit for 15 minutes and then re-dipping the item

in the dye for deeper hues.

Creating a Wax Resist

My daughter and her husband created dots on their shoes by using melted wax and the end

of a paintbrush.  (We kept the melted wax hot in a old mini crock pot.)

The melted wax creates a resist that will repel the dye.

They covered the souls of the shoes with removable painters tape to protect it from the dye.

A large brush was used to paint the dye on the shoes instead of dipping them.

Once dyed…we hung the items on a clothesline tied between two trees in the front yard.

My husband said it looked real classy.  I thought it looked beautiful.

We left them hanging overnight as they need 24-48 hours to dry and oxidize.

As with a lot of new techniques…there is a little bit of a learning curve.

We were pleased with the results and can’t wait until she’s home again to dye some more.

FYI…We used Shibori Indigo Dye Kit from Made Kits by One-OneThousand*


Dream Create Inspire Wall Decor

Dream Create Inspire Wall Décor

I have been working diligently for the last couple of months on my new craft room.

Moving, purging, organizing and very slowly decorating.  (so much stuff!)

I’m almost ready for a “craft room reveal” but not quite yet.

This past week-end I decided to add a little inspiration to my freshly painted closet doors.

I like the look of inspirational quotes on walls and decided to create one of my own.

With the help of my Silhouette Cameo Wireless Cutting Machine* and

Matte Removable Adhesive Vinyl* from Styletechcraft the project was real easy to create.

(getting a good picture of the final project not so easy)

*Disclosure:  This blog uses ads and affiliate links.  If you choose to make a purchase using one of the links, I receive a small commission (at no additional cost to you) that helps offset the costs of maintaining this blog.  Thanks for your support!

  • I measured the space on the door where I wanted the words to go and decided where the best spacing would be for all three words.
  • I cut the Gridded Vinyl Transfer Tape* to fit inside the space.
  • I used the bottom line of the grid and line on the door inset to line up my words.
  • Once you place your word onto your surface, smooth over word with the vinyl tool.

  • I found it easier to place the words Dream and Inspire first and then center the word Create in between the two.

  • I cut two small flowers using dark red removeable vinyl and placed them in between the words.

Did you know that Matte Removable Vinyl will remove cleanly for up to two years?

This vinyl  film is great for decorating a kid’s room, a classroom or just about anywhere

you just  need a temporary graphic.

“This is a sponsored post.  As a member of the StyleTechCraft Design Team I have been provided product and compensation in exchange for my creative ideas.  The views and opinions are my own.

You can now find the full line of StyletechCraft online at ATSM.

Shop Your Fav Brands at Scrapbook.com

Simple Summer Vase

Create a Simple Summer Vase using Transparent Adhesive Vinyl from StyleTechCraft.

Transparent vinyl is great when you just want to add a subtle touch of color.

It’s great for using on windows, glassware and just about anywhere else you want a unique look.

To create my Simple Vase I used:       (*affiliate links)

Directions:

  1. Cut several flower shapes using the Silhouette Cameo* and the Sky-Blue Transparent Vinyl.  Don’t have a electronic die cutter?  The transparent vinyl can be cut using various metal dies.
  2. Cut leaves out of the teal vinyl.
  3. Using the weeding tool, I carefully removed the negative spaces in and around the flowers and leaves.
  4. Place a piece of Vinyl Transfer Tape* over the flower image.  Apply transfer tape onto the cylinder vase and rub over the vinyl using a vinyl scraper tool to eliminate bubbles.
  5. Remove transfer tape.
  6. Repeat with the leaves.

Allow vinyl to cure for several days.  (Hand washing is recommended.)

I added a piece of white paper inside the vase so you can see the pattern better.

It’s hard to see in this picture the variation between the sky blue and teal vinyl.

“This is a sponsored post.  As a member of the StyleTechCraft Design Team I have been provided product and compensation in exchange for my creative ideas.  The views and opinions are my own.

You can now find the full line of StyletechCraft online at ATSM.

Let’s Go Fly a Kite

Let’s Go Fly a Kite…

I’m so happy that Spring is finally here.

I’m ready to celebrate Spring with beautiful sunny skies and just enough breeze to fly a kite.

If you’re not into flying kites, you could always make a fabric one to hang up on the wall.

Kite Wall Hanging                                   (*affiliate link)

*Disclosure:  This blog uses ads and affiliate links.  If you choose to make a purchase using one of the links, I receive a small commission (at no additional cost to you) that helps offset the costs of maintaining this blog.  Thanks for your support!

How to make a Kite Wall Hanging:

  • Creating a kite pattern… Cut the white cardstock to 9″ x 12″.  Fold the cardstock in 1/2 lengthways.  On the two long sides make a mark at 4″.
  • For the top of the kite, draw a line from the top middle fold to the 4″ mark on each side.  For the bottom of the kite, draw a line from the 4″ mark to the bottom middle folds.
  • Cut out Kite pattern.
  • Trace and cut out the kite pattern on the backsides of both of the printed fabrics and the white felt.

  • Sandwich the white felt between the two patterned pieces.  Pin into place and top stitch around the kite.
  • Arrange the words “Let’s go fly a kite” onto the front of the kite with the shiny side down.
  • Cover with soft, clean cloth and iron on cotton settings for 30 seconds.  Turn kite over and repeat for an additional 30 seconds.

  • Cut the top flower and leaves off the floral applique.
  • Arrange the flowers on the kite and iron onto the kite the same way as the letters.
  • Glue rick rack around the edge of the kite.

  • Cut strips of fabric and tie onto a 14″ piece of twine.  Glue one end of the twine to the backside of the kite.
  • Make a small loop with a second piece of twine and glue to the top of the kite.

“This is a sponsored post.  As a member of the Joy® Design Team I have been provided product and compensation in exchange for my creative ideas.  The views and opinions are my own.


Don’t Miss a Thing…Make Sure to Follow me

Glittered with Mod Podge Ultra

Rainbow Glittered Monogram with Mod Podge Ultra

I have used Mod Podge for years…

So, when Plaid gave me the opportunity to try out Mod Podge Ultra, I thought why not.

I always love trying something new.

What makes Mod Podge Ultra different?

America’s favorite decoupage medium is now available as a spray!  Mod Podge Ultra  is a super strong, non-toxic spray formula that works as all-in-one glue and sealer with a high adhesion level.  Perfect for adding dimensional design embellishments to your projects.  This versatile, water-based formula dries quickly and naturally self-levels, leaving no brush marks.  It cleans up easily with soap and water and is available in both matte or gloss finishes.

For my Framed Rainbow Glitter Monogram I used:                         (*affiliate links)

Directions:

  • Protect your work area with newspaper or drop cloth.
  • Shake Bottle for 15 seconds.
  • Prime the nozzle with a few test pumps.
  • Spray the chipboard letter with Mod Podge Ultra using short even strokes.
  • Add various colors of glitter over the letter.
  • Pour excess glitter off.  Allow project to dry for 30 minutes.
  • Seal letter with 1-2 coats of Mod Podge Ultra.
  • Allow  the letter to fully dry.
  • Accent the outside edge of the letter  using the silver leaf paint pen with a chisel point.
  • Spray or paint the back of the letter with Mod Podge Ultra and add to a piece of black chipboard.
  • Place inside frame for fun and funky framed art.
  • Just like a paint brush, Mod Podge Ultra Spray tops need to be cleaned after every use. If they aren’t they will clog and become unusable.

Shop Your Fav Brands at Scrapbook.com

*Disclosure:  This blog uses ads and affiliate links.  If you choose to make a purchase using one of the links, I receive a small commission (at no additional cost to you) that helps offset the costs of maintaining this blog.  Thanks for your support!

With most glittered projects… if you touch the glittered area you leave a little bit of glitter everywhere you go.  Once I sealed the glittered “S” the glitter does not rub off.  How cool is that.

A special Thank You goes out to Plaid the makers of Mod Podge Ultra*.   

My project is part of a Blog Hop put on the Designer Crafts Connection Blog.

For more fun projects using Mod Podge Ultra and the list of participating blogs click here.

Embroidery Hoop Art

Loving the new Home Décor trend using Embroidery Hoops. 

I really love the new Home Décor trend using embroidery hoops and was so excited

when I saw the new Mix the Media Embroidery Hoop Art from Jillibean Soup at Creativation.

The embroidery hoop comes plain with an embroidered word inside in 8″ and 10″.

So many opportunities for embellishments.  (I couldn’t wait to get my hands on one.)

At the show, the Jillibean Soup crew were doing make and takes using the embroidery hoops.

I loved the project, but once I got home, I decided to make-over the embroidery hoop

to better fit my style and décor.  (for me…it needed a little red)

Here’s what I added to my Embroidery Hoop…

Directions:

  1. Glue vintage flower trim around the edge of the embroidery hoop using Beacon Adhesives 3 in 1 glue.
  2. Create a banner using twine and 3″ strips of ribbon.  I added vinyl letters to spell the word “welcome”.
  3. Glue off white flowers from Prima Marketing onto the bottom of the hoop and add a couple heart stick pins.
  4.  Make a 1 1/2″ red and cream ribbon bow and glue it to the top of the embroidery hoop.

Shop Your Fav Brands at Scrapbook.com

*Disclosure:  This blog uses ads and affiliate links.  If you choose to make a purchase using one of the links, I receive a small commission (at no additional cost to you) that helps offset the costs of maintaining this blog.  Thanks for your support

My 90’s Kitchen Remodel

When we bought our house in 1996, a beautiful Southern Colonial…

we fell in love with the large trees and expansive yard.

What we didn’t fall in love with was the kitchen.

My husband hated the dark dated 80’s cabinets and blue and white windmill tile backsplash.

Being the frugal person that I am, I didn’t mind the tiles and wanted to live with it for awhile.

(2018 Kitchen Before Make Over)

Persuaded that the updates “had” to be done, we made over the kitchen in true 90’s fashion.

Victorian was the trend, so a nice tea cup border and complimentary wallpaper was installed.

To keep costs low, we decided to keep the original footprint and the 6″ x 6″ terra cotta tile floor.

I was young and inexperienced.

Because we didn’t have a lot of expendable money

we’ve spent the last few years doing minor changes.

The first to go was the tea cup border and terra cotta floors.

We had large 18″ x 18″ tiles installed to help the small kitchen look bigger.

Since I knew I wanted to eventually go with a lighter counter top,

a darker color was used on the floor.

Fast forward to 2018…

It was around this time last year when we started discussing a Kitchen Remodel.

We visited a Kitchen Showroom and talked to a designer on how we could refigure our kitchen.

We have a large peninsula in our small kitchen with cabinets overhead.  (a 80’s trend)

It gives us a lot of great counter space and storage.

The problem, it closes off the kitchen and doesn’t allow natural light to come in.

And…if you’re taller than 5′ 2” (which isn’t a problem for me) it’s hard to have a

conversation with anyone in the dining room.  It completely blocks their view.

We made arrangements for the designer to come and look at our kitchen. 

The first thing she said was “your kitchen has a good flow”.  (her first mistake)

She drew up 3 designs for our approval.  None of the designs really had what we wanted.

She didn’t come up with a solution for all the cabinets that I’d be giving up.  (mistake #2)

We’d also need to re-do the kitchen tile and patch the wood floor in the dining room.

Not to mention the fact that we’d spend $20K plus to have the work done.

We weren’t sure we had the energy for a complete remodel of this scale.

(I’m not young and inexperienced anymore.)

So after a lot of contemplation and discussion, we decided to try cleaning the cabinets.

We used Murphy Oil Multi-Use Wood Cleaner*to clean the cabinets and

Rejuvenate Cabinet & Furniture Restorer*to give them back their original shine.

It took several days of cleaning and polishing the cabinets. (2-3 coats for a good shine)

I was pleasantly surprised at how well the cabinets looked.

We had originally discussed painting the cabinets and decided to “try” cleaning and polishing

them first.   My husband had promised, that if I wasn’t happy we could try painting them.

I was happy with the results of the cleaning and polishing.

Shop Your Fav Brands at Scrapbook.com

*Disclosure:  This blog uses ads and affiliate links.  If you choose to make a purchase using one of the links, I receive a small commission (at no additional cost to you) that helps offset the costs of maintaining this blog.  Thanks for your support!

Then for $220 we added new polish nickel hardware to replace the old brass ones.

We also installed new LED lighting under the peninsula.

Since I was saving so much money…I splurged by picking a beautiful quartz counter top.

It looks lovely with my red and white dishes.

Next, came the issue of the kitchen sink. 

I wanted a off-white “bisque” porcelain sink to complement the beautiful counter top.

We looked around at several of the big box Home Improvement Stores.

We finally found the sink I wanted, only to find out that because of a fire

in one of the main manufacturing locations the sink wouldn’t be available until June.

I’d waited this long what’s a little more. 

Then…I found out I couldn’t get the sink until July, then we were told they weren’t sure

when it would be available, then I was told November.  (Say What?)

I’ve had a “busy” looking kitchen for so long, what I wanted now was clean and simple.

Picking a tile should of been easy. 

I had it narrowed down to 2 or 3 tiles depending on how the sink dilemma went.

I was told to wait before choosing to see how everything went together.

Not wanting to wait until November, we decided to go with a in-stock white porcelain sink.

We paid to have the white sink installed and it didn’t look bad.

All I had to do was decide on the tile.

Within a few days of the sink installation, I noticed spots around the edges of the sink. 

It looked like rust.

The plumber came back out, re-caulked the sink and low and behold the spots came back.

My husband called the manufacturer of the sink, we had a couple options,

we could take the sink out and paint the bottom and see if that solved the problem

or they could send us a new sink.

During the conversation with the customer service guy,

my husband mentioned that we originally had wanted the “bisque” sink.

“I can send you the bisque sink if you want?”  

It was decided to send the bisque sink (which costs almost double than white).

In the meantime…the white sink had started to grow on us

and the tile selection had come down to which sink we decided to use.

Porcelain sinks are very heavy, so it wasn’t a “let’s just try it out” kind of decision.

With the plumber charging $400 to install, a final decision had to made in advance.

In the end, we decided to go with the bisque sink and off white subway tile. 

The tile was installed a week before Christmas.

And.. I am Happy!  (phew…what a process)

I love my “new kitchen” and the way the light reflects off the tile and counter.

It is bright and cheery with the clean and simple look I was going for.

Final tally…The cost of the make-over ended up being approximately 1/4 of what a total

kitchen remodel would have been.

On a curious side note… I just got an email last week from the kitchen designer following up on her designs.  (her third mistake)


Don’t Miss a Thing…Make Sure to Follow me