DIY a Colorful Garden Chair for your Gnome

diy-a-colorful-garden-chair-for-your-gnome-2

A Colorful Chair for Colorful Little Gnome…

Every year around this time, my Grandson and I start making our mini gardens.

It’s our special annual tradition.

Last year, we added a Gnome named Mr. Elfsnail.

This year, I decided to create a chair for him to sit on while working in the garden.

We take our gardening seriously.   Read about Mr. Elfsnail’s garden.

For Mr. Elfsnails chair…

I found this cute little wooden chair in the toy area of Dollar Tree and knew it’d be a cute

mini garden chair for my gnome.

How to make a Colorful Gnome Chair

Supplies Used:
  • Miniature Wood Doll Chair
  • DecoArt Americana Paint:  Watermelon Slice, Marigold, Olive Green
  • DecoArt Multi-Surface Satin Acrylic Paint:  Night Sky, Cotton Ball
  • Paint Brush
  • Sand Paper
  1. Lightly sand any rough spots off the chair.
  2. Paint the chair in a variety of colors.
  3. Create small flowers on the top of the chair by dipping the end of the paintbrush in paint and adding small dots as the petals.

Chair measures 3″ tall.

I might have even left it here (glued to the tree) if I didn’t think it’d drive the boys crazy.

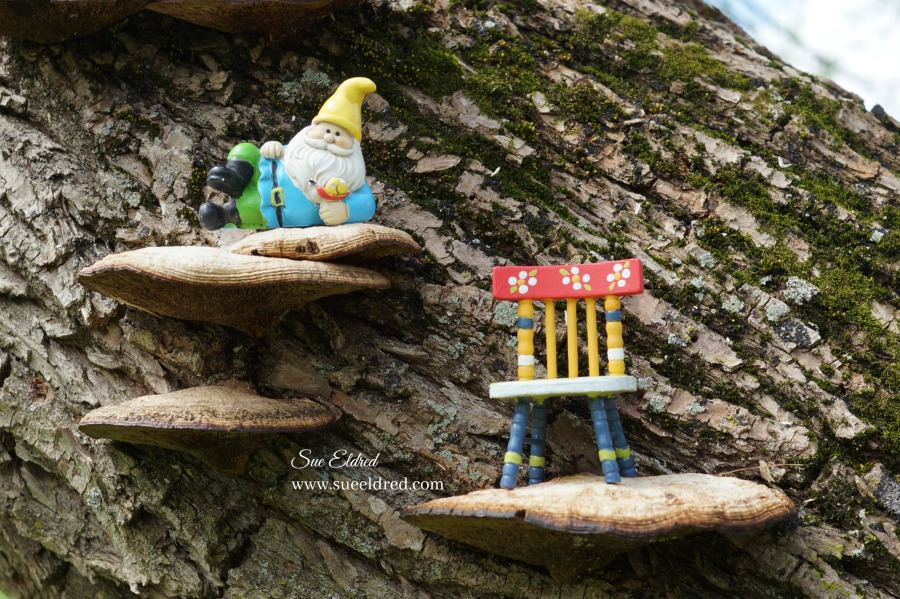
A little fun and whimsy. 

For a dollar and some paint, it might be fun to let the boys paint a chair of their own.

For more summer fun… click on ad below ↓

Slimer

Disclaimer:  This blog uses ads and affiliate links.  If you choose to make a purchase using one of the links, I receive a small commission (at no additional cost to you) that helps offset the costs of maintaining this blog.  Thanks for your support!

Join Amazon Kindle Unlimited 30-Day Free Trial

Berry Boxes and Bunny Bubbles

Berry Baskets for my Grandsons…

This year, I decided to get a little creative with the boys Easter present.

I recently received these cute little berry baskets from Leisure Arts and decided to use them

for the boys instead of traditional Easter baskets.  (see Leisure Arts Ad below)

I painted the berry boxes with acrylic paint.  I made tags with each of the boys names and

tied the tags on to the boxes with color coordinated twine.  (simple, simple, simple)

My daughter recently told me…

she never forgot the year I made their Playdoh containers into Easter Bunnies.

I had forgotten all about it.   (sounds like something I’d do)

Apparently it had made an impression on her.

So inspired by the memory… I made plain old bubble containers into “Bunny Bubbles”.

To make the Bubble Bunnies…

  • Remove the label that came onto the bottle.
  • Measure and cut a piece of white felt to go around the side of the bottle.
  • Use a craft glue and apply glue around the area on the bottle where the felt will go.  (It’s easier to apply the glue to the bottle than the felt.)  Wrap felt around bottle and secure into place.
  • For the bowtie…Wrap and glue ribbon around the top of the felt.  Create a little bow from additional ribbon and glue to cover  the ribbon seam.
  • Glue small buttons on the seam of the felt.
  • Cut two ears out of white felt.  Color the center of the ears with a light pink marker.  Glue ears onto the top of the lid.
  • Glue googly eyes and a small pink triangle nose onto the side of the lid.  (Add whiskers under the nose if you like.)
  • Glue a small white pom pom on the back for a bunny butt.

A fun little addition to the berry box.

And…Maybe, just maybe, they’ll remember the year grandma made  bunny bubbles.

"Painting

*Disclaimer:  This post uses ads and affiliate links.  If you choose to make a purchase using one of the links, I receive a small commission (at no additional cost to you) that helps offset the costs of maintaining this blog.  Thanks for your support!

Easter Egg Hunt Sign

Any Easter egg hunts in your near future?

I whipped up this cute little sign for our Easter Egg Hunt using a DEFLECT-O Chalkboard Easel*

Simply embellish the easel with stickers and scrapbook paper for a quick DIY project.

Add your message with the chalk marker that comes with the easel.

For more fun, let the kiddo’s decorate the sign.

It also makes a cute sign to label your Easter Buffet.

(Easter stickers and paper from Paper House Productions.)

Join Amazon Kindle Unlimited 30-Day Free Trial

*Disclaimer:  This post uses ads and affiliate links.  If you choose to make a purchase using one of the links, I receive a small commission (at no additional cost to you) that helps offset the costs of maintaining this blog.  Thanks for your support!

 “This is a sponsored post. As a member of the Deflecto Design Team I have been provided product in exchange for my creative ideas, views and opinions.”

Ring Toss Anyone?

For Nick’s Carnival themed birthday party, earlier this month…

I was given the task to create the Ring Toss Game.

 After washing and spray-painting all the bottles, I needed a cute sign for the game.

Joy letters to the rescue – I just adhered them to scrapbook paper I added to the outside

of the plastic bin that holds the bottles.

I used lightweight Smoothfoam rings painted with acrylic paint for the kids to toss.

ring-toss-game-sues-creative-workshop

Besides the Ring Toss Game there was a Hit the Can, Frisbee Toss, Fishing Game, Shoot Em Up, Tattoo Parlor, Fortune Teller.

fishing-game

Warren especially love the Fishing Game.

So much, he stuck his head in the tub.  (it was unseasonably HOT that day)

nicks-6th-birthday-party

There was Ice Cream Cone Cupcakes, Corn Dogs, Popcorn, Nacho’s and a ton of prizes.

The kids and adults had a really good time at the party.

This post was sponsored by Joy Sa and DecoArt.

Disclosure:  This blog uses ads and affiliate links.  If you choose to make a purchase using one of the links, I receive a small commission (at no additional cost to you) that helps offset the costs of maintaining this blog.  Thanks for your support!

Join Amazon Kindle Unlimited 30-Day Free Trial

DIY for Kids: Doodling on Craft Frames

Doodling on Craft Frames 8769

Doodling on clear acrylic craft frames…

a fun little project to make with the kids this summer that will help keep

the kids Happy and Busy.

Print out a few 4th July or Summer Fun pictures in wallet size and pick up a few

supplies and let their creativity soar.  (my frame is 3″ x 4″)

Trace around picture 4089

  • Cut a piece of white paper the size of your frame.
  • Center and trace around the picture on your paper.

Tracr around picture with ruler 4091

Using a pencil and ruler draw your grid lines on the paper.

Retrace pencil marks with black paint pen 04111

Reinsert the paper into the clear acrylic craft frame and retrace the lines.

Using paint pens or sharpies, add additional lines and doodles on the frame.

Tip:  When using paint pens, allow drying time in between adding colors.


Deflecto Mini Slanted Sign Holders, 10 Piece, 3 x 4 Inches (20006CR)


“This is a sponsored post. As a member of the Deflecto Design Team I have been
provided product in exchange for my creative ideas, views and opinions.”

*This post uses Amazon Affiliate links.  I am an Amazon Affiliate.

Patriotic Tie Dyed Shirts for the 4th of July

We’re at it again.

This past week, my daughter in law and I did a little Summer Tie Dying.

(see last year’s shirts here)

Inspired by photo’s she saw on Pinterest,

Bonnie made these cute Patriotic Tie Dyed shirts for the boys.

DSC08616

We used Tie Dye Kits that come with the premeasured squeeze bottles.

She gathered the shirt at one corner and rubber banded it in three sections and squeezed the

dye directly onto the shirt and then covered it with Saran Wrap.

We allowed several hours before rinsing out the dye.

Too Cute!  (don’t you agree?)

For more summer fun… click on ad below.

Slimer

Disclaimer:  This blog uses ads and affiliate links.  If you choose to make a purchase using one of the links, I receive a small commission (at no additional cost to you) that helps offset the costs of maintaining this blog.  Thanks for your support!

Join Amazon Kindle Unlimited 30-Day Free Trial

Mr. Elfsnail’s Garden

Mr. Elfsnail's Garden 8202

This marks the third summer since Nicholas and I started the tradition of creating our

Mini Garden.  And…as we exclaim every year…  “this one’s our favorite”.  (it really is!)

Each year we like to add something new and different for our garden.

It has been noted, that at some point, we may have to get a bigger wagon.

Mr. Elfsnail 8140

Our Garden has never had an official occupant.

So, this year we added Mr. Elfsnail.  (named by Nicholas for obvious reasons)

We picked him up along with a wishing well and a pair frogs at our local Hobby Lobby.

Nick and I (mostly Nick) spent the evening before laying out the garden on the kitchen counter.

We like having a plan and being prepared.

Nick had me outside working on the garden by 7:45 a.m. the next morning.

Have I ever mentioned I’m not a morning person?

adding the water feature

For those of you that may not know about our garden, you can read about

the original garden here.

For our garden…we start with an old broken rusty wagon.

After arranging the fence and arbor, Nick quickly set off to work adding a new water feature

using a small, round, black dish (from a microwave desert) into the dirt.

this is how my other grandma told me to get them out

Now that he’s five and a very confident gardener….he didn’t need any help placing the plants.

the path

The “plan” was to add a small path to the new wishing well using crushed shells.

the path now a beach

And because more is always better… MORE CRUSHED SHELLS.

It’s starting to look a little more like a beach.

We added cocoa bean shells around the plants to make it looks nice.  (love the smell)

the frogs

N ♥ S

That just warms my heart.

Even though it should be Nick loves Grandma instead of Nick loves Sue.

(Maybe he named the frogs after us?)

Wishing Well

Nick loved adding water to the wishing well and making sure it worked.

admiring the garden

Our Finished Garden.

Nick and Mr. Elfsnail's Garden with insert

This really is such a fun project to do with kids.

You don’t need anything fancy to use for a container.

And you know what?  I enjoy making it as much as him and maybe even more.

It’s important to take time and do something together.  (Planting the gardening seed.)

Making memories… My buddy and me.

For more summer fun… click on ad below ↓

Slimer

Disclaimer:  This blog uses ads and affiliate links.  If you choose to make a purchase using one of the links, I receive a small commission (at no additional cost to you) that helps offset the costs of maintaining this blog.  Thanks for your support!

Join Amazon Kindle Unlimited 30-Day Free Trial

Craft Sticks… not just for Kids!

Stenciled Chalkboard Sign

Craft Sticks for Grown-ups?  

Who knew the craft medium we used as kids could produce a grown-up look.

I was messing around one day, looking for something different to stencil on.

Inspired by my favorite “Fixer Upper” show, I decided to create my own mini shiplap.

The projects below are the result of my “playtime”.

Learn More

Americana Sign

This one’s for anyone who loves Americana, old signs, topography and the look of old shiplap.

Or for anyone who loves playing with wood craft sticks.

How to make the Americana Sign:              (*Amazon Affiliate Links)

Finished Size: 6” x 6”

*Disclosure:  This blog uses ads and affiliate links.  If you choose to make a purchase using one of the links, I receive a small commission (at no additional cost to you) that helps offset the costs of maintaining this blog.  Thanks for your support!

Americana Sign Collage

Directions:

  1. Create a sign by gluing together 8 tongue depressors on the front and 4 tongue depressors on the back.
  2. Paint both sides of the sign with blue paint.
  3. Using select sections of the stencil, tape stencil in place using removable painters tape.
  4. Using a stencil brush, dip just the tip of your brush into the paint. Tap off excess paint before applying to prevent the paint from seeping under the edges of the stencil.
  5. Apply paint with stencil brush in a straight up and down motion called stippling.
  6. Drill small hole in the top corners and insert red twine to use as a hanger.
  7. Optional Step: For a distressed look, lightly sand the edges of the sign with extra fine sand paper.

Here’s a project I did a few years ago using a product called sticky sticks. 

Deck the Halls with Sticky Sticks  Sticky Stick Frame Basic Construction

The paint and stencils used in these projects were sponsored by DecoArts.

Shop Amazon Scrapbooking Supplies*

Crafting with Kids: Serenity’s Craft Bag

Serenity's Craft Supplies 2

When it comes to craft supplies for some reason people tend to refer to me.

So when I heard that my 5 year old niece was looking for beads and craft supplies for her

birthday, I jumped all over that one.

Serenity's Crafting Supplies 4207

I had a small 8″ x 8″ canvas bag from Canvas Corps and iron-on letters from Creating with Joy.

Who doesn’t like a personalized bag, to let everyone know just who’s bag it is?

I filled Serenity’s bag with a divided container full of beads and gave her paintbrushes,

pom poms, craft stems and pink scissors.  (Things a typical 5 year old might need.)

True story…

Sad Nick Face

One Sunday, my 5 year old grandson, said to me, “Grandma, let’s do a project.”

I looked him straight in the eyes and said…

“Do I look like the kind of Grandma that does projects?”

He gave me the saddest look, not knowing what to say.

Happy Nick Face

When his mom started laughing, a big smile emerged.

I can’t remember if we did a project or not.

Nick’s Garden Caddy (for Easter)

Nick's Garden Caddy 5510

As soon I walked into Target, a few weeks ago, I was stopped in my tracks by their adorable gardening

supplies for kids.  (in the one spot area)  I am a sucker for cute little things.

Sweet little metal tools and polka dot gardening gloves (oh my) and when I found the plain wood

caddy…  I knew exactly what I wanted to use for Nicholas’ Easter basket.

Nicholas, as you may know, is my gardening buddy.

Wood Caddy 5459 2

Instead of leaving the caddy plain (what fun would that be), I decided to paint and personalize the

caddy with a chalkboard on one side and his name on the other.

(I used Deco Art Urban Ink Stencil, 6″ by 9″, Sea Dogto stencil on his name.)

Back of Nick's Garden Caddy 5538

I went back to Target last week to see if I could find another wood caddy but sadly they were all out.

If you happen to spy one at your Target make sure to grab one, they make wonderful paint caddies.

Wood Caddy with Paint 5462

Along with the Gardening supplies, I added tie-dye chalk (for the chalkboard), jelly bellys, a light up

ball and of course marshmallow peeps.

Nick's Garden Caddy Haul 5493

And… I didn’t forget little brother Warren.  (I picked up all these goodies at Target)

Warren's Easter Bucket 5545

In case your wondering… No this isn’t a sponsored post for Target.  (but I wish it was)


*This post uses Amazon Affiliate links.  I am a Amazon affiliate.