Creating A Miniature “Christmas Magic” Room with Graphic 45 and Xyron

How to Create A Miniature Christmas Room…

Graphic 45 Christmas Magic…Decorating the tree.

I knew as soon as I started working with Xyron that one day I would make a miniature room.

When I got the opportunity to work with Graphic 45’s “Christmas Magic” Collection,

I knew the time had come.  (Graphic 45 and Xyron are the perfect combination.)

Here’s What I used to make my Miniature Christmas Magic Room:            (*affiliate link)

*Disclosure:  This blog uses affiliate links.  If you choose to make a purchase using one of the links, I receive a small commission (at no additional cost to you) that helps offset the costs of maintaining this blog.  Thanks for your support!

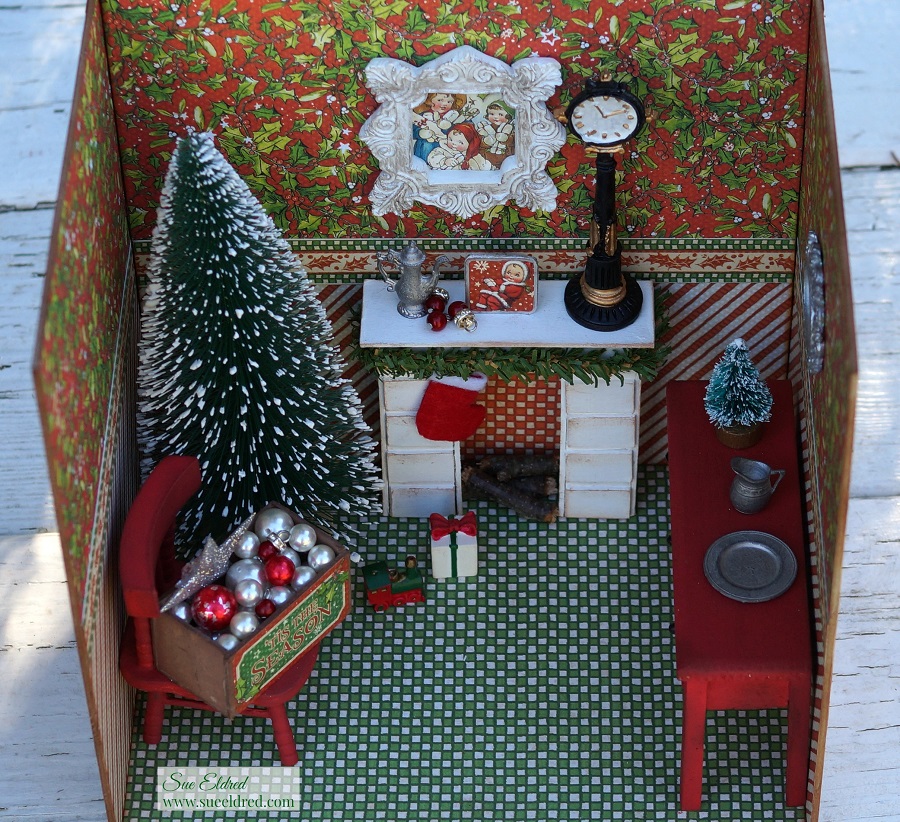
How to make a miniature Christmas Magic Room…

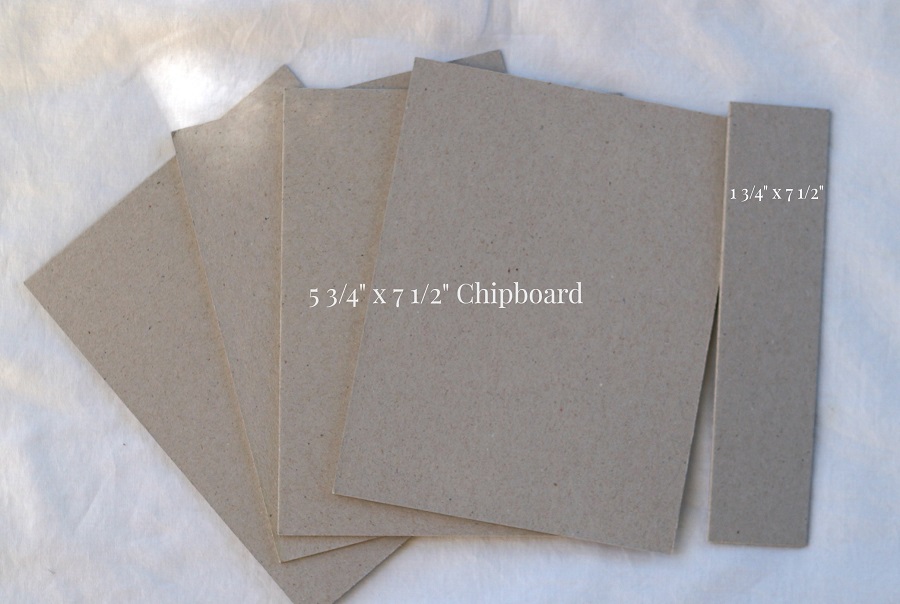
  • My Christmas Room is 7 1/2″ wide, 7 1/2″ tall and 5 1/2″ deep.  I used 5 3/4″ x 7 1/2″ chipboard pieces.  (that’s what I had on hand)  You could use a 7 1/2″ x 7 1/2″ piece of chipboard for the back wall instead of piecing it together like I did.

  • I cut paper for my walls into 3 3/4″ strips.
  • I cut a small strip of paper for my decorative border.
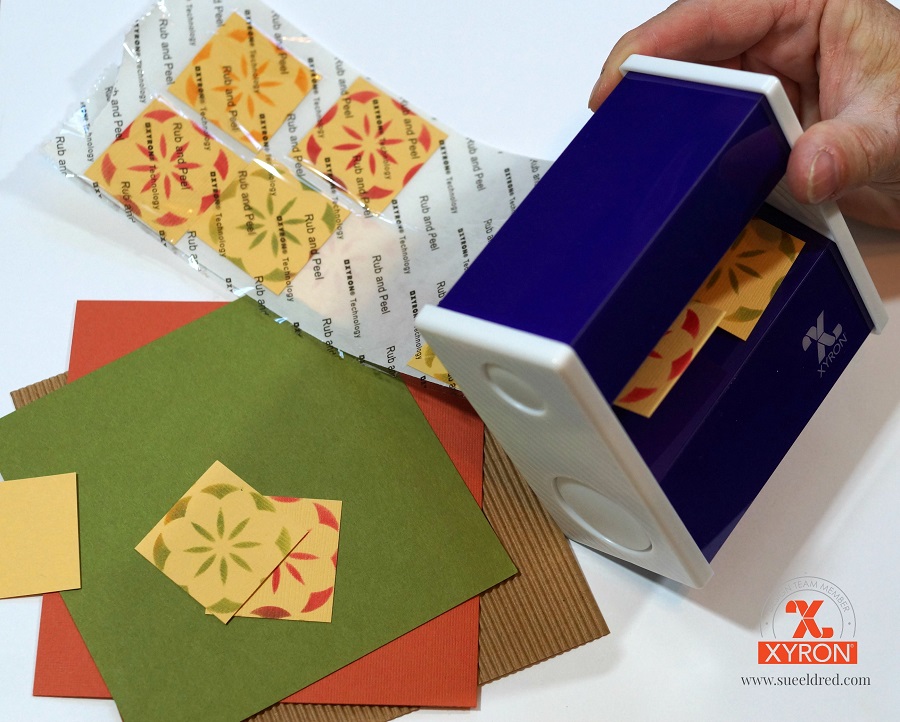
  • I ran each of my strips through the Xyron Creative Station*.
  • Adhere paper to the chipboard.

The Creative Station is perfect for projects like this.  I wanted complete adhesive coverage on every corner and edge of the paper.  (No wrinkles, no bubbles, easy to use.)

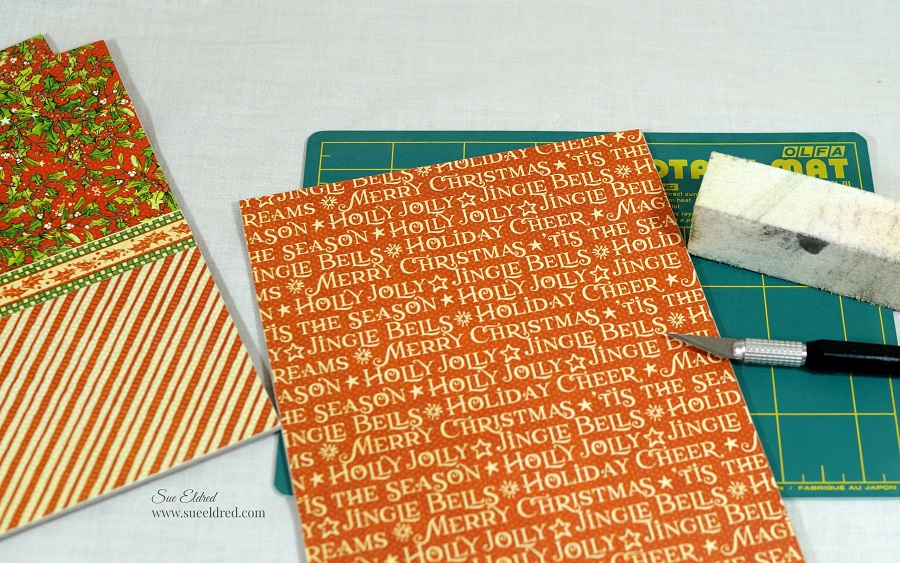
  • I cut my paper slightly wider than I need so I can trim the edges with a craft knife.
  • Gently sand edges with a extra fine sanding block for the perfect edge.

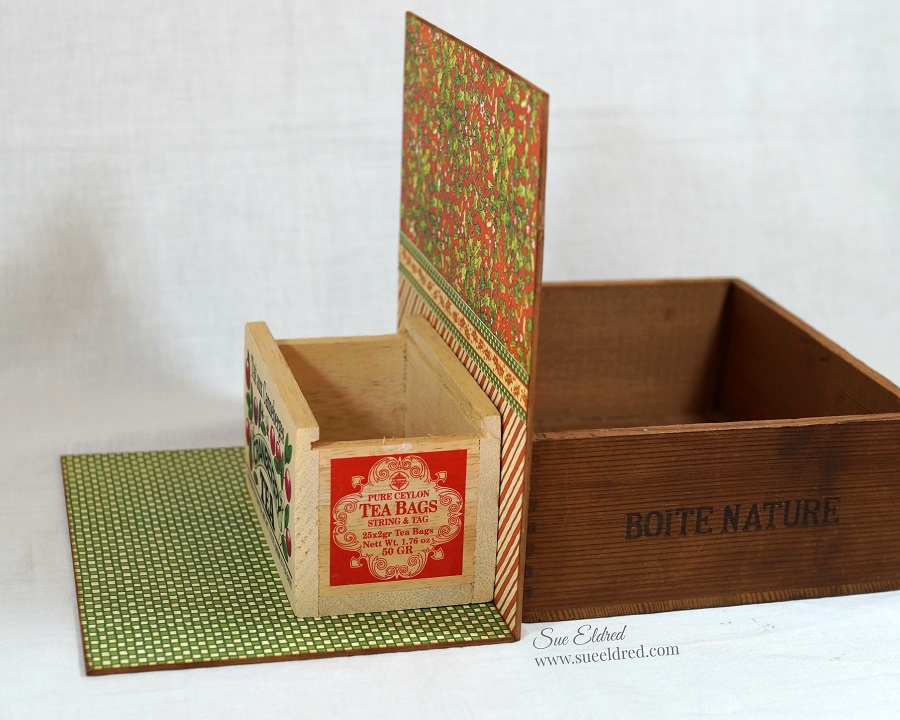
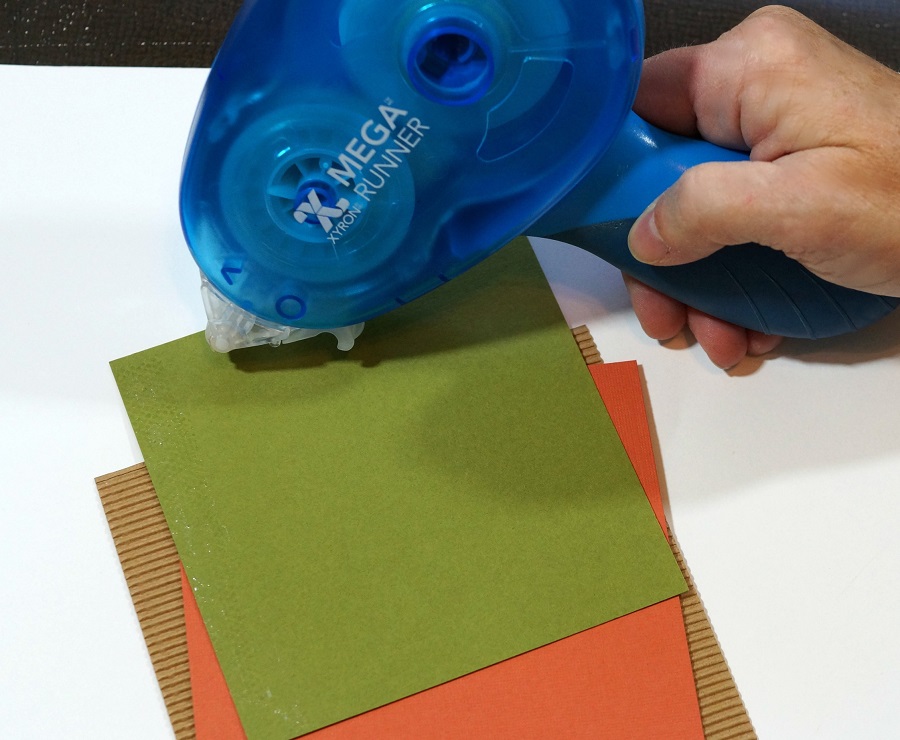
  • Glue the walls together using a good craft glue.  I used wood boxes to hold my wall up while the glue dried.  (If you have a better idea I’d love to hear it.)

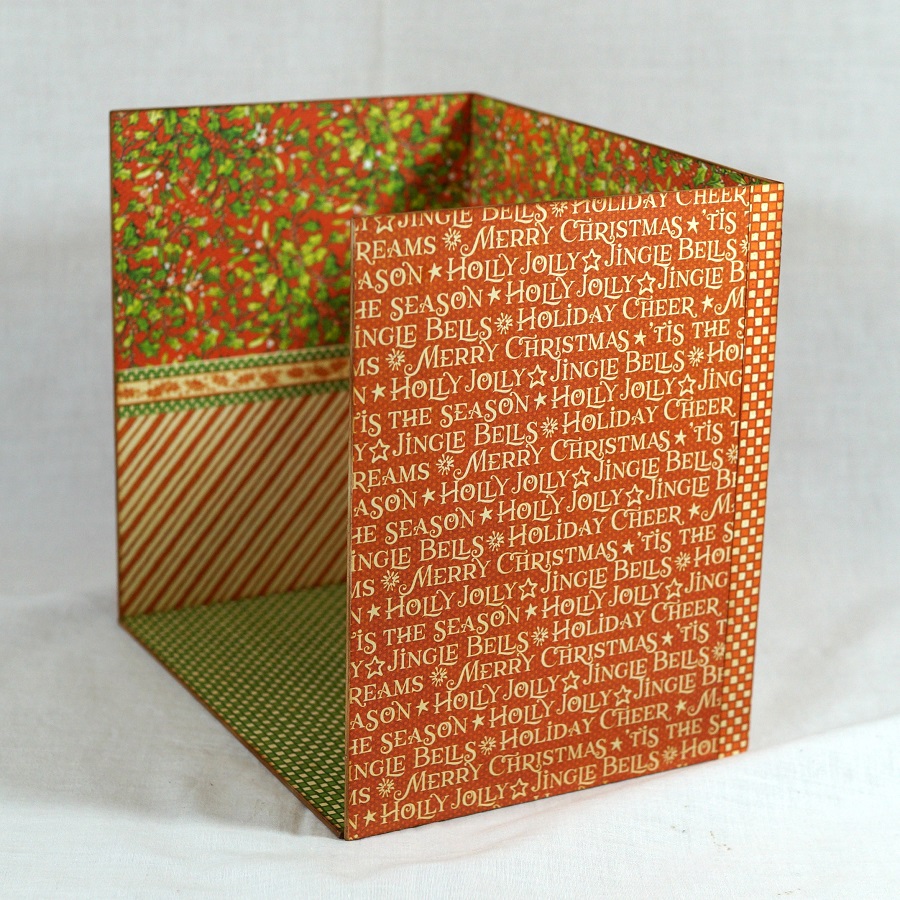
  • I covered the back of my room with coordinating paper and added small strips of paper on the back corners for added support.

  • I made a small fireplace out of chipboard.  (I needed a place to hang my stocking)
  • Paint the fireplace with white paint.  Give it a vintage feel by rubbing a little ink on the edges.

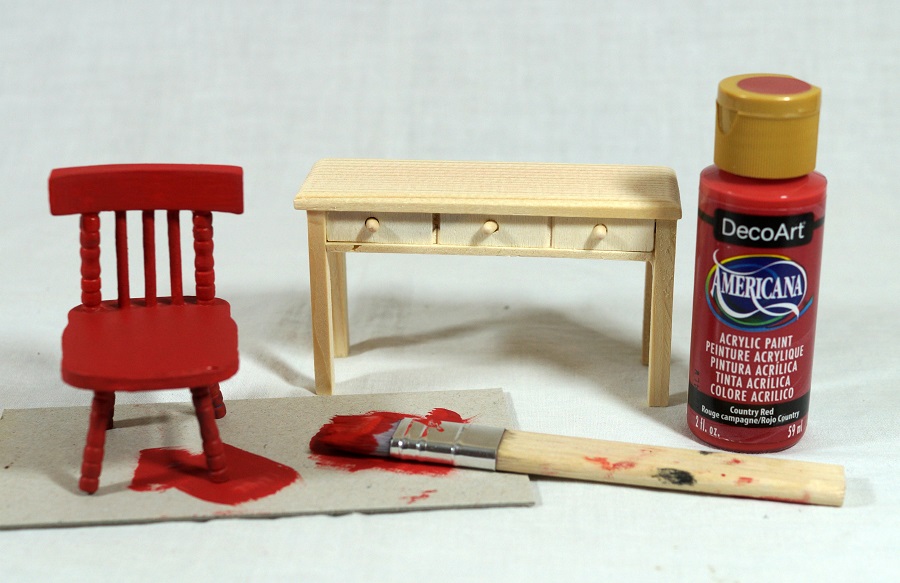
  • I purchased inexpensive unfinished doll furniture at the Dollar Tree* and painted it red.
  • For a vintage look add ink to the edges of the furniture.

  • I used stickers from the collection kit to make little framed art.

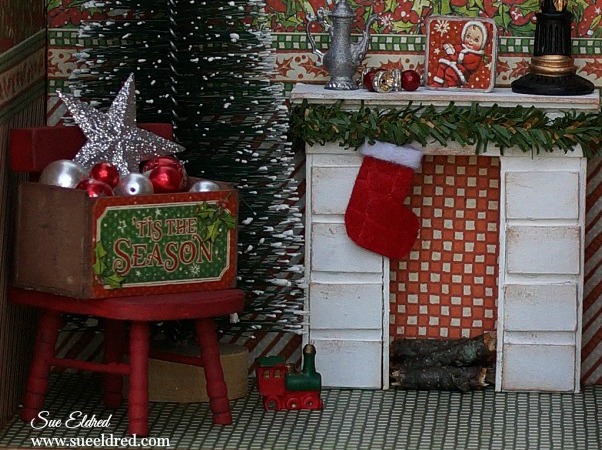
  • I made a small little crate to hold my “ornaments” out of chipboard and painted it brown.  I added a small “tis the season” sticker on the front.

  • I created a small picture using a sticker and chipboard and a small felt stocking to add to the mantel.

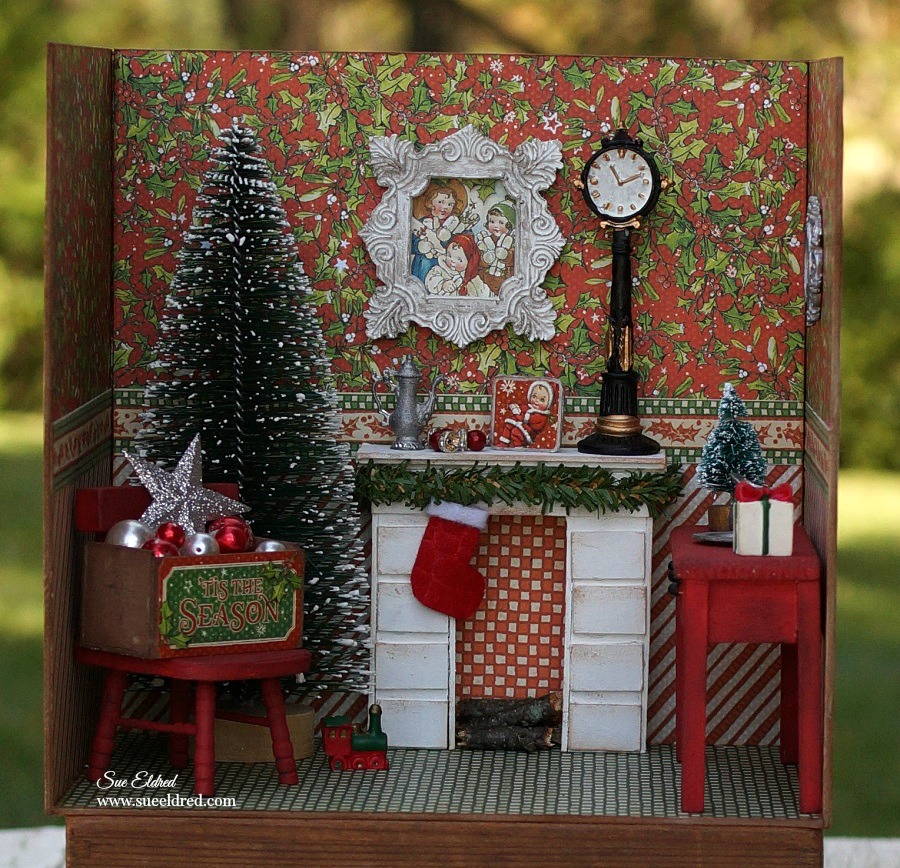
I have spent way to much time rearranging the furniture and playing with it.

It was a real labor of love.  (and I loved every minute of it)

“This is a sponsored post.  As a member of the Xyron Design Team I have been provided product and compensation in exchange for my creative ideas.  The views and opinions are my own.

Fall Quilt Card…stenciling with ink

Fall Quilt Card…stenciling with ink

a quick and easy fall card.

This week the Xyron® Design Team partnered up with Clearsnap® the maker of Colorbox® inkpads and more for some fun projects.

Here’s what I used:                  (*affiliate link)

Directions:

Place the stencil onto yellow cardstock and secured it with removable painters tape.

Ink the cardstock using the blending tool and Amber, Turtle and Cranberry Colorbox Inks.

The Art Screen stencil cleans up easily with water.

Cut the stenciled cardstock into small squares.    (Mine were slightly smaller than 1 inch.)

Place the squares through the Xyron 3″ Sticker Maker* for the perfect little sticker.

Adhere all the card layers using the Xyron Mega Runner*.

For added detail…draw in small stitch lines using a fine point marker and glue teeny tiny buttons into the center of each square..

“This is a sponsored post.  As a member of the Xyron Design Team I have been provided product and compensation in exchange for my creative ideas.  The views and opinions are my own.

*Disclosure:  This blog uses affiliate links.  If you choose to make a purchase using one of the links, I receive a small commission (at no additional cost to you) that helps offset the costs of maintaining this blog.  Thanks for your support!

Dollar Store Pumpkin Makeover

I love the look of heirloom pumpkins and those cute little white pumpkins called “baby boo”.

But…I always have a hard time finding them.

This year, I decided to make my own.

I found these cute little 4″ metallic pumpkins* at my local Dollar Tree*.

At $1.00 each, I couldn’t pass them up.

I painted the pumpkins with Americana Multi-Surface Satin Acrylic Paint in White Birch*.

It took 4-5 coats.  In hindsight, I wish I would have left a little green showing through.

I used Americana Multi-Surface Satin Acrylics Paint in Coffee Bean* to paint the stem and

accent the grooves of the pumpkin.  To make it look more realistic, I used a baby wipe to

strategically wipe off some of the extra brown paint.

I really please with the way they turned out.

Best part is… they won’t spoil and I can reuse them year after year.

Shop Your Fav Brands at Scrapbook.com

*Disclaimer:  This post uses ads and affiliate links.  If you choose to make a purchase using one of the links, I receive a small commission (at no additional cost to you) that helps offset the costs of maintaining this blog.  Thanks for your support!

Save

How to create an Embroidery Hoop Pumpkin…

How to Create an Embroidery Hoop Pumpkin

A Quick and Easy Fall Decoration.

What do you get when you find an outdated plaid Fall shirt, a small oval embroidery hoop

and then you add a few simple embellishments and some Joy Iron On Embroidered Letters?

You get a cute little Fall Pumpkin and A Quick and Easy Fall Decoration.

For my Embroidery Hoop Pumpkin I used:            (*affiliate link)

  • Lay the embroidery hoop onto the fabric first and  then place the letters inside the hoop to help you figure the best placement.

  • Set Iron to cotton setting, approx. 350 degrees, or follow garment care label.
  • Position letters with shiny side down onto fabric.
  • Cover letters with a fine cloth.  With a firm pressure, iron cloth over letters for 30 seconds.
  • Turn fabric over and iron the back for another 30 seconds.

  • Loosen the screw on the top of the embroidery hoop and insert fabric making sure to keep the letter alignment straight.  (re-tighten screw)
  • Trim excess fabric from outside of embroidery hoop.
  • Glue the green braided trim around the outside of the embroidery hoop.

  • Tie ribbon and leaves to the top of the frame.
  • Glue small acorn embellishment onto ribbon.
  • Super cute and simple to make.

“This is a sponsored post.  As a member of the Joy® Design Team I have been provided product and compensation in exchange for my creative ideas.  The views and opinions are my own.

Shop Your Fav Brands at Scrapbook.com

*Disclosure:  This blog uses ads and affiliate links.  If you choose to make a purchase using one of the links, I receive a small commission (at no additional cost to you) that helps offset the costs of maintaining this blog.  Thanks for your support!

So many reasons to Laminate…

Laminating with Xyron…

When Xyron sent me the Double Sided Lamination Refill Cartridge* to use in my

Xyron Creative Station* you might say I got a little carried away.

There are so many uses and things to laminate I couldn’t stop at just one project.

My favorite project and one of the easiest was using the laminating as an overlay…

I cranked the handle of my Xyron Creative Station* with the Laminate Cartridge* inserted

and actually laminated nothing.                              (*affiliate link)

I wanted a clear sheet of laminate to use as an overlay on my “all about ME” mini album*

I added glitter vinyl letters on top my laminated sheet before putting the album together.  

After creating the overlay, I inserted the Xyron Permanent Adhesive Refill Cartridge*

back into the Xyron Creative Station*  to add adhesive on the paper used to cover my album.

Complete coverage and no wrinkling!

I also wanted to make a bookmark using freshly pressed flowers.

I grabbed a few blooms from the garden and stuck them into a heavy book overnight.

Ideally, you’re supposed to leave them alone for 2-3 weeks.

Since I’m an impatient crafter,

I found online that you can speed up the process with a low temp iron.

I used craft glue to lightly and gently glue the flowers onto cream cardstock.

Insert the cardstock in the Creative Station with the Laminating Cartridge.

Laminate, trim, punch a small hole for twine and your ready to read.

Almost every one in the airport has a black suitcase.  (am I right?)

I’m getting ready for vacation in a few weeks and I want my bag to stand out for easy

recognition.   I created a small 3″ x 4″ decorated name tag and added my business card

to the back of the tag.  Then I laminated it.  (so easy)

Technically, this could almost be chalked up to a craft fail…

There’s always the question floating around my house, is the dishwasher clean or dirty?

To solve the problem, I decided to create laminated signs to put on the front of the dishwasher

and added magnets to the back.  Smart?  Right?

I forgot that magnets do not stick to stainless steel dishwashers.

My Mom worked at a middle school for several years before she retired.

One of her jobs, among many others, was laminating things for the teachers.

When we went through her things this summer, we found…

  • Laminated Brochures
  • Laminated Maps
  • Laminated Ticket Stubs
  • Laminated Cartoon Strips
  • Laminated Newspaper Clippings
  • Laminated Recipes

I guess Mom liked laminating too.

“This is a sponsored post.  As a member of the Xyron Design Team I have been provided product and compensation in exchange for my creative ideas.  The views and opinions are my own.

*Disclosure:  This blog uses affiliate links.  If you choose to make a purchase using one of the links, I receive a small commission (at no additional cost to you) that helps offset the costs of maintaining this blog.  Thanks for your support!

Painted Happiness Pillow

Happiness Pillow…

One of my favorite childhood memories was the summer I was cast as Lucy in the library’s

production of  “You’re a Good Man Charlie Brown”.

My favorite song was “happiness is”.  At the end of the show we all held hands and sang.

Still makes me happy.

When it comes to using Joy Iron-on letters…

I’ve dyed them, inked them and even misted the letters, I never thought about painting them.

Joy White Embroidered Iron On Letters are great for creating any color you can imagine.

They even work great with acrylic paint.

To Make the Happiness Pillow you’ll need…                            (*affiliate link)

*Disclosure:  This blog uses affiliate links.  If you choose to make a purchase using one of the links, I receive a small commission (at no additional cost to you) that helps offset the costs of maintaining this blog.  Thanks for your support!

  • Paint each letter to create a rainbow of H-A-P-P-I-N-E-S-S.
  • Allow letters to fully dry.

  • Insert cardboard into pillow blank.
  • Add Fabric Medium to acrylic paint white and light blue paint.
  • Paint directly onto the canvas pillow.
  • Allow paint to fully dry.
  • Set Iron to cotton setting, approx. 350 degrees, or follow garment care label.
  • Position letters with shiny side down onto pillow
  • Cover letters with a fine cloth.  With a firm pressure, iron cloth over letters for 30 seconds.
  • Turn pillow over and iron the back for another 30 seconds.
  • Position Embroidered Floral Applique and iron onto pillow the same as the letters.
  • Allow to cool for 1 minute before handling.
  • Insert pillow form or add Polyfil.

Shop Your Fav Brands at Scrapbook.com

Look for Joy® iron-on embroidered letters and numbers at your favorite craft store. They’re available in different sizes, colors and fonts, suitable for every occasion.

“This is a sponsored post.  As a member of the Joy® Design Team I have been provided product and compensation in exchange for my creative ideas.  The views and opinions are my own.

Shop Amazon Scrapbooking Supplies*

Personalized Pool Party Glasses

Keeping Cool and Living the Dream…

Here in the Midwest, summer has turned H-O-T!

And because we have a pool, we get a lot of extra visitors. 

To help us all keep cool…we keep the blender whirling.

This is one of my favorite Summer activities.

Today… I’m participating with several designers of the Designer Craft Connection

in a Designer Challenge using Adhesive Vinyl from Styletech Craft.

For a full list of the participating designer’s projects CLICK HERE.

How to make personalized Pool Party Glasses.                  (*affiliate link)

  • Pick up a couple of inexpensive glasses at Dollar Tree*.   While you’re there…don’t forget to pick up the cute palm tree swizzle sticks.
  • Clean the glasses with warm soapy water to remove any grease or residue.
  • I used my Silhouette Cameo 3* to create and cut the words “just chillin” and “living the good life” out of Self Adhesive Glitter Vinyl Sheets- by Styletech*
  • Remove the background vinyl from the words using a vinyl weeding tool or metal pick.

  • Pick up the words off the backing paper with Vinyl Transfer Tape* and apply directly onto glass.  Rub the words to make sure they’ve stuck before removing the transfer tape.
  • If you can…Wait 4 days for the adhesive to fully cure before using the glass.
  • It is recommended to hand wash only.

Ask for Self Adhesive Glitter Vinyl Sheets- by Styletech from Tape Technologies* at your local Scrapbook Store.

Shop Your Fav Brands at Scrapbook.com

*Disclosure:  This blog uses ads and affiliate links.  If you choose to make a purchase using one of the links, I receive a small commission (at no additional cost to you) that helps offset the costs of maintaining this blog.  Thanks for your support!

Home is Where the Heart is Stitched Sampler

Celebrate special occasions with a personalized stitched sampler.

A great gift idea for a wedding, anniversary or new home.

Home is where the Heart is products used:                      (*affiliate link)

*Disclosure:  This blog uses ads and affiliate links.  If you choose to make a purchase using one of the links, I receive a small commission (at no additional cost to you) that helps offset the costs of maintaining this blog.  Thanks for your support!

Create custom numbers to match the project by spraying numbers with glimmer mist. 

Allow numbers to fully dry before using .

Directions:

  1. Cut a shapes using the picture above.
  2. The flowers were made using a simple hand drawn flower shape and traced onto the felt.
  3. Add red ink to the tips of the cream flowers with a stencil brush.
  4. Machine stitch the gray scalloped square onto the tan square
  5. Machine stitch the roof onto house and machine stitch onto the gray scalloped square.
  6. Iron numbers onto the center of the red heart.
  7. Arrange and adhere smaller pieces onto house using fabri tac glue.
  8. Hand stitch smaller pieces and buttons into place using needle and thread.
  9. Add finish piece into a shadow box frame.

Look for Joy® iron-on embroidered alphabet letter sheets at your local craft store.

“This is a sponsored post. As a member of the Creating with Joy Design Team I have been provided product and compensation in exchange for my creative ideas.  The views and opinions are my own. 


Translucent Vinyl Suncatcher

When I received the Translucent Vinyl from Tape Technologies,

I knew it would be perfect for making a Suncatcher.

The translucent vinyl comes in several great colors to choose from.

To make my Suncatcher I used a framed glass sample I rescued from the garbage.

You could also use a small frame and glue the glass into the frame.

To create my shapes I used my Silhouette Cameo*and Jillibean Soup’s Floral Mandala cut file.

*Disclosure:  This blog uses ads and affiliate links.  If you choose to make a purchase using one of the links, I receive a small commission (at no additional cost to you) that helps offset the costs of maintaining this blog.  Thanks for your support!

I used the Vinyl Transfer Tape* to overlay the blue onto the pink.

I then transferred both images onto the glass to create the Suncatcher.

To create a little more sparkle I added adhesive rhinestones onto the glass.

Shop Your Fav Brands at Scrapbook.com

“This is a sponsored post. As a member of the Tape Technologies Design Team I have been provided product in exchange for my creative ideas, views and opinions.”

Ask for Self Adhesive Glitter Vinyl Sheets- by Styletech from Tape Technologies* at your local Scrapbook Store.

DIY Bloom Planters

“bloom where you are planted”

A little Inspiration for my Summer Flowers…

I’m not sure if it’s a subliminal message or a direct request.  (to my plants that is)

BLOOM!

I picked up these beautiful purple flowers over the week-end and decided to spruce up a couple

of plain pots into something special.

FYI…the name of the plant with Campanula, a partial shade loving perennial.

How to make a DIY Bloom planter…              (*affiliate link)

  1.  Paint terra cotta pot with 2 coats of white paint.
  2. Brush a thin layer of purple paint along top band.  (no need to be perfect)
  3. Lightly sand pot for a distressed look.
  4. Using a cut file and the Silhouette Cameo*, cut the saying out of the purple glitter vinyl.
  5. Apply the saying onto the pot using transfer paper.  Smooth into place and remove transfer paper.

Shop Your Fav Brands at Scrapbook.com

*Disclosure:  This blog uses ads and affiliate links.  If you choose to make a purchase using one of the links, I receive a small commission (at no additional cost to you) that helps offset the costs of maintaining this blog.  Thanks for your support!

The blue ceramic planter was plain and simple until I added stripes using the glitter vinyl,

and applied the light blue glittered vinyl words using a Vinyl Transfer Tape*.

Perfect decorative accent for my summer front porch.  (or a great gift idea)


Don’t Miss a Thing…Make Sure to Follow me


Ask for Self Adhesive Glitter Vinyl Sheets- by Styletech from Tape Technologies* at your local Scrapbook Store.

“This is a sponsored post.  As a member of the StyleTechCraft Design Team I have been provided product and compensation in exchange for my creative ideas.  The views and opinions are my own.