Remembering Dad…

When my Dad passed away a few months ago I wanted to write a tribute to honor him.

I wanted to share just how special he truly was.

Every night when I’d lay my head down, the words (and tears) would flow.

I never wrote them down, the feelings were still too tender.

The other night, I had a dream about him that was so real I didn’t want to wake up.

I still miss him!

I grew up in the middle of a family of 7 living in a small 900 square foot house.

What the home lacked in size, we made up for with love.  

This past month, we  started the tedious task of sorting through all of the “memories”

and stuff stored in our childhood home for the past 58 years.

As challenging as it feels,

we always stop, share and get excited by the little treasures that we find.  

This home holds a lot of memories.

My Dad was a hard-working man…

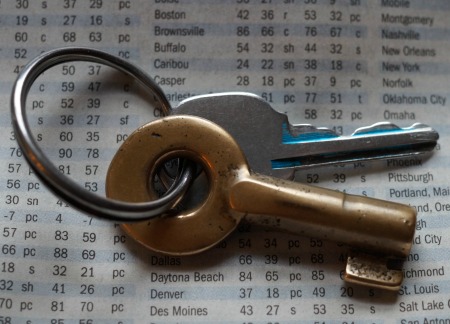
he worked on the railroad as a Switchman for over 40 years.

Recently he told me that on his last day of work he was supposed to turn in his switchman key.

He decided to keep it for a souvenir.

He kept it in his pocket as a keychain for the next 21 years.

Growing up in a house with 4 girls (and one boy) we did a lot of “girl” things with Mom.

As we grew older it was not uncommon for us to be shopping with Mom, talking

on the phone, having lunch out, going to the movies.  Having a Girls Night.

It wasn’t until after my Mom died, when Dad started coming over regularly for dinner

that our real closeness happened.  Don’t get me wrong, I’ve always loved my Dad,

I just never really had one on one time with him until then.  Mom was always there.

During those years, Dad and I had our shows that we watched together (a lot of NCIS)

and when my husband was out of town he’d take me to dinner.

I’d never had a father/daughter date.

My Dad was a man of faith.  He believed with his whole heart.

Being a quiet man…it took me a little off guard, when during his

cancer struggles last year, he became very vocal in his faith.

I never tried to stop him, but I must admit I squirmed a bit at times.

During one of his visits to the University Hospital he was attended by a new doctor.

As the appointment was ending, I was sitting there thinking to myself.

Hmmm…he’s not going to do it.

As the doctor was leaving, his hand on the door, he looked over and said…

“you look like you have a question to ask.”

Dad smiled and said “Do you know Jesus?”

At times, it was apparent he made some feel uncomfortable…

while others told us how wonderful and sweet he was.

Some even told us he made a difference in their life.

I had to remind Dad often he was planting seeds.

He felt like over the last year… with all the many doctors, nurses and

technicians that he met, during the course of 3 surgeries and radiation,

that it was his mission to spread the word.

In his last month of life, after a bad fall,

he spent 2 weeks in the hospital and one in a nursing home.

While none of us were totally prepared, he gave us 3 weeks to say good-bye.

He told me not long before his fall…”I’m 86, I won’t be here forever”.

“When I die, you will grieve for a while,

then I want you to be happy, because I will be happy”.

On the night that he died, when he took his last breath,

he opened his eyes, a smile on his face and a tear in his eye.

I believe he is happy.

Xyron 2018 Design Team

Sorry I haven’t posted much lately.

That stupid influenza bug had me sidelined and wiped out for the last couple of weeks.

It feels good to feel good again.

And now for some Exciting News…

It is such an honor to have been chosen by Xyron to be on their 2018 Xyron Design Team

and work along side these lovely and talented ladies.  It’s going to be a good year!

Rotating Embellishment Organizer

Being a paper crafter at heart, I sometimes wonder…

What’s your favorite way to embellish?

For me it’s flowers, twine, buttons and pearls.

My Rotating Embellishment Organizer also know as Deflecto’s Rotating Carousel Organizer*

is a great way to organize my “go to” embellishments.  (and it looks pretty too.)

The Deflecto Rotating Carousel Organizer with Nine Canisters*   (*affiliate link)

comes with three 6″ bins and six 3″ bins.


It is also available as a Rotating Carousel Organizer with Six 6″ Canisters*.

It’s a great way to organize your supplies.

“This is a sponsored post. As a member of the Deflecto Design Team I have been provided product in exchange for my creative ideas, views and opinions.”

*Disclaimer:  This blog uses ads and affiliate links.  If you choose to make a purchase using one of the links, I receive a small commission (at no additional cost to you) that helps offset the costs of maintaining this blog.  Thanks for your support!

Shop Amazon Scrapbooking Supplies*

How to make a Love Coaster with Easel

A Quick and Easy, DIY, Valentine’s Decoration or Gift.

The “Love Coaster with Easel” is one of the projects that I made at the StyleTechCraft

booth while at Creativation last week.  

Everyone loved how easy it is to make an easel using a clothespin.

Materials Used:              (*affiliate link)

*Disclosure:  This blog uses ads and affiliate links.  If you choose to make a purchase using one of the links, I receive a small commission (at no additional cost to you) that helps offset the costs of maintaining this blog.  Thanks for your support!

To make the Love Coaster…                               

  • You can use Plain White Square Coasters* or…I made my scalloped coaster using a steel rule die and white chipboard.
  • Cut a heart out of Translucent Red Glittered Vinyl from Tape Technologies using a thin metal die.  Apply the glitter heart to the coaster using a transfer paper made for vinyl.
  • Using my Silhouette Cameo Electronic Die Cutting Machine*, I cut the word “love” out of Black Glittered Translucent Vinyl and applied it directly over my heart using transfer paper.
  • I edged the sides of my coaster in silver, using a Silver Leaf Paint Pen*.

How to make an easel using a clothespin.

To make the Easel…

  • Glue a Wooden Clothespin* on the back of the coaster with Rapid Fuse Adhesive*.
  • Pull the clothespin open just enough so that the round metal spring comes slightly out of its groove.  (Some clothespins work better than others so you might need a little luck.)
  • To keep the clothespin from snapping shut…glue the top ends of the clothespin together.

Love Coaster-Sue's Creative Workshop-www.sueeldred.com 1576

A couple of guys at the show made theirs into Valentine’s cards.

I told them all they had to do was add a sweet note inside and, they were set.

Maybe I should have told them including flowers and chocolates is also a good idea.

“This is a sponsored post.  As a member of the StyleTechCraft Design Team I have been provided product and compensation in exchange for my creative ideas.  The views and opinions are my own.

You can now find the full line of StyletechCraft products online at ATSM.

Give the Gift of Amazon Prime*

DIY…Mad for Plaid Baby Bib

Life gets messy sometimes…with this cute little washable flannel bib, it’s ok.

It’s no secret that I love plaid, especially red plaid.

And…since I had red flannel left over from a pillow project,  I decided to make my sweet

grandson a cute little bib.  It never hurts to have a extra bib or two for those times when

he needs to get messy.

This is how I made my “Get Messy” flannel bib…

  • I made a pattern for my flannel bib by folding an old bib in half and laying it “fold to fold” on a folded piece of cardstock.
  • I wanted the new bib to be a little bigger than the original bib, so, I sketched it with pencil marks to extend the pattern.
  • Cut out the pattern and trace two bibs onto the flannel using a black permanent marker.  Cut out bibs from the flannel.
  • Sew bibs together leaving space on one end to turn bib inside out.  Iron bib to make it lay flat.
  • Sew a top seam around bib and to close the open end.
  • Personalize the bib using Iron-on Embroidered letters from Joy SA.
  • Attach Velcro on each end to close bib.

My “Get Messy” bib was created for and sponsored by Joy SA.

Sew Cute Baby Bibs

*Disclaimer:  This post uses ads and affiliate links.  If you choose to make a purchase using one of the links, I receive a small commission (at no additional cost to you) that helps offset the costs of maintaining this blog.  Thanks for your support!

Try Amazon Prime 30-Day Free Trial

Next Stop…Creativation 2018

I’m heading West today to Phoenix for warmer weather and the Creativation Trade Show.

While there, I will get to see the latest and the greatest in the Hobby and Craft Industry.

Can you say Creative Overload?

I will be doing make and takes in the Deflecto Booth first thing Saturday morning and again

in the afternoon.  I will be demoing in the Tape Technologies Booth on Monday afternoon.

In between working…I will be walking the show, networking, meeting up with old friends

and hopefully taking lots of pictures to share with you.

After the show is over, I’ll be heading to Sedona, AZ for a little rest and relaxation.

I can’t wait to get out of this cold and snow.    Stay tuned….more to come.

Try Amazon Prime 30-Day Free Trial

*Disclaimer:  This post uses ads and affiliate links.  If you choose to make a purchase using one of the links, I receive a small commission (at no additional cost to you) that helps offset the costs of maintaining this blog.  Thanks for your support!

Making it Cozy…

Cozy up the house this Winter with a personalized flannel pillow!

When the holidays are “really” over and everything is finally packed away…

it’s time for me to relax, cozy up with a comfy pillow, warm blanket and a good book.

I love to hibernate in the winter.  (I really don’t like the cold)   

That’s when I start layering up the house (and me) with blankets and pillows.

I like it warm and “cozy”.

To make my Cozy pillow you’ll need:

Directions:

  1. With right sides together, sew three sides of the flannel pieces together to create the pillow cover. Turn so the right side is facing out.
  2. Position the letters on the front then, following directions on the back of the package, iron in place using a pressing cloth.  Let cool then turn the pillow cover inside out and iron again from the back.  Let cool for at least one minute, then turn again with the right sides out.
  3. Insert the pillow form then stitch then the pillow cover closed.

My cozy pillow was created for and sponsored by Joy SA.

Joy® iron-on numbers and letters are available in different sizes, colors and fonts at your favorite craft stores…

Try Amazon Prime 30-Day Free Trial

*Disclaimer:  This post uses ads and affiliate links.  If you choose to make a purchase using one of the links, I receive a small commission (at no additional cost to you) that helps offset the costs of maintaining this blog.  Thanks for your support!

Organizing… the Kids Craft Cabinet

Organizing the kids craft cabinet-Sue's Creative Workshop-www.sueeldred.com 1282

I have this awkward wall cabinet between my kitchen and dining room.

It opens fully on the dining  room side and only partially on the kitchen side.

Not completely functional, it doesn’t get used all that much.

Organizing the Kids Craft Cabinet Before-Sue's Creative Workshop-www.sueeldred.com 1275

It’s been the dumping spot of misc. household and kid crafts for the past two decades.

My very active grandsons are always wanting to make something, do something.

I thought a more organized easily accessed spot would be a good idea.

Organizing a kids craft cabinet-Sue's Creative Workshop-www.sueeldred.com 1292

After a little sorting and purging, it’s nice and neat.

Organizing the kids craft cabinet-Sue's Creative Workshop-www.sueeldred.com 1287

Everything’s labeled.  It’s easy to find everything they’ll need.

Organizing a Kids Craft Cabinet-Sue's Creative Workshop-www.sueeldred.com 1294

Here’s the products I used to organize my Kid’s Craft Cabinet from Deflecto Craft:

“This is a sponsored post. As a member of the Deflecto Design Team I have been provided product in exchange for my creative ideas, views and opinions.”

Shop Your Fav Brands at Scrapbook.com

*Disclaimer:  This blog uses ads and affiliate links.  If you choose to make a purchase using one of the links, I receive a small commission (at no additional cost to you) that helps offset the costs of maintaining this blog.  Thanks for your support!

Happy New Year 2018

Happy New Year 1249

By the time we get through all the Christmas Festivities and Parties….

I’m ready to stay in and eat pizza by the time New Year’s Eve comes along.

Relaxing and low key is the answer.

We may even toast the New Year, that is if he’s still awake.

Happy New Years-Sue's Creative Workshop-www.sueeldred.com 1198

Even though we’re not having a big party, Party Hats are always fun.

I must have been really good this year…

because Santa brought me a new Silhouette CAMEO 3 Wireless Cutting Machine*

I used my new present to whip up some simple party hats

Happy New Years-Sue's Creative Workshop-www.sueeldred.com 1203

I used two strips of Ultra FX Glitter Vinyl from Styletech and laid them side by side.

I made sure my fonts lined up so that I could cut both colors at the same time.

Happy New Years-Sue's Creative Workshop-www.sueeldred.com 1208

  • I also cut a large mat shape from black cardstock and a slightly smaller mat shape using silver metallic vinyl.
  • I used the transfer paper to remove all the letters at once and laid them onto my shiny mat to create my hat.
  • I cut the bottom section of the mat shape and added a small strip of vinyl for extra decoration.  I created a band for my hat from two strips of cardstock and stuck the “happy new year” mat on the front.  (pretty simple)

Happy New Years Hat-Sue's Creative Workshop-www.sueeldred.com 1241

Now it’s a party.  (well sort of)

Shop Amazon Scrapbooking Supplies*

*Disclaimer:  This post is sponsored by Tape Technologies and uses ads and affiliate links.  If you choose to make a purchase using one of the links, I receive a small commission (at no additional cost to you) that helps offset the costs of maintaining this blog.  Thanks for your support!

Top Ten Blog Posts of 2017

As 2017 winds to an end…

It’s fun to look back through the year and pick which posts were your favorite (and mine too).

As a special treat, this year, I’m joining along in with a group of 40 awesome

Creative Bloggers in a Blog Hop sharing their top 10 favorite posts.

Prepare yourself for Creative Goodness Overload.


Shop Your Fav Brands at Scrapbook.com

If you’ve come from Tifany DeGough  your next stop would be  Melissa Elsner.

As promised here is the full list of the Top Ten Blog Hop…. (enjoy!)

Shop Amazon Scrapbooking Supplies*

*Disclaimer:  This post uses ads and affiliate links.  If you choose to make a purchase using one of the links, I receive a small commission (at no additional cost to you) that helps offset the costs of maintaining this blog.  Thanks for your support!