My Summer Vacation…

When the Jimmy Buffett tune came across the radio…

I was immediately filled with a combination of jealousy and sadness.

My husband’s vacation was just a few days away and we had no plans.

I mean none other than work in the garage and scrape and paint the deck.  (yay!)

Hilton Head 2013

Every other summer we try to plan a “beach vacation” and this was that summer.

For months, I’ve endured everyone’s Facebook vacation pictures while longing for the beach.

(Insert dramatic sigh!)

But…being practical people, this summer, we’d opted for a “Garage Make-Over” instead.

Don’t get me wrong… I love our new garage.  (another post for another day)

I just love the beach too.

Truth is…  I have a teen-ager.

The thought of him being stuck with two boring parents away from his friends,

his music and games for a whole week sounded like torture to him.

He was not interested in the least.

I know we should of made him go.

But… I wasn’t sure that I wanted to spend all that money to take a sulky teen.

So, we opted for practical instead.

But… when I heard the song on the radio, it reminded me of our favorite Mini Golf place

the one on Myrtle Beach where they play nothing but Jimmy Buffett songs.

I told my husband when I got home, and…being the good man that he is…

he checked for last minute cheap airfare and hotels.  (what a guy!)

But… practicality won out again and we decided for something closer.

A trip to Lake of the Ozarks.  (romantic I know)

Lake of the Ozarks 08088

When we opened the door to our room, on the Marina, we were struck by the amazing view.

Our son, who’d refused to bring his swim trunks was now having second thoughts.

fishing off the patio 8089

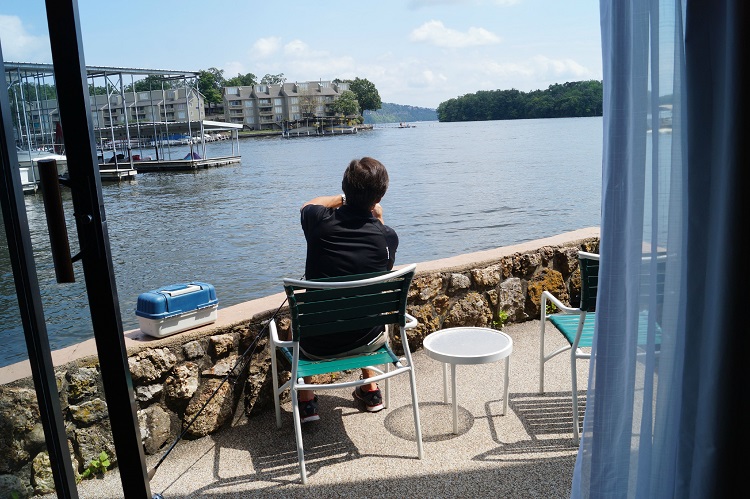
Seriously, you could fish off the patio.  (Which he immediately did.)

the cave 8101

Neither one of the guys had been in a cave before.  So we did that.

on the boat 8111

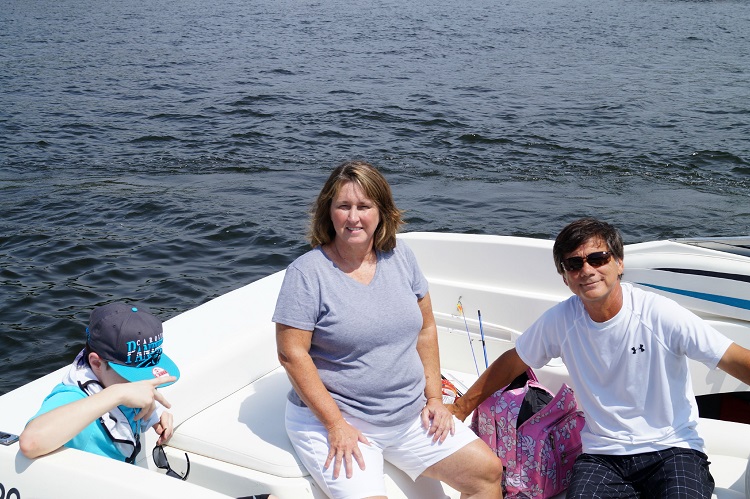
The real highlight of the trip was when we rented the boat and took it out on the lake.

Justin 8127

Driving a boat for the first time, girls waving from the other boats, actually brought a smile

to his face.  I didn’t catch it on camera, but it was definitely there.

It was a great trip, a great memory and I’m so glad we went even if it was for just a few days.

Painting on Acrylic Frames

Painting on Acrylic Frames

With all this new Home Décor chalk paint out on the market…

with it’s claims of being able to paint on most anything.  I decided to give it a test.

I’ve used it on wood, old frames, stuff like that.

Acrylic frames?  It was worth a try.

Creating a mask 5889

I created a mask using blue painters tape and applied it onto the front of a

Mini 3″ x 4″ Sign Holder* (*affiliate link) from Deflecto Craft Solutions.

Make sure to burnish the edges of the tape.

adding red paint 5890

I painted the surface of the frame with:

FolkArt Home Decor Chalk Furniture & Craft Paint in Imperial*

I used 3 coats of paint.  Make sure to allow good drying time in between coats.

adding black paint 5897

After allowing plenty of time for the red paint to dry and cure.

I gave the frame an aged look by applying a layer of Tattered Angels Decor and DIY Paint*

I wiped it off with a damp paper towel.  Leaving bits of the black streaks.

Crackle Stamp 5899

I stamped around the edges of the frame with a crackle background stamp

and  Tsukineko StazOn Ink Pad, Jet Black*

Carefully remove the blue painter’s tape mask.

At this point, I stopped and admired my frame for almost a month.

Just waiting for inspiration….

Rachael Cunningham Parr 7560

Meet Rachael Cunningham Parr. 

I found Rachel, a tin type, years ago while hunting for treasures.

If Rachael is your relative, I’m pretty sure she wasn’t really a gypsy.

(She really is a beautiful woman.)

I embellished the frame with some vintage rickrack, key, and a tiny flower.

“R is for Racheal” was made with Metal Type Charms by Tim Holtz*

Once inspired…  I created a couple more frames.

The frames uses charms and hardware from Canvas Corps Brands 

and Chitchat Word Stickers by Tim Holtz*.

Now to try this on a bigger frame!

 “This is a sponsored post. As a member of the Deflecto Design Team I have been provided product in exchange for my creative ideas, views and opinions.”

*Disclaimer:  This blog uses ads and affiliate links.  If you choose to make a purchase using one of the links, I receive a small commission (at no additional cost to you) that helps offset the costs of maintaining this blog.  Thanks for your support!

Creating a Decorative Display Board for all my Little Pretties

Smoothfoam Display Board 07114

My project started as a Memo Board and… 

While I was looking for some push pins I stumbled across a collection of little pretties.

Tucked away in a cabinet along with a lot of other embellishments were these little

metal frames.  Something that I’d been hoarding since my K & Company days.

I added those frames along with some other little pretties onto my board.  (Love!)

Memo Board Products

To make my Memo/Display Board I used:            (*amazon affiliate link)

Directions:

  1. Paint wood frame with cream acrylic paint.
  2. Cut the Smoothfoam sheet a 1/4″ larger than the center opening of the frame.
  3. Apply spray adhesive to the front of the Smoothfoam and lay onto the fabric.
  4. Wrap and glue the fabric around the back of the Smoothfoam.
  5. Glue the frame onto the front of the covered Smoothfoam.
  6. Decorate the top and bottom of the frame with dimensional flowers.

*My little pretties are stuck into the display board with decorative garment pins.

A really fast and easy project.

This project was created for and sponsored by Smoothfoam.

Shop Amazon Scrapbooking Supplies*

Disclaimer:  This blog uses ads and affiliate links.  If you choose to make a purchase using one of the links, I receive a small commission (at no additional cost to you) that helps offset the costs of maintaining this blog.  Thanks for your support!

My trip to CHA Paper Arts in Chicago

Last week, I got the opportunity to attend CHA Paper Arts in Schaumburg, IL.

I hadn’t been able to attend a CHA Show (Craft Hobby Association) since the last time

it was in Chicago a few years ago.

As you can imagine I was excited to go.  (any excuse for a get-a-way)

I knew going in that it was going to be a small show.

But…by being a small show, it gave me the opportunity to mix, mingle and really get to know people.

I got to meet, in person, a few online friends, was able to make a few more and make some really

great connections.  All in all I was satisfied.

Back in it’s hey day, when I had my store, I remember spending three days walking the show

and still not being able to see everything.  (those were the days…)

On the first day of the two day show, I did remember to take a few pictures.

I wish I had taken more.   Enjoy!

Stephanie Ackerman 2813

First off in the Sizzix Booth was dies from Stephanie Ackerman. 

I’ve been following Stephanie’s blog, Homegrown Hospitality, for years.

She’s a real Superstar in my books.

Tim Holtz 2809

 New House Dies from Tim Holtz and Sizzix

I love the little house dies from the always popular Tim Holtz.

Tim Holtz 2810

Tim Holtz Holiday Canvas

Ken Oliver and the Girls 2846

Ken Oliver of Ken Oliver Crafts

Ken’s another one of my Favorite Superstars.  Here I am with Ken and The Paper Forest girls.

They had just taken a picture with Ken and was rubbing it in my face.

So… I made them take another.

Ken Oliver's Color Burst

I finally got the opportunity to play with Ken’s Color Bursts. 

It only took a few minutes to create this masterpiece.

Eileen Hull 2845

Eileen Hull’s Vintage Camper, Scotty on The Paper Trail at CHA.

Eileen Hull 2840Eileen Hull 2841

Such a cute little camper.  You can read about Eileen and Scotty’s Adventure here.

Eileen Hull 2842

Eileen Hull’s Samples made using Sizzix Dies.

Eileen Hull 2843

More samples from Eileen.

I met Eileen a few years back and she’s such a sweet and personable lady.

You can’t help but love her.  And her dies… they are just too cute.

If I had her camper, I just might enjoy camping.  (well maybe)

Graphic 45 2823

Another picture with The Paper Forest girls at the Graphic 45 booth.

Graphic 45 2829

Graphic 45 World’s Fair

Graphic 45 2832

Graphic 45 Mon Amour

Kaisercraft 2861

Kaisercraft

Ready for Christmas Crafting?  I am!

Kaisercraft 2863

More Kaisercraft Christmas…

Kaisercraft 2862

Kaisercraft

Little B 2852

Little B LLC Christmas

Little B 2858  I fell in love with Little B’s New Christmas Washi Tape.

This is another one of those booths where I got talking and forgot to take more pictures.

Ikea

As a reward for all my work (aka…having fun).  

I ended my adventure with a trip to my favorite Big Blue Store, IKEA.


DIY: Mini Crate Make-Over

Red Crate 5878

DIY Mini Crate Make Over…

Because sometimes a girl changes her mind.

crate 4158

It all started with this…  My Sweet Earth Day Tea Party Crate. (←original post)

A cute cream and pink crate with a pretty pink flower.

It was perfect for what I wanted at the time.

But… always resourceful, I decided to reuse the mini crate* (*affiliate link) in my work space.

Because my work space has a vintage vibe… a mini make over was in order.

Paint with Red Chalk Paint 5173

I took off the flower embellishment and gave the mini crate* a light sanding.

Then I painted the crate with FOLKART Home Decor Chalk, Imperial*.

Being an impatient crafter, I was tempted to start my next color right away.  Make sure to wait.

Allow a couple of hours for the piece to dry before adding the next color.  (trust me)

Paint a thin coat of black paint 5182

Next, I gave the crate a light coating with Black Home Décor paint.

Use a small paint brush to get into those corners.

With a soft, damp, clean cloth, wipe off the black paint to give it an aged distressed look.

I used Tattered Angels Décor in Ebony*.

extra red highlights5200

If you start to think it looks to dark, just add highlights with the red paint directly over the

ebony paint.  If you like a matte finish, you can stop right here.

I wanted a little more sheen, so I applied FOLKART Plaid Clear Home Decor Wax*.

With the wax, you apply a thin coat, wait one hour and buff with a clean soft cloth.

I’ve always loved furniture with that aged red finish and wanted to give it a try.

Now that I’ve started with something small, (which is always a good idea)

I’ve got my eye on a couple more pieces I’d like to refinish.

FYI:  If you’d like a mini crate like mine you can get it at online at Amazon* or Walnut Hollow.

This project was sponsored by Walnut Hollow, Canvas Corp and Plaid. 

Join Amazon Kindle Unlimited 30-Day Free Trial

Disclaimer:  This blog uses ads and affiliate links.  If you choose to make a purchase using one of the links, I receive a small commission (at no additional cost to you) that helps offset the costs of maintaining this blog.  Thanks for your support!

Frosted Holly Wreath Ornament

Frosted Holly Wreath Ornament

While most of you are outside basking in the Summer’s warmth…

some of us are inside thinking “cool” thoughts.


robins nest smoothfoam blog hop


As you know… I love participating in the Designer Craft Connection’s Monthly Design Challenges.

The theme for the Challenge was Christmas in July.

This month’s Manufacturer Design Challenge was sponsored by Robin’s Nest and Smoothfoam.


Holly Wreath 7192

My project for the challenge is a simple ornament using a small Smoothfoam Wreath

and a variety of dew drops, tear drops, diamond drops and trim from Robin’s Nest.


To Make the Wreath:

  1. Apply a layer of embossing paste or Snowtex to cover the front and sides of the wreath.
  2. Allow time for the paste to fully dry before continuing.
  3. Glue tear drops and dew drops on the front of the wreath with a good liquid craft glue.
  4. Glue trim around outside of the wreath.  I originally had no trim on the outside of the wreath.  By adding the decorative trim around the outside it gave me the pop of green that I needed to accent the wreath.
  5. Next…Punch or cut a 3″ circle from red glitter cardstock.  Find the center of the circle and start forming the snowflake pattern using 12 diamond drops.  Glue small metallic dew drop in the center of the snowflake.
  6. Glue hanger on the back of the wreath before adding the red snowflake circle.


Wreath Close Up Side 7217

A Big Thanks to Smoothfoam and Robin’s Nest for providing the products to work with.


DCC image

To see what the other designers have come up with. 

Click on the Designer Craft Connection Logo on my right sidebar to start hopping.


Kindness Matters

Kindness Matters.  All Day.  Every Day. 

This card was made using Art Play Paintables and Blender Basics.

I water colored the image using a waterbrush and a variety of inks from markers and inkpads.

Happy Friday Everyone!

Shop Your Fav Brands at Scrapbook.com

*Disclosure:  This blog uses ads and affiliate links.  If you choose to make a purchase using one of the links, I receive a small commission (at no additional cost to you) that helps offset the costs of maintaining this blog.  Thanks for your support!

Thrifty Tuesdays Really Good Finds…

My Thrifty Finds 7058

We awoke to a rainy un-seasonably cool July morning.  Not really a outdoorsy kind of summer day.

So my daughter and I (since she was in town) went to one of our favorite Thrift Stores.

You know…The kind that is ran by old church ladies and the prices are really cheap.

My very favorite kind.

I found all the items above along with 3 stemmed glassware cordials for only $8.50.

hardware

Of all the things that I purchased today (and I love them all) this has to be my favorite.

A creamy white platter with no cracks or crazing for .50 and a bag of old hardware for a dollar.

That totally made my day.

basket pot and box

I almost put all three of these things back.  (total cost $1.50)

Instead I gave the little box to my daughter, and will use the terra cotta pot

with the great patina for a bunch of pink impatiens that need re-potting.

Stephanie And Me Selfie 2

After so much energy on great finds, my daughter and I treated ourselves to a nice lunch

at Potbellys and took a “selfie”.

It doesn’t take much to make us happy.

Quick & Easy Washi Tape Make-Over

Quick & Easy Washi Tape Make Over 7015

Quick and Easy, Keep It Simple.  Sounds like a great DIY plan. 

With a little creativity you can transform plain into something fun and personal.

Deflecto Black Pencil Cup 6944

I started with a plain pencil cup from Deflecto.

With a little Washi Tape wrapped around the top and bottom of the cup, a couple of stickers and

accessories…  I now have a cute pencil cup to set on my desk.

I added a couple of my favorite pictures of my special guys from last year.  (boy have they grown)

Quick & Easy Washi Tape Make Over 7014

Need a couple “brownie points” for the upcoming back to school?

This would make a great teacher gift.

Just add the Teacher’s Name, Grade or “Welcome Back to School” along with a apple sticker or two.

Great for Dorm Rooms too.

“This is a sponsored post. As a member of the Deflecto Design Team I have been provided product in exchange for my creative ideas, views and opinions.”

 Featured on Hometalk.com

Tie Dying for the 4th of July

This may be the last Tie Dye Post from me.  (or not?)

On Father’s Day we tie dyed shirts with the kids.  It turned out to be a really great group activity.

Because we had to let the shirts set, rinse and then be washed….

I was not able to get pictures of all the kids and their shirts.  (you know…the big kids)

Last Wednesday my sister brought my niece over for a play date with my grandsons and

I was able to get a few cute ones.

You may be wondering why only one kid got the last red white and blue popsicle.

Well…. the really cute and innocent looking littlest one had just recently taken a good hard

bite on the tip of his big brothers nose.  “Ouch!”

It didn’t take long before he forgave his little brother and was sharing his popsicle.

Little brother wouldn’t have had it any other way.

Isn’t she adorable?

On her shirt, the dye was painted directly onto the shirt with a paintbrush.