American Vintage Travel Dungaree Album

American Vintage Travel Dungaree Album 06693

With Summertime comes the Road Trips.

Whether you’re hitting the beach or hiking up trails, you’ll want to savor these memories forever.

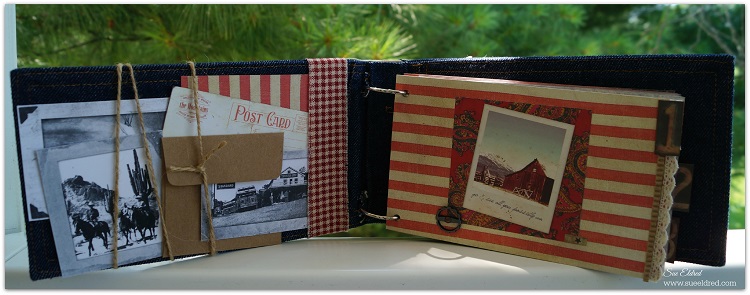
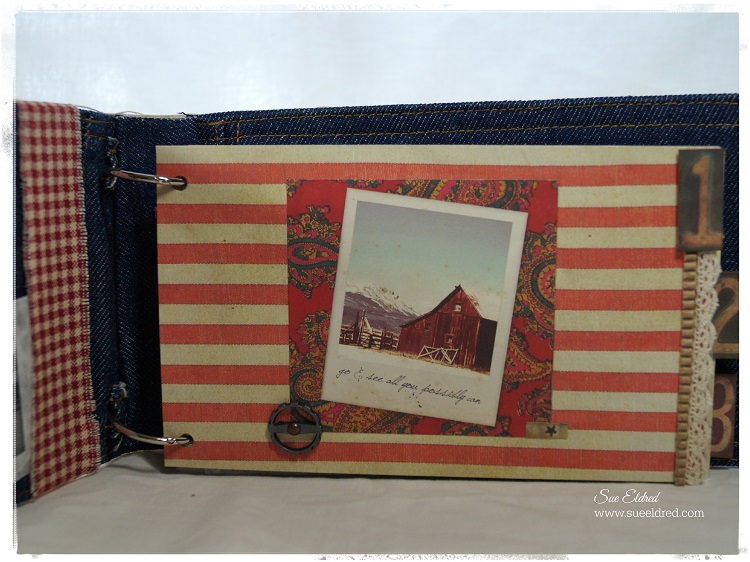
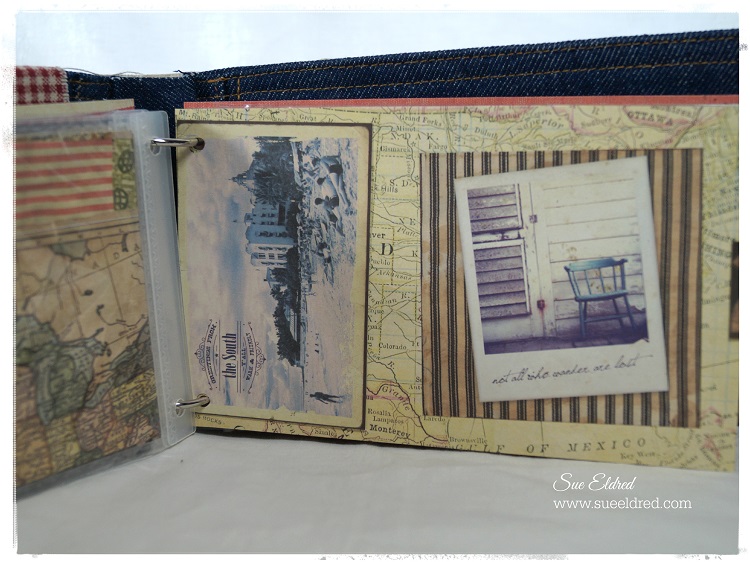
My Travel Album made using Canvas Corp Brands  “American Vintage Collection” and Dungaree

Album is a great place to save all the pictures and memorabilia you’ll be collecting along the way.

American Vintage Dungaree Journal Open 6705

Instructions to make the American Vintage Dungaree Travel Album…

Canvas Corp Brands Products Used:

Additional Products Used:

(Disclosure:  I will get a small commission if you click and purchase through my product links.)

American Vintage Album 6178

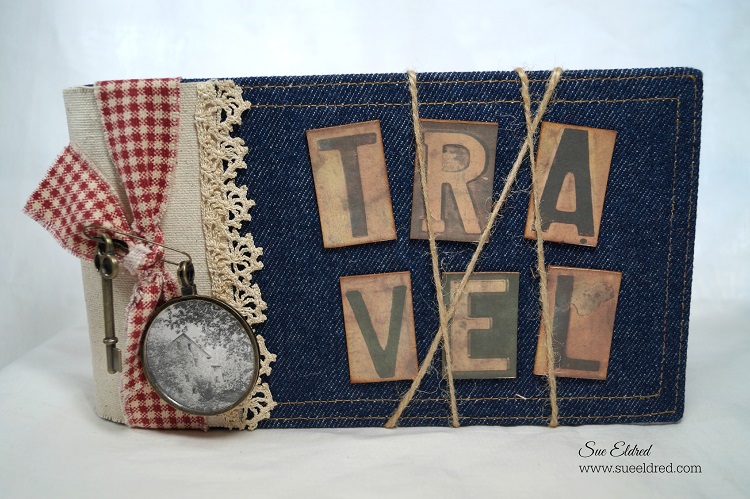
  1. For the Travel Album, start with the Dungaree Journal.  (available in three sizes.)
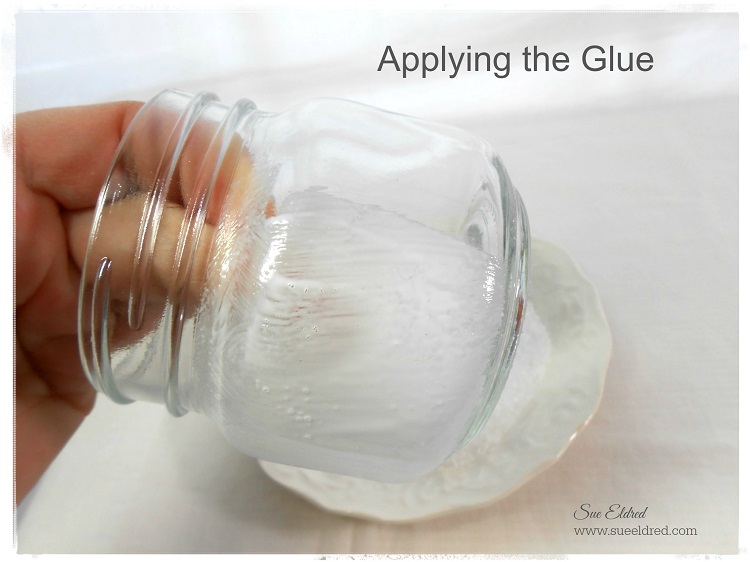
  2. Glue a piece of plain canvas around the spine with Fabri Tac glue and cover the edges of the canvas with a piece vintage lace.
  3. Tear a strip of gingham fabric and tie it around the album for a bow.

American Vintage ALbum Close Up 6244

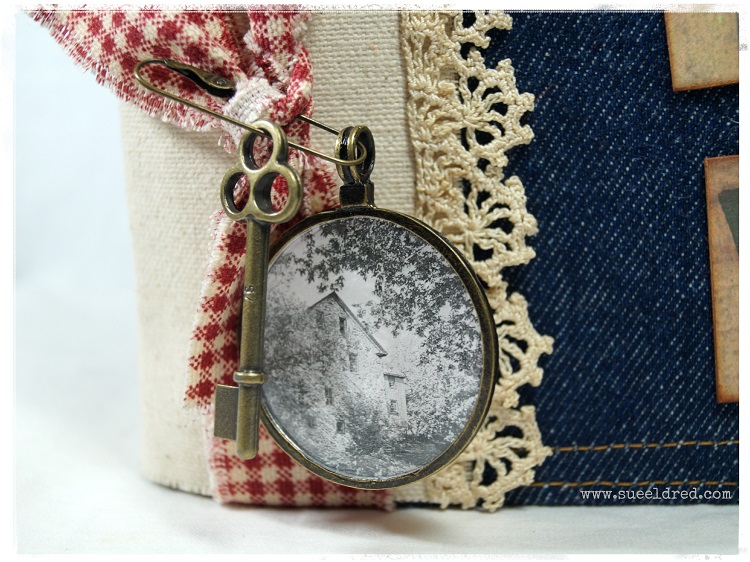
4.  Take a photo from the American Vintage Photo’s and punch it into a 1″ circle.  Apply glue with a gluestick to the front of the picture and place inside the optical lens.

5.  Stick the vintage pin into the knot of the bow and hang the optical lens and key.

6.  Cut the letters “travel” from one of the pieces of paper from the 8″ x 8″ paper pad and glue onto a piece of chipboard for added dimension.  Edge around each of the letters using Vintage Photo Distress Ink and a ink applicator.  Glue the letters on the front of the album with Fabri Tac glue.  Wrap a length of twine around the album.

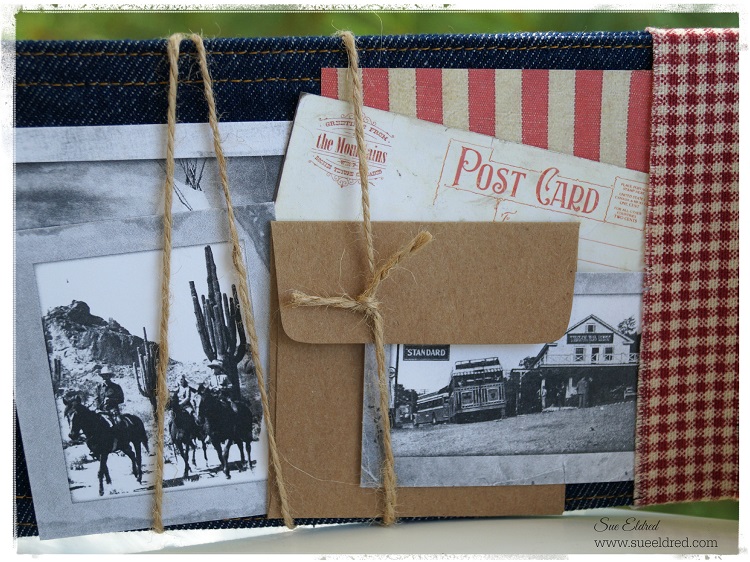
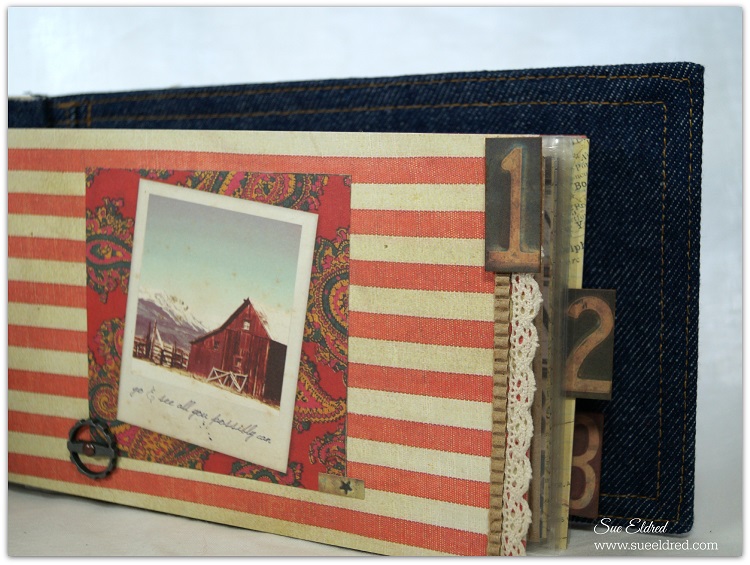
7.  Add pictures and memorabilia into the album.

American Vintage Dungaree Album Inside Front Cover 6700

The Dungaree Journal includes two chrome rings for binding as well as 10 page protectors. 

American Vintage Dungaree Album Inside Pages 6683

American Vintage Dungaree Album Page #1 6673

American Vintage Dungaree Journal Inside Pages 6675

Have a Great Summer.

DIY No Sew Pillows to Dye for…

A Pillow to Dye For

Recently, I participated with a group of Designers in a Manufacturer Challenge sponsored by

Fairfield World the makers of Pillow Forms, Batting, Poly-fil®… and a whole lot more.

After a little good natured trash talking between the designers, the challenge was dubbed the

“Pillow Fight” and with that it was game on.

Not being much of a seamstress I knew I had to take it in another direction.

Hopefully, what I lack in sewing skills I’m making up for in quantity and possibly inspiration

for other non-sowers like me.

If you happened to see my post, “Tie-Dying with Nick” then you’ll know I’m on a little bit

of a tie-dying kick.  (why stop now?   oh… and make sure to check out the bonus project at the end.)

Nick's Tie Dye Pillow 6430Warren's Pillow

Here are a couple of pillows I made for my grandsons using a one-step tie-dye kit

and the Ombre Technique.  (see instructions below)

It was such a fun and easy project that I let my grandson in on the fun.

Thanks to canvas pillow squares and pillow forms there is no sewing involved.

(The red pillow above also uses the ombre Technique only with one color of dye.)

Iron-On embroidered letters allowed me to easily personalize the pillows for the boys.

Nick and the Ombre Technique

For my No Sew Pillows I used:                                                                  (*amazon affiliate links)

These are the instructions included with the Tulip dye kit.

  1. Apply dye.
  2. Dip brush into dye and apply.
  3. Dip brush into water and apply.
  4. Cover dyed fabric with plastic wrap to keep damp.
  5. Let set for 6-8 hours or longer for intense colors.
  6. Rinse well with water until excess dye is removed.
  7. Fill washer to “large load” setting with hottest water suitable for fabric and a small amount of laundry soap.  Wash and dry separately.  Wash separately for the first few washes.

Directions for Stenciling:

The pattern on the Red Pillow was made using the 12″ Doily Stencil*.

  1. Lay protective paper layer inside the canvas pillow square before stenciling.
  2. Center and tape stencil onto pillow with removable painter’s tape so that the stencil won’t move.
  3. Stenciling is a “dry” brush technique. Using a stencil brush, dip just the tip of your brush into the paint. Tap off excess paint before applying to prevent the paint from seeping under the edges of the stencil.
  4. Apply paint with stencil brush in a straight up and down motion called stippling.
  5. Stuff pillow with pillow form or Poly-fil®.

And for an added bonus… Tie Dyed Socks!!!  (Someone stop me)

Tie Dyed Socks

This project was sponsored by Fairfield World, Canvas Corp Brand, Tulip Brand and DecoArt.

*DisclaimerThis post uses ads and affiliate links.  If you choose to make a purchase using one of the links, I receive a small commission (at no additional cost to you) that helps offset the costs of maintaining this blog.  Thanks for your support!

Join Amazon Kindle Unlimited 30-Day Free Trial*

Tie-Dying With Nick

Tie Dying with Nick

CUTE KID ALERT:  I love working on crafts with Nicholas and his Mommy.

Last Sunday, we decided to Tie Dye t-shirts.

It all started because of a Tulip One-Step Mini Tie-Dye Kit-Neon* (affiliate link) I received

free last February after a CHA Fave Crafts Designer Event from Tulip and I Love to Create.

I had been meaning to use it, but, hadn’t gotten around to it yet.

Using the squeeze bottles made it so much easier and less messy than the old way of tie-dying.

We had so much fun with this project that Bonnie (Nick’s Mommy) went out and bought a

larger kit the next day.  This past Sunday, when everyone came over for Father’s Day,

we tie-dyed Red White and Blue t-shirts and socks with the kids.

Just saying “a little addicting”.

Choosing the design

The kit came with a large full color sheet of designs, techniques and instructions.

For the boys shirts we did the “swirl” technique.

Nicholas and Warren Fronts and Backs

For Bonnie’s shirts we did the “crumple” and “ombre” techniques.  (no pictures, darn)

Nicholas and Warren 2

It doesn’t get much cuter than this!

I used this picture in a frame for their Daddy’s Father’s Day gift.

Many Faces of Nick Collage

This post would not be complete without including the “Many Faces of Nick“.

Disclaimer:  This blog uses ads and affiliate links.  If you choose to make a purchase using one of the links, I receive a small commission (at no additional cost to you) that helps offset the costs of maintaining this blog.  Thanks for your support!

Join Amazon Kindle Unlimited 30-Day Free Trial

DIY Wedding Projects Day #5: Gift Tag

DIY Wedding Project Day #5 Wedding Tag

Congratulations on your Special Day!

Weddings, Anniversaries, Birthdays… customize a tag to fit the celebration.

I hope you enjoyed my DIY Wedding Projects this week and feel inspired to make

a few DIY projects of you own.

For me… The joy is in the making.  (and the giving, of course)

Shop Handmade – The Wedding Store

Wedding Tag Supplies Needed:

Directions for Wedding Tag:

  1. Cut a 3 1/2” x 6 1/4” tag out of scrapbook paper.
  2. To create the pleated ribbon you will need 12” of the Pierre Ivory ribbon. Fold 1/2” end of the ribbon under and secure with a mini glue dot.
  3. Turn ribbon over and create pleats by folding and gluing each fold inside and under securing with mini glue dot.
  4. Glue pleated ribbon onto bottom of the tag.
  5. For added detail, glue Galena 1/8” silver ribbon over pleated ribbon.
  6. Glue Design Chain Tracy-Silver onto tag above pleated ribbon.
  7. Cut 12” of Antique White 7/8” ribbon.
  8. Using the needle and thread with a long tail, make a simple running stitch down one side of the ribbon.
  9. Gather ribbon together with thread and tie in the center to form the ribbon rosette flower.
  10. Glue a gem cut from the Design Chain Tracy onto the center of the flower.
  11. Create and print computer generated greetings on to cream card-stock.
  12. Cut greetings down and edge card-stock with silver leaf pen.
  13. Adhere first greeting to tag using double stick tape runner, allowing part of the greeting to hang over edge of the tag.
  14. Glue Ribbon Flower onto tag above first greeting.
  15. Glue Gleaming leaves under flower.
  16. Add second greetings to the Deco Ice stick pin. Leave enough room on the card-stock greeting to fold around the pin and adhere.
  17. Stick Deco Ice pin into the glued flower.
  18. Insert remaining 7/8” Antique White Satin Ribbon into top hole on tag.
  19. Fold 5/8” Antique White Satin Ribbon to form a bow. Tie and knot around the center of the bow with the cream twine.
  20. Tie bow around 7/8” ribbon and secure.
  21. Thread small cream button on ends of the twine and secure on the front of the bow with a knot.

Disclaimer:  This blog uses ads and affiliate links.  If you choose to make a purchase using one of the links, I receive a small commission (at no additional cost to you) that helps offset the costs of maintaining this blog.  Thanks for your support!

DIY Wedding Projects Day #4: Wedding Album

Wedding Album 2

Preserve your memories from weddings, anniversaries, and more, in this beautiful burlap covered scrapbook or photo album. Embellish the cover with ribbon, gems, twine and more for a personalized look you will love.

Supplies Needed:

  • 1 yd. Gazette 2” Ribbon: Raw Silk
  • ½ yd. Antique White Double Faced Satin 7/8”
  • ½ yd. Lucy Ivory Lace
  • 2 Gems from Design Chain Tracy-Silver
  • Twine
  • Chic Silver Leaves
  • Pre-Made 5” x 7” Burlap Covered Scrapbook Album
  • 3” Chipboard Heart
  • Beacon Fabri-Tac Permanent Adhesive*  (affiliate link)
  • Needle and Thread

Wedding Album Directions:

  1. Cut approx. 16-18” of Gazette Raw Silk Ribbon. Using the needle and thread with a long tail, make a simple running stitch down one side of the ribbon.
  2. Gather ribbon together with thread and tie in the center to form the ribbon rosette.
  3. Create a second ribbon rosette using 12” of 7/8” Antique White Double-Faced Satin Ribbon.
  4. Glue Antique White rosette onto the center of the Raw Silk rosette.
  5. Cut a gem from the Design Chain Tracy-Silver and glue to the center of the rosette flower.
  6. Wrap 12” piece of Gazette Raw Silk Ribbon with the ends meeting centered on the front of the album. Glue ends to the album.
  7. Wrap a 12” piece of Lucy Ivory Lace around album, again meeting centered on the front of the album. Glue ends to album.
  8. Glue Ribbon flower onto front of the album cover the ends of the lace and ribbon.
  9. Bend slightly the ends of the Chic Silver Leaves and glue onto the album with the ends underneath the flower.
  10. Wrap twine around the chipboard a couple of times and tie with a bow.
  11. Glue a small gem cut from the Design Chain Tracy-Silver onto the center of the twine bow.
  12. Glue chipboard heart onto the front of the album.

Shop Handmade – The Wedding Store

Disclaimer:  This blog uses ads and affiliate links.  If you choose to make a purchase using one of the links, I receive a small commission (at no additional cost to you) that helps offset the costs of maintaining this blog.  Thanks for your support!

DIY Wedding Projects Day #3: Wedding Votive

DIY Wedding Votive

Make a statement with Soft and Elegant candle lights on each table. 

This frosted votive will make quite the impact and will fit with several types of wedding décor.

It’s super quick and easy to make.

Tip…Pair with the DIY Vase Table Maker from Day #1

DIY Wedding Votive Supplies Needed:                                       (*Affiliate Link)

Time Needed for Completion: 1 hour plus drying time

Shop Your Fav Brands at Scrapbook.com

*Disclosure:  “This is a sponsored post.  I have been provided product in exchange for my creative ideas.  The views and opinions are my own.”  This blog uses ads and affiliate links.  If you choose to make a purchase using one of the links, I receive a small commission (at no additional cost to you) that helps offset the costs of maintaining this blog.  Thanks for your support!

wedding votive applying glue

  • Generously apply Tacky Glue around the side of the jar. Do not put glue on the top neck or bottom of jar.

Wedding Votive Applying Epson Salt

  •   Cover jar with Epson Salt. Allow to dry.

Directions for decorating the votive:

  1. Thread two Blingella Beads onto a length of Quasar ribbon. Tie ribbon around neck of the jar with a knot. Trim and knot ends of Quasar ribbon to hold the beads in place. A little bit of glue on the ends of each knot will add extra security to the beads.
  2. Tie Pierre Ivory Ribbon around the neck of the jar with a knot. Trim ends.
  3. Cut approx. 12” of Antique White Satin ribbon.
  4. With the needle and thread with long tail, make a simple running stitch down one side of the ribbon.  (*see basic flower assembly picture)
  5. Gather ribbon together with thread and tie in the center to form the ribbon rosette.
  6. Glue gem to center of ribbon flower and glue finished flower onto the knot of the Pierre Ribbon.
  7. Glue gleaming leaf behind flower.
  8. Add Tea Light Candle.

Basic Flower Assembly from Wedding Frame (Day #2)

Make sure to check all the 5 days of the DIY Wedding Projects.

Shop Handmade – The Wedding Store

This project was sponsored by Offray Ribbon.

DIY Wedding Projects Day 2: Love Frame

Offray Wedding Frame 2056

 Make a special frame for a wedding day gift or another special event.

This DIY frame has a soft, shabby chic feel that is perfect for a spring or summer wedding.

Supplies Needed

Wedding Love Frame Directions:

  1. Paint the Plain Wooden Frame with Antique White acrylic paint. Once the frame is dry, lightly sand the edges of the frame to give a distressed look.
  2. Spray paint chipboard letters with Cream Spray paint.
  3. Adhere chipboard letters to the frame with Fabri Tac Glue.
  4. Cut approx. 18” of Gazette Raw Silk Ribbon. With the needle and thread with long tail, make a simple running stitch down one side of the ribbon. Ribbon Flower Assembly 2123
  5. Gather ribbon together with thread and tie in the center to form the ribbon rosette.
  6. Create a second ribbon rosette using 12” of 7/8” Antique White Double Faced Satin Ribbon.
  7. Glue Antique White rosette onto the center of the Raw Silk rosette.
  8. Glue Dazzle Radiance Pin onto the center of both flowers.
  9. Wrap 25” piece of Gazette Raw Silk Ribbon around the frame, meeting the two ends near the top of the frame. Glue ends to the frame.
  10. Glue Flower onto ribbon cover the two ends of the wrapped ribbon.
  11. Adhere Design Chain Tracy-Silver down center of the ribbon and underneath the flower.  Glue Gleaming Leaves Dazzle onto frame.

Click on the pictures below for links of Offray Products Used:

gazette_rawsilkdfs_antiquewhiteradiance

gleaming_leaves_24karatdesignchain_tracy

Shop Handmade – The Wedding Store

Disclaimer:  This blog uses ads and affiliate links.  If you choose to make a purchase using one of the links, I receive a small commission (at no additional cost to you) that helps offset the costs of maintaining this blog.  Thanks for your support!

DIY Wedding Projects Day #1: Vase Table Marker

Offray Wedding Vase 2

Make your own table markers for your wedding day or another special event.

This DIY table marker features a pretty butterfly theme that is perfect for a

Spring or Summer wedding.

Butterfly 2255  Wedding Table Marker Vase

Supplies Needed:

Wedding Vase Instructions:

  1. Measure the distance around the top of your jar. Cut and remove the wire from the Natural Jute Cord.
  2. Apply a little bit of glue on each end of the Jute Cord to prevent fraying.
  3. Glue cord around top of the jar. Glue on gem to cover seam.
  4. Thread two Blingella Beads onto a length of Quasar ribbon. Tie ribbon around neck of the jar with a knot. Trim and knot ends of Quasar ribbon to hold the beads in place. A little bit of glue on the ends of each knot will add extra security.
  5. Tie Gazette Ribbon around the center of the vase with a knot. Add a small amount of glue underneath the knot to hold the ribbon in place.
  6. Glue small gem onto knot.
  7. Print a computer generated table number or greeting onto cream card-stock.
  8. Trim and cut card stock. Cut the end with a “v” to create the banner. Leave enough card-stock on the left side of the banner so that it can be folded around the Deco Ice stick pin.
  9. Attach banner around the Deco Ice stick pin and insert into the Gazette Ribbon knot.
  10. Fill vase with flowers and add the Fabrique Butterfly.

Shop Handmade – The Wedding Store

Disclaimer:  This blog uses ads and affiliate links.  If you choose to make a purchase using one of the links, I receive a small commission (at no additional cost to you) that helps offset the costs of maintaining this blog.  Thanks for your support!

Sue’s Creative Workshop’s Wedding Week

Wedding Picture Collage

June Brides, Weddings, Love is in the Air…

Time for some DIY Wedding Projects.

Last fall, I was given the opportunity to create five Wedding projects for Offray Ribbon.

I had so much fun working on this project with them.

They allowed me to choose anything I wanted to work with.

So many beautiful ribbons and embellishments.

Last week, I received permission that I could share them with you on my blog.

So… for the next five days, I will feature a DIY Wedding project complete with instructions

and pictures.

Enjoy and Share!

Shop Handmade – The Wedding Store

Disclaimer:  This blog uses ads and affiliate links.  If you choose to make a purchase using one of the links, I receive a small commission (at no additional cost to you) that helps offset the costs of maintaining this blog.  Thanks for your support!

4th of July Centerpiece

4th of July Centerpiece 2

White picket fences, the good old red white and blue. 

A 4th of July Celebration with Fireworks, Flags, Banners and Pinwheels all rolled into one

fun Party Centerpiece.

Products Used:                 (*affiliate link)

  1. Paint the disc with Navy Blue paint.
  2. Cut two 1” x 12” strips of the red striped paper and one 1” x 2” piece. Adhere to the side of the disc with double stick tape roller.
  3. Cut 7 fence sections.
  4. Paint 15 round toothpicks white. (set four aside to use later.)Fence 3836
  5. Cut 11 toothpicks in half. Glue one toothpick half on each end and middle of the fence with the pointed end facing down.

  6. Insert fence sections onto the top edge of the disc.

  7. Paint the 4” cube red.

  8. Cut five 3 ¾” x 3 ¾” pieces of Navy & Ivory dot paper. Adhere to the sides and top of the cube. Glue cube to center of the disc.

Base 3839

9. Paint two bamboo skewers white. Cut skewers to 5”.

10.  Glue small blue beads to top of each skewer.

11.  Create small ½” flags from scraps of paper and cardstock. Adhere onto a 12” piece of blue and white twine.  Tie ends of the twine to top of the skewers to make a flag banner. Insert into disc.

Flags 3845

12.  To create Bottle Rockets:  Paint two bamboo skewers red.  Cut two pieces of red striped paper 1 3/4” x two. Wrap around pencil to curve paper. Remove pencil and roll tightly to form a small tube. Wrap a 1/2” strip of navy dot paper around tube.  Glue a small piece of twine inside of tube to create the bottle rocket wick. Glue tube onto red bamboo skewer and insert into disc. Create second bottle rocket for other side of the disc.

Rosette 3847

13.  Punch two 3” Navy and Ivory Dots scalloped circles.

14.  Cut two strips of red card-stock: 1 1/4”” x 12” and 2 1/4” x 6 1/2” . Adhere the two strips together to form one long 2 1/4” x 18” strip of red card-stock.

15.  Using scoring board and scoring tool. Score card-stock every 1/4” down the entire length. Fold strip accordion fold. Glue ends together with a strong adhesive to form a cylinder.

16.  On a flat surface, gather the bottom of the cylinder tight while spreading and pushing down on the top to create the Rosette.

17.  With a strong adhesive, attach one of the scalloped circles to the center of the Rosette. Hold into place until the adhesive starts to hold.

18.  Turn the Rosette over and attach the second scalloped circle onto the other side of the rosette.

19.  Create a second smaller rosette using a 1” x 12” strip of red striped paper. Score strip ever 1/4”.

20.  Glue blue button into center of the rosette to hold in place. Glue onto center of the scalloped circle. Add star sticker to center of button.

21.  Paint a bamboo skewer with Navy paint. Cut into a 5” piece. Insert into back of finished Rosette.

Rosette 3849

22.  Insert finished Rosette into top of the 4″ cube.

Pinwheels 3857

23.  Create small pinwheels by adhering two pieces of 1” x 1” paper together.  On each corner, cut diagonally two-thirds of way to square’s center, dividing each corner into two points. Bring every other point to center so that the points overlap. Glue into place.

24.  Glue small red button to center of each pinwheel.  Glue onto white painted toothpick and insert into base.

25.  Create and print computer generated “CELEBRATE” and “4th of July” onto white card-stock.  Cut and layer to size and adhere onto picks and skewers and insert onto centerpiece.

This project was created for Smoothfoam and sponsored by Smoothfoam and Canvas Corp Brands.

For summer fun… click on ad below.

Slimer

Disclaimer:  This blog uses ads and affiliate links.  If you choose to make a purchase using one of the links, I receive a small commission (at no additional cost to you) that helps offset the costs of maintaining this blog.  Thanks for your support!

Join Amazon Kindle Unlimited 30-Day Free Trial