Sue’s Christmas Sugar Cookie Recipe

Christmas Cookies

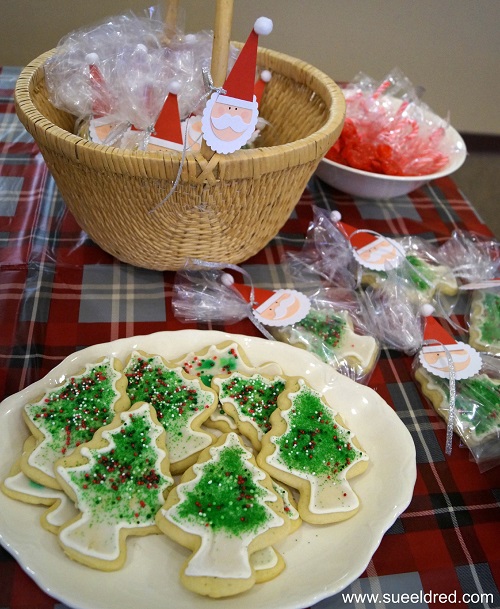
Every year, around the Holidays, I like to share my Sugar Cookie Recipe with you.

It’s a great recipe.  (and easy too.)

The cookies are soft, delicious and even a little bit popular in my circle of family and friends.

The recipe was given to me by my mother on my first Christmas as a new Bride.  (a long time ago)

It was carefully written down, in her own handwriting, on a piece of notebook paper which has now

turned yellow.  It is brittle, tattered, ripped, creased and stained.  (It is priceless to me.)

Enjoy!

Sue's Sugar Cookies

Sue’s Sugar Cookies

  • 1- 1/2 c. powdered sugar
  • 1 c. butter or margarine
  • 1 egg
  • 1 tsp. vanilla
  • 2- 1/2 c. all purpose flour
  • 1 tsp. cream of tartar
  • 1 tsp. baking soda
  1. Cream sugar & butter, add egg & flavoring, mix thoroughly.
  2. Sift dry ingredients together and stir in.  (I dump)
  3. Refrigerate 2 to 3 hours.
  4. Heat oven to 375°.
  5. Divide dough in half & roll out on lightly floured pastry sheet.
  6. Roll thin, but thick enough to pick up the design with the cookie cutters.
  7. Dip cookie cutter into flour before each cutting.  Cut as many cookies from each rolling as possible.  The least amount of working with the dough gives the best cookie.
  8. Place on lightly greased baking sheet.  Bake 7 to 8 min. or until delicately golden.
  • For the Glaze I dump around a cup of powdered sugar into a bowl.  Add a dash of vanilla.    Add milk one tablespoon at a time until you get the consistency you want.  (hint:  not too runny)


A little Holiday Sparkle…

Sue Eldred's Holiday Sparkle Frame

Thinking of adding a little Holiday Sparkle this year?

Adding a little Holiday Sparkle doesn’t get much easier than this.

Holiday Sparkle Bow 2007

Gather up a few sparkly holiday sprigs…

tie them together with a jingle bell and satin ribbon and then glue them onto

your favorite frame.  Your frame will be dressed to impress.

Holiday Sparkle Frame in the Snow

I loved the way this frame turned out, so sweet and simple. 

But let me tell you… I really struggled trying to get a good picture to show you.

Taking good pictures of clear acrylic frames is really hard.

I took over 150 pictures of this frame.  (no joke)

When it started snowing yesterday morning, I decided to try again.

It was such a beautiful snow, I didn’t even mind getting cold.

Holiday Sparkle Supplies 1808

For my Holiday Sparkle Frame I used the NEW Clear Magnetic Curved frame

that will be available from Deflecto Craft Solutions in January 2016.

I love the original curved magnetic frame* and I am so happy that they decided to

make it in a smaller size without a border.  (can’t wait to get my hands on a few more)

This new frame measures 5″ x 7″ and is perfect for a 4″ x 6″ picture or graphic.

(you can find the larger size here*)

“Tis the Season to Sparkle” comes from the 4×6 Horizontal Journaling Card Elements

from Simple Stories “Claus & Co.” collection layered on red glitter cardstock.

*Disclaimer: “This is a sponsored post. As a member of the Deflecto Design Team I have been provided product in exchange for my creative ideas, views and opinions.” This post uses Affiliate links if you choose to make a purchase, I receive a very small commission that helps maintain this site.  Thank You for your support!

How to build a Snowman with Smoothfoam…

How to make a Snowman Using Smoothfoam balls and snowtex

Making a Snowman is pretty easy.  All it takes is a little patience and time.

(and a few ingredients)

Here’s what you’ll need to make a Snowman:                  (*amazon affiliate link)

*Disclosure:  This blog uses ads and affiliate links.  If you choose to make a purchase using one of the links, I receive a small commission (at no additional cost to you) that helps offset the costs of maintaining this blog.  Thanks for your support!

Shop Your Fav Brands at Scrapbook.com

Directions:

  1. Cut a small section off the bottom of the 4″ Smoothfoam ball so that it sits flat.
  2. Cut a couple of 3″ sections from the bamboo skewer.  Stick the skewer into the center of the 2″ and 3″ Smoothfoam balls.
  3. Add craft glue to the ends of the skewers before sticking the three balls together to form the snowman base.  (Allow glue to fully dry before continuing to the next step)
  4. Using a palette knife, smooth Snow-tex over Snowman base.  Here’s where the patience comes in… Allow a couple of hours for the Snow-tex to completely dry.
  5. Paint the entire Snowman base with white acrylic paint.  This fills in and helps cover any area missed by the Snow-tex.
  6. For a Frosty Look…paint the Snowman base with Craft Twinkles Glitter Paint.
  7. Cut a thin strip of grey felt and glue around the base of the hat to create a band.  Glue holly embellishment onto band to cover seam.  Glue to the top of the Snowman head.
  8. Cut a strip of gingham fabric and tie around neck.  Cut small slits into the ends of fabric for fringe.
  9. Use two small black brads inserted into the head for the eyes.  Use five micro black brads insert as the mouth.
  10. Cut the pointed end from a bamboo skewer and paint with orange paint.  Stick into head for the nose.

Here’s a Close up of Mr. Snowman.  Isn’t he Handsome?

This project was created for Smoothfoam and sponsored by Smoothfoam and DecoArt.

Love Snowmen?  Create your own “Snowball Fight” here.

Shop Amazon Scrapbooking Supplies*

Countdown to Christmas

Hello December Christmas Countdown

I had this idea to make a Countdown to Christmas using a small wood clipboard.

I’d been thinking about it and planning it in my head for a while.

When I went to the store all I could find were bright colored acrylic ones.

I knew if I kept searching I could find a wood one…

But, I really didn’t want to go running around to more stores so I picked one up

and decided I would change my plan.

Christmas Countdown Clipboard

The more I looked at this neon clipboard, I knew I wasn’t happy.

So… I decided to improvise.

I lightly sanded both sides of the clipboard with a fine grit sanding block.

Next, I gave the clipboard a couple of coats of Red Chalky Finish Paint.

After it was completely dried, I masked off an area with removable painter’s tape

and painted the inside of the masked area with black chalkboard paint.

Christmas Countdown Close Up

 “Hello December” is from a sheet of scrapbook paper from Simple Stories “Claus & Co.” Collection.

I embellished the clipboard with a silver ribbon, jingle bell and sparkly red berries.

Christmas Countdown 2

I’m never satisfied with my own handwriting on these things…

so I added letter stickers on the bottom.  (now I’m happy!)


Here’s what I used:

These products available at your local craft stores or online on amazon.com*

*Disclosure:  I am a Amazon Affliate.

Mini Ribbon Wreath Ornaments

Mini Ribbon Wreath Ornaments

No matter how you decorate for the Holidays…Shabby, Homespun, Country or Cute.

You can easily customize these Mini Ribbon Wreath Ornaments to fit your personal style.

Easy to make and sure to impress.

How To make Mini Ribbon Wreath Ornaments

Finished Size : 3”

Materials Used:

*Disclaimer:  This post uses ads and affiliate links.  If you choose to make a purchase using one of the links, I receive a small commission (at no additional cost to you) that helps offset the costs of maintaining this blog.  Thanks for your support!

Directions:

  1. Apply a strip of 1/8″ adhesive around the outside edge of the Smoothfoam wreath. This keeps the ribbon securely in place while wrapping.
  2. Wrap ribbon tightly around wreath. When you’ve wrapped the ribbon half way around wreath add the jump ring with jingle bell to ribbon so that it hangs on the bottom of the wreath and continue wrapping. When finished wrapping the ribbon, glue ribbon end onto back of wreath.
  3. Add metallic ribbon trim on top of the wreath as the ornament hanger.
  4. Glue mini bottle brush tree inside wreath.
  5. Glue a piece of burlap or scrapbook paper onto a piece of chipboard and cut into a circle that will cover the inside of the wreath and glue to the back of the wreath.
  6. Print a computer generated greeting on to a piece of cream card-stock. Cut down to size and notch out both ends to create a banner.
  7. Give the banner a quick wave using your fingers and glue onto the bottom of the wreath.
  8. Add adhesive pearls on to the wreath.
  9. Add bow on the top of the wreath to finish it off.

Try Amazon Prime 30-Day Free Trial

Etched Snowflake Candy Jar

Quick and Easy Holiday Gift Idea

When it comes to the Holidays I love Quick and Easy Gift Ideas.

For the Snowflake Candy Jar…

I used a small canning jar etched with snowflakes and filled with candy.

It’s a project that I was able to put together in under a half hour.

Snowflake Candy Jar Supplies 1274

To make the Snowflake Candy JAR…                 

  1. Punch a strip of Snowflakes using etchmask™ vinyl and a snowflake punch.
  2. Carefully cover the jar with the vinyl.
  3. Make sure to burnish the vinyl to get out air bubbles and to make sure the all edges all down.
  4. Apply a thick coat of Etchall over the snowflake cut out using the squeegee.
  5. Wait 15 minutes.  Scrape excess etching crème from the side of the jar and return extra etching crème back into the bottle. (it’s reusable)
  6. Rinse jar with warm water to clean.
  7. Remove Stencil and dry.
  8. Add adhesive rhinestones to the center of each snowflake.
  9. Wrap craft stem around the neck of the jar and glue on a red button.

Snowflake Candy Jar Covered 1287

  • Cut a small circle from decorative scrapbook paper and adhere to lid of the jar.
  • Embellish jar with greenery stem, jingle and bow.

Snowflake Candy Jar 1472

   This would make a great Teacher, Hostess, Bunco, or Gift Exchange Gift.

This project was created for and sponsored by Etchall®.


Don’t Miss a Thing…Make Sure to Follow me.

Shop Your Fav Brands at Scrapbook.com

Disclaimer:  This blog uses ads and affiliate links.  If you choose to make a purchase using one of the links, I receive a small commission (at no additional cost to you) that helps offset the costs of maintaining this blog.  Thanks for your support!

Try Amazon Prime 30-Day Free Trial

How to make a Holly Jolly Flip Album…

Holly Jolly Flip Book

I wanted to share with you today one of my favorite projects from my Holiday Workshop

last Saturday.  It is the “Holly Jolly Flip Album” using paper from Canvas Corp Brands

Farmhouse Christmas Collection and a 5″ x 7″ Black Acrylic Frame from Deflecto Craft Solutions.

It’s a fairly simple project and the ladies were able to complete the album in just a couple of hours.

Farmhouse Christmas Flip Book Front Cover7638  Farmhouse Flip Book Supplies 07392

Holly Jolly Flip Album

Here’s the complete supply list:

Directions:

  1. Mark and measure hole placement on black acrylic frame.
  2. Drill 3/8” holes into frame.
  3. Cut a 7” x 9” piece of Red & Kraft Ribbon Stripe paper and insert into frame.
  4. Album Cover: Cut the “Holly Jolly Christmas” section from the Better Not Pout Tags on Kraft. Layer it onto black cardstock, kraft corrugated paper and then another back cardstock layer.
  5. Cut a 4 3/4” x 6 3/4” piece of Red & Black Stitched Diamonds and adhere it onto a piece of 5” x 7” Red Cardstock layer. Add a 3/4” x 4 3/4” strip of Red & Kraft Ribbon Stripe. Adhere “Holly Jolly” layers onto the Red & Black Stitched Diamonds.
  6. Punch a 1 11/16” circle from the Better Not Pout Tags and glue onto the back of the Optical lens by adding craft glue along the outside edges of the lens. Add jump ring to Optical Lens.
  7. Mark and measure holes to line up with black acrylic frame on the Album Cover and punch holes. Add eyelets to holes with the Crop-a-dile.
  8. Tie a piece of gold ribbon around the front of the album cover.
  9. Cut several pieces of black 5” x 7” cardstock layers to use as the pages of the album. Decorate album pages using additional scrapbook paper layers, strips, flips, pockets, trim, cords, tickets and mini bags.
  10. Align, measure and punch holes in the top of the album pages.
  11. Add album cover and pages to the black acrylic frame using medium book rings. Add Optical lens to ring.
  12. Embellish the stand by adding gold decorative trim with Fabri-Tac glue.

Pg. #4 Farmhouse Christmas Flip Book Special Delivery Side view 07658    Pg #1 Farmhouse Christmas Flip Book Made with Love Pocket Page 7646


“This is a sponsored post.  As a member of the Deflecto Design Team I have been provided product in exchange for my creative ideas, views and opinions.”

Kaisercraft “Home for Christmas” Card Class

New Christmas Card Class…

I will be teaching “Home for Christmas” at The Paper Forest in Washington, Illinois.

Home for Christmas Class

Home for Christmas

We will be making a set of Christmas cards featuring the “Home for Christmas” collection from Kaisercraft.  Come have fun, get in the holiday spirit and maybe pick up a new technique or two!

The Paper Forest

Thursday, November 12 from 5:30-7:30

Cost:  $22.00

Contact The Paper Forest http://www.thepaperforest.com or call 309-745-3440 to sign up for the class.

Warm Wishes 9720 Have a Holly Jolly Christmas 9721 Love Joy & Peace 9726 Merry Christmas Poinsettia 9731

Frosted Holly Wreath Ornament

Frosted Holly Wreath Ornament

While most of you are outside basking in the Summer’s warmth…

some of us are inside thinking “cool” thoughts.


robins nest smoothfoam blog hop


As you know… I love participating in the Designer Craft Connection’s Monthly Design Challenges.

The theme for the Challenge was Christmas in July.

This month’s Manufacturer Design Challenge was sponsored by Robin’s Nest and Smoothfoam.


Holly Wreath 7192

My project for the challenge is a simple ornament using a small Smoothfoam Wreath

and a variety of dew drops, tear drops, diamond drops and trim from Robin’s Nest.


To Make the Wreath:

  1. Apply a layer of embossing paste or Snowtex to cover the front and sides of the wreath.
  2. Allow time for the paste to fully dry before continuing.
  3. Glue tear drops and dew drops on the front of the wreath with a good liquid craft glue.
  4. Glue trim around outside of the wreath.  I originally had no trim on the outside of the wreath.  By adding the decorative trim around the outside it gave me the pop of green that I needed to accent the wreath.
  5. Next…Punch or cut a 3″ circle from red glitter cardstock.  Find the center of the circle and start forming the snowflake pattern using 12 diamond drops.  Glue small metallic dew drop in the center of the snowflake.
  6. Glue hanger on the back of the wreath before adding the red snowflake circle.


Wreath Close Up Side 7217

A Big Thanks to Smoothfoam and Robin’s Nest for providing the products to work with.


DCC image

To see what the other designers have come up with. 

Click on the Designer Craft Connection Logo on my right sidebar to start hopping.


My Home for the Holidays

It’s almost Christmas.

The house is decorated, presents bought and cookies baked.

Time to relax and enjoy.

It's the most Wonderful TIme of the Year

Christmas Dishes 211

I love Christmas.  It’s the most Wonderful time of the year.

Melissa Frances Village

Here are some houses made using Melissa Frances kits.   (I’m not sure they make them anymore.)

China Cabinet

Snowflake Garland

I used paper punches and twine on this garland.  (This strand has lasted three years.)

Village Close Up

The mantel over the fireplace is quite eclectic with vintage and new items.

Santa's

Toy Maker Santa

My home and tree is filled with memories of the 30 plus years we have spent together as a family.

Some are very old, some handmade.   I remember where each ornament  came from and who

gave them to me.

Christmas Tree 2014

This year, I didn’t pull out all my ornaments.  Believe or not I kept it simple.

Jasmine, Aladdin, Lion King and Star Trek didn’t make it on the tree.

But… Buzz and Woody still makes the cut.

Playing with the Bells

All the unbreakable ornaments are on the bottom branches.

Following in his brother’s footsteps.  Warren loves the Jingle Bells.

He pulls them off the tree, starts shaking them and looks and smiles when we all start

singing Jingle Bells.