How to make a Relaxing Guy Card

I’ve always found making cards for a guy  to be tricky. 

Making feminine cards come easy to me.

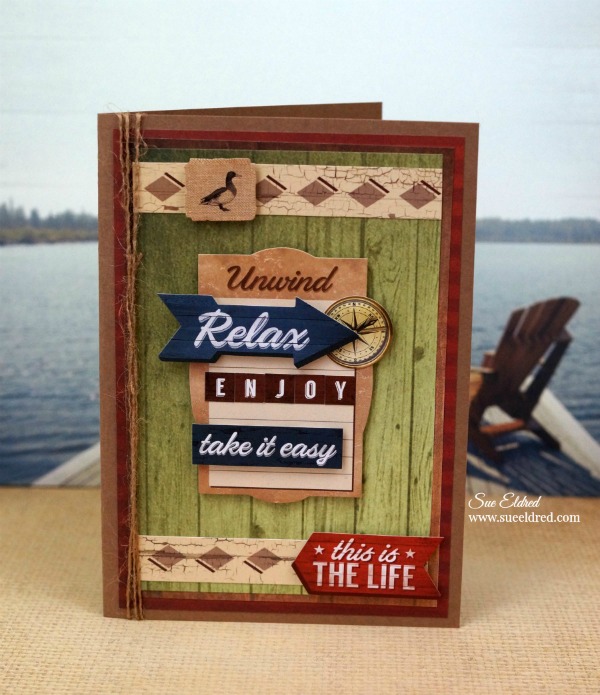
For the upcoming summer season, I decided to make a “guy” card

that would make a perfect birthday, Father’s Day and even  Retirement.

To make the Relaxing Guy Card…

TIP:  Before removing the back off the 3D foam mounting squares.  Brush baby powder to the back of the stickers to remove the tackiness.  The stickers become like die cuts and will only stick where you want them too.


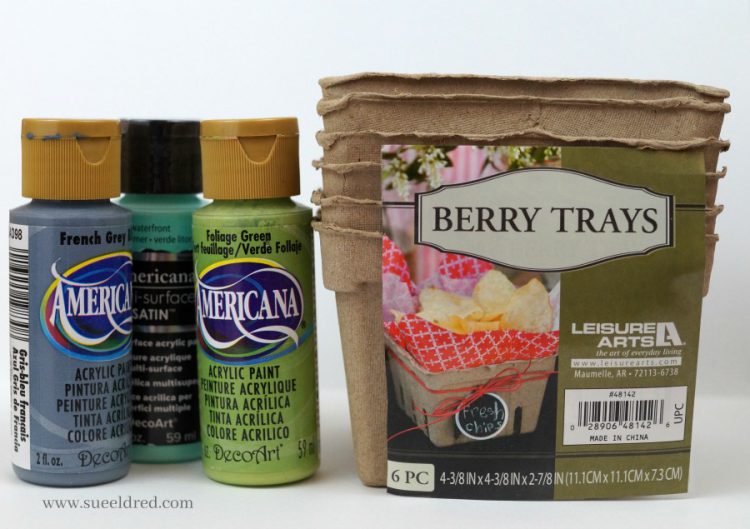
Materials Used:                                                                   (*affiliate link)

 
Directions:
  1. Cut a 4″ x 6″ piece of green scrapbook (dock on the lake) layer.  Add border sticker strip onto the top and bottom of the layer leaving approx. 1/8″ border.
  2. Adhere the green layer onto a 4 1/4″ x 6 1/4″ piece of brown scrapbook paper (day at the lake) and then onto a 4 1/2″ x 6 1/2″ piece of red (lake time) scrapbook paper.
  3. Create a 5″ x 7″ side fold card from the kraft cardstock.
  4. Adhere scrapbook layers onto kraft card.

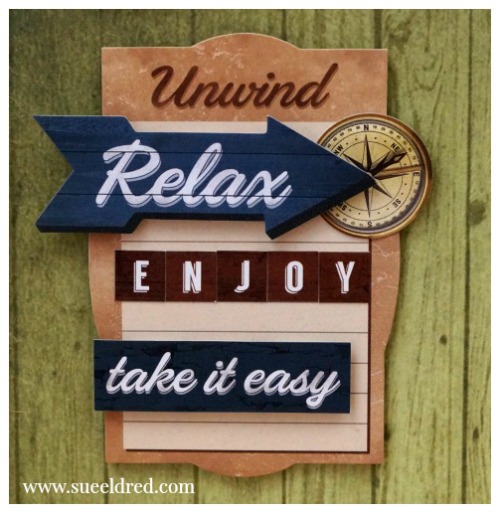
5.  Create dimensional stickers by adding and layers stickers with 3D foam mounting squares.  Add stickers to the front of the card.

6.  Wrap twine around the left side of the card and tie with a knot.

Mini Tape Runners

*Disclaimer:  This blog uses ads and affiliate links.  If you choose to make a purchase using one of the links, I receive a small commission (at no additional cost to you) that helps offset the costs of maintaining this blog.  Thanks for your support!

DIY…Bloom Garden Stepping Stone

Create a little fun and whimsy in your Garden with a Bloom Garden Stepping Stone.

(The links and instructions to make the Garden stone are included down below.)

I just got the Garden Issue of Craft Ideas Magazine and I’m so excited that I can finally share

with you my “Bloom Garden Stone”.   (you can find it on page #24)

Make sure to check out the entire Garden issue of Craft Ideas,

the issue is full of great garden themed ideas and inspiration.

Materials and Supplies:                                                                                    (*affiliate links)

Directions:

  1. Cover the sides and bottom of an old cake pan with Petroleum Jelly for easy removal.
  2. Mix Rapid Set Concrete Mix according to manufacturer’s instructions.  Fill pan with cement approx. 1″ thick. Shake pan a little to fill in the gaps and smooth.  Allow a couple hours for cement to set before removing from the pan.  Let the cement stone dry for a day or two before painting.

3.  To create a better surface for painting and stenciling, paint cement stone first with DecoArt DS17-9 Americana Multi-Purpose Sealer*

4.  Mix together Night Sky and Cotton Ball acrylic paint and basecoat entire stone.

5.  Tear a piece of white cardstock with an irregular edge as shown to create a mask stencil for  cloud background.

6.  Place cloud mask stencil onto stone and paint with an upward motion. Move mask stencil around stone to paint additional clouds and let dry.

7.  Stencil bloom flower using a mixture of Watermelon Slice and Marigold and stencil “bloom” with Night Sky as shown.  Paint leaves Woodland Green and let dry.

8.  Apply DecoArt Americana DuraClear Varnishes* using paintbrush over stone to help protect the stone from the outdoor elements.

You also might like this stepping stone project I created with my grandson Nick.

The Bloom Garden Stone was created for and sponsored by Craft Ideas Magazine.  Craft Ideas for Every Occasion, Every Skill Level.

Join Amazon Kindle Unlimited 30-Day Free Trial

*Disclaimer:  This blog uses ads and affiliate links.  If you choose to make a purchase using one of the links, I receive a small commission (at no additional cost to you) that helps offset the costs of maintaining this blog.  Thanks for your support!

Sue’s ADORNit Unboxing Video

You may remember last month when I mentioned that I’d been given the opportunity

to be a ADORNit Brand Ambassador.

I patiently waited for my Happy Mail to arrive.  They said it’d be worth the wait.

They weren’t kidding.

For the next three months…

I will be sharing with you a variety of fun projects using their products.

I thought it might be fun to show in a video you what was inside.

I’m not the best at making video’s and this one gave me quite a few unexpected challenges.

But being fully determined, I finally got it done.  (Thanks in to my son Justin.)

To see all that ADORNit has to offer make sure to visit them at http://www.adornit.com.

Berry Boxes and Bunny Bubbles

Berry Baskets for my Grandsons…

This year, I decided to get a little creative with the boys Easter present.

I recently received these cute little berry baskets from Leisure Arts and decided to use them

for the boys instead of traditional Easter baskets.  (see Leisure Arts Ad below)

I painted the berry boxes with acrylic paint.  I made tags with each of the boys names and

tied the tags on to the boxes with color coordinated twine.  (simple, simple, simple)

My daughter recently told me…

she never forgot the year I made their Playdoh containers into Easter Bunnies.

I had forgotten all about it.   (sounds like something I’d do)

Apparently it had made an impression on her.

So inspired by the memory… I made plain old bubble containers into “Bunny Bubbles”.

To make the Bubble Bunnies…

  • Remove the label that came onto the bottle.
  • Measure and cut a piece of white felt to go around the side of the bottle.
  • Use a craft glue and apply glue around the area on the bottle where the felt will go.  (It’s easier to apply the glue to the bottle than the felt.)  Wrap felt around bottle and secure into place.
  • For the bowtie…Wrap and glue ribbon around the top of the felt.  Create a little bow from additional ribbon and glue to cover  the ribbon seam.
  • Glue small buttons on the seam of the felt.
  • Cut two ears out of white felt.  Color the center of the ears with a light pink marker.  Glue ears onto the top of the lid.
  • Glue googly eyes and a small pink triangle nose onto the side of the lid.  (Add whiskers under the nose if you like.)
  • Glue a small white pom pom on the back for a bunny butt.

A fun little addition to the berry box.

And…Maybe, just maybe, they’ll remember the year grandma made  bunny bubbles.

"Painting

*Disclaimer:  This post uses ads and affiliate links.  If you choose to make a purchase using one of the links, I receive a small commission (at no additional cost to you) that helps offset the costs of maintaining this blog.  Thanks for your support!

How to make a Springtime Delights Resin Magnet

I have to admit, working with Resin intimidated me at first.

With a little practice, I found that it’s really not hard and you can get some amazing results.

Especially when you start small.    (Just make sure to read the package instructions)

My Springtime Delights magnet measures only 2″ x 2.

Materials:            (*affiliate link)

Directions:

Cut and glue a small piece of scrapbook paper to fit inside of tin.

Arrange 3D stickers inside of tin.  You may need to add extra glue under each sticker to make sure they stay in place.

Measure, Mix and pour the resin as directed in the product packaging.

Blow air onto the resin using a thin straw to help remove bubbles.

Allow plenty of drying time for the resin to cure before gluing magnet onto the back of the tin.

CreateForLess.com - Create More, Spend Less

*Disclaimer:  This post uses ads and affiliate links.  If you choose to make a purchase using one of the links, I receive a small commission (at no additional cost to you) that helps offset the costs of maintaining this blog.  Thanks for your support!

Stamping in White Embossing Powder


Good Old Embossing Powder…                             

When I was introduced to stamping in 1996, do you know what hooked me?

It was the Gold Embossing Powder.

The first time I watched them melt that gold embossing powder.  WOW!

At the time, I had a gift store and was looking for something new.

I can’t tell you how many people I hooked with that gold embossing powder.

Here’s a little throwback to where I started.

Back to embossing powder.  (this time with a twist)

For this project, I started with a oval that was cut from chipboard.

I rubbed Colorbox White Embossing Pad*  onto the surface of the oval.

Next, I poured White Embossing Powder* over the entire oval.

After pouring the excess powder off, heat the oval with a

Multi-Purpose Embossing Heat Tool*.

Make sure all the embossing powder is melted.

Repeat that step 3 or 4 times, building up a thick layer of embossing powder.

After it was thick enough, I added a little red ink to the edge of the oval and

inked up the “Windmill” stamp.

I heated up the oval again, making sure the powder was really hot and melted.

I pressed the inked stamp into the hot, melted powder.  Success!

I love the way it looks like red toile.  (which is something I collect)

*Disclaimer:  This post uses ads and affiliate links.  If you choose to make a purchase using one of the links, I receive a small commission (at no additional cost to you) that helps offset the costs of maintaining this blog.  Thanks for your support!

Two of my Favorite Snowman Projects

Snowball Fight 2

Sharing two of my all time favorite Snowman Projects…

This little guy is perfect for those times when it’s too cold to go outside and play.

Snowball Fight 3249

If you’re not loving the cold…

Here’s a snowball fight you can have while snuggling up inside.

Snowball Fight Supplies

Here’s what’s you’ll need:                                                 (*affiliate link)

Directions:

  1. Cut the 2″ Smoothfoam ball in half.  Cut the top off the rounded side of one of the balls.
  2. Poke two holes into the bottom of the Snowman body using the craft pick.  Break a toothpick in half, dip ends into craft glue and insert in holes.  Attach the sliced ball onto the Snowman body.
  3. Apply Snow-tex with palette knife over the newly formed Snowman and the 6″ disc.  Allow both to dry fully.
  4. To Create a Snowball Wall… Poke holes into the 1″ balls with the craft pick.  Insert toothpick halves with craft glue on the ends into balls.   Build wall by sticking the balls together.
  5. Apply Snow-tex onto wall using the palette knife.  (Allow to dry.)
  6. Create scene by attaching snowman and wall onto the disc.  Reinforce the pieces with toothpicks and craft glue.
  7. For a shimmery snowy glow…paint all the pieces with Crystal Craft Twinkles paint.  (Allow to fully dry.)
  8. Add shadows to the snowman and snowballs by gently applying vintage photo ink using a stipple brush.
  9. To Create the Snowman Hat… Measure and cut fabric to fit around snowman head.  Fold over and glue one of the long edges of the fabric to create a brim.  Glue fabric ends together to create a tube.  Tie top of the tube with a piece of string, cut excess fabric off top of the tube and fray the ends by making small cuts with the scissors.  Glue to the top of the Snowman head.
  10. Add arms to the Snowman using small twigs.  Warm him up with a fabric scarf and mittens cut from the fabric scraps.
  11. For the Snowman’s Face… Use two small black micro brads inserted into the snowman face for the eyes.  Paint the tip of a bamboo skewer with orange paint, cut and insert into the face for the nose.  Add a smile to the snowman’s face using a extra fine black paint marker.
  12. Make a small snowball using a small pieced of paper wadded up and covered with Snow-tex.  Glue finished and dried snowball onto mitten.

Snowball Fight Close Up 3194

Another one of my Favorite Snowman Projects was titled “How to make a Snowman”.

Smoothfoam Snowman 887

Making a Snowman is pretty easy.  All it takes is a little patience and time.

(and a few ingredients)

snowman parts

Here’s what you’ll need to make a Snowman:                               (*affiliate link)

Directions:

  1. Cut a small section off the bottom of the 4″ Smoothfoam ball so that it sits flat.
  2. Cut a couple of 3″ sections from the bamboo skewer.  Stick the skewer into the center of the 2″ and 3″ Smoothfoam balls.
  3. Add craft glue to the ends of the skewers before sticking the three balls together to form the snowman base.  (Allow glue to fully dry before continuing to the next step)
  4. Using a palette knife, smooth Snow-tex over Snowman base.  Here’s where the patience comes in… Allow a couple of hours for the Snow-tex to completely dry.
  5. Paint the entire Snowman base with white acrylic paint.  This fills in and helps cover any area missed by the Snow-tex.
  6. For a Frosty Look…paint the Snowman base with Craft Twinkles Glitter Paint.
  7. Cut a thin strip of grey felt and glue around the base of the hat to create a band.  Glue holly embellishment onto band to cover seam.  Glue to the top of the Snowman head.
  8. Cut a strip of gingham fabric and tie around neck.  Cut small slits into the ends of fabric for fringe.
  9. Use two small black brads inserted into the head for the eyes.  Use five micro black brads insert as the mouth.
  10. Cut the pointed end from a bamboo skewer and paint with orange paint.  Stick into head for the nose.

put a stick in it

Here’s a Close up of Mr. Snowman.  Isn’t he Handsome?

Snoman Face

These projects was created for and sponsored by Smoothfoam and also sponsored by DecoArt.

Smoothfoam Snowman Side view

*Disclaimer:  This post uses ads and affiliate links.  If you choose to make a purchase using one of the links, I receive a small commission (at no additional cost to you) that helps offset the costs of maintaining this blog.  Thanks for your support!

Try Amazon Prime 30-Day Free Trial

A little Americana for your front porch swing

The quickest way to spruce up the front porch swing for summer is with new pillows.

And if your a little bit handy and have a sewing machine why not try making a few of your own.

When it comes to sewing I’m very simple and it doesn’t get much easier than this.

A simple stenciled and stitched pillow.

Deco Arts has so many 12″ stencils in a variety of patterns, you’re sure to find one you’d love.

Supplies 270 2

DecoArts® Products Used:                           (*affiliate link)

  • ADS16 American Tribute Stencil*
  • Americana® Multi-Surface Satin Acrylics: Dark Scarlet, Cotton Ball, Night Sky
  • Splendid Gold Dazzling Metallics® Acrylic Paint

Additional Products:

Directions:

  1. Lay paper under muslin fabric before stenciling.
  2. Center and tape stencil onto muslin with removable painter’s tape so that the stencil won’t move.
  3. Work one color at a time and mask off with painter’s tape the areas that won’t be painted.
  4. Remove the “star section” of the flag using a craft knife and set aside.
  5. Stenciling is a “dry” brush technique. Using a stencil brush, dip just the tip of your brush into the paint. Tap off excess paint before applying to prevent the paint from seeping under the edges of the stencil.
  6. Apply paint with stencil brush in a straight up and down motion called stippling.
  7. Once you’ve added the red, blue and gold colors. Replace the star section of the flag back onto the stencil and stencil the stars with white paint.
  8. Create a simple pillow by sewing the muslin onto the red and cream ticking fabric.
  9. Stuff pillow with Poly-fil®.

God Bless America Pillow 572 2

This project was sponsored by DecoArts.

Disclosure:  This blog uses ads and affiliate links.  If you choose to make a purchase using one of the links, I receive a small commission (at no additional cost to you) that helps offset the costs of maintaining this blog.  Thanks for your support!

Speckled Eggs for Spring

Speckled Eggs for Spring 4927

Now that I only have a teen-ager at home, we don’t do the dyed eggs anymore.  (he’s no fun)

But… I still needed some soft pastel hued Speckled Eggs for Spring.

Putting my eggs in one basket 4847

So… I grabbed a few of my Smoothfoam Eggs.

I gave the eggs a light sanding to remove the ridge and painted them with a soft chalky finish.

Like the name suggests, these eggs have a smooth finish making them perfect for painting.

The best way to paint an egg 4895

The best way to paint an egg…

Use a small glass or candle votive to hold the egg.  Paint one half of the egg at a time.

Speckled Eggs Close Up 4943

I especially like the look of speckled eggs, so I grabbed an old toothbrush for speckling.

  • Speckled the eggs by lightly rubbing the old toothbrush into brown paint and gently flicking the paint onto the eggs.
  • Make sure to wear an apron to protect your clothing.  Flicking can be quite messy.

This project was created for and sponsored by Smoothfoam™, The Crafters Foam.

Stitched Sampler

Stitched Sampler

I hate throwing anything away that might possibly be used on a project later.

In an effort to make room and not become a hoarder,

I actually threw these little scraps of fabric away.   (It was hard, I love these prints.)

But…Only minutes later, while I was making a permanent home for my new sewing machine

that I got for Christmas,  (thanks Nick and Bonnie) I got the idea to make a stitched sampler.

What a great use for little pieces of fabric.

Now, bear in mind that this is my first real project on my new machine.

Stitched Sampler Close Up

I misted the iron-on embroidered letters from Joy SA and the white decorative trim with

Tattered Angels Ruby Slipper Chalkboard Mist Paint and stitched to my hearts desire.

I cut a large die-cut square out of premium gray felt using my Accu-cut machine.

I’m pretty please with the way it turned out.

Stitched Sampler 3584

This project was created for and sponsored by Joy SA.