Getting Creative with Resin

Getting Creative with Resin 8181

I’ve always wanted to use resin in a project but have always felt somewhat intimidated.

Thanks to an opportunity with Environmental Technology Inc., the makers of

jewelry resin and much more, I finally got my chance.


EnviroTex Jewelry Resin

And… after watching this video.  I felt confident to start.

I couldn’t believe how easy it was and how happy I was with the results.

The hardest part was deciding what to make and what to fill.

Halloween before the resin 2880 Creative before the resin 2883

For my Projects:

  • I started with some over-sized bottle caps from Maya Road which I spray painted black.
  • I used a circle punch to make a background from scrapbook paper.
  • I used dimensional stickers, metal pieces, regular stickers and glued everything in place using  white craft glue.
  • I measured and mixed the resin according to the instructions and filled the bottle caps.
  • Then it was time to wait for the resin to cure.

waiting for the resin to cure

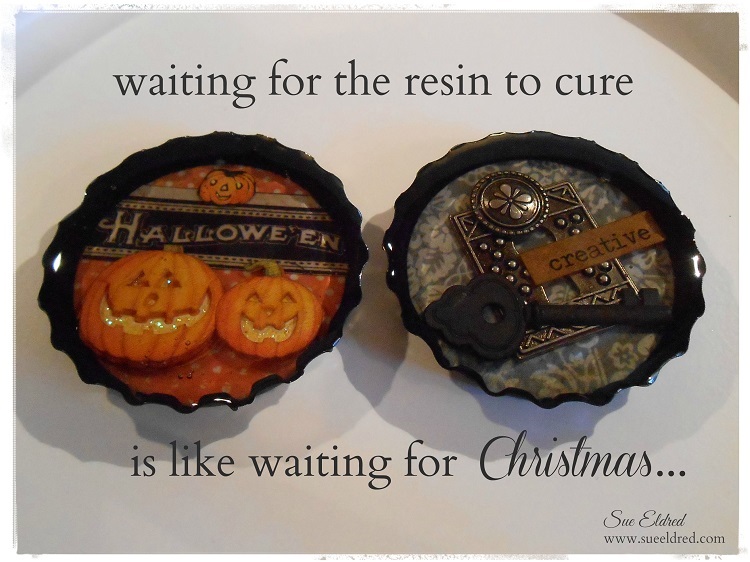
The original plan was to add a hanger on the back, and use them as a decoration.

But… I had a better idea and decided to add a magnet to the back instead.

I really, really like them.

Resin Work in Progress 2908

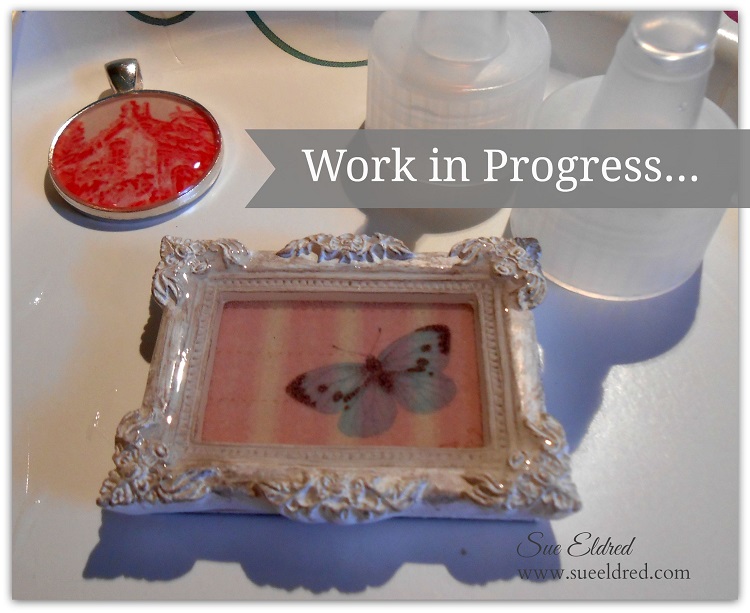
Now that I’ve seen how easy it is, I’ve got a few more things in the works.

Shop Amazon Scrapbooking Supplies*

*Disclaimer:  This post uses ads and affiliate links.  If you choose to make a purchase using one of the links, I receive a small commission (at no additional cost to you) that helps offset the costs of maintaining this blog.  Thanks for your support!

Creating a Decorative Display Board for all my Little Pretties

Smoothfoam Display Board 07114

My project started as a Memo Board and… 

While I was looking for some push pins I stumbled across a collection of little pretties.

Tucked away in a cabinet along with a lot of other embellishments were these little

metal frames.  Something that I’d been hoarding since my K & Company days.

I added those frames along with some other little pretties onto my board.  (Love!)

Memo Board Products

To make my Memo/Display Board I used:            (*amazon affiliate link)

Directions:

  1. Paint wood frame with cream acrylic paint.
  2. Cut the Smoothfoam sheet a 1/4″ larger than the center opening of the frame.
  3. Apply spray adhesive to the front of the Smoothfoam and lay onto the fabric.
  4. Wrap and glue the fabric around the back of the Smoothfoam.
  5. Glue the frame onto the front of the covered Smoothfoam.
  6. Decorate the top and bottom of the frame with dimensional flowers.

*My little pretties are stuck into the display board with decorative garment pins.

A really fast and easy project.

This project was created for and sponsored by Smoothfoam.

Shop Amazon Scrapbooking Supplies*

Disclaimer:  This blog uses ads and affiliate links.  If you choose to make a purchase using one of the links, I receive a small commission (at no additional cost to you) that helps offset the costs of maintaining this blog.  Thanks for your support!

DIY Wedding Projects Day #4: Wedding Album

Wedding Album 2

Preserve your memories from weddings, anniversaries, and more, in this beautiful burlap covered scrapbook or photo album. Embellish the cover with ribbon, gems, twine and more for a personalized look you will love.

Supplies Needed:

  • 1 yd. Gazette 2” Ribbon: Raw Silk
  • ½ yd. Antique White Double Faced Satin 7/8”
  • ½ yd. Lucy Ivory Lace
  • 2 Gems from Design Chain Tracy-Silver
  • Twine
  • Chic Silver Leaves
  • Pre-Made 5” x 7” Burlap Covered Scrapbook Album
  • 3” Chipboard Heart
  • Beacon Fabri-Tac Permanent Adhesive*  (affiliate link)
  • Needle and Thread

Wedding Album Directions:

  1. Cut approx. 16-18” of Gazette Raw Silk Ribbon. Using the needle and thread with a long tail, make a simple running stitch down one side of the ribbon.
  2. Gather ribbon together with thread and tie in the center to form the ribbon rosette.
  3. Create a second ribbon rosette using 12” of 7/8” Antique White Double-Faced Satin Ribbon.
  4. Glue Antique White rosette onto the center of the Raw Silk rosette.
  5. Cut a gem from the Design Chain Tracy-Silver and glue to the center of the rosette flower.
  6. Wrap 12” piece of Gazette Raw Silk Ribbon with the ends meeting centered on the front of the album. Glue ends to the album.
  7. Wrap a 12” piece of Lucy Ivory Lace around album, again meeting centered on the front of the album. Glue ends to album.
  8. Glue Ribbon flower onto front of the album cover the ends of the lace and ribbon.
  9. Bend slightly the ends of the Chic Silver Leaves and glue onto the album with the ends underneath the flower.
  10. Wrap twine around the chipboard a couple of times and tie with a bow.
  11. Glue a small gem cut from the Design Chain Tracy-Silver onto the center of the twine bow.
  12. Glue chipboard heart onto the front of the album.

Shop Handmade – The Wedding Store

Disclaimer:  This blog uses ads and affiliate links.  If you choose to make a purchase using one of the links, I receive a small commission (at no additional cost to you) that helps offset the costs of maintaining this blog.  Thanks for your support!

Happy Little Camper


Happy GlampingI always tell people, my idea of roughing it is a bad hotel room. But who knows, if I had a happy little camper like this, I might try my luck with camping.

Supplies:

6″ Smoothfoam Disc
2″ Smoothfoam Ball
Window & Door Die by Impression Obsession
Diecutting machine
Scrapbook paper
Acrylic paints – Antique White, White, Light Blue, Black
Paintbrush, Q-tip
Silver metallic paint marker
Ribbon & twine
Craft glue
Assorted brads
Corsage pins
Craft knife or Hotwire Foam Cutter

1.  To create the body of the camper, cut 2″ off the edge of the Smoothfoam disc.  Paint the top antique white and the bottom light blue.  Add white polka dots on top of the blue with a small Q-tip.

2.  Cut two slices out of the middle of the Smoothfoam ball for the wheels and paint them black.

3.  Cut a small block from the leftover Smoothfoam to prop up the camper’s front end and color it with the silver paint pen.

4.  Glue all the pieces together as shown.

5.  Die-cut two windows from white paper and glue them onto patterned paper, then trim to create the window background. Cut a 1″ x 2″ piece of red cardstock to use as the door.
Glue one windows to the camper and the other to the door, then glue the door to the camper.

6.  Make a banner with ribbon and twine.  Tie twine ends around corsage pins and stick into top of the camper.

Happy Glamper 2

Smiley Face Graduation Pencil Topper

What every Graduate needs.  A Smiley Face Graduation Pencil Topper. 

And because this little guy’s feeling really special, he needed a bow tie.

To make the Smiley Face Pencil Topper you’ll need:

  • 2″ Smoothfoam Ball
  • Sanding Block or Fine Sandpaper
  • Craft Knife
  • Yellow and Black Acrylic Paint
  • Pencil
  • Black Cardstock or Black Chipboard
  • Red Twine
  • Black Brad
  • Black Gingham Ribbon
  • Craft Glue
  1. Lightly sand ridge from the smoothfoam ball.
  2. To make the top of the ball flat, cut a small portion from the top of the ball with a craft knife.
  3. Paint the ball with yellow paint.
  4. Paint the top portion of ball with black paint and paint on face.
  5. Bore a hole into the bottom of the ball big enough to fit the pencil.
  6. Using the red twine, make a small tassel.
  7. Cut a 2″ square piece of black chipboard.
  8. Punch a small hole in center of the chipboard.  Insert ends of the tassel and black brad.
  9. Glue Mortarboard onto top of the Smiley Face.  Insert onto pencil
  10. Make a small bow tie from black gingham ribbon and glue onto the front of the pencil.

This project was created for and sponsored by Smoothfoam.

The Cooker Guy

Another fun kid friendly project with one of my favorite helpers.  The Cooker Guy!

Kids love helping in the kitchen and this guy’s no exception.  Whenever he catches me

working on something in the kitchen, a scooting chair is soon to follow.

The Cooker Guy

I’ve been told several times, “Grandma you need a kid apron for me.”

So… I decided we should make a special one just for him.

Misting the Apron

I purchased a small apron from Canvas Corp Brands.

They call it a Toddler Apron, but it’s plenty big enough for this 4 year old.

Stenciled and sprayed

We misted and sprayed the apron with various colors of Glimmer Mists from Tattered Angels.

We also used a couple of stencils to create designs on the apron.

Personally, I think it looks more like a Art Apron than a Chef Apron.

But really?  Who’s to say?  He’s happy and that’s all that matters.

Custom Letters

To make this apron special I used these really nice iron-on embroidered letters I received from

I used the Funky Style Hobo Font in white.

I like getting the letters in white so that I can customize them any color I want.

Make sure to check out their Creating with Joy Blog.  www.creatingwithjoy.blogspot.com

I asked Nick what he wanted his apron to say and he choose the words “Cooker Guy.”

Cooker Guy Collage

Here’s my happy “Cooker Guy”, doing what does best.  Helping out.

“This is a sponsored post.  As a member of the Joy® Design Team I have been provided product and compensation in exchange for my creative ideas.  The views and opinions are my own.

Shop Your Fav Brands at Scrapbook.com

*Disclosure:  This blog uses ads and affiliate links.  If you choose to make a purchase using one of the links, I receive a small commission (at no additional cost to you) that helps offset the costs of maintaining this blog.  Thanks for your support!

Block Stamping on Canvas with Smoothfoam

Both Canvas' 4913

I had this great idea to make stamps using Smoothfoam so that I could do sidewalk stamping with my

Grandsons.  After one messy (but fun) try, I decided it really wasn’t going to work the way I wanted.

So… I decided to use the stamps on a canvas instead.

(See Wednesday’s post:  The Good, the Bad and the Messy)

Handmade Smoothfoam Stamps 4837

I created the stamps using a Hotwire Foam Cutter.  You could also use a craft knife.

Because the original plan was to use them with the kids, I glued handles on the back.

I made flower shapes, leaves, squares and triangles.

Block Stamping Collage

Supplies Used:

  1. Prime canvas with acrylic paint.
  2. Sponge acrylic paint on the back of the Smoothfoam pre-cut square, stamp onto the canvas.  You may need to press the back of the canvas with your remaining hand to get crisper image.  Repeat three more times to create square background.
  3. Stamp flower and leaves.  Using a small Smoothfoam ball cut in half, stamp center of flower.
  4. Stencil words on Canvas.

Block Stamping on Canvas with Smoothfoam

Disclaimer:  This project was created for and sponsored by Smoothfoam.

Creating a Keepsake Memory Box with Decorative Trimmings

Sue Eldred's Keepsake Memory Box

I recently got a beautiful assortment of ribbons and trims from Decorative Trimmings to use

on a special project.  It was hard choosing which trims I wanted to use, because their selection

is wonderful.  I decided to Create a Keepsake Memory Box.

You know… for all those special little things that you want to keep and remember forever.

A perfect little box to fill with small gifts for Weddings, Mother’s Day, Bridal or Baby Showers.

Or maybe old love letters from your husband.   (Hmmm… I’d need a bigger box.)

Keepsake Box and Tag Close Up 4973

For my Keepsake Memory Box and Tag I used three of the trims.

  • 1/2″ Pink & White Mini Polar Puff
  • 3/4 Inch Pink Rose Tulle Trim
  • Chinese Braid White
  1. Paint a large papier mache box with white acrylic paint.
  2. Cover it with scrapbook paper.   (I purchased mine from Michael’s.)
  3. Glue the Decorative Trimmings using Beacon Fabri-Tac Permanent Adhesive* (affiliate link)
  4. Stamped greeting is from Serendipity Stamps.

Tea Cup and Tag 4969

Today’s post is part of a blog hop hosted by Decorative Trimmings.

Shop Handmade – The Wedding Store

Disclaimer:  This blog uses ads and affiliate links.  If you choose to make a purchase using one of the links, I receive a small commission (at no additional cost to you) that helps offset the costs of maintaining this blog.  Thanks for your support!

How to Make a Garden Butterfly Sign

Welcome to My Garden Butterfly Sign 4758

How to make a Garden Butterfly Sign.

A fun technique using Black Sign Tags from Deflecto Craft Solutions.

According you my you tube account it’s been 4 years since I made my first video.

I guess it was finally time for my second one.  (let me know what you think)

“This is a sponsored post. As a member of the Deflecto Design Team I have been provided product in exchange for my creative ideas, views and opinions.”

Home Sweet Home Cookbook

Sue Eldred's Graphic 45's Home Sweet Home Cookbook with Deflecto Pouches 4737

There’s something about good old family recipes that’ll bring a smile to your face. 

Warm, Comforting, a little piece of Home.

So… When I saw the Home Sweet Home Collection from Graphic 45, I knew a cookbook was in order.

I paired the Home Sweet Home collection with the new 5″ x 7 1/4″ flexible pouches from

Deflecto Craft Solutions.  Using the pouches not only helps protect your recipes from stains and spills

but they also make it easy to swap recipes in and out.

Deflecto Flexible Pouches 4699

  • My cookbook album was put together by covering chip board with the scrapbook paper and distressing the edges with Vintage Photo Distress Ink.
  • I made the stickers dimensional by adding each one to chipboard and cutting them out.
  • The circle stickers that spell the word “recipes” were stuck on round buttons and then glued onto the book.
  • The pouches were punched and the book bound using the Cinch Binding Machine.

Graphic 45 Home Sweet Home Cookbook with Deflecto Pouches 4744

Products used:


  Product Ordering Information through Amazon*  (see disclosure policy)

“This is a sponsored post. As a member of the Deflecto Design Team I have been provided product in exchange for my creative ideas, views and opinions.”