Celebrating Winter with a Little Paper Crafting

Winter Memories Album

Now that the Holidays are over, I’m embracing the quiet of the Winter Season

by creating a few things with Eileen Hull’s and Sizzix’s New Release Chapt. One Dies

and the Simple Winter Woods Scrapbook Collection Kit from Simple Stories*.

Look at this beautiful New Scrapbook Paper Collection from Simple Stories.

I fell in love with the soft, muted colors of the Simple Winter Woods Collection*

and knew I had to have it.  (It was perfect for these projects.)

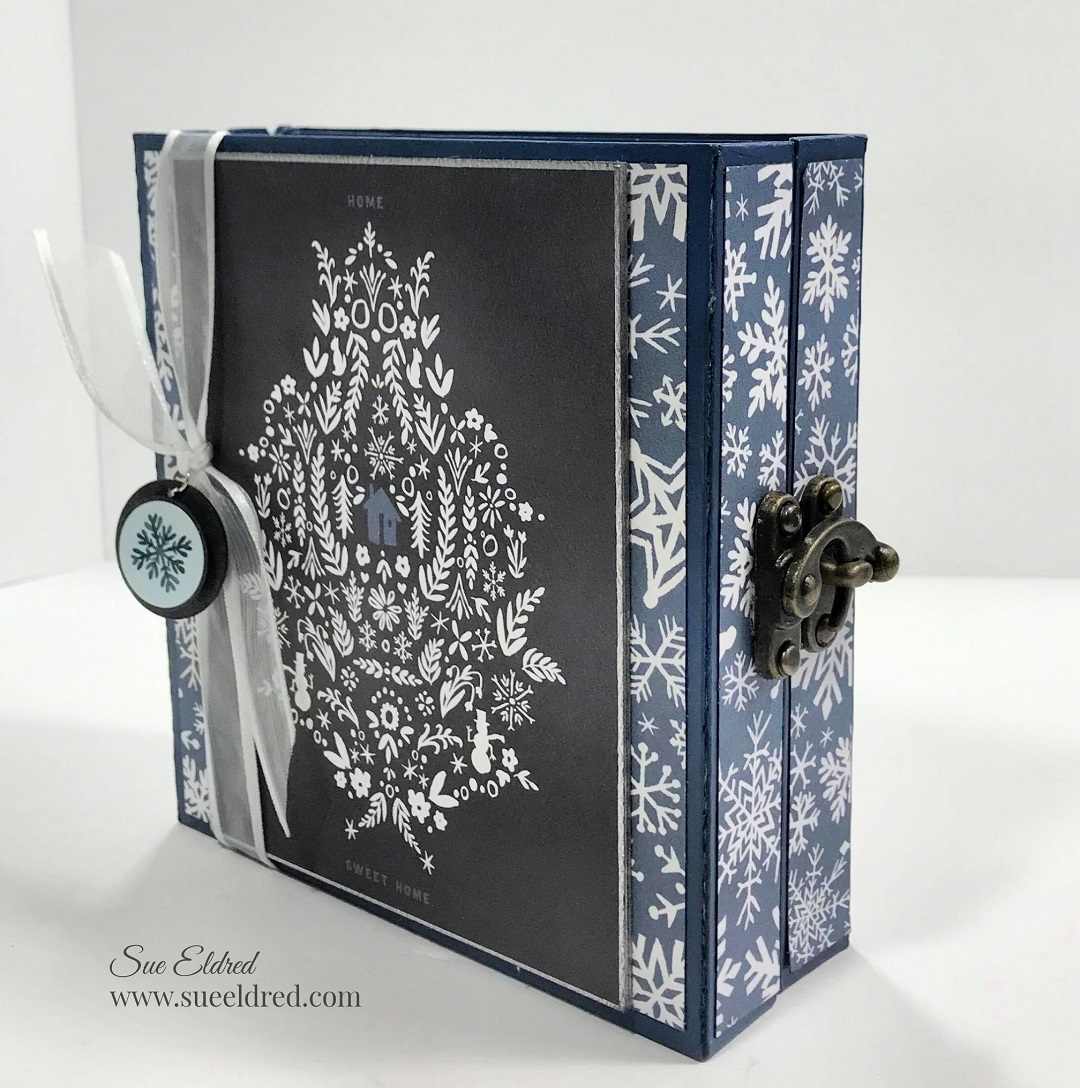
Winter Memories Album

Supplies Used to make the Projects:    (*affiliate links)

*Disclosure:  This blog uses ads and affiliate links.  If you choose to make a purchase using one of the links, I receive a small commission (at no additional cost to you) that helps offset the costs of maintaining this blog.  Thanks for your support!

Winter Memories Album

First, I must show you the new toy I got for Christmas this year.

After many years of use and abuse, I finally upgraded my old Big Shot Machine with a Newer, Bigger model.

Behold the Sizzix Big Shot Plus Die-Cutting Machine*.

I needed it to die-cut the larger dies like the NEW Sizzix Frame Pocket Journal Die by Eileen Hull*.

Winter Memories Album

Winter Memories Album

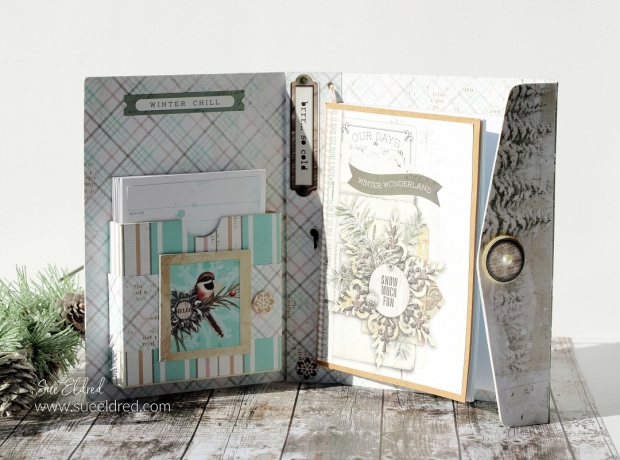
The Journal measures 4 1/2” x 6 1/2” x 1 1/4” with an adjustable spine.

What makes this die special are the additional pieces on the die, a pocket to hold ephemera, a frame and flap!
Winter Memories Album

There are several ways to make the inside of your album.  

Winter Memories Album

I created a pocket on the inside of the album using the die and covered matboard.

Winter Memories Album

The pocket is great for adding a small skinny notebook or several little notecards.

I used the 3″ x 4″ journal cards from the Winter Woods Paper Collection for the front of the cards.

Winter Memories Album

I used twine and the holes on the spine to hold a small notebook in place.  

I covered the Small Kraft Notebook* using a paper and stickers from the collection.

Hello Winter 2023 Framed Picture

Continuing with the Winter Theme…

I created a framed picture using the NEW Sizzix Thinlets Tile Alphanumeric Die by Eileen Hull*.

The Tile Alphanumeric is very versatile because you can use both the positive and negative shapes.

Each letter is perforated which makes it easy to create and line up words.

Hello Winter 2023 Frame Picture

It’s so easy to create a little dimensional piece of art using the supplies you have around you.
Simple Vintage Winter Woods Card

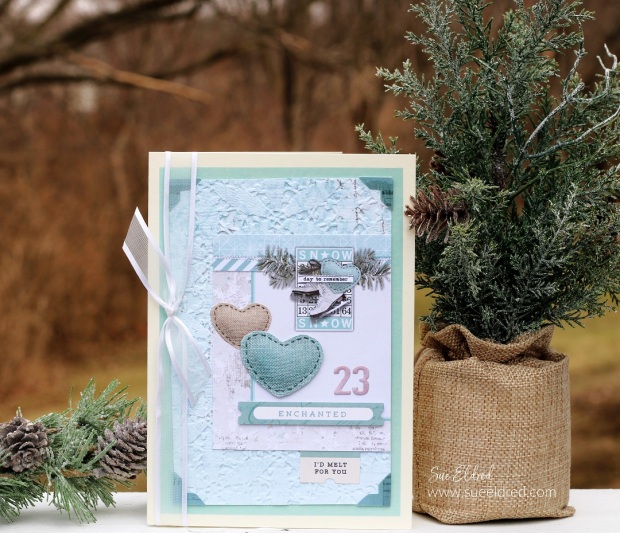
And last but not least, I created a 5″ x 7″ card using Eileen’s NEW Sizzix 3D Tablecloth Embossing Folder

as the background for my card.

Eileen Hull 2023 Chapter One New Release Dies

For more projects using the NEW Eileen Hull Chapter One Release Dies…

Please join us for the Ch. 1 2023 Release Party on Tuesday, January 3 at 12:00 ET when Eileen will be joined by team members sharing their projects. We will also have a blog hop that day so we hope you will hop along with the team and be inspired!

LIST OF HOP STOPS:

Eileen Hull Designs  
Pam Bray
Jennie Atkinson
Sarah Lizzie
Lisa Hoel
Susie Bentz
Tonya Trantham
Elizabeth Robinson
Jenny Marples
Maggi Harding
Karen Bearse
Sue Eldred   (you are here!)

Eileen Hull Educator Logo

Disclosure:  This is a sponsored post.  As a member of the Eileen Hull Educator Team, I have been provided product in exchange for my creative ideas.  The view and opinions are my own. 

Handmade Holiday Tags made with Cork

Making Holiday Tags using Cork

Make your Gifts Special with Handmade Holiday Tags made with Sizzix Cork Sheets*.

If you’ve been here before, you know I love experimenting with new materials.

So, when Sizzix offered to send me some rolls of their cork sheets, I gladly accepted.

(I especially love the way it looks on kraft-colored wrapping paper.)

Disclosure:  This is a sponsored post.  I have been provided product in exchange for my creative ideas.  The view and opinions are my own. 

Making Holiday Tags using Cork

Materials Used:  (*affiliate links)

*Disclosure:  This blog uses ads and affiliate links.  If you choose to make a purchase using one of the links, I receive a small commission (at no additional cost to you) that helps offset the costs of maintaining this blog.  Thanks for your support!

Making Holiday Tags using Cork

With the help of my sewing machine and a few of my favorite Eileen Hull dies.

Making the tags was fairly easy to do.

Making Holiday Tags using Cork

Stitched Snowflake Tag

  • I die-cut the tags using the large tag die from the Tags Die Set*.
  • I sewed the tags together using a sewing machine with silver thread
  • Die-cut a paper snowflake.  Sew the Snowflake and white pom-pom trim onto the tag.

Making Holiday Tags using Cork

Fun and Festive Reindeer Tag

  • The reindeer tag uses a small wood reindeer that I painted silver.
  • Glue the reindeer and bow onto the front of the tag.
  • The word stickers on the reindeer and snowflake tags are from the Simple Vintage Christmas Lodge Sticker Sheet*.
  • The deep red satin ribbon makes this tag feel special.

Making Holiday Tags using Cork.

Simple and Elegant Joy Tag

Simple greenery picked from a bush outside adds to the natural feel of this tag.

Up to 30% off Christmas Crafts

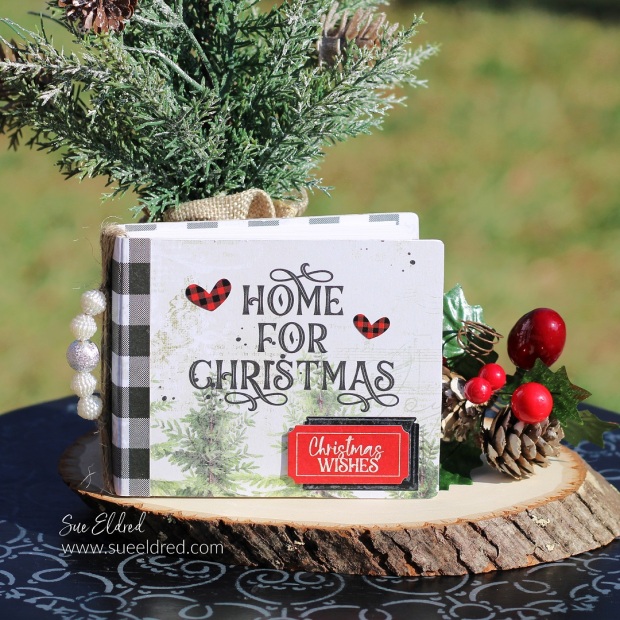
Home for Christmas Mini Album

Home for Christmas Mini Album

How to make a Holiday Mini Album…

I wanted to share with you a Simple little Christmas Album that I made for

the Eileen Hull Comfort & Joy Event over on Eileen’s Facebook Fan Page.

Sizzix Notepad Scoreboards Die by Eileen Hull

I used the Sizzix Notepad Scoreboard Die by Eileen Hull* and paper from

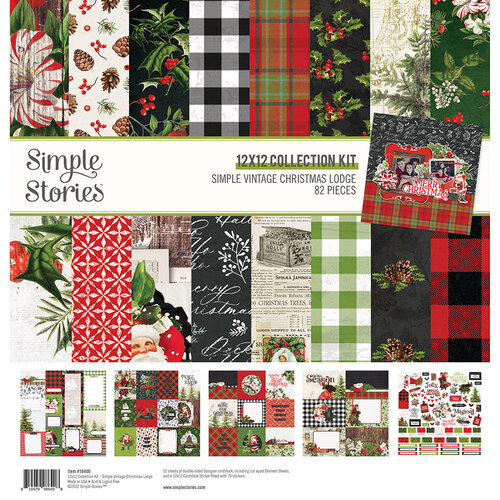
Simple Stories Simple Vintage Christmas Lodge Collection* to create the mini album.

Materials Used:  (*affiliate links)

*Disclosure:  This blog uses ads and affiliate links.  If you choose to make a purchase using one of the links, I receive a small commission (at no additional cost to you) that helps offset the costs of maintaining this blog.  Thanks for your support!

Home for Christmas Mini Album

The album may be small, but it has plenty of room for Holiday pictures.

It measures approximately 3 1/2″ x 4 1/2″.

Home for Christmas Mini Album

Sue’s Tips for Making the Home for Christmas Mini Album:

  • I used the Xyron Creative Station* to add adhesive to the back of the paper before adhering it to the mat board and die-cutting the pieces to make the notepad.
  • I adhered the spine of the front and back cover using Rapid Fuse Adhesive*.
  • For the inside of the album, I created four small “signatures” to place inside the album.
  • To secure the “signatures” inside the album, wrap thin twine around the spine and the paper.

Home for Christmas Mini Album

Home for Christmas Mini Album

When it comes to family, Home is the best place to be.

Eileen Hull Educator Logo

Disclosure:  This is a sponsored post.  As a member of the Eileen Hull Educator Team, I have been provided product in exchange for my creative ideas.  The view and opinions are my own. 

Crafty IKEA Cabinet Makeover

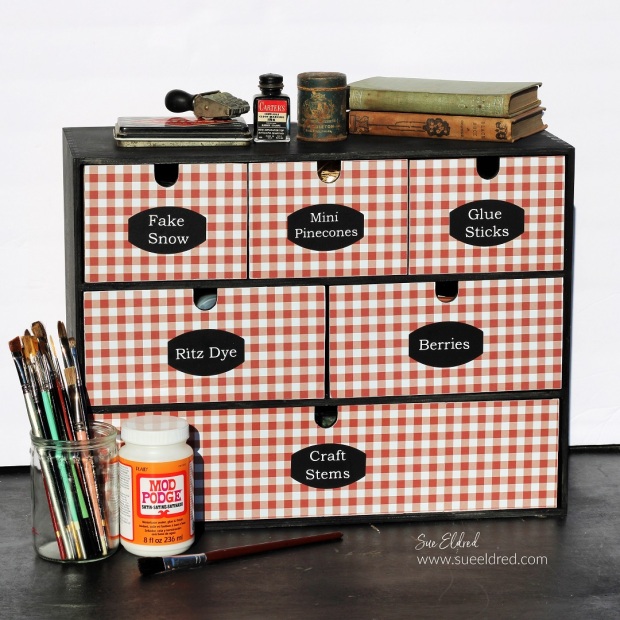
Crafty IKEA Cabinet Makeover

Give a basic IKEA storage cabinet a little personality with a crafty makeover.

I’m a little bit of a neat freak.  I geek out when I find a good storage piece.

I found this IKEA Moppe Mini Storage Chest* on a recent IKEA trek.

The mini cabinet was the perfect solution to replace an old decrepit plastic one.

“This is a sponsored post.  As a member of the StyleTechCraft Design Team I have been provided product and compensation in exchange for my creative ideas.  The views and opinions are my own.

Crafty IKEA Cabinet Makeover

If you don’t have an IKEA store close, you can get the IKEA Moppe Cabinet*

on Amazon for a bit more.

The IKEA MOPPE mini chest with drawers is a true classic with its many drawers

and timeless style.  It’s made of untreated wood that you can paint and

decorate as you like, over and over again.

Crafty IKEA Cabinet Makeover

Here’s what I used Used:   (*affiliate links)

*Disclosure:  This blog uses ads and affiliate links.  If you choose to make a purchase using one of the links, I receive a small commission (at no additional cost to you) that helps offset the costs of maintaining this blog.  Thanks for your support!

Crafty IKEA Cabinet Makeover

Directions:

  • Lightly sand the surface of the cabinet with a Sanding Block* to smooth away any rough spots.
  • Paint the cabinet and drawers with Classic Black Deco Art Americana Decor® Satin Enamels*.
  • You may need to give it a second coat. (I didn’t paint the inside of the cabinet or drawers.)
  • Lightly sand over the paint to smooth the grain of the cabinet.
  • Wipe the cabinet with a clean, soft rag to remove any dust.

Crafty IKEA Cabinet Makeover

Crafty IKEA Cabinet Makeover

Crafty IKEA Cabinet Makeover

  • I used Red Gingham Paper* to cover the front of my cabinet. The red gingham matches the decor in my craft room and is a simple pattern to match. (This is important if you want to line up your design.)
  • Brush a coat of Mod Podge Satin Decoupage Glue* over the drawer front. Make sure to get the Mod Podge to the edges of the drawer.
  • Lay the paper onto the drawer and smooth. Allow the Mod Podge to dry.

Crafty IKEA Cabinet Makeover

  • Place the drawer onto a cutting mat and cut away the excess paper using a craft knife.

Crafty IKEA Cabinet Makeover

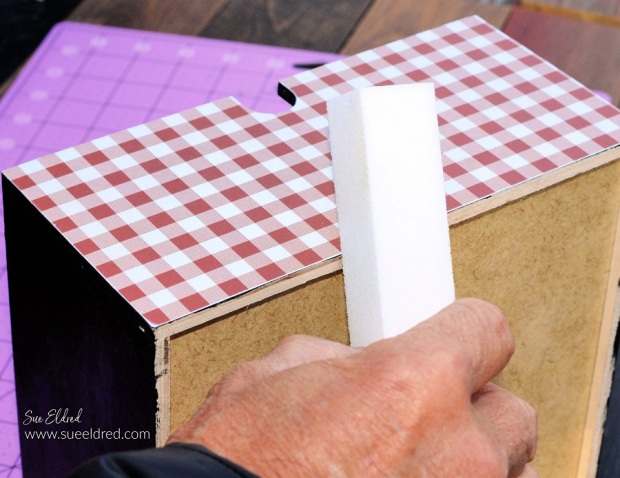
  • Sand away any rough-cut edges using a sanding block on the edge of the drawers.

Crafty IKEA Cabinet Makeover

  • A small nail file is great for getting into small to reach places.

Crafty IKEA Cabinet Makeover

Place the labels onto the drawer fronts and fill them with all your goodies.

Crafty IKEA Cabinet Makeover

Don’t judge me for my weird categories.

Crafters have a lot of random stuff to store, and this cabinet holds a lot of stuff.

Crafty IKEA Cabinet Makeover

You could use wallpaper, stencils, metal hardware to customize this into the perfect organized cabinet. 

Don’t Miss a Thing…Make Sure to Follow me

Vintage School Desk Make-Over Before and After-Sue's Creative Workshop


Top 3 Favorite Paper Crafting Projects of 2021

2021 Top 3 Paper Crafting Projects-Sue's Creative Workshop www.sueeldred.com

My Top 3 Sizzix/Eileen Hull Paper Crafting Projects.

As part of the Eileen Hull Educator Team, I post projects every month using her dies.  

This month Eileen asked us to pick our three favorite projects for 2021.  

These three projects are my top three favorites.  

Click on the pictures or links below ↓ to go to the original post with all the details.

Winter Fun Folio Album

The Winter Fun Folio Album was made with the Eileen Hull Folio Journal Die from Sizzix*.

If you like an album with a lot of options, then the Folio Journal Die is for you.  

You can see the full project details here.

*Disclosure:  This blog uses ads and affiliate links.  If you choose to make a purchase using one of the links, I receive a small commission (at no additional cost to you) that helps offset the costs of maintaining this blog.  Thanks for your support!

The Sweet Life Tiny Book

Good Things Come in Small Packages.

The “Sweet Life Tiny Book” was made with the Eileen Hull/Sizzix Tiny Book Die*

and Hershey Peanut Butter Cup Wrappers.  You can see the full project details here.

Simple Vintage Fall Memories Scrapbook Album

The “Simple Vintage Fall Memories Album” was made with

the New Full-Sized Journal Die* from Eileen Hull and Sizzix. 

This was probably my most favorite one.  I love this die because of its impressive size. 

The finished album measures 6 1/4″ x 8 3/4″.  

You’ll need to have a Sizzix Big Shot Plus*or Sizzix Big Shot Pro* to cut this.

You can read all the project details here.

Simple Vintage Fall Memories Album

Simple Vintage Fall Memories Scrapbook Album

The Simple Vintage Fall Memories Album is the perfect place for your Fall Memories.

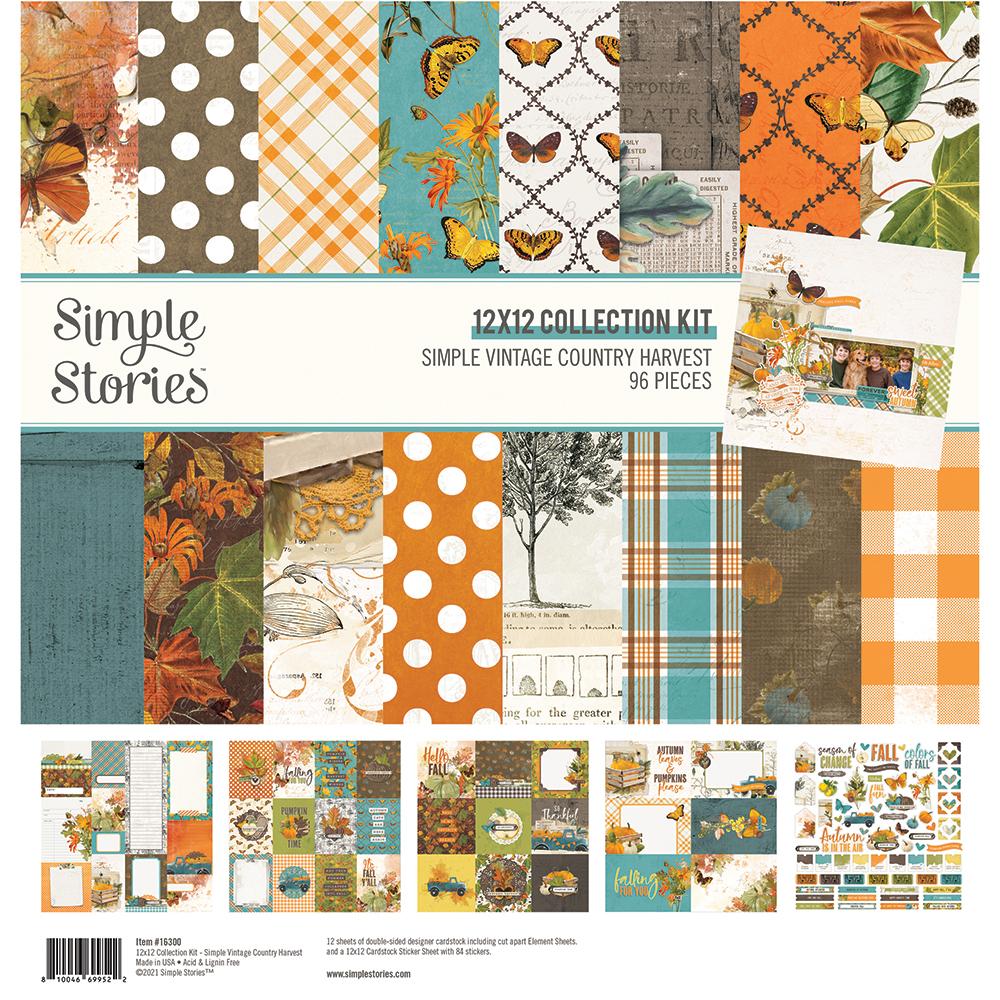
The album uses Simple Stories Simple Vintage Country Harvest Collection*

and the New Full-Sized Journal Die* from Eileen Hull and Sizzix.

Simple Vintage Fall Memories Album

Materials Used:     (*affiliate links)

*Disclosure:  This blog uses ads and affiliate links.  If you choose to make a purchase using one of the links, I receive a small commission (at no additional cost to you) that helps offset the costs of maintaining this blog.  Thanks for your support!

Simple Vintage Fall Memories Album

One Important Thing to Note…

Simple Stories Simple Vintage Country Harvest Collection Kit

Simple Vintage Fall Memories Album

  • I folded six 8 1/2″ x 11″ pieces of cardstock in half to create little “stories” to insert inside your album.  
  • I used thin twine to add my “stories” to the spine.

Simple Vintage Fall Memories Album

Simple Vintage Fall Memories Album

I’m happy with the way the album turned out…

and I love the size of the New Eileen Hull Full-Sized Journal. 

Now I’m off to take More Fall Photos.


First Day of School Scrapbook Layout

First Day of School Scrapbook Layout

Capturing the First Day of School Smiles…

As a kid, I always looked forward to going back to school.

New clothes, new supplies, and the new fall lineup on TV.

As a mom, I was a little sad sending them.

It always felt like summer was over as soon as the kids went back to school.

I was never that mom that couldn’t wait for them to go back.

But once we got back into the routine, everything was good again.

(The layout is of my older two Grandsons First Day of School.)

First Day of School Scrapbook Layout

Die-Cutting Tips…

  • For better results with dies that have grooves, use thick or double-layered cardstock.
  • I adhered two pieces of cardstock together using the Xyron Create-A-Sticker Mini*.
  • I also added a second layer of adhesive to the cardstock before cutting the pieces out using the Mini Maker Die Cutting Machine.
  • You will want to run it through and then back again to make sure that all layers have been cut.
  • Each little die-cut piece becomes a sticker which makes it easy to put all the parts together.

Maker's Movement

Disclosure:  This is a sponsored post  for The Maker’s Movement.  I have been provided product and compensation in exchange for my creative ideas.  The view and opinions are my own. 

School Essentials Die Set from The Maker's Movement First Day Die Set from The Maker's Movement

Materials Used:    (*affiliate links)


*Disclosure:  This blog uses ads and affiliate links.  If you choose to make a purchase using one of the links, I receive a small commission (at no additional cost to you) that helps offset the costs of maintaining this blog.  Thanks for your support!

DIY Holiday Planner

DIY Holiday Planner

Creating a Holiday Planner…

It’s never too early to start thinking about the Holidays.

So…when Xyron asked me to do a Christmas in July project using the Xyron Holiday Bundle,

of course, I said YES!

To be honest, my first thought was to run over to my local scrapbook store

and buy something new to use in my project.

Christmas is my weakness, and I have so much leftover from previous years.

I decided to “Scrap my Stash” instead. In the end, I used paper from 3-4 different collections.

(I’m so proud of my self-control.)

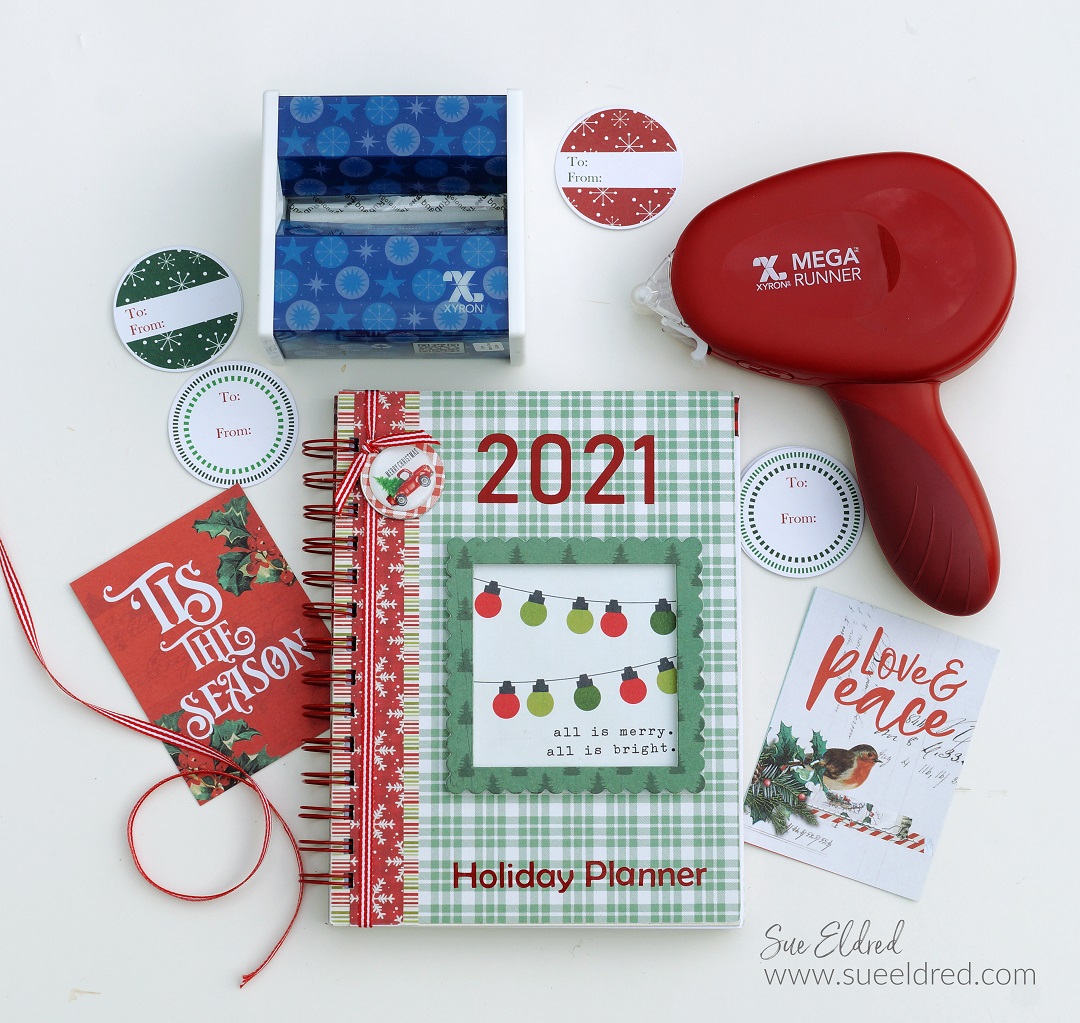
My Holiday Planner measures 6″ x 8″. 

It is big enough to write in but small enough to grab and go.
Xyron® is your official site for all your crafting needs
“This post is sponsored for Xyron.  I have been provided product and compensation in exchange for my creative ideas.  The views and opinions are my own.

Creating a Holiday Planner

Materials Used:

*Disclosure:  This blog uses ads and affiliate links.  If you choose to make a purchase using one of the links, I receive a small commission (at no additional cost to you) that helps offset the costs of maintaining this blog.  Thanks for your support!

Xyron Creative Station

DIY Planner Details:

  • Cut two 6″ x 8″ pieces of decorative paper for the front cover and two 6″ x 8″ pieces for the inside front and back covers.
  • Lay the paper into the Xyron 9″ Creative Station* design side up. Crank the handle of the Creative Station* to run it through the machine. As it goes through the machine it adds a complete layer of adhesive to the back of the paper. No electricity needed, easy to use.
  • Peel the decorative paper from the protective liner and place it onto a 6″ x 8″ piece of chipboard. Cover the front and back sides of the chipboard.
  • I love using the Xyron 9″ Creative Station* when I make albums.  I get complete coverage and everything lays smooth, no wrinkles.
  • I like to use a craft mat and craft knife to trim away any excess paper.
  • A sanding block is great for smoothing out the edges of the covered chipboard.

Xyron Disposable Sticker Maker

  • Cut decorative strips to add the front and back of the planner.  If you’ve never made a planner/album like this, you’ll want to give particular thought to the placement of the strips on the back cover to make sure they line up with the front of the planner.
  • I used coordinating decorative scrapbook paper to create a frame for the front of my planner using the frame die from The Maker’s Movement.

DIY Holiday Planner-Xyron Disposable Sticker Maker-Sue's Creative Workshop www.sueeldred.com 1081DIY Holiday Planner-Xyron Disposable Sticker Maker-Sue's Creative Workshop www.sueeldred.com 1101

DIY Holiday Planner Pages

  • I created several different types of pages using a word program for the inside of the planner.
  • As you can see, it doesn’t have to be anything fancy.
  • Once you get your cover finished and your inside pages created, you’ll want to bind it all together using a binding machine.  I used an old Bind it All Machine.  You can also use The Cinch Book Binding Machine*.

Holiday Planner-Calendar Pages

November and December are the crucial days when planning the Holidays. 

I printed out two calendar pages from SaturdayGift.com and sized them to fit in my planner.

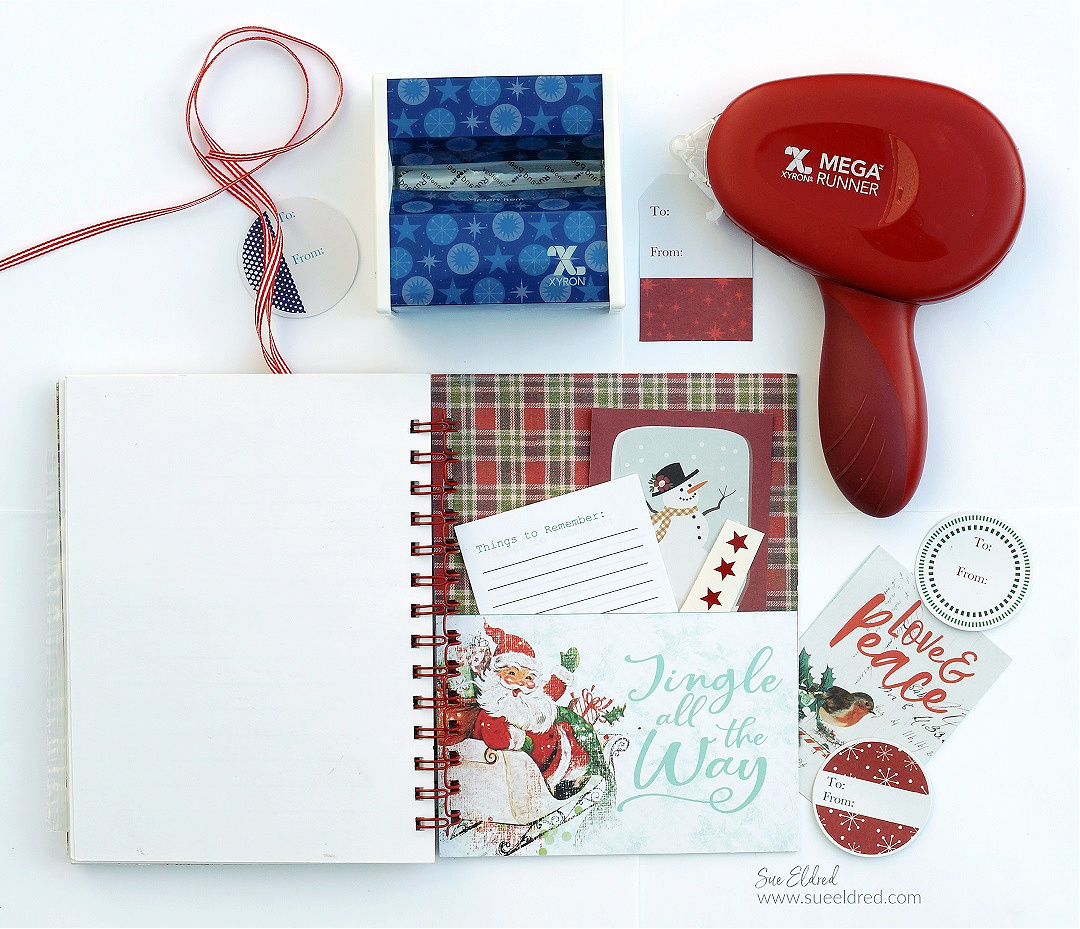
On the inside of the front cover, I created a pocket for lists and coupons.

DIY Holiday Planner

Christmas Gift List

I am that person.  I write down everything I buy for Christmas.

If you want to know what I bought you five years ago for Christmas, ask me.

DIY Holiday Planner

Christmas Card List

Do you still send Christmas Cards?

I love getting and sending Christmas Cards over the Holidays.  (sometimes I even make them)

I don’t get as many or send as many as I used to, but I love hanging them on display.

DIY Holiday Planner-Merry & Bright-Sue's Creative Workshop www.sueeldred.com 1515-2

A great way to be prepared for the Holiday Cookie Exchange. 

Creating pockets are a great way to keep organized and the perfect place for

blank Holiday recipe cards.

DIY Holiday Planner

Favorite Family Recipes…

I have several family favorite recipes that I make every year.

Several years ago, I typed them all up and saved them on my computer.

It was easy to reprint them and add them to this year’s Holiday Planner.

DIY Holiday Planner-Notes & Receipt Holder-Sue's Creative Workshop www.sueeldred.com 1549

Notes and Stuff…

These pages are for writing down special memories, tips of things that worked that’ll you’ll want

to remember for the next holiday get-together, or the other room mom’s phone number.

There’s so much that we need to remember during the holidays.

And don’t forget to save those receipts for easy returns.

I added a thick buffalo plaid zipper bag in my planner to hold those receipts.

DIY Holiday Planner

Jingle All The Way… 

Create another pocket in the back to tuck in pictures and invitations.

I can never have too many pockets to help keep me organized.

The nice thing about Christmas in July is that by the time the Holidays do arrive,

I’ll be almost ready.

Mini Donut Box Gift Card Holder

How to Make a Mini Donut Box Gift Card Holder.

How to Make a Sweet Mini Donut Box Gift Card Holder

using the Donut Box Die Set from The Maker’s Movement.

The perfect gift card/money holder for that special someone with a sweet tooth.

Maker's Movement

Disclosure:  This is a sponsored post  for the Maker’s Movement.  I have been provided product and compensation in exchange for my creative ideas.  The view and opinions are my own.   

How to Make a Mini Donut Box Gift Card Holder.

Materials Used:             (*affiliate links)

Shop Tombow

*Disclosure:  This blog uses ads and affiliate links.  If you choose to make a purchase using one of the links, I receive a small commission (at no additional cost to you) that helps offset the costs of maintaining this blog.  Thanks for your support!
Mini Donut Box Gift Box Holder

Directions:

  • Cut the Donut Box using the Crossover II Die-Cut Machine and the Donut Box Die Set.
  • Cut two scalloped rectangles using the Donut Box Die Set.  I like to run the paper through the Xyron Create-A Sticker Mini to add adhesive to the back of it before die-cutting.  It makes the scalloped rectangle a sticker which makes it so much easier to adhere to the box.
  • Remove the protective coating off of the acetate and adhere to the backside of the box opening.
  • Remove the backing off the “rectangle sticker” and place one on the front of the opening and the second onto the back of the opening.
  • Cut a small piece of acetate slightly larger than the opening on the Donut Box.
  • Gently fold Donut Box on the score lines.  Glue the side tabs together to form the box.

How to Make a Mini Donut Box Gift Card Holder

  • Cut the donuts out of cardstock.
  • Use the light tan Tombow Maker* around the edges of the Donuts to give them a “baked” look.

How to Make a Mini Donut Box Gift Card Holder

  • Place the “sprinkles” paper into the Xyron Create-A-Sticker Mini* design side up.
  • Turn the knob of the machine to run the paper through it.  As it goes through the machine it adds a layer of adhesive to the paper.

How to Make a Mini Donut Box Gift Card Holder

  • Cut the “icing for the donuts” out of the “sprinkles” paper and place it onto the cardstock donuts.
  • Cut a small 2 1/4″ x 3 1/2″ rectangle tray to fit inside the donut box.
  • Add thin 3D foam squares to the back of the donuts and stick them onto the tray.
  • I added two braided loops and taped them under the tray with regular tape.  I cut a second 2 1/4″ x 3 1/2″ piece of decorative scrapbook paper and adhered it under the donut box tray with the thin 3D foam squares.

How to Make a Mini Donut Box Gift Card Holder.

  • Cut a small tag using the tag die that comes with the Donut Box Die Set.
  • Cut two small flowers and two leaves using the Petite Flowers Die Set.  Add pink to the edges of the flowers using the #800 Pink Tombow Marker.
  • Carefully scrunch the flower with your fingers to give the flower shape.
  • Glue the flowers and leaves together onto the tag.

How to Make a Mini Donut Box

The Donuts look good enough to eat.

How to Make a Mini Donut Box Gift Card Holder.

Hide a gift card to your favorite donut shop or money under the donut tray for a sweet little surprise.

A Coffee Gift Card Holder for Mom

a Coffee Card for Mom

How to make a “coffee-themed” gift card holder for Mom for Mother’s Day.

Do you have a Mom who’s a coffee lover?

Make her a cute “coffee-themed” card perfect for adding a gift card to her favorite store

or coffee place.

A Coffee Themed Gift Card Holder for Mom.

Materials Used:     (*affiliate link)


*Disclosure:  This blog uses affiliate links.  If you choose to make a purchase using one of the links, I receive a small commission (at no additional cost to you) that helps offset the costs of maintaining this blog.  Thanks for your support!

A Coffee Themed Card for Mom

Directions:

  • Die-cut the pieces from the Coffee Die Set out of scrapbook paper using the Crossover II Die-Cutting Machine.
  • Assemble the die-cut pieces on a layered card front.
  • For the base of the gift card holder, I cut a piece of cardstock 5 1/4″ x 9 3/4″.  Score lengthwise every 3 1/4″.
  • Adhere a 3″ x 5″ piece of green polka dot paper onto the middle panel.
  • On the third panel, cut down the side approx. 2 1/2″.  Cutaway the remaining section of the panel on a diagonal to create a flap.
  • Adhere the bottom and the short side of the flap to the middle panel to create a pocket.
  • Decorate the pocket with a flower that was “fussy cut” from the floral paper.  Add a small strip to edge the pocket.

Die-Cutting letters using the Crossover II.

Directions Continued:

  • For the letters on the front of the card, I used gold foiled paper.  To make the letters stickers, I ran the gold foiled paper through the Xyron Creative Station*.  As you run the paper through the machine it adds a complete layer of adhesive to the back of the paper.
  • Die-Cut the letters to spell “MOM” using the Alphabet Die Set and the
  • Die-cut the gold foiled paper (with adhesive added to the back) using the alphabet die and the Crossover II Die-Cutting System*.
  • Remove the backing off the back of the letters and stick them onto the front of the card.
  • Tie gold thread around the front of the card and tie it with a knot.

LETTER ALIGNING TIP…If you’re a perfectionist like I am and want to align the letters as straight as possible. Use Gridded Transfer Paper* to help you line up the letters. Place the front of the foiled letters on the adhesive side of the transfer paper, remove the backing off of the foiled paper and transfer the letters onto the front of the card.

A coffee themed card for Mom

Now all you need to do is add a gift card for her favorite store or coffee place along with a sweet note.

Maker's Movement

Disclosure:  This is a sponsored post for the Maker’s Movement.  I have been provided product and compensation in exchange for my creative ideas.  The view and opinions are my own.