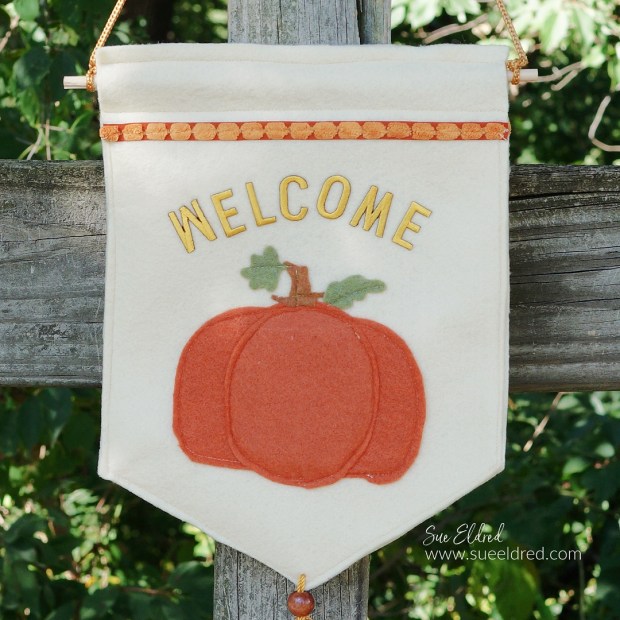
How to make a Felt Pumpkin Banner for Fall.
This past weekend in the middle of my Paper Crafting Fall Home Décor project,
I was inspired to sew up this cute felt pumpkin banner. It didn’t hurt that I already
had the sewing machine out (because I had to mend the dog bed, once again).

Materials Used: (*affiliate links)
- Kunin Felt Square Pumpkin Spice*
- Kunin Felt Square Olive*
- Kunin Felt Square Antique White* (2 pcs.)
- M12654 Pumpkin Die Set
- Crossover II Die-Cutting System*
- Sewing Machine*
- Gold Iron On Letters*
- Iron and Ironing Board
- 1/4″ Wood Dowel Rod*
- Decorative Trims
- Small Wood Bead
- Beacon Fabri-Tac Adhesive*

*Disclosure: This blog uses ads and affiliate links. If you choose to make a purchase using one of the links, I receive a small commission (at no additional cost to you) that helps offset the costs of maintaining this blog. Thanks for your support!

I used the Pumpkin Die from The Maker’s Movement to cut out the felt pieces.
The pumpkin die is used for cutting paper and not necessarily to cut fabric and felt.
While the die does not always cut through the felt, it did leave deep impressions.
I used the deep impressions as my guide to cut out the remainder of the shape.
(not recommended on smaller detailed pieces.)
Directions:
- I used a pre-cut 9″ x 12″ Antique White Felt for the base of the banner.
- On the bottom of the Felt, make a small mark at 4 1/2″ the center. Measure and mark on both sides, starting from the bottom, at 3″. Draw light lines from the 3″ mark to the center mark. Cut along the lines to create the bottom point of the banner.
- Die-cut pumpkin pieces.
- Place the pumpkin pieces and the letters on the banner to decide on the correct placement. (make sure to allow space up on top for the trim and the rod pocket)
- Remove letters and set them aside.
- Sew around pieces of the pumpkin using a sewing machine. (if you’re good at hand stitching, that would be even better)
- Place iron-on embroidered letters onto the banner, cover with a thin cloth, and iron according to directions on the packaging.
- Sew a piece of decorative trim near the top of the banner.
- Cut a second piece of Antique White Felt the same size as the first.
- Sew the top closed, leave a small 1/4″ border. Create a small rod pocket by sewing another seam at approx. 1 1/4″.
- Sew around the remainder of the banner.
- Create a small tassel using a wood bead and thin braided decorative trim. Poke a small hole on the point of the banner and tie the tassel. Because my Trim had a slick surface, I added a tiny bit of Fabri-Tac Adhesive* under the bead and at the knot that ties my tassel.