
Cantilever Jewelry Box
Last month, Sizzix reintroduced a few older “classic” dies,
including the Cantilever Box Die*.
I promised I’d make one, and I finally made a Cantilever box
using the Cantilever Die by Eileen Hull*.
Instead of making a sewing box, I made mine into a jewelry box.

*Disclosure: This blog uses ads and affiliate links. If you choose to make a purchase using one of the links, I receive a small commission (at no additional cost to you) that helps offset the costs of maintaining this blog. Thanks for your support!

Putting it all together…
- Included on the back of the die-cut packaging are image directions on how to assemble the box.
- Cut out the pieces as show in the picture above.
- I used three sheets of the Sizzix Making Essentials Matboard* to die-cut all the pieces used to make the Cantilever Jewelry Box.
Materials Used: (*affiliate links)
- Sizzix Cantilever Box Die*
- Sizzix Making Essentials Matboard*
- Sizzix Big Shot Die Cutting Machine*
- Black Multi-Surface Acrylic Paint*
- Grey Plaid Scrapbook Paper (single-sided)
- Xyron 3″ Disposable Sticker Maker*

- I painted all my die-cut pieces with Black Multi-Surface Acrylic Paint*. I did that before gluing.
- The instructions on the box showed using a hot glue gun to assemble the boxes. Eileen told me she uses Zip Dry Adhesive* and rubber bands to assemble the boxes. I wasn’t a big fan of using the hot glue gun and will definitely try the Zip Dry Adhesive* the next time.

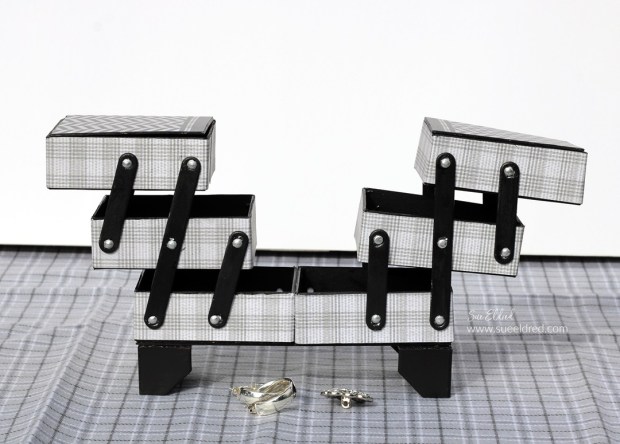
- I cut 1″ strips of a single-sided grey plaid paper and ran them through the Xyron 3″ Disposable Sticker Maker* to add adhesive to the back of the strips.
- I carefully added the strips around the edges of each box. Since the paper I used was single-sided, it was easy to cover the boxes.
- Once all the boxes were assembled, putting the cantilever box together wasn’t too hard.
- For added stability, I glued the bottom two boxes together. I also added a 2″ x 6″ piece of black painted matboard to the bottom before adding the feet.
![]()
Disclosure: This is a sponsored post. As a member of the Eileen Hull Educator Team, I have been provided product in exchange for my creative ideas. The view and opinions are my own.
