Pot of Gold Party Favors

Pot of Gold Party Favors

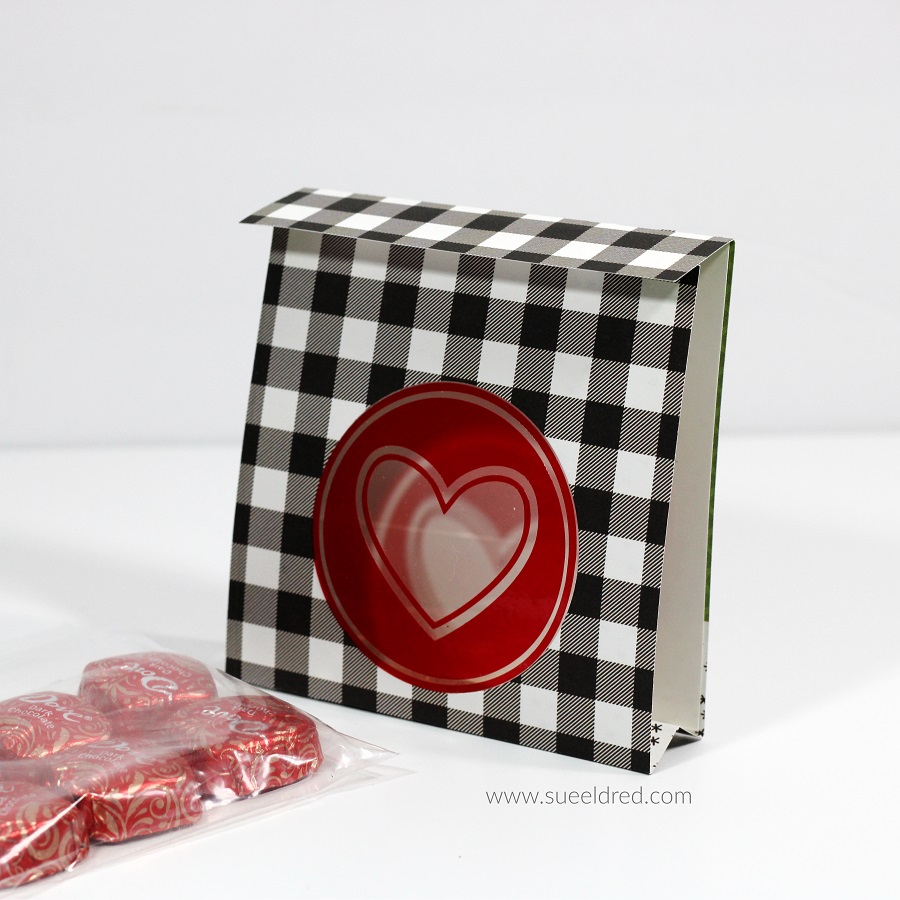
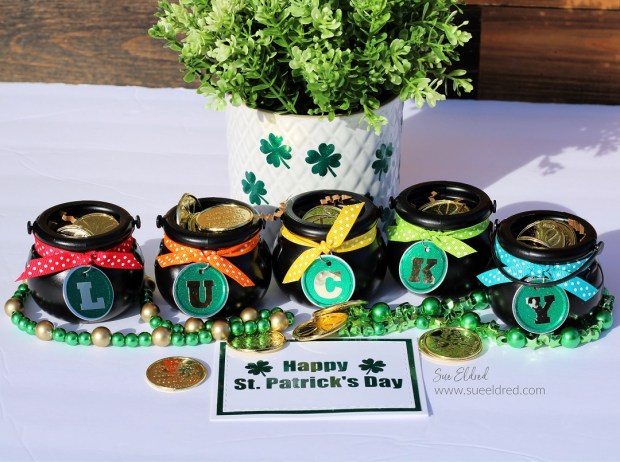
Celebrate St. Patrick’s Day with these cute pots of gold party favors.

A quick and simple little party favor for your guests.

Fill with all kinds of goodies and chocolate coins.

Gwen Studios Logo

Disclosure:  This is a sponsored post for Gwen Studios.  I have been provided product in exchange for my creative ideas.  The views and opinions are my own.

Pot of Gold Party Favors

Materials Used:

I found the little Black Cauldrons* at Dollar Tree with their St. Patrick’s Day display.  I knew they would look cute as little pots of gold under rainbows of ribbon.  (And don’t forget to get a few extra to save for next Halloween.)

*Disclosure:  This blog uses ads and affiliate links.  If you choose to make a purchase using one of the links, I receive a small commission (at no additional cost to you) that helps offset the costs of maintaining this blog.  Thanks for your support!

Pot of Gold Party Favors

To personalize the Pots of Gold…

Solid and Polka Dot Grosgrain Ribbon Pack, 24 Bright Colors, 3/8" x 48 Yards by Gwen Studios

If you love ribbon, you can find the variety pack of Polka Dot Grosgrain Ribbon Pack by Gwen Studios* at Walmart or Walmart.com.

Crafty IKEA Cabinet Makeover

Crafty IKEA Cabinet Makeover

Give a basic IKEA storage cabinet a little personality with a crafty makeover.

I’m a little bit of a neat freak.  I geek out when I find a good storage piece.

I found this IKEA Moppe Mini Storage Chest* on a recent IKEA trek.

The mini cabinet was the perfect solution to replace an old decrepit plastic one.

“This is a sponsored post.  As a member of the StyleTechCraft Design Team I have been provided product and compensation in exchange for my creative ideas.  The views and opinions are my own.

Crafty IKEA Cabinet Makeover

If you don’t have an IKEA store close, you can get the IKEA Moppe Cabinet*

on Amazon for a bit more.

The IKEA MOPPE mini chest with drawers is a true classic with its many drawers

and timeless style.  It’s made of untreated wood that you can paint and

decorate as you like, over and over again.

Crafty IKEA Cabinet Makeover

Here’s what I used Used:   (*affiliate links)

*Disclosure:  This blog uses ads and affiliate links.  If you choose to make a purchase using one of the links, I receive a small commission (at no additional cost to you) that helps offset the costs of maintaining this blog.  Thanks for your support!

Crafty IKEA Cabinet Makeover

Directions:

  • Lightly sand the surface of the cabinet with a Sanding Block* to smooth away any rough spots.
  • Paint the cabinet and drawers with Classic Black Deco Art Americana Decor® Satin Enamels*.
  • You may need to give it a second coat. (I didn’t paint the inside of the cabinet or drawers.)
  • Lightly sand over the paint to smooth the grain of the cabinet.
  • Wipe the cabinet with a clean, soft rag to remove any dust.

Crafty IKEA Cabinet Makeover

Crafty IKEA Cabinet Makeover

Crafty IKEA Cabinet Makeover

  • I used Red Gingham Paper* to cover the front of my cabinet. The red gingham matches the decor in my craft room and is a simple pattern to match. (This is important if you want to line up your design.)
  • Brush a coat of Mod Podge Satin Decoupage Glue* over the drawer front. Make sure to get the Mod Podge to the edges of the drawer.
  • Lay the paper onto the drawer and smooth. Allow the Mod Podge to dry.

Crafty IKEA Cabinet Makeover

  • Place the drawer onto a cutting mat and cut away the excess paper using a craft knife.

Crafty IKEA Cabinet Makeover

  • Sand away any rough-cut edges using a sanding block on the edge of the drawers.

Crafty IKEA Cabinet Makeover

  • A small nail file is great for getting into small to reach places.

Crafty IKEA Cabinet Makeover

Place the labels onto the drawer fronts and fill them with all your goodies.

Crafty IKEA Cabinet Makeover

Don’t judge me for my weird categories.

Crafters have a lot of random stuff to store, and this cabinet holds a lot of stuff.

Crafty IKEA Cabinet Makeover

You could use wallpaper, stencils, metal hardware to customize this into the perfect organized cabinet. 

Don’t Miss a Thing…Make Sure to Follow me

Vintage School Desk Make-Over Before and After-Sue's Creative Workshop


Eileen Hull & Sizzix New Dies

Chapter 1 Eileen Hull Sizzix Release

It’s that time of year when Sizzix releases its new designs.

And being part of the Eileen Hull Teams, I wanted to share a few projects

that I made with Eileen’s New Dies.

Watercolor Floral Postal Collage Card

The “Watercolor Floral Postal Card” is made using the Snail Mail Thinlets Die Set*.

*Disclosure:  This blog uses ads and affiliate links.  If you choose to make a purchase using one of the links, I receive a small commission (at no additional cost to you) that helps offset the costs of maintaining this blog.  Thanks for your support!

Watercolor Floral Postal Collage Card

The snail mail die* is a faux postage stamp pane that fits on the front of an A-2 card.

It’s easy to create postage stamps by tearing them apart with a ruler

and the perforation marks.

Mae's Treasure Box made using Eileen Hull Sizzix XL Scoreboard Book Box Die

My favorite project hands-down is this sweet little treasure box

that I made for my new granddaughter that is coming in May.

I’m very excited to have a little more “pink” in my life.

I will be sharing more on how I put this box together later in the month.

It uses the New Eileen Hull XL Score-Board Book Box*.

This die is very versatile because you use it to create a book or a box.

Eileen Hull Sizzix Phone Stand

The New Phone Stand Die* is a quick and easy project to put together.

So easy to personalize with your favorite patterned paper.

And it looks good sitting on my desk.

These phone stands would make a fun gift.

Eileen Hull Sizzix 2022 Chapter One Release Party

Check out the Designers Links below for even more ideas. 

There’s a giveaway too! If you leave a comment for each of the designers in the Release Party Hop, or during the Facebook Live or YouTube video, you will be eligible to win one of the newly released products! Tell us what your favorite new product is and what you plan to do with it! Thanks for hopping with us

Sue Eldred (you are here!)


Prissy Pink Princess Wreath

Prissy Pink Princess Ribbon Wreath

How to make a Prissy Pink Princess Ribbon Wreath.

I decided to stray from my typical “clean and simple” style to go super feminine

with this Prissy Pink Princess Ribbon Wreath.

The wreath could also double as a princess crown.  (If you’re into that kind of thing.)

Ribbon Wreath 327

Usually, when I start a project, I have an idea of how I want it to turn out.

This project, however, turned out completely different than my original plan.

I started with a basket of pink, white and red ribbons in various widths and styles.

I wanted to make a simple ribbon wreath and tie cut strips of ribbon to a wreath form.

I wasn’t happy with it, so I scratched that idea. (it’s a good idea to be flexible)

Prissy Pink Princess Ribbon Wreath

Here’s what I did instead:

  • Being resourceful, I used a 5 ½” lid from an extra-large Nesquik can for the base.
  • Using the inside ridge as my guide, I cut away the inside.

Prissy Pink Princess Ribbon Wreath

  • Because when I started this project, I was going to do something different, I spray painted the rim of the lid white.
  • It’s still probably a good idea to do, depending on what kind of wreath you intend on making. (Unless you like the color blue.)

Prissy Pink Princess Ribbon Wreath

  • Wrap and cover the rim of the lid with a 7/8″ White Grosgrain Ribbon*. To give the ribbon wreath a little more softness and size, I added a little bit of poly-fil under the ribbon while wrapping. Use a Hot Glue Gun* to glue the ribbon to keep the ribbon from moving. It took approximately two yards of ribbon to go around the edge of the lid.
  • Wrap additional pink sheer ribbon around the white grosgrain ribbon.

*Disclosure:  This blog uses ads and affiliate links.  If you choose to make a purchase using one of the links, I receive a small commission (at no additional cost to you) that helps offset the costs of maintaining this blog.  Thanks for your support!

Prissy Pink Princess Ribbon Wreath

Make ribbon rosettes flowers to go around the wreath in different sizes.

Prissy Pink Princess Ribbon Wreath

  • Gather the ends of the thread together and tie in a knot. Trim the ends. I use a heavy-duty sewing thread for the rosettes. It doesn’t break when I tighten them.
  • Hot glue a fancy rhinestone button in the center of the rosette.
  • Glue flower onto the wreath.
  • To make smaller rosette flowers, use 6″ strips of 3/8″ satin or grosgrain ribbon. Create a “running stitch” like used in the larger rosette and tighten.
  • Glue a small pearl bead in the center of the rosettes.
  • Glue smaller rosettes around the larger rosette.
  • Create small leaves by folding and scrunching green ribbon. Glue under the rosette flowers.
  • Create strings of pretty beads anchored with additional flower rosettes to hang in the middle of the wreath.
  • Cut a larger piece of ribbon for hanging the Prissy Pink Princess Ribbon Wreath.
  • Create a ribbon bow for the top of the wreath. Glue a fancy rhinestone button onto the bow and glue it into place.

Gwen Studios Logo

Disclosure:  This is a sponsored post for Gwen Studios.  I have been provided product in exchange for my creative ideas.  The views and opinions are my own. 

Materials Used:     (*affiliate links)

Easy Valentine Treat Pouch

Easy Valentine Treat Pouch

A simple little project to make for Valentine’s Day.

The Valentine Treat Pouch would make a cute gift for teachers and friends

or anyone you want to share a little love and kindness with.

Easy Valentine Treat Pouch

Materials Used:          (*Affiliate Links)

*Disclosure:  This blog uses ads and affiliate links.  If you choose to make a purchase using one of the links, I receive a small commission (at no additional cost to you) that helps offset the costs of maintaining this blog.  Thanks for your support!

Easy Valentine Treat Pouch

Directions:

  • Cut a piece of scrapbook paper (or cardstock) 4″ x 10″.
  • Using a Scoring Board and Scoring Tool*, score the paper at 4″, 4 ½”, 5″, and 9″.  (The lines on the above sample are just for reference.)

Easy Valentine Treat Pouch

  • Fold the paper along the score lines.  Create a “valley” fold at the 4 ½” and 5″ mark.  Fold the 1″ section over to create a flap.
  • If you don’t want to see the paper pattern on the inside, you can adhere a 4″ x 4″ piece of white paper on the inside.

Easy Valentine Treat Pouch

  • Cut a 2 ½” circle on the first 4″ section.  (Make sure to leave room for the 1″ flap.)
  • Cut a 3″ x 3″ piece of clear acetate.  Remove the protective coating from the acetate and adhere to the inside of the pouch under the circle.

Easy Valentine Treat Pouch

  • Instead of using stickers on the front of the acetate, I cut a Valentine Heart and Circle Design using a Silhouette Cameo and StyleTechCraft Red Transparent Vinyl*.  I sized the design to fit inside the 2 ½” circle.
  • After removing the excess vinyl from the design, use transfer paper to adhere to the acetate.

“This is a sponsored post.  As a member of the StyleTechCraft Design Team I have been provided product and compensation in exchange for my creative ideas.  The views and opinions are my own.

Easy Valentine Treat Pouch

  • Fill a clear bag with treats and place it inside the treat pouch.
  • Punch two holes through the front and back of the pouch and bag.
  • Insert ribbon through holes and tie.

You can easily adapt the measurements to create a larger or smaller treat pouch.

Top 3 Favorite Paper Crafting Projects of 2021

2021 Top 3 Paper Crafting Projects-Sue's Creative Workshop www.sueeldred.com

My Top 3 Sizzix/Eileen Hull Paper Crafting Projects.

As part of the Eileen Hull Educator Team, I post projects every month using her dies.  

This month Eileen asked us to pick our three favorite projects for 2021.  

These three projects are my top three favorites.  

Click on the pictures or links below ↓ to go to the original post with all the details.

Winter Fun Folio Album

The Winter Fun Folio Album was made with the Eileen Hull Folio Journal Die from Sizzix*.

If you like an album with a lot of options, then the Folio Journal Die is for you.  

You can see the full project details here.

*Disclosure:  This blog uses ads and affiliate links.  If you choose to make a purchase using one of the links, I receive a small commission (at no additional cost to you) that helps offset the costs of maintaining this blog.  Thanks for your support!

The Sweet Life Tiny Book

Good Things Come in Small Packages.

The “Sweet Life Tiny Book” was made with the Eileen Hull/Sizzix Tiny Book Die*

and Hershey Peanut Butter Cup Wrappers.  You can see the full project details here.

Simple Vintage Fall Memories Scrapbook Album

The “Simple Vintage Fall Memories Album” was made with

the New Full-Sized Journal Die* from Eileen Hull and Sizzix. 

This was probably my most favorite one.  I love this die because of its impressive size. 

The finished album measures 6 1/4″ x 8 3/4″.  

You’ll need to have a Sizzix Big Shot Plus*or Sizzix Big Shot Pro* to cut this.

You can read all the project details here.

Making a Christmas Putz House

Making a Christmas Putz House

Christmas Putz houses are little cardboard or paper houses.

Sometimes illuminated, they are usually decorated with mica flakes

and glitter to make festive Holiday Villages.

Making a Christmas Putz House
Last year, the Eileen Hull Teams got together to bring everyone a little

Comfort and Joy during a rough Christmas Season.

Everyone seemed to enjoy it, so we decided to do it again.

My Christmas Putz House, made with Eileen’s House Ornament Die*,

is my contribution to this year’s “Comfort and Joy” collaboration.

*Disclosure:  This blog uses ads and affiliate links.  If you choose to make a purchase using one of the links, I receive a small commission (at no additional cost to you) that helps offset the costs of maintaining this blog.  Thanks for your support!

Making a Christmas Putz House

Materials Used:  (*affiliate link)

Making a Christmas Putz House

Directions:

  • Cut two 6″ x 8″ pieces of Christmas Scrapbook.
  • Run both pieces of paper design side up through the Xyron Creative Station®*. As the paper moves through, it adds adhesive to the underneath side. You get complete adhesive covering.
  • Cut two pieces of Sizzix Matboard* 6″ x 8″.
  • Adhere the Christmas Scrapbook paper onto each one of the mat boards. (Underneath will be plain)
  • Lay covered mat board on top of the House Ornament Die*. Sandwich the die and mat board between the cutting plates. Run the die, matboard, and cutting plate through the Big Shot Die-Cutting Machine*. The Big Shot will cut out the house shape and two tiny houses you can use on a later project.
  • Cut two of the house shapes.
  • Carefully fold on the scored lines.
  • Cut off the top tab with the two holes on both houses. (It is for making the house into an ornament.)
  • You will also need to cut the bottom flap from one of the houses.
  • Use Rapid Fuse Adhesive* to assemble the house. Glue all sides of the house together before gluing the roof tabs.  

Making a Christmas Putz House

  • For the Roof: Cut a piece of Kraft Corrugated paper 2 1/4″ x 4″. Fold in half and glue to the top of the roof.
  • Place two small pieces of white mat board over the window section of the ornament house die and run through the big shot die cutting machine. Trim around the matboard to create two small windows. Cut two small pieces of gold paper or vellum to fit under the window frame and glue them into place. Glue the windows frames onto the house.  
  • Cut a tiny piece of mat board to use as a door.  Glue a small piece of corrugated paper over the door for the roof.
  • Use a 3″ x 4″ piece of mat board as the base for the house. Cover the mat board with scrapbook paper.
  • Glue the putz house, bottle brush tree, and mini snowman ornament to the base.
  • Decorate your Christmas Putz House with small wreaths, snowflakes, glitter and mica flakes.

DIY Rainbow Ribbon Pillow

Rainbow Ribbon Pillow-Sue's Creative Workshop www.sueeldred.com 9617

How to make a Rainbow Ribbon Pillow.

If you have a little girl in your life,  

this bright and colorful Rainbow Ribbon Pillow is sure to make her smile.

DIY Rainbow Ribbon Pillow

Materials Used:    (*affiliate link)

*Disclosure:  This blog uses ads and affiliate links.  If you choose to make a purchase using one of the links, I receive a small commission (at no additional cost to you) that helps offset the costs of maintaining this blog.  Thanks for your support!

DIY Rainbow Ribbon Pillow

Directions:

  • Cut several 4″ strips of ribbon in a variety of rainbow colors.  
  • Lightly glue the ends of the ribbon together to form a loop.

DIY Rainbow Ribbon Pillow

  • Cut a 7″ x 7″ piece of white felt.  Glue the ribbon loops around the four edges of the felt.  

Rainbow Ribbon Pillow-Sue's Creative Workshop www.sueeldred.com 9634

  • Hand cut a sun, raindrops, and the word “SMILE” out of Kunin Classic Felt.
  • Cut another piece of white felt 6 1/2″ x 6 1/2″.  Stitch the felt cut-outs onto the white felt square.
  • Iron on the Rainbow Applique onto the middle of the felt square.
  • Cut a 7″ x 7″ piece of blue felt.  Center the decorated white square onto the blue felt and pin it into place.  Sew around the white felt using a sewing machine.  (This is the pillow front.)
  • Lay the “pillow front” onto the white felt square with ribbon loops.  Sew around the edge of the felt.  Leave a small gap for adding poly-fil*.  After stuffing, finish sewing the edge of the pillow to close.

Gwen Studios Logo

Disclosure:  This is a sponsored post for Gwen Studios.  I have been provided product in exchange for my creative ideas.  The views and opinions are my own. 

How to make a Holiday Door Hanger

How to make a Holiday Door Hanger

Welcome your guests this Winter Season with a Snowflake Door Hanger

that you can leave up until Spring.

How to make a Holiday Door Hanger

The White Snowflake Welcome Door Hanger measures 10″ and is happy hanging as a

Holiday Welcome on your front door or just hanging out on the wall.

Add it to the center of a wreath for even more pizazz.

How to make a Holiday Door Hanger

Materials Used:      (*affiliate link)

*Disclosure:  This blog uses ads and affiliate links.  If you choose to make a purchase using one of the links, I receive a small commission (at no additional cost to you) that helps offset the costs of maintaining this blog.  Thanks for your support!

How to make a Holiday Door Hanger

Directions:

  • Cut the Welcome Snowflake out of StyleTechCraft White Ultra Metallic Vinyl* using the Welcome Snowflake SVG file and a Silhouette Cameo Electronic Die Cutting Machine*.
  • Remove the excess vinyl from in and around the snowflake and cut letters.
  • Paint the 10” Unfinished Wood Circle* with one or two coats of black acrylic paint.
  • Lightly sand over the painted area with a Sanding Block* to smooth the grain.
  • Drill a small hole in the top of the wood circle for hanging.
  • Trim the paper around the vinyl snowflake and lay it onto the wood circle to determine the placement of the red stripe. Line the tip of the snowflake with the top hole.
  • Place a pencil mark on each side of the first double line. Draw a line between the two pencil marks.  Measure two inches down from the first pencil marks and draw a second line.
  • Place Removable Painters Tape* above and below the pencil lines.
  • Paint the area within the two-inch strip with red acrylic paint.
  • Lightly sand over the red paint to smooth.

How to make a Holiday Door Hanger

  • Cut a 10” x 10” piece of gridded vinyl transfer paper*. Remove the backing from the transfer paper and place it over the vinyl snowflake welcome.  Rub over the transfer paper* with a vinyl scraper tool to make sure that the vinyl has transferred.  (You can use a bone folder or credit card to rub over it if necessary.)  Remove transfer paper.
  • Add the piece of natural twine through the top hole for hanging.

How to make a Holiday Door Hanger

  • To make the bow, you’ll need approximately 24” of ribbon.
  • Fold the ribbon in thirds.

How to make a Holiday Door Hanger

  • Gather and wrap red twine around the center of the ribbon a couple of times and tie tightly. Add jingle bell to the twine and tie again.
  • Using a hot glue gun, glue the bow to the top of the wood sign, glue greenery under the bow.

Red Snowflake Welcome 10" Wood Door Hanger

The Red Snowflake Welcome is another example of what you can make.

I used a walnut stain on the wood base and a dark red metallic snowflake for a completely different look.

“This is a sponsored post.  As a member of the StyleTechCraft Design Team I have been provided product and compensation in exchange for my creative ideas.  The views and opinions are my own.

Warm & Cozy Snowflake Christmas Card

Warm & Cozy Snowflake Card-Sue's Creative Workshop www.sueeldred.com 6066

How to make a Warm & Cozy Snowflake Christmas Card 

using the Sweater Embossing Folder* from Sizzix* and Eileen Hull.

I have a “thing” for cable-knit sweaters. (just ask my family)

So it comes as no surprise how much I love this new embossing folder.

It’s perfect for creating quick and easy cards.

Sizzix Eileen Hull 3D Sweater Embossing Folder       Sizzix Big Shot

Materials Used:

*Disclosure:  This blog uses ads and affiliate links.  If you choose to make a purchase using one of the links, I receive a small commission (at no additional cost to you) that helps offset the costs of maintaining this blog.  Thanks for your support!

Warm & Cozy Embossed Sweater Card

Directions:

  • To create the embossed sweater layer, place a 3 3/4″ x 5″ piece of cream cardstock into the Sweater Embossing Folder*.  Place the embossing folder onto the Sizzix Big Shot* platform.   Crank the handle of the Big Shot* to run the embossing folder through the machine.
  • Adhere the embossed layer onto the blueberry cardstock layer. Adhere those layers onto a 4 1/4″ x 5 1/2″ cream cardstock base.
  • Add adhesive to the back of the wood snowflake and adhere to the front of the card. Add the adhesive pearl to the center of the snowflake.
  • Tie a small bow and glue it onto the top of the snowflake.
  • Using a computer generated font, print the words “warm & cozy” onto a piece of cream cardstock.  Cut the cardstock into a strip with a v notch on each end. Place thin foam mounting squares under the cardstock strip and add to the front of the card under the wood snowflake.

FYI…This is a thick card.  You will need extra postage to mail it.  (It might be best to hand deliver.)