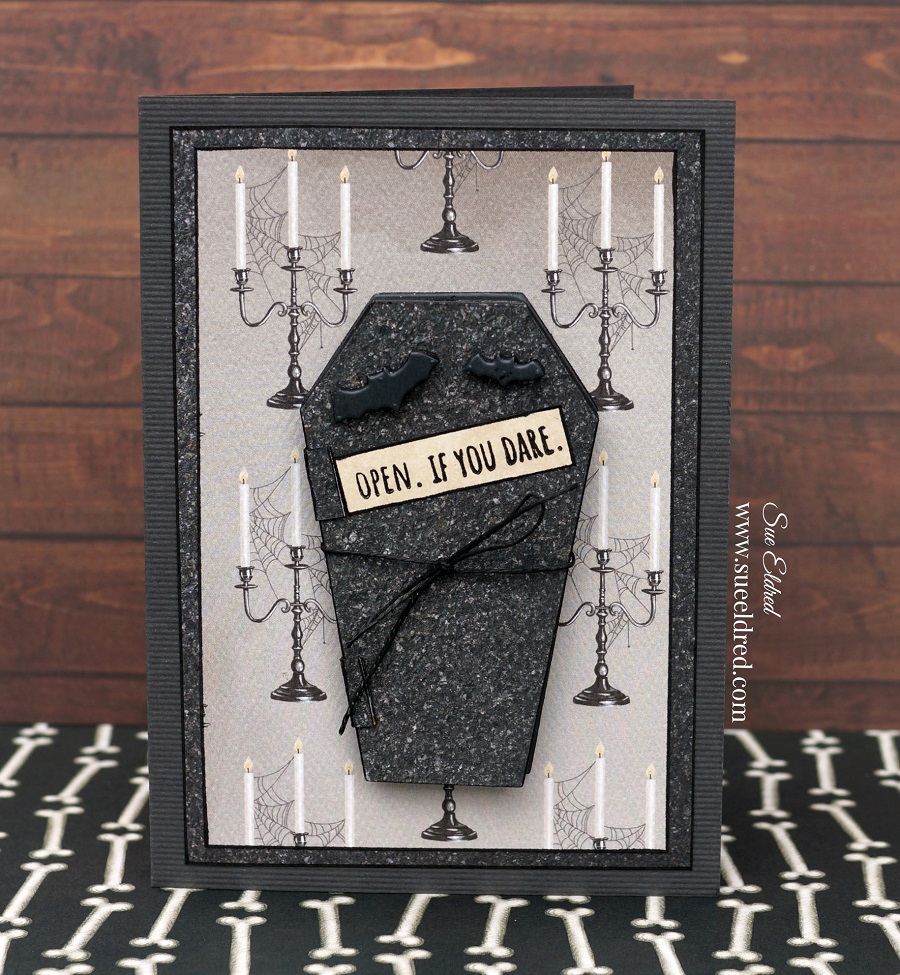
Spooky Scary Halloween Card

Open if You Dare!

Here’s a spooky card for all you Halloween Lovers.

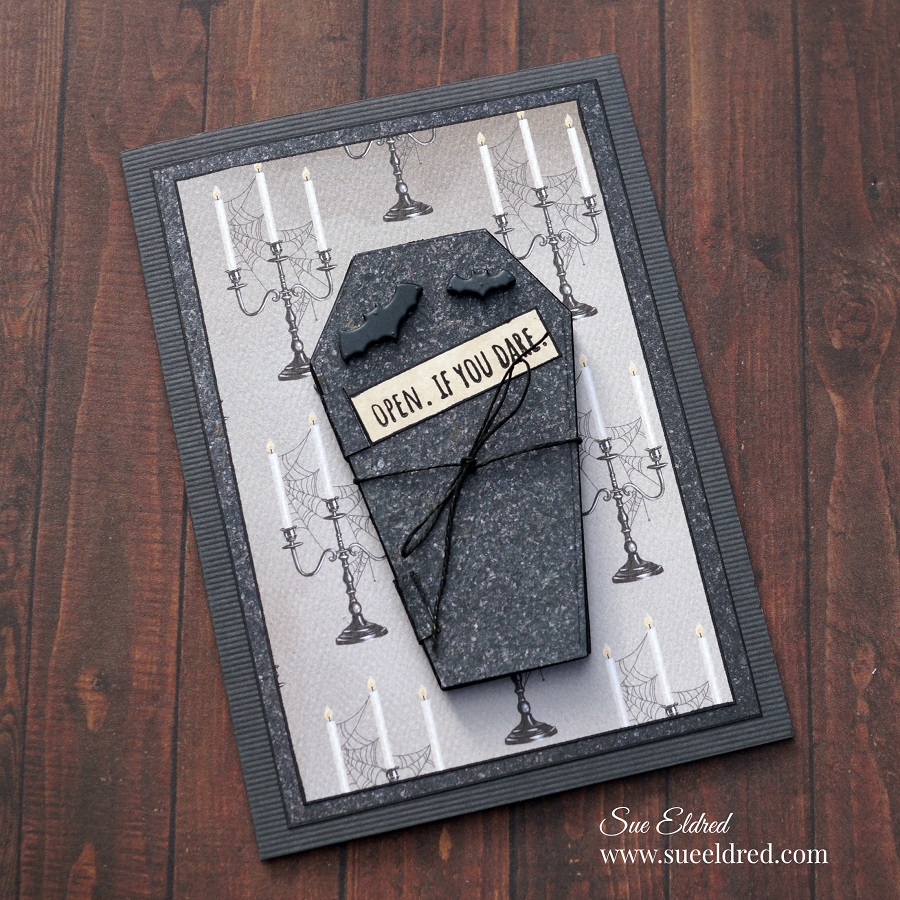
If you love a card with dimension, this card has a lot of spooky goodness.

The Spooky Scary Halloween Card was made using the “Spooky Scary” stamp and die set* from

The Maker’s Movement.

Disclosure:  This is a sponsored post.  I have been provided product and compensation in exchange for my creative ideas.  The view and opinions are my own.

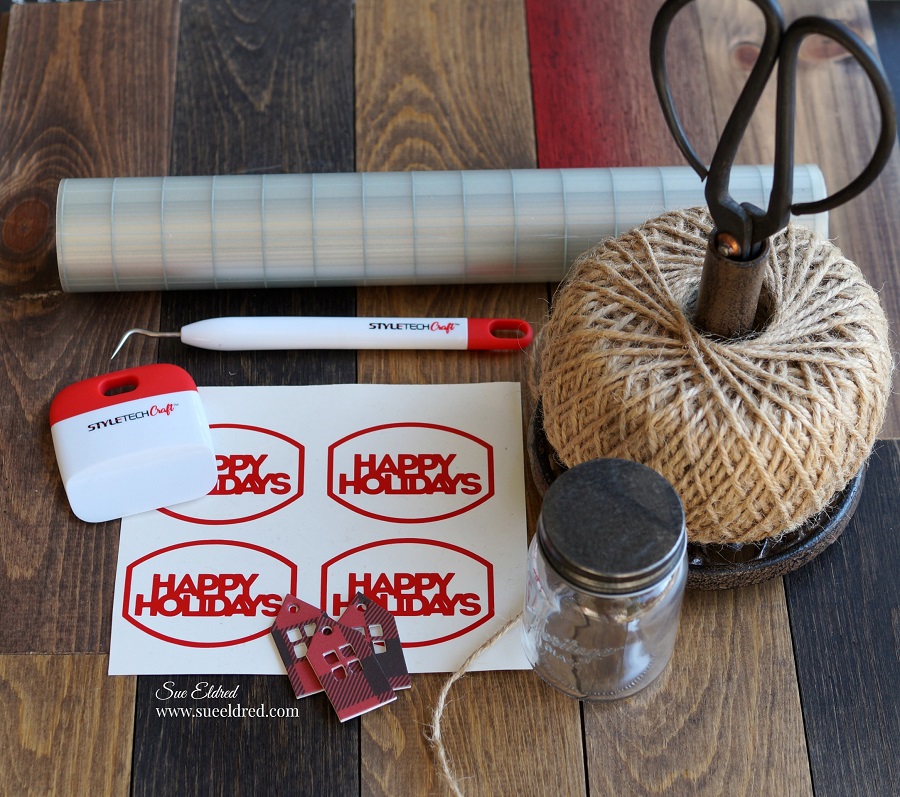
Materials Used:            (*affiliate link)

*Disclosure:  This blog uses affiliate links.  If you choose to make a purchase using one of the links, I receive a small commission (at no additional cost to you) that helps offset the costs of maintaining this blog.  Thanks for your support!

My process for making cards sometimes changes as I sit down to create.  I was getting into this

one and decided to forgo all the step-by-step pictures.  Instead, I will give you lots of details.

Here’s one tip I highly suggest.  (Especially with the skeleton die.)

Run the white cardstock through the Xyron Create-A-Sticker Machine* before cutting out the

skeleton die.  The Xyron Create-A-Sticker Machine* puts adhesive on the back of the

cardstock, making the skeleton pieces stickers.  By making stickers, adhering the skeleton

to the coffin was so much easier than using liquid glue.

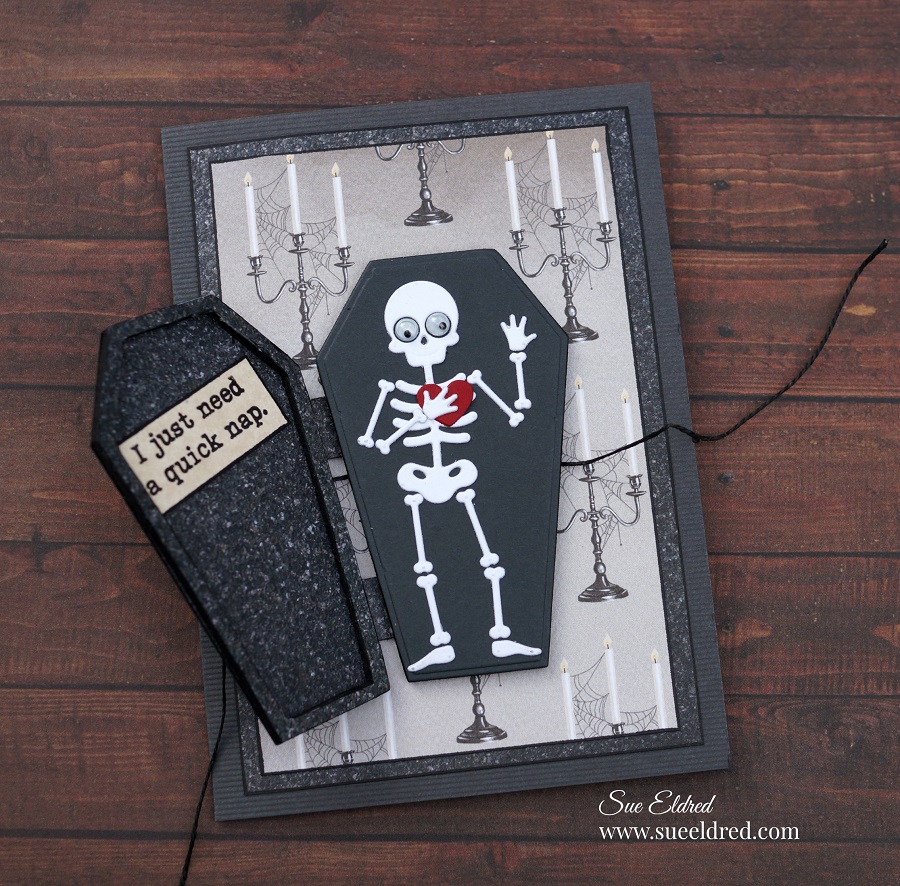
  • I cut a piece of double-sided adhesive foam large enough to cut the casket shape.  I adhered a piece of gray cardstock to one side of the foam before die-cutting.
  • To cut the casket shape.  Place the casket die on the foam and run it through the Crossover II Die-Cutting Machine.  Because the foam is so thick, you may want to run it back and forth a couple of times to make sure the die cuts entirely through the foam.
  • Another good tip…Use a black chisel tip paint marker* to color the sides of the craft foam.

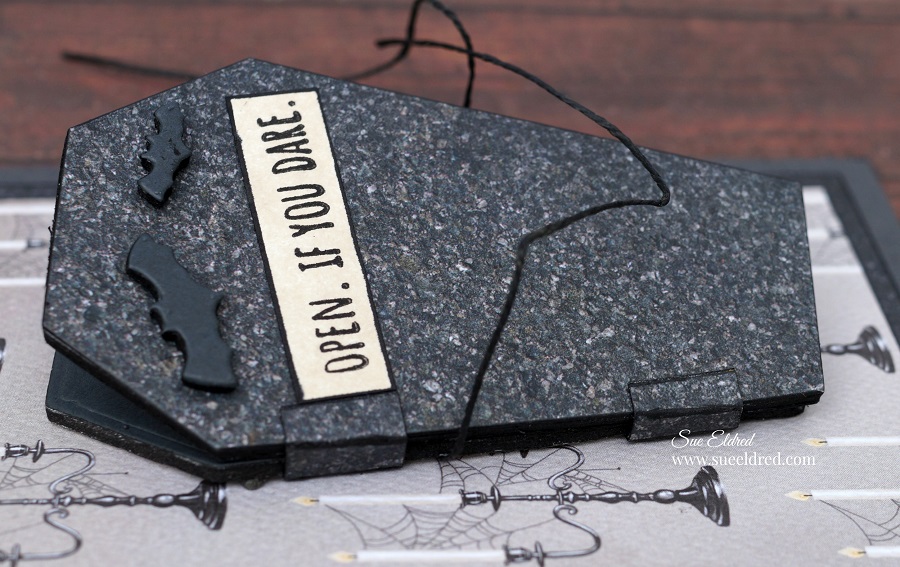
  • The lid of the casket was made by sticking two pieces of black patterned scrapbook paper together and die-cutting the scrapbook paper with the casket die. (I used the Xyron Sticker Maker)
  • Adhere a piece of scrapbook paper onto a piece of adhesive foam.
  • Using the casket outline die, cut a casket outline from the foam. Stick the casket outline on the inside of the lid.
  • Fold two small pieces of paper to use as the hinges. Glue only the top and bottom of the hinges. Not on the side of the casket.

  • Before sticking the casket onto the layered card base, attach a thin black string onto the back of the casket.
  • If you don’t have black string, put a little black paint between your thumb and index finger and run the string through the paint.  Voila, black string.
  • Tie string around the casket to keep the lid closed.

Save

Save

Crafting Beach Vibes

A few fun projects using the Beach Vibes stamp and die sets from The Maker’s Movement.

(If I can’t get to the beach, I might as well bring the beach to me.)

I am really loving the Beach Vibes Stamp and Die Set.  So many cute images to use.

*FTC Disclosure… “This is a sponsored post for The Maker’s Movement.  I have been provided product and compensation in exchange for my creative ideas.  The views and opinions are my own.”

Before I ever start creating my projects…

I stamp the images onto watercolor paper* and practice coloring.

It’s a great way to decide the best marker color to use.

Using watercolor paper* makes it easy to blend the markers.

Tip…I start with the darker colored marker and finish coloring the image with a complimentary lighter-colored marker, blending the colors as I go.

FIY…I have my markers stored in the Expandable Marker Accordion* from Deflecto.

Beach Vibes Frame

Using the Crossover II Die Cutting Machine*, I was able to easily line up the coordinating die

to the colored image to cut out.  I added a few extra dots to my colored image before mounting

the Sandcastle to the corner of the frame.

Tip…I used blue painters’ tape and masked part of the “beach vibes” stamp and stamped the words one at a time.

Life is Better in the Sun…

I may complain a little bit when it gets super humid, but I would trade the snow and cold for a warm summer day anytime.

Tip…The background on this card is super simple to create.  Using an ink blending tool and several colors of dye ink, rub the ink onto the watercolor paper.  Spray the paper with water and dry the paper with a hairdryer.  (Easy Peasy)

The Sandcastle stamp also makes a perfect Ice Castle for a cute little princess. 

  • I stamped the Sandcastle on watercolor paper*.  I had fun coloring the castle in purples and blues and blending the colors.
  • I added a thin layer of white liquid applique* to the castle to look like snow. I let the liquid applique dry before heating it with a Heat Tool* to raise it.
  • To make the castle extra frosty, I painted the castle with Clear Glitter Glue*.
  • I framed the Ice Castle with a white scallop frame cut from the MOD287 Nested Square Frame Set.  (It makes a perfect little gift tag.)

*Disclosure:  This blog uses ads and affiliate links.  If you choose to make a purchase using one of the links, I receive a small commission (at no additional cost to you) that helps offset the costs of maintaining this blog.  Thanks for your support!

Christmas in July with Eileen Hull’s Dies

Christmas in July with Eileen Hulls New Release Snowman and Mitten Dies.

I wanted to share with you a couple of fun Wintery projects using the NEW dies that are

now available from Eileen Hull and Sizzix*.

The Gingham Mitten Gift Box uses the #664510 Mitten Box Die by Eileen Hull

It cuts out all the pieces you need to make a super cute gift box that you can fill with treats.

A few tips…

  • Adhere the gingham paper to Sizzix, Little Sizzles White Mat Board* using your favorite adhesive before cutting out the mitten die.  I like to use the Xyron Creative Station* to adhere the paper to the mat board so I get complete adhesive covering.
  • Paint the inside and sides of the box with red acrylic paint.
  • Glue lace onto the front of the gingham mitten before assembling the box.  I like to use a super-fast grab adhesive like DAP Rapid Fuse Adhesive*to glue my pieces together.

The second project is a Snowman Note Card Holder.

I used the #664511 Snowman Box Die by Eileen Hull and adapted it a bit. 

  • When I saw the scored piece that is supposed to be used to create the box, I saw a fence.  So, of course, I had to make a Snowman decorating a fence.
  • I glued two of the box parts together to make the fence.  I created a platform out of extra pieces of Little Sizzles Mat Board* for a place for the fence to stand.

The Snowman Box Die cuts all the pieces to makes these two adorable Snowman Boxes. 

Extra Snowman Supplies                 (*affiliate links)

*Disclosure:  This blog uses ads and affiliate links.  If you choose to make a purchase using one of the links, I receive a small commission (at no additional cost to you) that helps offset the costs of maintaining this blog.  Thanks for your support!

There’s a lot of dimension that was added to my Snowman.

  • I painted the fence and snowman with white acrylic paint.  After the paint had dried, I gave them both a coat of One Step Crackle Paint*.  The thicker the paint the larger the crackles.  (My crackles are more subtle.)
  • I used White Liquid Applique* on the rim and top of the snowman’s hat.  I let the liquid applique dry before heating it with a Heat Tool* to raise it.  If you let it dry before heating, the liquid applique raises evenly not bumpy.
  • I used DecoArt Dimensional Effects*on the tops of the fence and around the base.  I also used it on the bottom of my Snowman.

Check out the creative ways the Inspiration and Education Teams have used the Mitten and Snowman dies! We hope that you will be inspired too and share how you use the dies in the Eileen Hull Fan Club.

For a full list of designers visit Eileen’s Blog Here.

But wait- there’s more- the Release Party continues!  You won’t want to miss the Facebook Live at Eileen Hull Designs at 12:00 noon Eastern time on Wednesday, July 1! Join the chat- and a random commenter will win the Snowman die.

Please hop with us through all of the projects and leave comments on the different designers’ blogs. A lucky commenter will win the Mitten Box die…

Thanks everyone!

Save

Red, White and Blue Star Shaker Tags

Star Shaker Tags

I love making cards and tags that move and shake.

Generally, making Shaker Tags are fun and easy to make.

But I sometimes tend to make things harder than they need to be?

That was the case with the Star-shaped Shaker Tag.

After working on it and getting frustrated because the vision I had wasn’t quite working out,

I set it aside and went for a simpler version.

As you can see, I did finish the Star Tag and like how both of them turned out.

How to Make a Star Shaker Tag for the 4th of July

The Maker’s Movement Products Used:         (*affiliate link)

  • MOD284 Nested Stars Dies
  • MOD282 Large Nested Tags
  • MOD276 Mini File Folder Die Set (banner)
  • Crossover Fabric & Paper Cutting System*
  • MMT211 Double Sided Adhesive Craft Foam
  • MMT212 Clear Acetate Sheets
  • Rainbow Shaker Sprinkles
  • MOS204 Home for the Holidays Stamp Set

*FTC Disclosure… “This is a sponsored post for The Maker’s Movement.  I have been provided product and compensation in exchange for my creative ideas.  The views and opinions are my own.”

Additional Products Used:            (*affiliate link)

*Disclosure:  This blog uses ads and affiliate links.  If you choose to make a purchase using one of the links, I receive a small commission (at no additional cost to you) that helps offset the costs of maintaining this blog.  Thanks for your support!

Directions: 

  • Cut two tags using the Nested Tag Die Set.  The larger out of red cardstock and the smaller out of red, white, and blue floral print.

  • Adhere the tags together using the tape runner.
  • Die-cut both layers with the star die. Once happy with the placement, put a small piece of removable painters tape* over the star to keep it from moving when it is die-cut.
  • Lay banner die onto the tag to help figure the correct placement for the star hole.
  • Place the tag and die onto the Crossover II Die-Cutting System*
  • .Place clear acrylic protective plate over the dies and crank the handle to run the die through the machine.

  • Cut a small piece of acetate to fit over the star opening.  The acetate comes with a protective liner on both sides.  You will need to remove both sides before adhering it to the tag.

  • Pick out Red and Blue Shaker Sprinkles, from the Rainbow Sprinkles, to use for the inside of the shaker tag.

  1. On the back of the die-cut tag, place tear it tape adhesive around the opening of the star.
  2. Remove protective liner off the tape.  Place acetate over the star opening.
  3. Cut a second red tag.  Place strips of adhesive craft foam around the star to make a well around the star.  Add additional strips around the bottom and top.
  4. Add red and blue sprinkles in the well around the star.  Remove protective liner off the back of the foam strips and adhere to the second red tag.

  • Center two star together, place a piece of removable painters tape* on the dies to keep them from moving.  (The smaller star is the same size as star opening.)  Run the dies through the Crossover II die-cutting machine to create a star frame.

  • Adhere star frame over the star opening.
  • Cut a banner out of plaid paper.
  • Stamp “Celebrate with a bang!” (from the Home for the Holidays stamp set) Trim down to fit onto the plaid banner.
  • Glue pleated ribbon around the bottom and top of the tag.
  • Punch hole in the top of the tag.  The Crop-A-Dile Punch* easily goes through all the layers.
  • Tie twine together and loop through the hole.
  • Glue small star and flag embellishments onto the tag.

Close up of the Star Shaker Tag

  • I used the largest of the Nested Star Die for the outline of the star.
  • What made the process a little more difficult for me was that I also cut a foam star the same size.  I had problems getting the foam star to line up and had to set it aside momentarily.
  • A small star cut out of foam and scrapbook paper was used as the dangler on the tag.
  • I cut several banners to use on the front of the tag.
  • You can find the small banner instructions here.

Here’s another tag that I made for The Maker’s Movement using the Nested Star Dies. 

Save

Save

How to make an Egg-stra Special Shaker Tag

An Eggstra Special Shaker Tag-Sue's Creative Workshop www.sueeldred.com 8718

How to make a Egg-stra Special Shaker Tag

An Eggstra Special Shaker Tag-Sue's Creative Workshop www.sueeldred.com 8494

Supplies Used on the Egg-stra Special Shaker Tag:                   (*affiliate link)

Disclosure:  This blog uses affiliate links.  If you choose to make a purchase using one of the links, I receive a small commission (at no additional cost to you) that helps offset the costs of maintaining this blog.  Thanks for your support!

An Eggstra Special Shaker Tag-Sue's Creative Workshop www.sueeldred.com 8599

  • Stamp the chick image with black ink onto white cardstock.
  • Stamping on non-porous white cardstock helps the markers blend easier.

An Eggstra Special Shaker Tag-Sue's Creative Workshop www.sueeldred.com 8631

  • Color in the edge of the chick with the light ochre marker.  Use the pale yellow marker to blend and fill in the rest of the chick.

An Eggstra Special Shaker Tag-Sue's Creative Workshop www.sueeldred.com 8637

An Eggstra Special Shaker Tag-Sue's Creative Workshop www.sueeldred.com 8648

An Eggstra Special Shaker Tag-Sue's Creative Workshop www.sueeldred.com 8649

Counting the Nesting Tag dies as 6 being the largest and 1 being the smallest…

  • Using the largest (#6) Nesting Tag Die, and the 4th largest Nesting Tag Die, center and tape the two dies together to create a tag frame.

An Eggstra Special Shaker Tag-Sue's Creative Workshop www.sueeldred.com 8685

Shaker Tag pieces:

  • Cut a large (#6) “blue skies” tag from the largest nested tag die.
  • Cut a large (#6) green dot tag.  Cut a wavy line die on the bottom of the tag using a wavy line die.  (From the MSD209  Some Bunny Loves You Stamp and Die Set.)
  • Adhere bottom of the wavy cut tag onto the blue skies tag.
  • Cut a acetate tag from the 5th largest nesting tag die.
  • Cut a large purple gingham egg, a floral cracked egg and several small eggs from coordinating scrapbook paper.

An Eggstra Special Shaker Tag-Sue's Creative Workshop www.sueeldred.com 8695

  • On the back of the tag frame, add a thin line of adhesive around the inside opening of the tag.
  • Remove the protective coating from both sides of the acetate and place it on top of the adhesive.
  • Cut thin strips from the double-sided foam sheets.  Remove one side of the protective layer from the foam strips and place around the inside edges of the tag.
  • Add shaker bits inside tag.
  • Remove the second side of the protective layer from the foam strips and adhere to the blue skies layer on the inside of the tag.

An Eggstra Special Shaker Tag-Sue's Creative Workshop www.sueeldred.com 8739

  • Glue the small floral cracked half egg onto purple gingham egg.
  • Add foam to the back of chick and egg and add to front of the card.
  • Punch a hole on the top of the tag using the crop-a-dile, add purple and white twine.
  • Adhere ribbon bow to top of the tag.

Maker's Movement

*FTC Disclosure… “This is a sponsored post.  I have been provided product and compensation in exchange for my creative ideas.  The views and opinions are my own.”

Don’t throw away those Christmas Photo Cards!

What do you do with all those Christmas Photo Cards you’ve just received? 

Before you put all your Christmas Crafting Supplies away…

I have one last project for you to make.

The Beloved Christmas Photo Card.

I love annual Christmas photo cards and how it  shows how your family changes from

one year to the next.  I have a hard time throwing them away after the season is over.

What do you do with them besides putting them in a box?

This year, I finally decided to make an album to put them in.

The album had to be simple so that I can easily add the next years’ photo cards and easy

enough that I would actually do it.

This is how I made it…

  • I started with two 5-1/2″ x 8-1/2″ pieces of white matboard and two 12″ x 12″ pieces of Christmas Scrapbook paper.
  • I used my Xyron Creative Station* to add adhesive to the back of the scrapbook paper before adhering it to the matboard.  I added the second piece of scrapbook paper to the other side of the matboard.
  • I used my  Silhouette Cameo Electronic Die Cutting Machine* to create the words and cut them from Glittered Self Adhesive Vinyl from StyleTechCraft.
  • I added a small Christmas chipboard sticker on the front of the album to add dimension.
  • Punch a hole in the top of the matboard covers with a Crop-A-Dile Punch*.
  • Align the Photo Cards with the top cover and use a pencil to draw a mark on the card so you’ll know where to punch the hole.
  • Using a large book ring, I added my cards to my album with the most recent photo cards on top.

For your convenience here’s these are the products I used:    


*Disclosure:  This blog uses affiliate links.  If you choose to make a purchase using one of the links, I receive a small commission (at no additional cost to you) that helps offset the costs of maintaining this blog.  Thanks for your support!

“This is a sponsored post.  As a member of the StyleTechCraft Design Team I have been provided product in exchange for my creative ideas.  The views and opinions are my own.

Merry Christmas from my Family to Yours

I was reminiscing this morning with my brother and sisters on how we hung our Christmas stockings.  We didn’t have a fireplace mantel or fancy stockings.  We would grab one of Dad’s socks (because his socks were larger than ours) and hang them on the piano.  We would lock them into place on the piano lid.  It just goes to show it doesn’t need to be fancy to have great memories.

Wishing you all a safe and Happy Holidays.

Sue

Special Delivery Envelope

Christmas Special Delivery Envelope

As promised, I want to share with you a few more samples made with the NEW RELEASE

Tammy Tutterow Stamps and Dies from The Maker’s Movement.

The first thing that came to mind when I looked at the Special Delivery Card Kit was Valentines.

It also makes a super cute Christmas Envelope perfect for stuffing a Holiday gift card.

Who doesn’t want a little extra “love”?

MOD274 Special Delivery Card Kit

Special Delivery Love Envelope for Valentine’s Day

The top flap is creased to fold.  It makes the cutest little envelope to tuck in a sweet note.

The journaling card die that fits inside the envelope makes it the perfect embellishment

for Scrapbooking or Cardmaking.

When open the envelope measures 3 3/4″ x 4 3/4″.

The back of the Special Delivery Love Envelope.

How cute is the postage stamp die?

A little more LOVE…

I made a couple tags using the Nested Rounded Tags and the Sweet Petites Sentiment Stamps.

I love both of these sets.  Great for any time of the year!


MOD279 Nested Round Tags       MSD213 Sweet Petites Stamps

*FTC Disclosure… “This is a sponsored post.  I have been provided product and compensation in exchange for my creative ideas.  The views and opinions are my own.”

Red Buffalo Plaid Hot Chocolate Bar

Fun and Easy Red Buffalo Plaid Party Ideas

The theme for this year’s Sue’s Holiday Workshop was “Mad for Plaid”.

To add to the fun of the event, I created a Red Buffalo Plaid Hot Chocolate Bar.

The Hot Chocolate Bar was simple to put together and was a big hit.

The most important part of the Hot Chocolate bar is the Hot Chocolate.

I went back and forth trying to decide on how I wanted to present the Hot Chocolate.

There are so many recipes online for delicious hot chocolate.

Because this was a “creative event”, I went with a little more creative approach.  (and simple)

For my Hot Chocolate Jars…

I found little tiny mason jars at Michaels Craft Store.  I created labels for the jars using a

Silhouette Cameo Electronic Die Cutting Machine* and Red Glossy Craft Vinyl from

StyleTechCraft.  I applied my labels onto the jars using Vinyl Transfer Tape* .

I tied a small plaid chipboard house made from Eileen Hull’s House Ornament Die*

with twine around the neck of the jar.

*Disclosure:  This blog uses affiliate links.  If you choose to make a purchase using one of the links, I receive a small commission (at no additional cost to you) that helps offset the costs of maintaining this blog.  Thanks for your support! 

The jars were filled with enough Hot Chocolate mix for one individual serving.  

They make a great party favor, and the guest gets to take home a cute little jar.

I put all the jars on the bottom of a plain black two-tiered metal stand.

I applied Red Buffalo Plaid Washi Tape* around the rim.

This little detail helped make it stand out and added to the theme.

On the top of the metal stand I added spoons, mini chocolate chips, candy canes.

I also left a place for a can of whipped cream (not yet added to this picture).

For the Table…

I used a black tablecloth for the base of my table and cut a red buffalo plaid runner from

plaid flannel.  (Sew Simple…I didn’t even sew the edges.)

It’s a really quick and inexpensive way to create the look

Air Pots filled with Hot Water made making the Hot Chocolate easy and mess-free.

For a vintage feel, I used large mason jars filled with extra hot chocolate mix,

extra marshmallows, and caramels.

I picked up the Buffalo Plaid Insulated Coffee Cups* and Red Buffalo Plaid Party Supplies* online.

A Hot Chocolate Bar would not be complete without frosted sugar cookies.

My sweet daughter in law baked these sugar cookies from my favorite sugar cookie recipe.

You can see the sugar cookie recipe here.

(The little red bird was made using an Easter Chick cookie cutter.)

I made the Holiday Hot Chocolate Sign by painting a wood bracket sign with black chalkboard

paint.  I used a Silhouette Cut SVG file from the Silhouette Store and my Silhouette Cameo

Electronic Die Cutting Machine* and resized the image to fit my sign.

I used red and white glossy craft vinyl from StyleTechCraft.

To complete the fun, I had fun Red Buffalo Plaid Themed Photo Props*.

I used Red and Black Buffalo Plaid wrapping paper on the background wall.

A fun way to break the ice and get the party started.

Red Buffalo Plaid Party Supplies Available on Amazon.

How to make a Red Buffalo Plaid Frame


How to Make a Red Buffalo Plaid Frame

Products Used:

Shop Your Fav Brands at Scrapbook.com

*Disclosure:  This blog uses affiliate links.  If you choose to make a purchase using one of the links, I receive a small commission (at no additional cost to you) that helps offset the costs of maintaining this blog.  Thanks for your support!

Directions:

  • Add strips of painter’s tape onto the frame to make stripes.  Rub your finger over the tape to make sure that the tape is securely on the frame and has no gaps.
  • Paint inside the stripes with black paint.  Be careful not to apply the paint too thick.   Only one thin coat of paint is needed.

  • Remove painter’s tape.
  • Allow black paint to fully dry before continuing to the next step.

  • Rotate the frame and apply the tape in the opposite direction.  Make sure the tape is securely on the frame.
  • Paint additional stripes.

  • Lightly sand the frame after dry.  Sanding brings out the woodgrain and helps to hide any little imperfection.
  • Wipe the frame smooth with a clean cloth.
  • Apply the Carta Bella Christmas Market Chipboard Accents to front of frame.

The Red Buffalo Plaid Frame was made in Sue’s 2019 Holiday Workshop.

 The Carta Bella Christmas Market Collection*

Give the Gift of Amazon Prime*