Mini Ribbon Wreath Ornaments

Mini Ribbon Wreath Ornaments

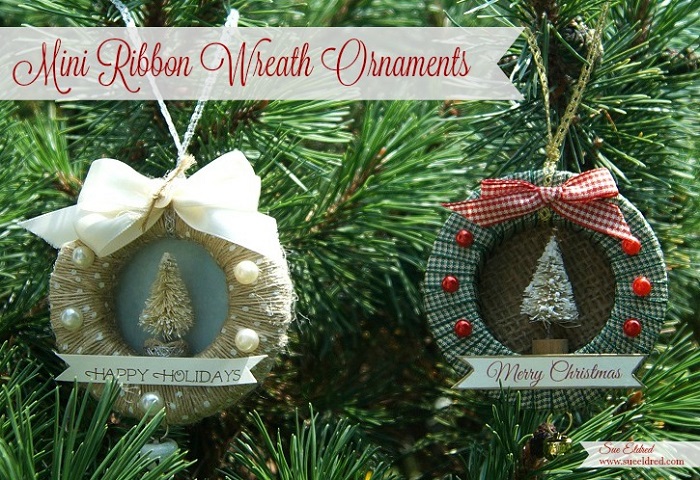
No matter how you decorate for the Holidays…Shabby, Homespun, Country or Cute.

You can easily customize these Mini Ribbon Wreath Ornaments to fit your personal style.

Easy to make and sure to impress.

How To make Mini Ribbon Wreath Ornaments
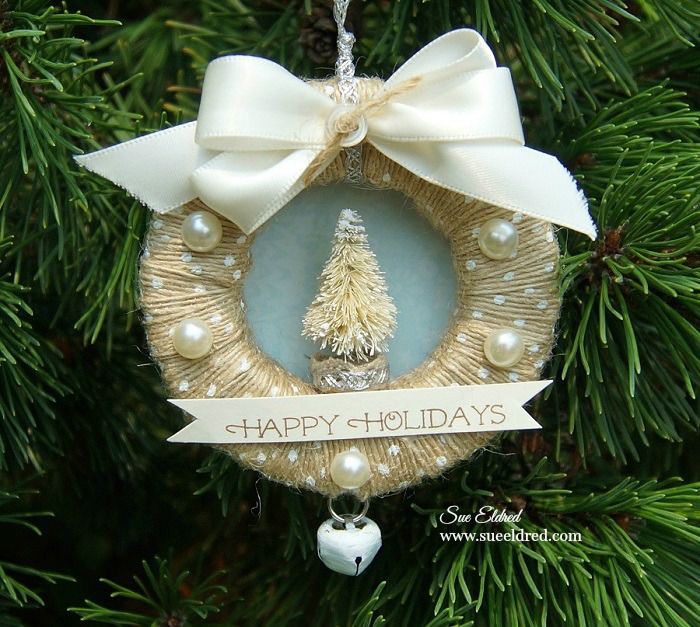
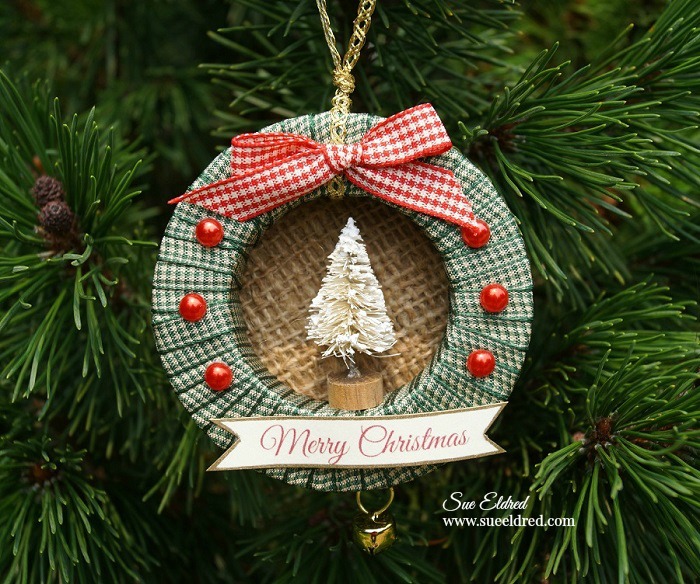
Finished Size : 3”

Materials Used:

*Disclaimer:  This post uses ads and affiliate links.  If you choose to make a purchase using one of the links, I receive a small commission (at no additional cost to you) that helps offset the costs of maintaining this blog.  Thanks for your support!

Directions:

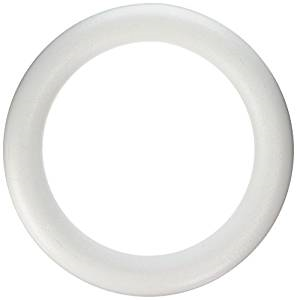
  1. Apply a strip of 1/8″ adhesive around the outside edge of the Smoothfoam wreath. This keeps the ribbon securely in place while wrapping.
  2. Wrap ribbon tightly around wreath. When you’ve wrapped the ribbon half way around wreath add the jump ring with jingle bell to ribbon so that it hangs on the bottom of the wreath and continue wrapping. When finished wrapping the ribbon, glue ribbon end onto back of wreath.
  3. Add metallic ribbon trim on top of the wreath as the ornament hanger.
  4. Glue mini bottle brush tree inside wreath.
  5. Glue a piece of burlap or scrapbook paper onto a piece of chipboard and cut into a circle that will cover the inside of the wreath and glue to the back of the wreath.
  6. Print a computer generated greeting on to a piece of cream card-stock. Cut down to size and notch out both ends to create a banner.
  7. Give the banner a quick wave using your fingers and glue onto the bottom of the wreath.
  8. Add adhesive pearls on to the wreath.
  9. Add bow on the top of the wreath to finish it off.

Try Amazon Prime 30-Day Free Trial

Etched Snowflake Candy Jar

Quick and Easy Holiday Gift Idea

When it comes to the Holidays I love Quick and Easy Gift Ideas.

For the Snowflake Candy Jar…

I used a small canning jar etched with snowflakes and filled with candy.

It’s a project that I was able to put together in under a half hour.

Snowflake Candy Jar Supplies 1274

To make the Snowflake Candy JAR…                 

  1. Punch a strip of Snowflakes using etchmask™ vinyl and a snowflake punch.
  2. Carefully cover the jar with the vinyl.
  3. Make sure to burnish the vinyl to get out air bubbles and to make sure the all edges all down.
  4. Apply a thick coat of Etchall over the snowflake cut out using the squeegee.
  5. Wait 15 minutes.  Scrape excess etching crème from the side of the jar and return extra etching crème back into the bottle. (it’s reusable)
  6. Rinse jar with warm water to clean.
  7. Remove Stencil and dry.
  8. Add adhesive rhinestones to the center of each snowflake.
  9. Wrap craft stem around the neck of the jar and glue on a red button.

Snowflake Candy Jar Covered 1287

  • Cut a small circle from decorative scrapbook paper and adhere to lid of the jar.
  • Embellish jar with greenery stem, jingle and bow.

Snowflake Candy Jar 1472

   This would make a great Teacher, Hostess, Bunco, or Gift Exchange Gift.

This project was created for and sponsored by Etchall®.


Don’t Miss a Thing…Make Sure to Follow me.

Shop Your Fav Brands at Scrapbook.com

Disclaimer:  This blog uses ads and affiliate links.  If you choose to make a purchase using one of the links, I receive a small commission (at no additional cost to you) that helps offset the costs of maintaining this blog.  Thanks for your support!

Try Amazon Prime 30-Day Free Trial

French Country Fall Stenciled Burlap Table Runner

French Country Fall Stenciled Burlap Table Runner 681 2

French Country Inspired Stenciled Burlap Table Runner for Fall.

This table runner is a Quick & Easy DIY project with no sewing involved.

Supplies 223

To make the table runner you’ll need:                                     *(affiliate links)

*Disclaimer:  This post uses ads and affiliate links.  If you choose to make a purchase using one of the links, I receive a small commission (at no additional cost to you) that helps offset the costs of maintaining this blog.  Thanks for your support!

Stenciling 269

Stenciled 380

Directions:

  1. Make sure to lay paper down before stenciling on burlap.
  2. Tape around stencil with removable painter’s tape so that the stencil won’t move.
  3. Using a stencil brush, dip just the tip of your brush into the paint.  Tap off excess paint.
  4. Stenciling is a “dry” brush technique.
  5. Apply paint with stencil brush in a straight up and down motion called stippling.
  6. Clean Stencil between each image.
  7. Glue lace trim onto each edge of the runner using Fabri Tac glue.
  • Burlap is a rough fabric.  You may want to add a layer of fabric or felt underneath the runner to protect the finish of your table.

Close UP 0666

Fall Display

Because I really liked how the table runner turned out…

I decided to create a pillow for the comfy chair in my dining room

I used muslin as a lining for the burlap and on the reverse side of the pillow.

(The pillow, of course, consisted of some sewing.)

Shop Amazon Scrapbooking Supplies*

How to make a Holly Jolly Flip Album…

Holly Jolly Flip Book

I wanted to share with you today one of my favorite projects from my Holiday Workshop

last Saturday.  It is the “Holly Jolly Flip Album” using paper from Canvas Corp Brands

Farmhouse Christmas Collection and a 5″ x 7″ Black Acrylic Frame from Deflecto Craft Solutions.

It’s a fairly simple project and the ladies were able to complete the album in just a couple of hours.

Farmhouse Christmas Flip Book Front Cover7638  Farmhouse Flip Book Supplies 07392

Holly Jolly Flip Album

Here’s the complete supply list:

Directions:

  1. Mark and measure hole placement on black acrylic frame.
  2. Drill 3/8” holes into frame.
  3. Cut a 7” x 9” piece of Red & Kraft Ribbon Stripe paper and insert into frame.
  4. Album Cover: Cut the “Holly Jolly Christmas” section from the Better Not Pout Tags on Kraft. Layer it onto black cardstock, kraft corrugated paper and then another back cardstock layer.
  5. Cut a 4 3/4” x 6 3/4” piece of Red & Black Stitched Diamonds and adhere it onto a piece of 5” x 7” Red Cardstock layer. Add a 3/4” x 4 3/4” strip of Red & Kraft Ribbon Stripe. Adhere “Holly Jolly” layers onto the Red & Black Stitched Diamonds.
  6. Punch a 1 11/16” circle from the Better Not Pout Tags and glue onto the back of the Optical lens by adding craft glue along the outside edges of the lens. Add jump ring to Optical Lens.
  7. Mark and measure holes to line up with black acrylic frame on the Album Cover and punch holes. Add eyelets to holes with the Crop-a-dile.
  8. Tie a piece of gold ribbon around the front of the album cover.
  9. Cut several pieces of black 5” x 7” cardstock layers to use as the pages of the album. Decorate album pages using additional scrapbook paper layers, strips, flips, pockets, trim, cords, tickets and mini bags.
  10. Align, measure and punch holes in the top of the album pages.
  11. Add album cover and pages to the black acrylic frame using medium book rings. Add Optical lens to ring.
  12. Embellish the stand by adding gold decorative trim with Fabri-Tac glue.

Pg. #4 Farmhouse Christmas Flip Book Special Delivery Side view 07658    Pg #1 Farmhouse Christmas Flip Book Made with Love Pocket Page 7646


“This is a sponsored post.  As a member of the Deflecto Design Team I have been provided product in exchange for my creative ideas, views and opinions.”

How to make a Frosted Pinecone Wreath

Frosted Pinecone Wreath

Autumn has come to the Midwest bringing with it crisp air and colorful leaves. 

I’ve even given up my flip flops for socks and shoes…

I like Autumn.

Really I do.  (If only it’d turn right back into Summer.)

Now that I’ve given up on Summer, I thought I’d better start with my Fall Decorations.

I like making projects that serve more than one purpose.

Like this Pinecone wreath.   After I’m done with my Fall Decorations…

I plan on adding red berries and re-making it into a Christmas Wreath.

How to Make a Frosted Pine Cone Wreath…

You’ll need:

  • 14″ Smoothfoam Wreath
  • Assortment of Pinecones
  • White Spray Paint
  • Craft Moss
  • Craft Glue
  • Hot Melt Gun and Glue
  • Ribbon and Raffia
  • Thin Wire

Directions:

  1. Gather an assortment of various sizes of pinecones.
  2. Spray one side of the pinecones with white spray paint.
  3. Glue Moss onto Smoothfoam Wreath.   (leave the outside of the wreath bare)
  4. Hot Glue and wire larger pinecones onto the wreath first.
  5. Fill in the Wreath with the smaller pinecones.
  6. Tie Ribbon around the outside of the wreath.
  7. Add raffia bow.

*Disclaimer:  This post uses ads and affiliate links.  If you choose to make a purchase using one of the links, I receive a small commission (at no additional cost to you) that helps offset the costs of maintaining this blog.  Thanks for your support!

This project was created for and sponsored by Smoothfoam.

Try Amazon Prime 30-Day Free Trial

Design Challenge with Little B…

I played a little hooky from all the projects on my never ending “To Do” list…

and did a little card-making (just for fun).  Thanks in part to a wonderful box of goodies

that I received from the good people at Little B LLC, the sponsor of this month’s

Designer Craft Connection’s Manufacturer Challenge.

(make sure to check out the great giveaway prize at the bottom of this post)

Graphic 45 and Little B Butterfly Card 91

My Butterfly Card uses mini dimensional butterflies from Little B

and scrapbook paper from Graphic 45’s Rare Oddities Collection.

To create the division between the butterflies,

I used a really thin Black and White Striped Decorative Tape

Little B Wedding Card 082

This Simple little card uses all kinds of Little B goodies.

Directions:

  1. Using the Lace Doily Punch, punch both sides of a white cardstock layer.                        (Approx. 4 1/4″ x 5 1/4″)
  2. Add Gold Foil Hearts and Gold Foil Toile tapes to the center of the punched cardstock.
  3. Add a thin strip of Gold Foil Love on top of the seem between the two previous tapes.
  4. Layer white cardstock onto a piece of gold cardstock and adhere to a white card base.
  5. Using three of the smaller layering heart dies, cut and emboss a small heart frame.
  6. Adhere the heart frame onto the bottom right corner of the card.
  7. Using a small Wedding bouquet from the Bride and Groom stickers, stick bouquet onto the center of the heart frame.
  8. Tie white sheer ribbon around top of the card.

Finished Card Size:  4 1/2″ x 5 3/4″


Little B img-logo

♥ Thank You Little B LLC for generously providing the dies, punches, dimensional stickers,

and decorative tapes used on these cards.   (You are awesome!)


DCC Little B Giveaway

Little B LLC is so awesome they’re giving away this prize package to one lucky winner.

To enter to win leave a comment on this post and/on the other designers’ blogs

and “like” the Little B LLC Facebook page… that’s all there is to it.

The more you comment the better your chances are to win!  Open to residents of US and Canada only.

Contest ends 10-29-15.

Check out the Designer Craft Connection Blog for participating Designer projects.


Etching for Fall

I picked up this very old bottle at a yard sale…

The story with this bottle is that the guy bought a collection of old medicine bottles from the

early 1900’s that came from the old Bartonville State Mental Hospital.

If your not from around here, rumor is, the old State Hospital is haunted.

I believe the show “Ghost Hunters” did an episode there.

So… that and the fact that it was only $2.00 had me intrigued.

The old bottle was in rough shape.

When I tried removing the cork, it pretty much disintegrated on the spot.

tape bottle and etchall creme 9950 Etched Bottle 9970

To breath new life into the old bottle… 

I masked the top and the bottom of the bottle with removable painters tape and added

a thick coat of etchall Etching Creme*.  (*affiliate link)

After waiting 15 minutes, I removed the excess etching crème and put the excess back

in the container.  I rinsed the bottle with warm water and let dry.

(make sure to read the instructions on the bottle of etching crème.)

To give the bottle a little Fall color…

I used a StazOn Ink Pad, Orange Zest* and rubbed the ink over the bottle.

The ink only adheres to the etched area.

To finish the look, I added a rub-on decoration to the front of the bottle with

a little raffia and key around the neck.

A new look for a very old bottle.

This project was created for and sponsored by Etchall®.

Disclaimer:  This blog uses ads and affiliate links.  If you choose to make a purchase using one of the links, I receive a small commission (at no additional cost to you) that helps offset the costs of maintaining this blog.  Thanks for your support!

Join Amazon Kindle Unlimited 30-Day Free Trial

My Friend the Ghost

Happy Halloween Mr. Boo 9065

Meet Mr. Boo, my newest Halloween Decoration.

I had all Mr. Boo’s parts finished when my Grandson showed up the other day.

I thought I’d let him help me decide what face Mr. Boo should end up with.

(he likes stuff like that)

To him it was like a game of Mr. Potato Head.  (actually… we all had fun with it)

The Many Faces of Mr. Boo 2

Angry?  Surprised?  Confused?  Happy?

So many looks for one little ghost.

And… before you say it, yes, he does look a little like a Pac Man Ghost.

Smoothfoam Ghost Parts 9045

To Make your own Mr. Boo you’ll need:          (*affiliate link)

Directions:

  1. Trace and cut a ghost shape on the Smoothfoam Sheet using the Hot Wire Foam Cutter*or cutting knife.
  2. Cut the 2″ ball in half to use for the eyeballs.
  3. Paint the ghost shape and the eyeballs with white acrylic paint.
  4. Mix the black and white paint together to create a light grey paint.  Paint around the ghost shape to create a shadow.
  5. Glue buttons on the top of the eyeballs.
  6. Glue eyeballs onto ghost.
  7. Paint eyebrows and mouth using black acrylic paint or cut pieces out of black cardstock and glue onto ghost.
  8. I added magnet to the back of my ghost so it will stick to my metal front door.

The Many Faces of Mr. Boo

The Many Faces of Mr. Boo

This project was created for and sponsored by Smoothfoam.

Disclaimer:  This blog uses ads and affiliate links.  If you choose to make a purchase using one of the links, I receive a small commission (at no additional cost to you) that helps offset the costs of maintaining this blog.  Thanks for your support!

Join Amazon Kindle Unlimited 30-Day Free Trial

Merry Album

Merry Album

Is it too early to start thinking about Christmas?

I bought this “Merry” Album from October Afternoon with hopes of using it during

my Annual Christmas Workshop.
To decorate my album:

  • I painted the chipboard with red acrylic paint.
  • After the album dried, I splattered it with white acrylic paint using an old toothbrush.
  • I added an extra 5″ x 7″ page of green cardstock behind the cover to make the word “merry” stand out.
  • I decorated the album with paper and stickers from Graphic 45’s “Twas the Night before Christmas” Collection.
  • Tie it off with some gingham ribbon, jingle bell and greenery.

October Afternoon Make it Merry Album


Creating a Garden Stepping Stone

Creating a Garden Stepping Stone 08274

Every one in my family thinks of me when they see Red Toile dishes.

It’s my thing.  (one can never have too many right?)

So… when my daughter saw a set of Red Toile dishes on clearance for $25 at her local thrift store

she immediately called me to see if I wanted them.   (um, yes!)

While packing the car for their visit home, my son in law picked up the box to rearrange the car

and the bottom fell out.  Most of the dishes survived.  Five of the large plates did not.

Broken China 08190

Deciding to turn lemons into Lemonade…

I kept the broken plates to make a few garden stones.

Nick and I making Garden Stones 2

I enlisted the help of my little buddy.  He was eager to lend a hand.  (with gloves of course)

Laying out the pieces in the pan 8187

Creating a Garden Stepping Stone:

  • Cover the sides and bottom of an old cake pan with Petroleum Jelly for easy removal.
  • Arrange the pieces of the broke china pattern side down in the bottom of the pan.  Make sure to use the flattest pieces.
  • Add glass stones in between the pieces for added color and interest.

Smoothing out the cement 8199

  • Mix a quick setting cement according to the directions on the package.
  • Fill pan with cement approx. an 1″ thick.
  • Shake pan a little to fill in the gaps and smooth.
  • Allow a couple hours for the stones to set.
  • Remove stepping stones from the pans and clean excess cement from the top of the stones with a stiff wire brush and water.
  • Allow a few days for the cement to cure before sitting outside in your garden.

close up of stone 8267

*Disclaimer:  This blog uses ads and affiliate links.  If you choose to make a purchase using one of the links, I receive a small commission (at no additional cost to you) that helps offset the costs of maintaining this blog.  Thanks for your support.

my flowers 8329

Any content on this website is created for inspiration purposed only.  Creating with my suggested methods, products used, and tools is under your own risk.


Try Amazon Prime 30-Day Free Trial