Kringle’s Christmas Tree Truck

Kringle's Christmas Tree Truck-A Dollar Store Holiday DIY

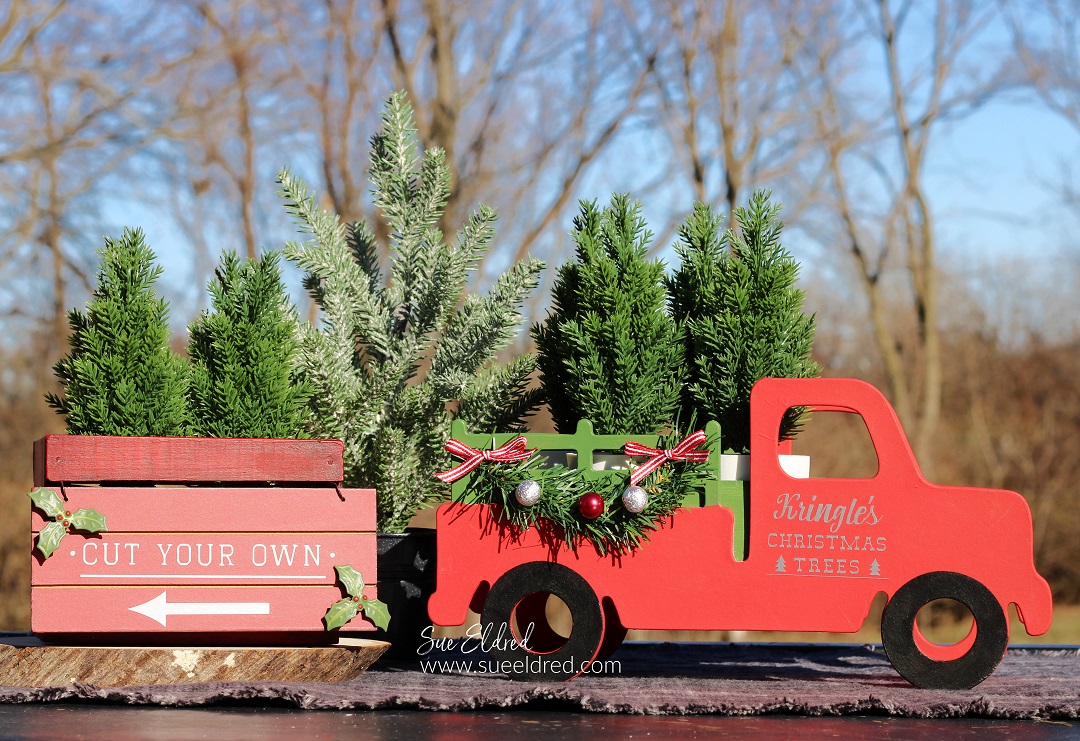
Kringle’s Christmas Tree Truck is an Easy Holiday Dollar Tree Craft.

The Christmas Tree Truck is a fun and inexpensive craft to create with the family.

This project is easily adaptable to fit your color scheme and style. 

So have fun with it.  (I did!)

Kringle's Christmas Tree Truck-A Dollar Store Holiday DIY

I only spent $3.75 at Dollar Tree and added a few items I had on hand.

(If you have to order them online, Dollar Tree has smaller quantities available for the truck.)

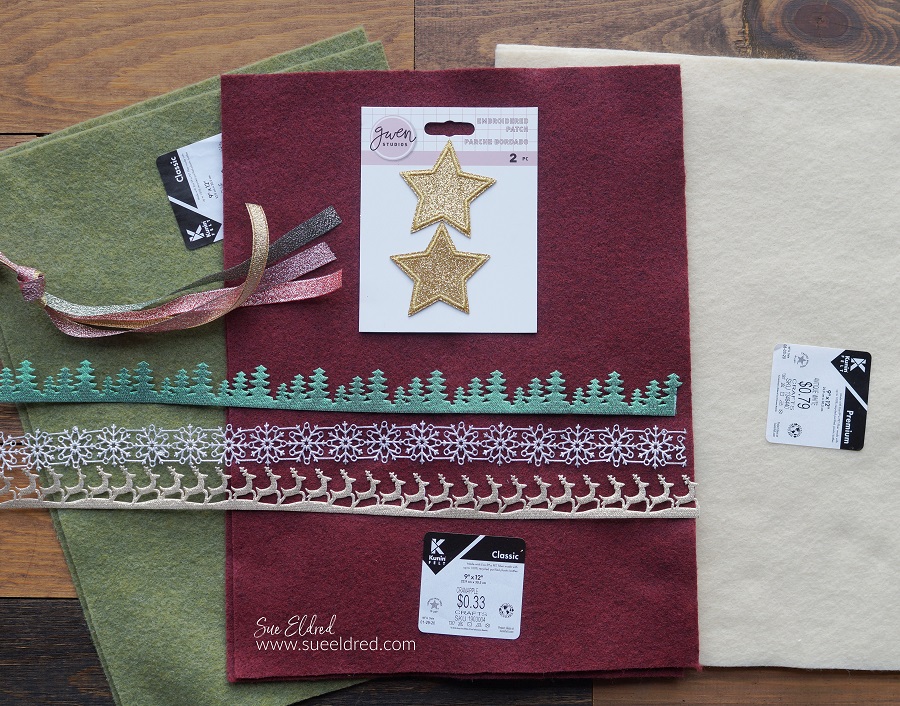
This is what I used:  (*affiliate links)

*Disclosure:  This blog uses ads and affiliate links.  If you choose to make a purchase using one of the links, I receive a small commission (at no additional cost to you) that helps offset the costs of maintaining this blog.  Thanks for your support!

Kringle's Christmas Tree Truck-A Dollar Store Holiday DIY

Directions:

  • Paint both sides of the Wood Trucks with acrylic paint.

Kringle's Christmas Tree Truck-A Dollar Store Holiday DIY

Unless you are steady-handed and can paint a perfect circle, here’s a trick I used.

  • Cut a circle the same size as the truck wheel. Cut the circle in half and use it as a mask to paint the top of the wheel. I used removable vinyl to cut my circle.
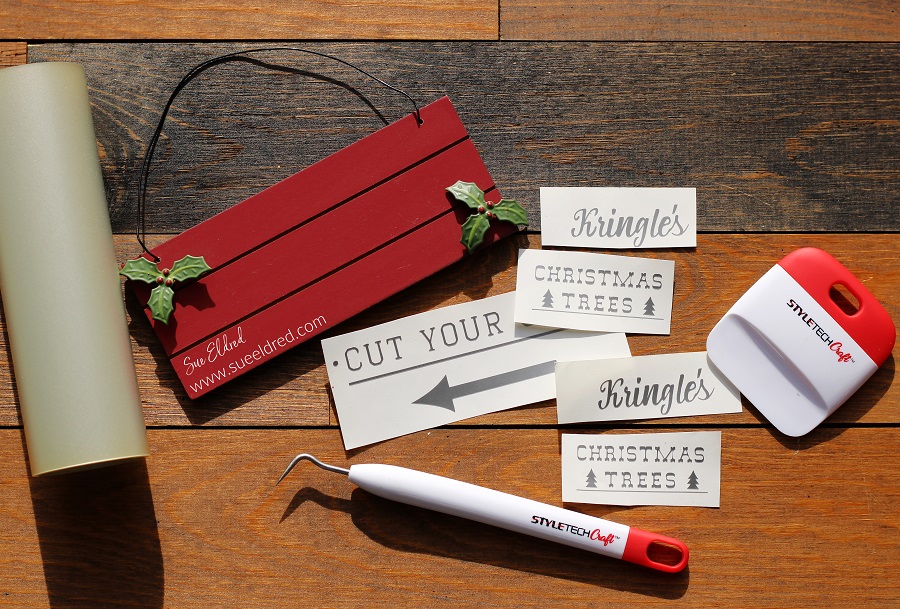
Kringle's Christmas Tree Truck-A Dollar Store Holiday DIY

“This is a sponsored post.  As a member of the StyleTechCraft Design Team I have been provided product and compensation in exchange for my creative ideas.  The views and opinions are my own.

Kringle's Christmas Tree Truck-A Dollar Store Holiday DIY

  • Cut a piece of Vinyl Transfer Tape* to fit over the vinyl words.  Gently rub over the transfer paper using the squeegee tool.  Lift the transfer tape to remove the vinyl from the white liner.

Kringle's Christmas Tree Truck-A Dollar Store Holiday DIY

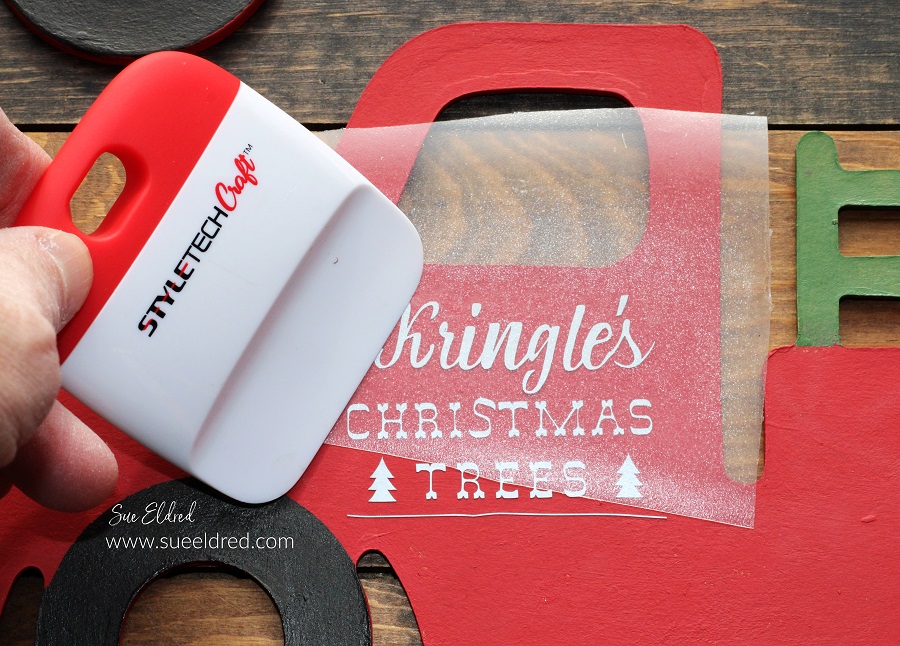
  • Using the vinyl transfer tape, line up the words onto the side of the truck.   
  • Gently rub over the vinyl transfer tape using the squeegee tool to make sure all the image has transferred.  
  • Remove the transfer tape.

StyletechCraft products brought to you by ATSM Craft*

Kringle's Christmas Tree Truck-A Dollar Store Holiday DIY

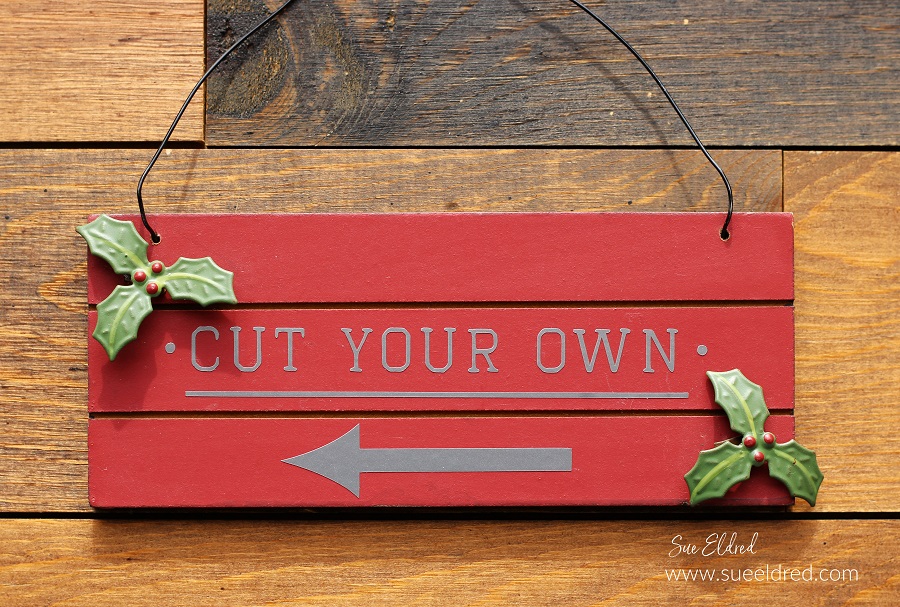
I added words to a plain ornament to create a “cut your own” sign.

Kringle's Christmas Tree Truck-A Dollar Store Holiday DIY

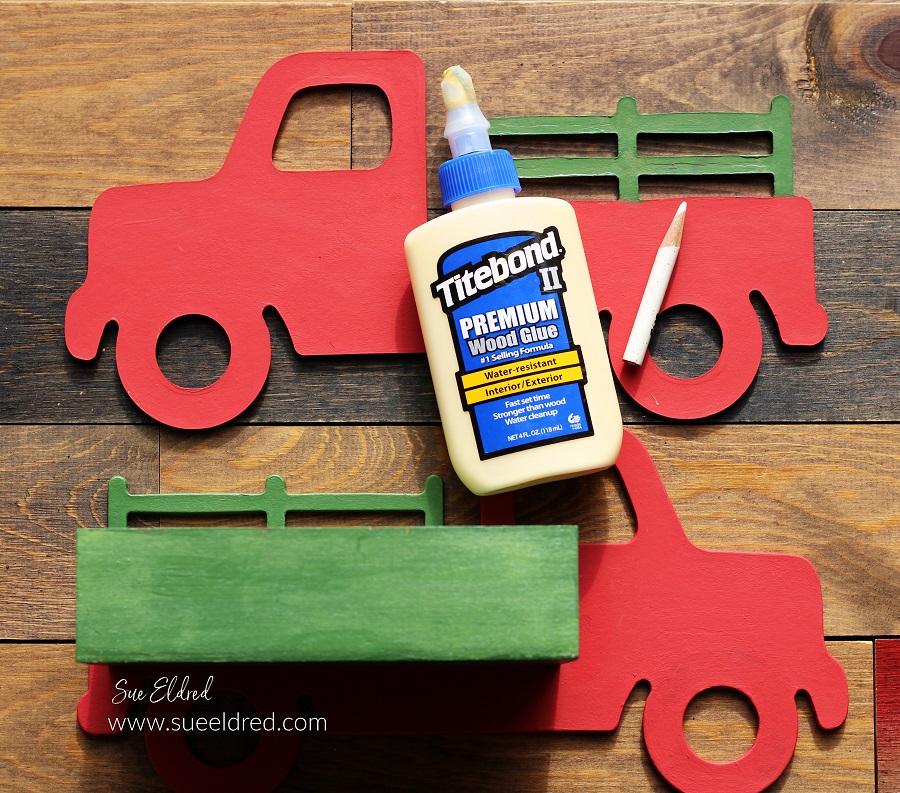
  • I used Wood Glue* to glue the truck.  I needed glue that would give me enough time to line up the box and still be sturdy enough to hold the weight.
  • Allow time for the glue to dry before picking up the finished truck.

Kringle's Christmas Tree Truck-A Dollar Store Holiday DIY

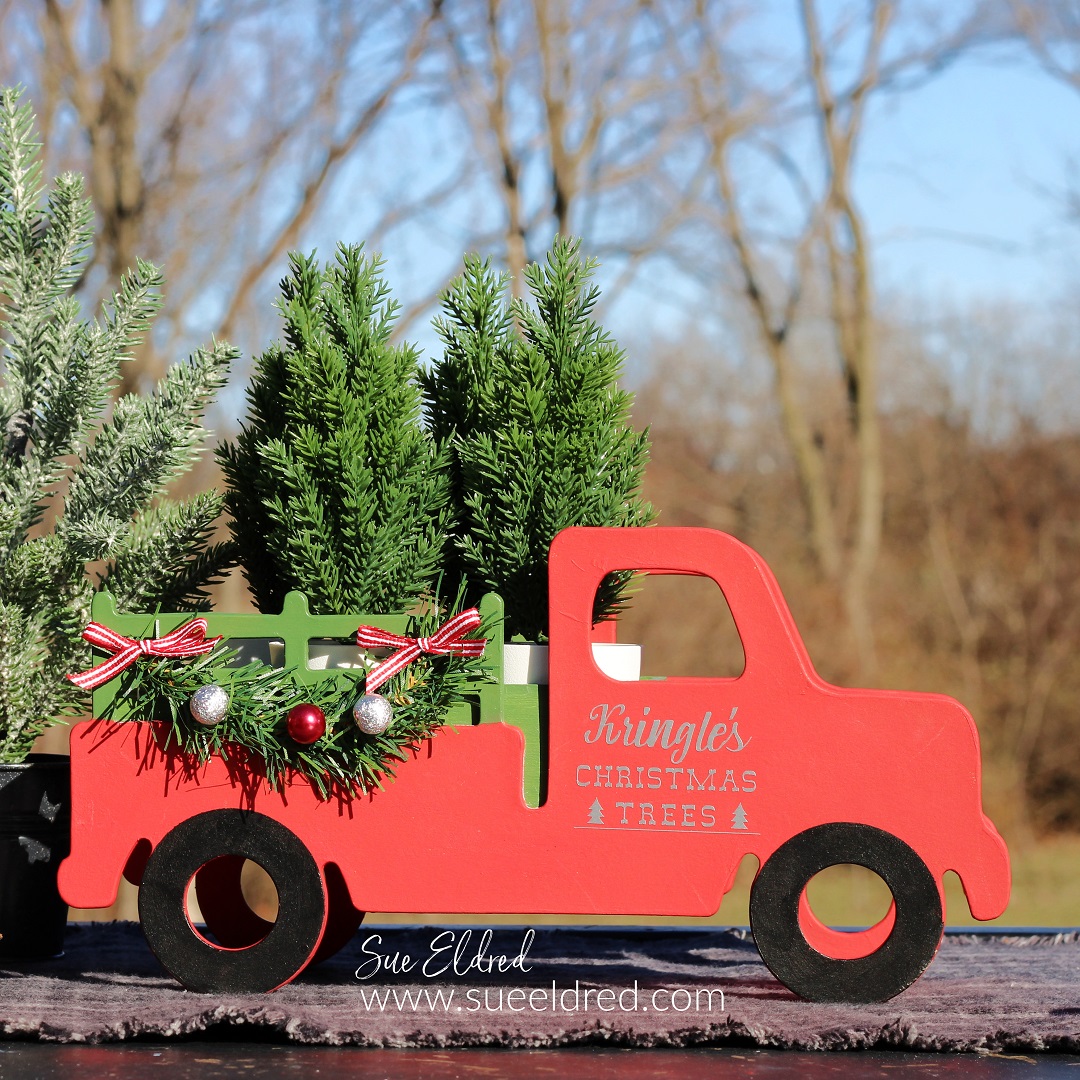
  • Decorate the body of the truck using a craft pine stem as garland. 
  • Glue small bows and beads onto the garland.

Kringle's Christmas Tree Truck-A Dollar Store Holiday DIY

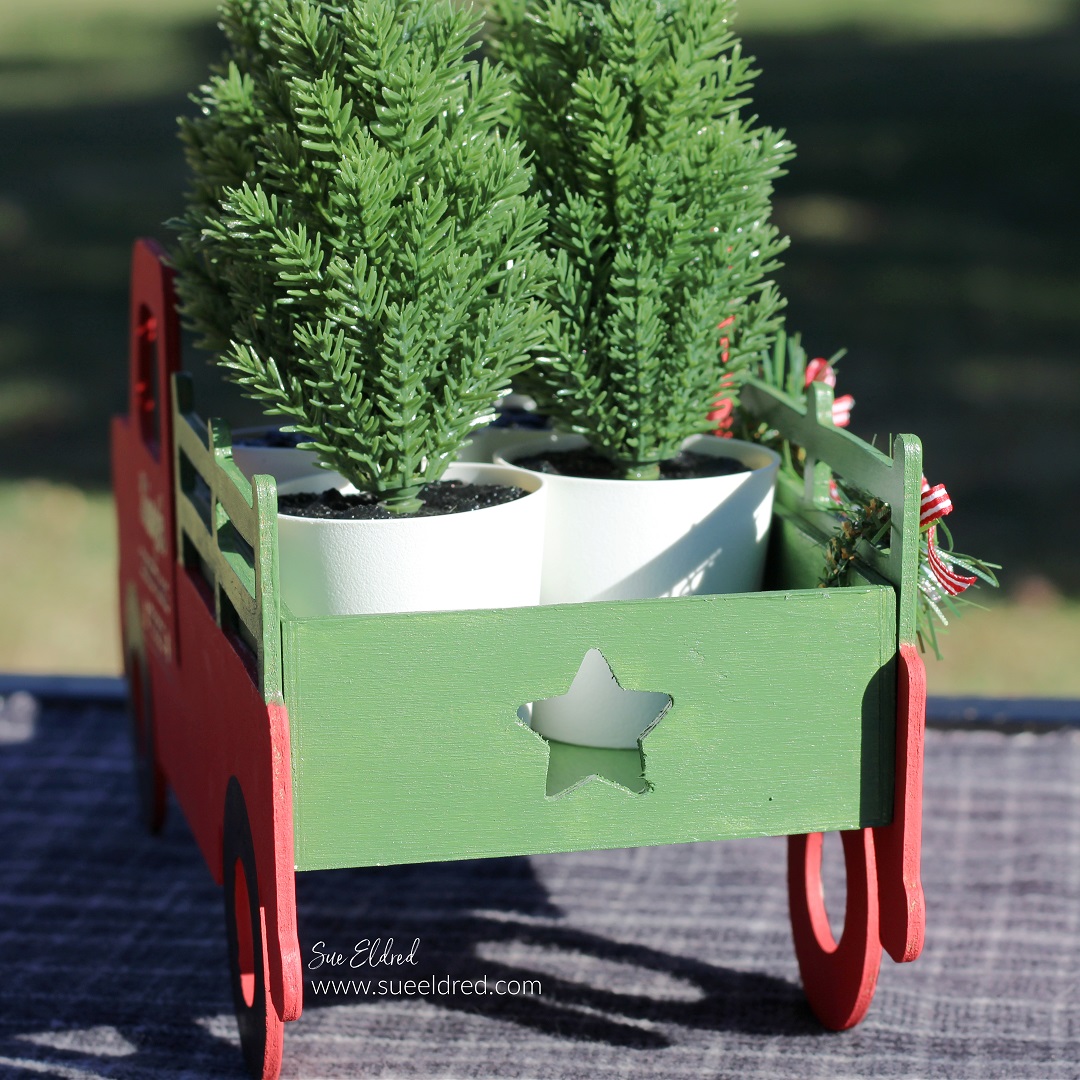
  • When picking out the small rectangle box to use as the bed of the truck, I thought the star was perfect.
  • Fill the bed of the truck with small Christmas Trees.

Kringle's Christmas Tree Truck-A Dollar Store Holiday DIY

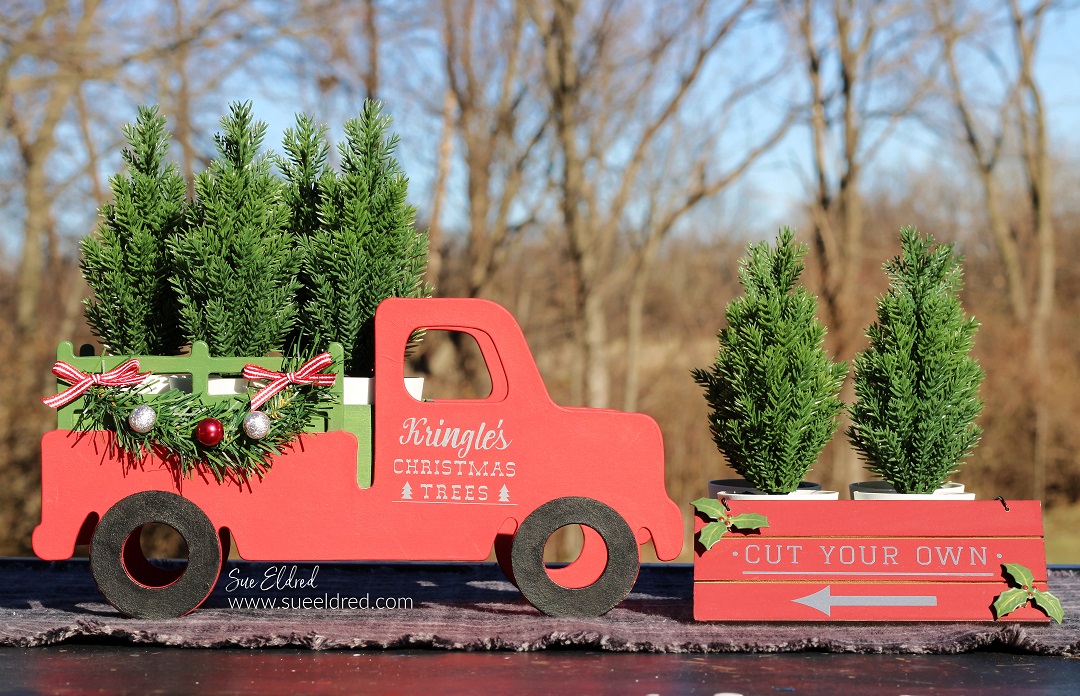
Kringle’s Christmas Tree Lot

You’ll need several mini trees to make a Christmas Tree Lot.

When I ordered the little trees at IKEA, I really hoped the trees would fit. 

I couldn’t be happier with the size.


DIY Stitched Felt Stocking with Die-Cut Ribbon

DIY Felt Christmas Stocking with Die Cut Ribbon

DIY Felt Holiday Stocking

If you love the warm and cozy feeling of Homespun Holidays and love making your gifts,

this simple felt stocking project is for you.

It makes a sweet stocking to hang on the mantel for Santa to add little gifts.

Or add in some greenery and use it as a Holiday decoration.

Gwen Studios Logo

Disclosure:  This is a sponsored post  for Gwen Studios.  I have been provided product in exchange for my creative ideas.  The views and opinions are my own. 

DIY Felt Christmas Stocking with Die Cut Ribbon

Materials Used:     (*affiliate link)


*Disclosure:  This blog uses ads and affiliate links.  If you choose to make a purchase using one of the links, I receive a small commission (at no additional cost to you) that helps offset the costs of maintaining this blog.  Thanks for your support!

DIY Felt Christmas Stocking with Die Cut Ribbon

Directions:

  • Draw or create a stocking pattern onto cardstock. I used an SVG cut file from the Silhouette Store and a  Silhouette Cameo Electronic Cutting Machine*. I sized the stocking pattern to fit on a 9″ x 12″ piece of felt and cut the stocking pattern using cardstock.
  • Trace the pattern pieces onto the felt and cut them out.

DIY Felt Christmas Stocking with Die Cut Ribbon

  • Cut the word “JOY” out of felt.  Hand stitch the felt pieces onto the stocking.
  • Tack the Snowflake Die-Cut Ribbon onto the front of the stocking using silver thread.

DIY Felt Christmas Stocking with Die Cut Ribbon

  • Iron the star patch onto the front of the stocking using the directions found on the back of the package.
  • Align the front and back of the felt stocking together. Using a “blanket stitch” stitch around the edge of the felt stocking.
  • Stitch a small piece of metallic ribbon as a loop on the corner of the felt stocking for hanging.


Sue’s 2021 Holiday Workshop

Sue's 2021 Holiday Workshop Samples

Sue’s 2021 Holiday Workshop…

After much contemplation, I’ve decided that Sue’s Holiday Workshop will be

virtual again this year.  Fingers crossed, we’ll be together next year.

Anyway…I’m kind of excited about this year’s kit.

I’ve worked hard to find ideas to inspire you with new things to try.

Here’s how it works…

When you order a kit, you’ll get supplies to make all the projects with detailed instructions.  You’ll also gain access to a Private Facebook Group where I will share videos of the project.

Here’s what we’ll be making:

  • Snowflake Welcome Wood Door Hanger:   great for hanging on the front door or adding to the center of a wreath  (you’ll be able to choose between a white or red snowflake welcome)
  • Holiday Joy Gift Card/Money Holder
  • Merry Christmas Shaker Card
  • Warm & Cozy Embossed Cable Knit Sweater Card  
  • Flannel Embroidery Hoop Ornament  (choice of red plaid flannel (shown), red and black buffalo plaid flannel, or a soft grey plaid flannel  (more pictures coming)

Included in the Kit:

  • Card layers and Stamped Pieces, Embellishments, Shaker Sprinkles, Ribbon, Twine, 3D Foam Squares and Envelopes
  • 10″ Wood Circle
  • 2 ft. Grey and Buffalo Plaid Ribbon
  • Greenery and Jingle Bell
  • Pre-cut Snowflake Welcome cut out of White or Red Ultra Metallic Glitter Vinyl
  • Transfer Paper
  • 3″ Embroidery Hoop
  • Flannel
  • Twill Ribbon
  • Pre-Cut Removeable Vinyl Words to use as a Stencil on the Twill Ribbon
  • Pine Craft Stem and Small Berry Sprig

You will need to provide:  (not included in kit)

  • Acrylic Paint
  • Paintbrush
  • Hot Glue Gun
  • Scissors
  • Tape Runner
  • Craft Glue

The cost of the Kit is $25.00*  
*Local Pick Up Available, Shipping is an Additional $9.00

There will be a limited amount of kits available, so reserve yours today.
Holiday Workshop Kits will be available November 1st to pick up or ship.

Email: suesholidayworkshop@yahoo.com to reserve your kit.

How to make a Christmas Tree in a Bottle Necklace

mini-tree-in-a-bottle-necklace-sues-creative-workshop-1161

How to make a Christmas Tree in a Bottle Necklace

I got this idea from a project I’d seen made by Tim Holtz.  Of course, I had to find a cheaper way to make it.  I’ve seen small bottles like these at Hobby Lobby with the jewelry supplies.  (I got mine online.)

Very Important…Make sure the base of the tree is small enough to fit in the top of the bottle.

Materials Used:  (*affiliate link)

 Dollar Tree-Everything always $1 – Shop Now*

*Disclaimer:  This post uses ads and affiliate links.  If you choose to make a purchase using one of the links, I receive a small commission (at no additional cost to you) that helps offset the costs of maintaining this blog.  Thanks for your support!

Directions:

  1. Squirt several drops of peeled paint ink* into the mini mister* and dilute it with water.
  2. Place a bleached bottle brush tree onto a protective surface.  Generously spray the tree with the diluted ink.  (You may want to wear rubber gloves.  I took 3 days until the ink came entirely off my fingers.)
  3. After the tree is dry, rub glitter glue* onto the tree.  Allow glitter glue to fully dry before continuing.
  4. Apply a small bit of all-purpose adhesive* onto the end of the Q-tip.  Insert the Q-tip into the bottle and add the glue to the bottom center of the bottle.
  5. Using the reverse grip tweezers, insert the tree into the bottle, and stick onto the glue.
  6. Pour glitter or micro beads into the bottle.
  7. Add a thin layer of adhesive around the side of the cork and place it back into the bottle.
  8. Screw a loop screw onto the top of the cork and add a necklace.

If you’re feeling a little funky…how about making your tree pink or purple? 

If you liked the Christmas Tree in a Bottle here’s another project you might like.

Click here for the Mini Ketchup Bottle Snow Globe Instructions. ↓

How to Make Wood Slice Snowmen

how-to-make-woodslice-snowmen-sues-creative-workshop-2854

What to do with a basket of Wood Slices*

This past summer, when my husband was trimming the old pine tree,

I asked him to save a few logs from the branches.

I wasn’t sure then what I was planning to make but I knew I wanted to save some just in case.

basket-of-wood-slices-sues-creative-workshop-1773

I asked my husband to cut wood slices out of the smaller logs using a circular saw.

If you don’t have access to a pine log or don’t feel like cutting Wood Slices*

you can also purchase them online.

For those of you who don’t want to cut your own Wood Slices*.

You can also find them online by clicking on the pictures↓.  (*affiliate link)


Make sure to double check sizes before ordering.

woodslices-sues-creative-workshop-1767

I picked out four wood slices of varying sizes.

drilling-the-hole-in-the-woodslice-sues-creative-workshop

I laid out the wood slices to determine placement of how I wanted them to go together.

I drilled small holes on the end of the wood slices with a fine drill bit approx. 1/4-1/2″ into the

end of the wood.

putting-the-woodslice-snowman-together-sues-creative-workshop-2710

Using small dowel rods or bamboo skewers for reinforcement,  I inserted the rods into the

holes with a squirt of DecoArt Americana Wood Glue*.  (*affiliate link)

Each wood slice has a small wood dowel piece in between to hold the snowman together.

drilling-a-hole-in-the-base-sues-creative-workshop

Once the wood slice snowman was completely dry and stable,

I drilled a hole in the center of the largest wood slice to use as my base.

The Snowman is attached to the base using a small dowel and wood glue*.

how-to-make-woodslice-snowmen-2855

To decorate the snowman…

  • Cut a piece of flannel slightly larger than the area around the head.
  • Fold and glue a small cuff using Fabri-Tac Permanent Adhesive*.
  • Glue the ends of the flannel together to create a tall “tube”.
  • Glue tube onto the top of the Wood Slice Snowman’s head,
  • Tie the top of the tube with a piece of string or thread.
  • Trim and fringe the excess fabric on the top of the tube to make it look like a hat tassel.
  • Cut a longer 1″ wide piece of flannel to tie around the neck of the snowman.  Don’t forget to fringe the ends.

wood-slice-reindeer-ornament-sues-creative-workshop-1186

To make a Reindeer Wood Slice Ornament…

  1. Paint the center of the wood slice with black chalkboard paint.
  2. Paint the reindeer cut out with silver acrylic paint.
  3. Glue reindeer onto wood slice with quick dry glue.
  4. Glue glitter holly berries embellishment onto reindeer.
  5. I used a push pin to start a small hole on the end of the wood slice.
  6. Screw a loop screw into the hole and add a ribbon to hang.

For more Wood Slice Projects Click on the Pictures below.


Don’t Miss a Thing…Make Sure to Follow me

Disclaimer:  This blog uses ads and affiliate links.  If you choose to make a purchase using one of the links, I receive a small commission (at no additional cost to you) that helps offset the costs of maintaining this blog.  Thank You.

Give the Gift of Amazon Prime*

Save

Reindeer Star Card

reindeer-star-card-sues-creative-workshop

Impress your friends and family this Holiday…

with a gatefold card that looks a lot harder than it really is.

This may not be a beginner card for some, but, I promise it really is not hard.

A few layers and a few simple steps and you’ll be done in no time.

The supply list may seem long…

but you can easily adapt the card with supplies you have on hand.


This is what I Used to make the Reindeer Star Card:                                           (*affiliate link)

Directions:

  1. Cut a piece of cream cardstock 7 1/2″ x 5″.  Score and fold on the 2 1/2″ mark to create a 5″ x 5″ card base with flap.
  2. Cut a piece of red patterned paper 2 1/4″ x 4 3/4″ and adhere to the front of the flap.
  3. Cut a 2 1/4″ x 2 1/4″ piece of light green patterned paper and adhere onto the bottom of the red patterned paper.  Repeat for the inside flap.
  4. Cut a piece of dark green patterned paper 4 3/4″ x 4 3/4″.  Adhere to the inside of the card.
  5. Cut a piece of red plaid paper 2 1/4″ x 4 3/4″ and adhere onto the bottom of the dark green patterned paper.
  6. Add a strip of thin washi tape to the seam of the patterned papers.
  7. Apply White and Gold Foil washi tape to a piece of white cardstock.reindeer-star-card-creating-a-washi-tape-background-sues-creative-workshop
  8. Cut two medium washi tape stars using the star die and Big Shot Cutting/Embossing Machine*.reindeer-star-card-cutting-the-star-dies-sues-creative-workshop
  9. Cut two larger stars from the gold metallic cardstock.reindeer-star-card-opened-sues-creative-workshop
  10. Adhere the first star halfway onto the flap (with the other half hanging over)  Adhere second star directly onto the back of the first star.
  11. Adhere medium washi tape stars onto the middle of the large gold stars.
  12. Cut one small gold cardstock and mount it to the middle of the front washi tape star with thin 3D foam mounting squares.reindeer-star-card-close-up-sues-creative-workshop
  13. Add small “white stag” dimensional sticker to center of the smallest star.  Add a small red adhesive rhinestone to the tip of the stags nose.
  14. Adhere a piece of gold cardstock onto the Stick It Adhesive Sheets*.  Die cut the words “Merry Christmas” using the Christmas Phrases die and stick onto card.
  15. Tie a thin gold ribbon around the flap with a small gold jingle bells and you’re done.

Finished Size:  5” x 5”  (may take additional postage to mail)


This project was sponsored by Little B LLC.

I am an Amazon Affiliate.  If you choose to purchase from Amazon using one of the above links, I will get a small commission that helps offset the costs of running this blog.  Thank You!

Try Amazon Prime 30-Day Free Trial*


Christmas Tree Card

christmas-tree-card-sues-creative-workshop-2755

Although I don’t always send a ton of handmade Christmas cards out, I do enjoy making them.

The Christmas Tree card was made using paper and stickers from Paper House Productions.

I love how the playful plaids blend perfectly together to form a Traditional Christmas feel

in this layered card.  Enjoy!  (makes me feel like singing “O’ Christmas Tree…”)


To make the card you’ll need:         (*affiliate links)

christmas-tree-card-assembling-the-layers-sues-creative-workshop

Directions:

  1. Cut a 4 1/2″ x 6″ piece of “red flannel” paper.  Hold the edge of the paper against the nib of the gold calligraphy marker to add a thin gold border on the edge of the paper.  Adhere the red flannel layer onto a 4 3/4″ x 6 1/4″ piece of black cardstock.
  2. Adhere the red flannel and black layers onto a 5″ x 6 1/2″ green card base.
  3. Cut the “deck the halls” paper (green plaid) using the “labels twenty two” die.  Add a thin gold border around the edge of the label like in step #1.  Adhere the green plaid label onto a 3 1/4″ x 3 1/4″ gold metallic cardstock layer.
  4. Cut a decorative square using the “captivating square” die and a piece of green cardstock.  Adhere the green plaid label and gold metallic square onto the top of the decorative square.
  5. Adhere the green and gold layers onto the bottom portion on the red flannel layer, leaving even spacing on the bottom three sides.
  6. Assemble the pine swag  using the 3D stickers and glue onto the top of the card.  (picture below)
  7. Finish embellishing the front of the card with the 3D Christmas Tree sticker and a couple of red adhesive rhinestones.

assembling-the-wreath-4974

This card was created for and sponsored by Paper House Productions.


*I am an Amazon Affiliate.  If you choose to make a purchase from Amazon using these links, I receive a small commission that helps offset the cost of running this blog.  Thank You!

DIY…”Merry” Canvas

Make the holidays “Merry” with this mini decorated canvas.

Create frosty, glittery goodness with this fun mini canvas project.

To make the Merry Canvas you’ll need:                                      *affiliate link

*Disclosure… This blog uses ads and affiliate links.  If you choose to make a purchase using one of the links, I receive a small commission (at no additional cost to you) that helps offset the costs of maintaining this blog.  Thanks for your support!

Directions:

  • Wrap twine around canvas and embellish with jingle bells, greenery and bow.

“This is a sponsored post.  As a member of the Joy® Design Team I have been provided product and compensation in exchange for my creative ideas.  The views and opinions are my own.

Holiday Diamond Art

Christmas Carol Set - 25 Favorite Songs, Delicious Holiday Recipes, Party Ideas & More!

Holiday Centerpiece or Party Serving Stand

holiday-centerpiece-sues-creative-workshop-2839

Tis the season for Holiday Parties and decorating…

around my house, it’s starting to kick in full steam.

Instead of stressing out, I try to create items with more than one purpose.

My Holiday Centerpiece also works wonderful as a Party Serving Stand.

holiday-stand-before-sues-creative-workshop-2810

I started with a Deflecto 3 Tier Dessert Stand* (affiliate link),

wrapping paper, glue stick and cutting mat.

holiday-centerpiece-cutting-the-circles-sues-creative-workshop-2812

  • I traced around all three of my circles onto the back of the wrapping paper.
  • Apply the glue stick generously around and inside the circle.  Lay circle onto wrapping paper and smooth out any air bubbles.  (The nice thing about using wrapping paper and a glue stick is that you can easily remove the paper and glue by soaking stand in warm water.)
  • Trim around circle and inside channels using a craft knife and cutting mat.

holiday-stand-close-up-sues-creative-workshop-2822

  • Glue lace around the outside of each circle and assemble stand.

holiday-adjustable-3-tier-stand-sues-creative-workshop-2826

Add ribbon and holly berries and you’re ready for a party.

holiday-centerpiece-sues-creative-workshop2841

Or add small ornaments and decorations for a fun Holiday Centerpiece.

“This is a sponsored post. As a member of the Deflecto Design Team I have been provided product in exchange for my creative ideas, views and opinions.”

Disclaimer:  This blog uses ads and affiliate links.  If you choose to make a purchase using one of the links, I receive a small commission (at no additional cost to you) that helps offset the costs of maintaining this blog.  Thanks for your support!

Try Amazon Prime 30-Day Free Trial

Joy Shadow Box Tray

joy-shadow-box-tray-8609

A simple Shadow Box that would be cute as Holiday Décor or used as a gift.

The “Happy Holidays” graphic would be cute replaced with a Holiday photo.

This project also uses a simple paint technique for old hardware.


Here’s what I used for my Shadow Box Tray:   

(*including amazon affiliate links)


Tips to make your project easier:

flicking-paint-8566

  • Add Snowy effect by flicking white acrylic paint onto the pine craft stem using an old paintbrush.

hardware-8570

  • Paint the brass hardware with black spray paint.  Once the paint is dry, rub Rose Gold Metallic Lustre over hardware for an aged vintage look.

joy-shadow-box-tray-close-up-sues-creative-workshop

  • For a cohesive look…rub Rose Gold Metallic Lustre onto the chipboard letters and the wood disc on the tree.
  • Cut the back of the bottle brush tree flat so that it fits snuggly into the tray.


This project was sponsored by Canvas Corp Brands and DecoArts.

I am an Amazon Affiliate.  If you choose to make a purchase using an Amazon link, I receive a small commission that helps offset the cost of running this blog.  Thank You!