DIY No Sew Valentine Gnome

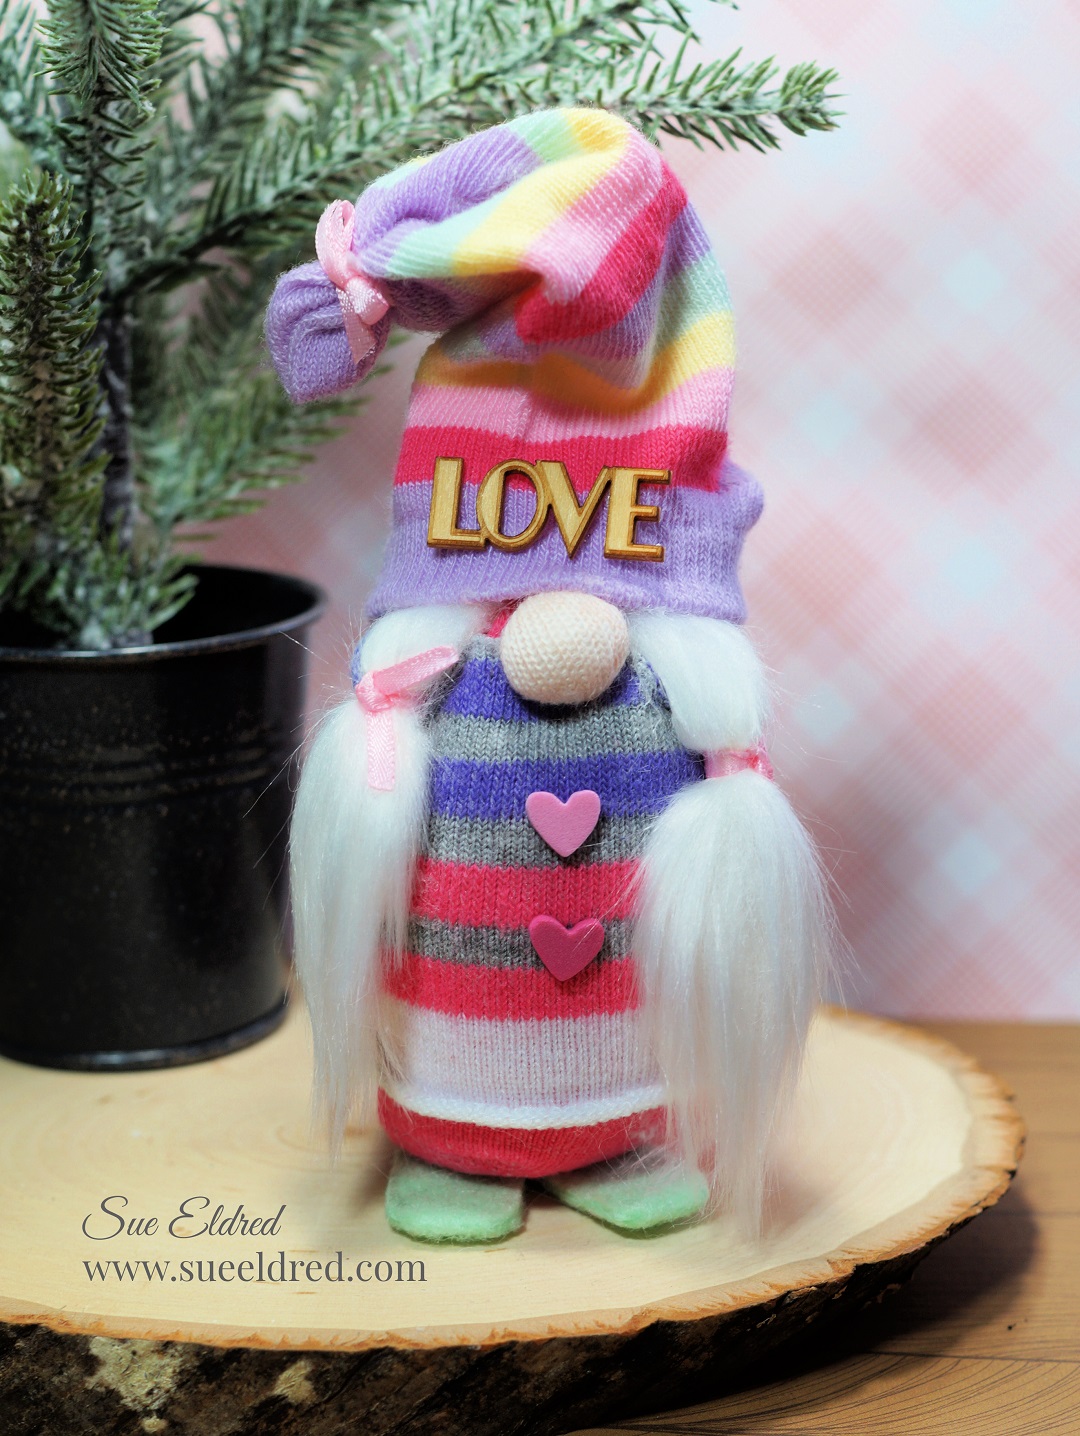
How to Make a No-Sew Valentine Gnome using Dollar Store Socks.

Love Gnomes? Love Fun Socks?

Put them together for a fun and inexpensive Valentine’s Day project.

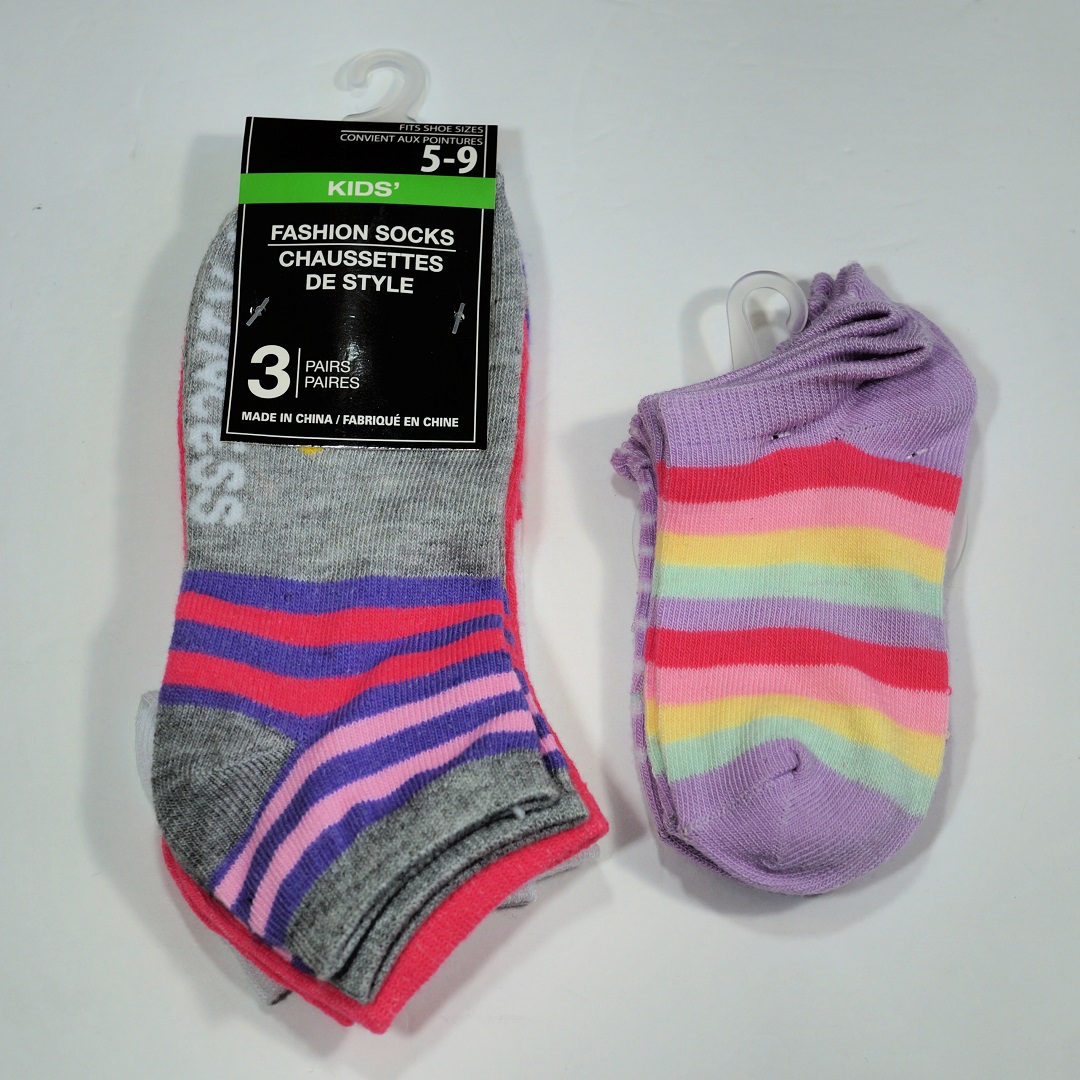
I stopped at Dollar Tree the other day to look around for “stuff” and found some super cute

valentine’s day socks. They gave me the idea to make a Valentine’s Day Gnome.

I carried around a pair for a while but ended up deciding I wanted a smaller Gnome.

I found these little girls’ striped socks, which were the perfect size for my small Gnome.

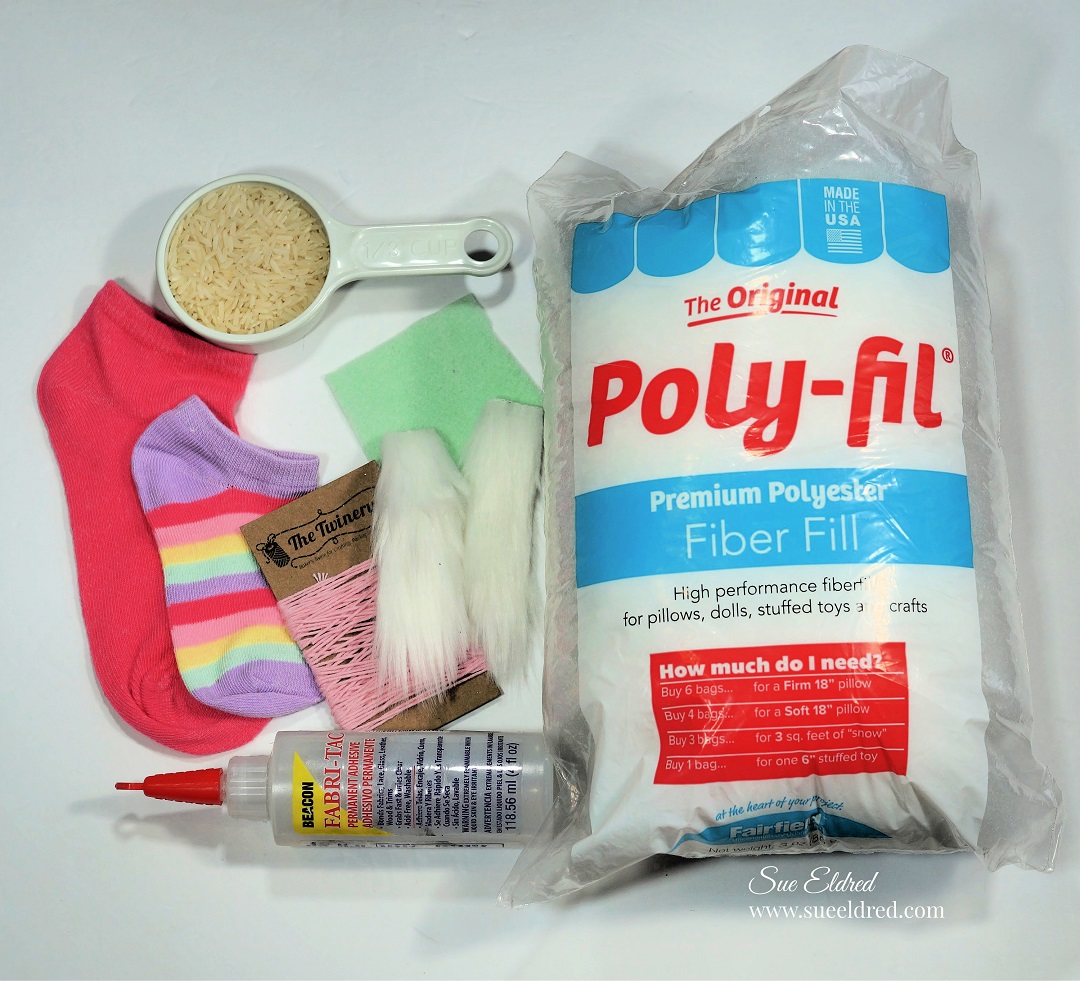
Materials Used:               (*affiliate link)

*Disclosure:  This blog uses affiliate links.  If you choose to make a purchase using one of the links, I receive a small commission (at no additional cost to you) that helps offset the costs of maintaining this blog.  Thanks for your support! 

Directions:

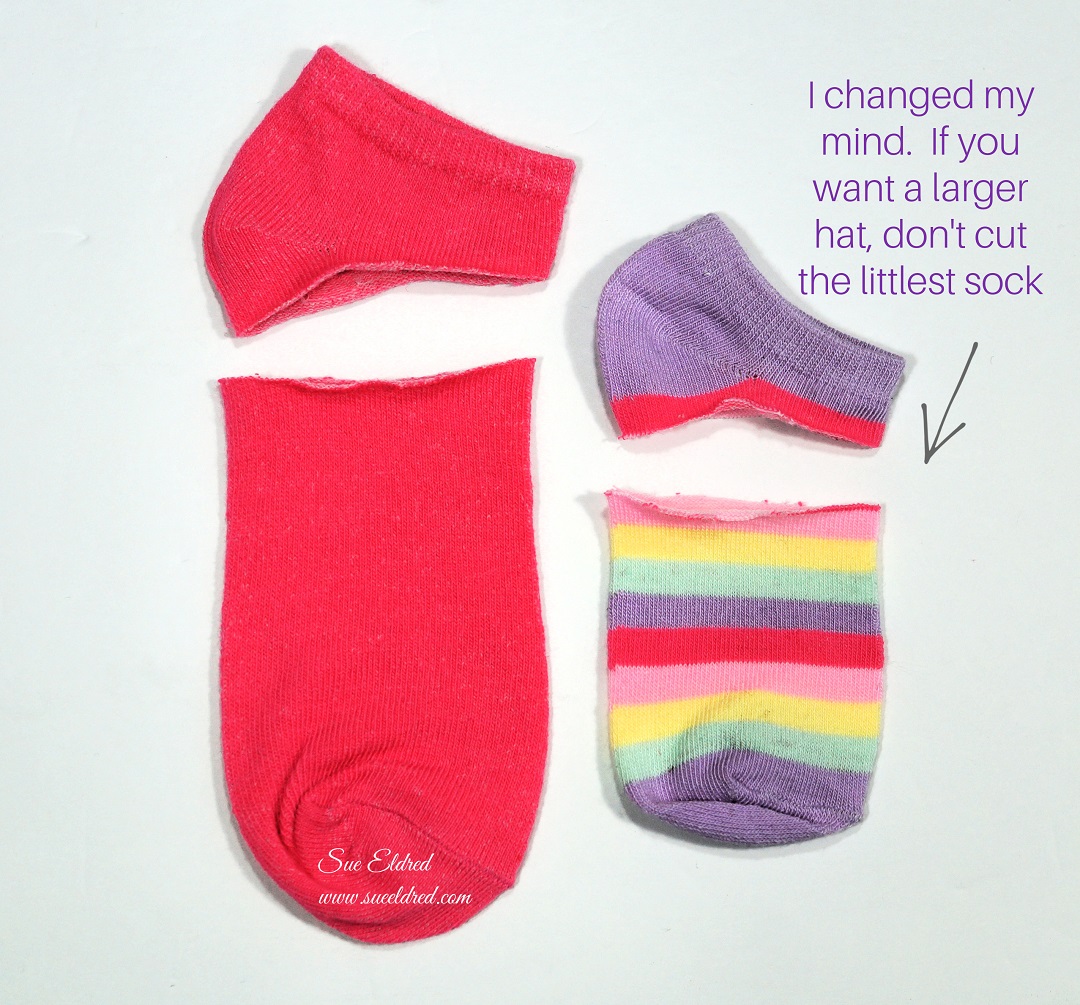
  • I used two sizes of little girls’ short socks. I originally cut both of the socks but later changed my mind. (I’ll explain later.)
  • Cut the larger sock at the heel, as shown in the image.

  • Place the 1/3 cup of rice into the sock and add poly-fil.
  • Tightly tie the sock closed with a piece of twine.
  • Add a dab of glue over the knotted string and cut away the excess material.

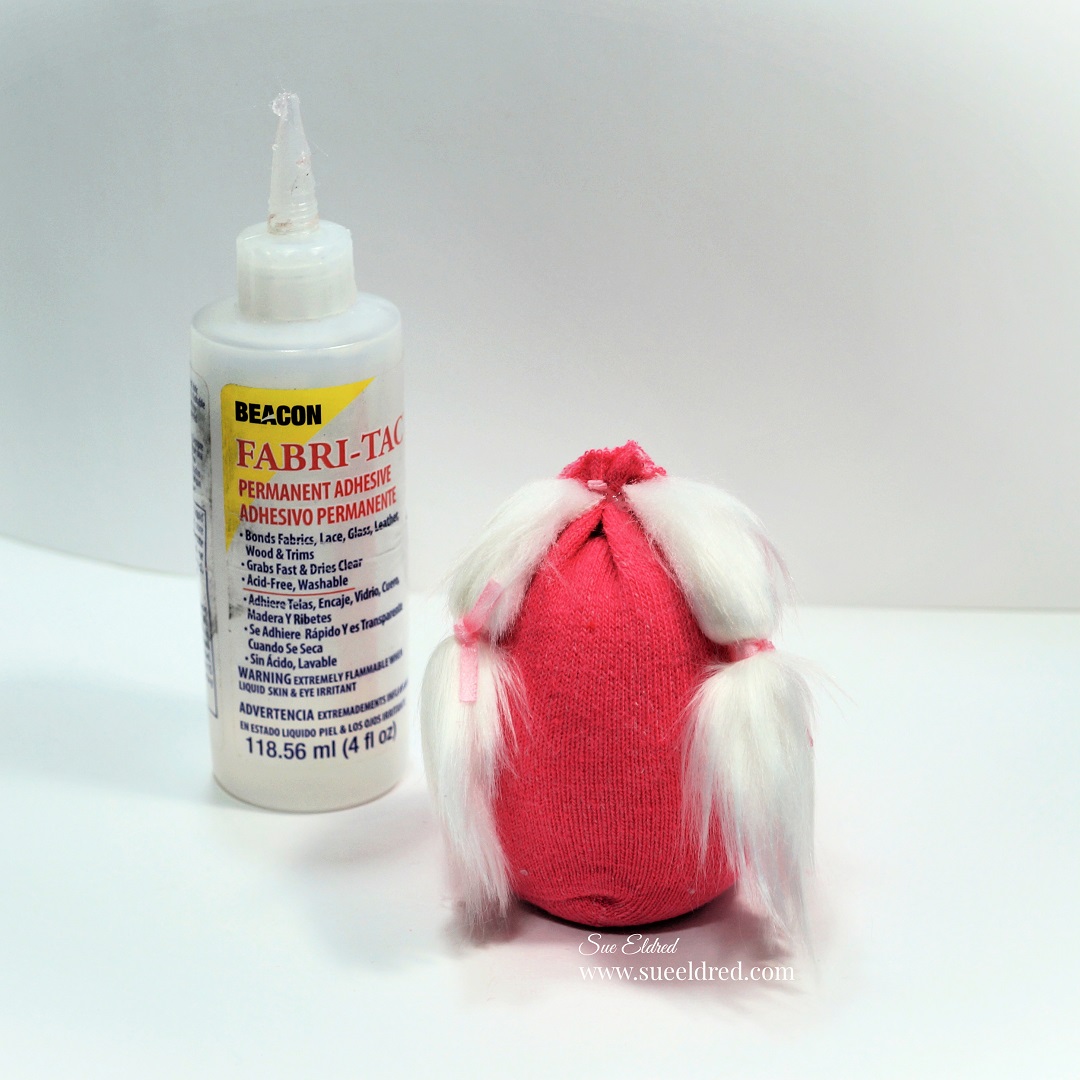
  • Cut two 1/2″ x 4″ pieces of faux fur.  (approximately)
  • Tie a piece of ribbon around the middle of each strip.
  • Glue the strips to the top of the filled sock.

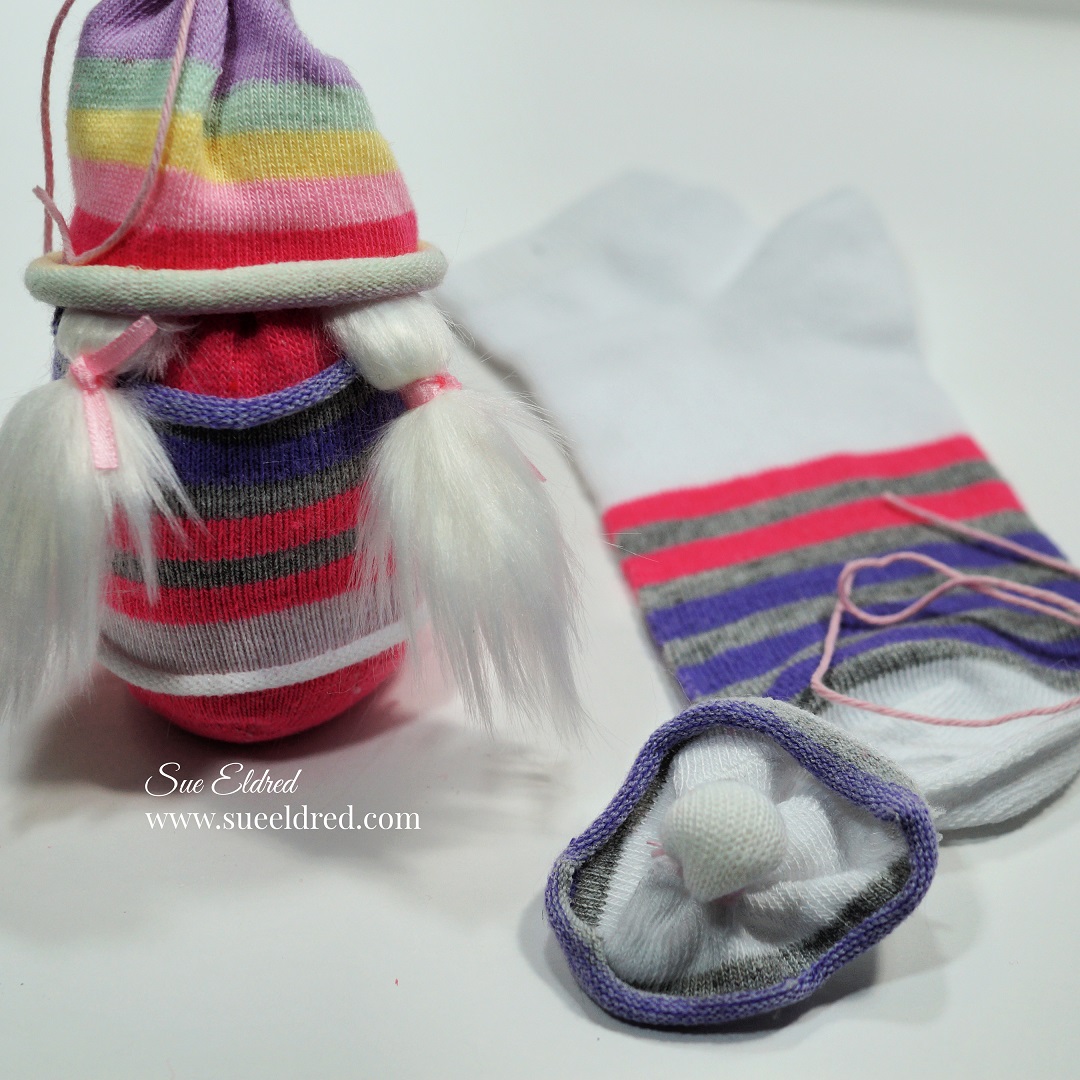
  • To make the Gnome Nose: Cut the white toe section off a second larger sock and place a small bit of poly-fil into the end. Tie tightly with string and cut the excess off.
  • Add a small bit of glue over the knot.
  • For the clothes:  Cut the rest of the striped section off the sock and place it over the sock body.
  • This is where I changed my mind. If you look at the picture above, you can see that the hat was too small for the Gnome. I used the full “smaller” sock to make the hat. I folded the heel into the back and added a small dab of glue to make it look like a fold.

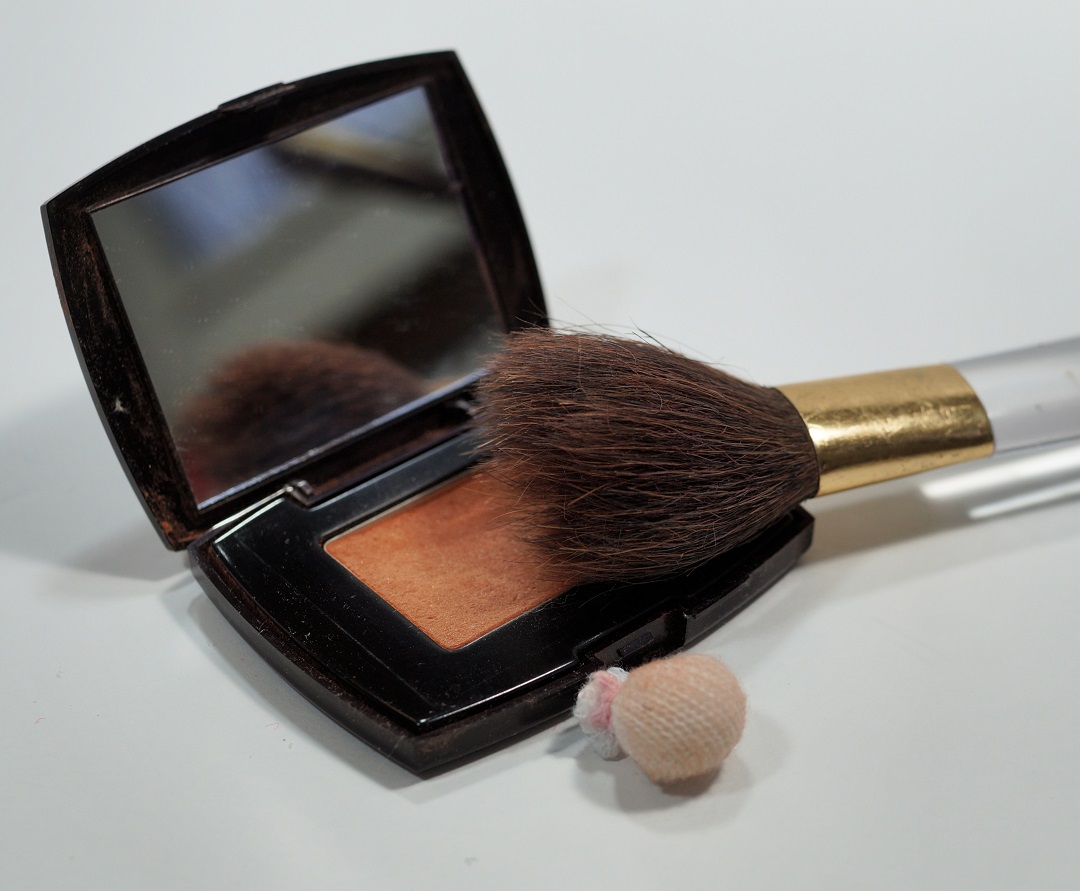
  • I used a makeup brush and bronzer powder to add color to the nose.

  • Glue the nose onto the front of the Gnome slightly over the top of the clothing.
  • Tie the end of the sock with a piece of twine to create a pom-pom.
  • Create a small bow from the pink ribbon and glue it onto the knot.
  • Place hat onto the Gnome and add a dab of glue under the rim to keep it in place.
  • Cut two small pieces of felt for the shoes and glue under the body of the Gnome.

With all the fun and colorful socks available in stores nowadays, just think of all the fun you can have while personalizing your Gnome.

Simple Country Christmas Vase

Simple Country Christmas Vase

Create a sweet Country Christmas Vase with a little help using Joy Iron On Embroidered Letters.

Supplies Used:

Shop Your Fav Brands at Scrapbook.com

*Disclosure… This blog uses ads and affiliate links.  If you choose to make a purchase using one of the links, I receive a small commission (at no additional cost to you) that helps offset the costs of maintaining this blog.  Thanks for your support!

Directions:

  1.  Spray the mason jar with a couple coats of ivory colored spray paint.

2.  After the paint has dried, lightly sand the jar to remove the paint off the letters.

3.   Drill a hole on the top of a small wood slice and paint the center with red acrylic paint.
4.  Glue the embroidered letters and wood star onto the wood slice with craft glue.
5.  Tie ribbon around the neck of the jar and add embellished wood slice.

You can find a wide selection of Joy® embroidered iron-on letters and alphabet sheets in different sizes at your local craft stores. 

“This is a sponsored post.  As a member of the Joy® Design Team I have been provided product and compensation in exchange for my creative ideas.  The views and opinions are my own.

Give the Gift of Amazon Prime*

Quick and Easy Summer Mini Album

Quick and Easy Summer Vacation Mini Album

You don’t have to take an expensive Summer Vacation to have fun when your a kid.

Between Baseball games, Swim Lessons, Swim Team, Carnivals, Pie Eating Contests,

Fireworks, Drive In Movies, Swimming, Summer Reading Program, Mini Gardens,

Tie-Dyeing and just playing outside….there’s always something to do.

Because we have so many great pictures, I decided to make my grandsons a

Summer Vacation Mini Album to remember all the good times they’ve had this summer.

To Create my Summer Vacation Mini Album I used:                            (*affiliate links)

*Disclosure:  This blog uses ads and affiliate links.  If you choose to make a purchase using one of the links, I receive a small commission (at no additional cost to you) that helps offset the costs of maintaining this blog.  Thanks for your support!

With the help of my Xyron Creative Station* putting the album together was super easy.

  • Cut two 6″ x 8-1/2″pieces of decorative scrapbook paper for the front and inside of the cover.
  • Lay decorative scrapbook paper (design side up) on the  Xyron Creative Station* crank the handle to run the paper through the machine.  As it moves through the Xyron Creative Station it adds adhesive to the back side of the paper.
  • Easy to use and it doesn’t need any electricity.
  • I like using the Xyron Creative Station* when making mini books because you get complete coverage, no wrinkling, no bubbles!

  • Cut a piece of mat board 6″ x 8-1/2″.
  • Adhere the decorative paper on each side of the mat board.

  • The notebook die creases the center of mat board as it goes through the Big Shot Die Cutting Machine making it easy to fold the cover for your mini album.

  • Cut a 2 1/4″ x 5″ strip of decorative paper to use for the spine and run it through the Xyron Creative Station*.
  • The small “hello summer” graphic is from an old Bo Bunny collection that I hoarded and never used.  It was perfect for this album.  (sorry I don’t think you can find it anymore)

  • Cut 5 white cardstock pages using the notebook die.
  • Crease the cardstock on the center score lines.
  • Using blue and white twine, wrap the twine around the inside creases and around the outside of the book cover to secure the pages.
  • I did one page at a time tying the twine in a knot on the outside after each page.

  • After I had all my pages together, I tied all the piece of twine together in one knot on the spine and let the ends of the twine hang loose.

I wanted this Summer Mini Album to be all about the pictures. 

There are no fancy embellishments or special pages inside this album.

(just lots of fun pictures of my boys)

The hardest part about making this album was choosing which pictures I wanted to use.

I printed my pictures 4″ x 5.3″ instead of the usual 4″ x 6″.

I cut each picture 3 1/4″ x 4 3/4″ which left a nice white border around my picture when added

to the album.  I used my Xyron Mega Runner* to add adhesive on the back of the pictures.

I had all 21 pictures added to my album in no time.  (one on the inside back cover)

These are three busy little boys. 

They’ve had a great summer so far and they still have another month to go before school starts. 

Who says summer is about lazy days.  

The Summer Vacation Mini Album measures 3 3/4″ x 5″.

“This is a sponsored post.  As a member of the Xyron Makers Program I have been provided product and compensation in exchange for my creative ideas.  The views and opinions are my own.

Create a Iridescent Birthday Card using StyletechCraft Opal Vinyl

Create a Quick and Easy Iridescent Birthday Card with StyleTechCraft Opal Vinyl.

When making a card using StyleTechCrafts Opal Vinyl, a regular picture just won’t do.

You need to see the shimmery iridescent fun.

StyleTechCraft’s Opal Vinyl is one of the coolest vinyl they have.

The colors shift dramatically based on light and their surroundings and adds a little

razzle dazzle to this simple birthday card.

To make the Birthday Card I used…                                        (*amazon affiliate links)

Shop Your Fav Brands at Scrapbook.com

*Disclosure:  This blog uses ads and affiliate links.  If you choose to make a purchase using one of the links, I receive a small commission (at no additional cost to you) that helps offset the costs of maintaining this blog.  Thanks for your support!

Directions:                                

  • Cut several 3/4″ strips of Opal Vinyl and stick it onto a 4 1/2″ X 6″ piece of black cardstock.  For my card I used Pink, Blue and Green Opal Vinyl.
  • Trim the excess vinyl strips from the sides of the cardstock.
  • Cut the cardstock 4″ x 5 1/4″.

  • The embossing folder creates a wonderful raised background.

  • Using a weeding tool carefully remove the negative spaces in and around the letters.
  • Place a piece of Vinyl Transfer Tape* over the letters.  Rub over the letters using a vinyl scraper tool to help the vinyl cling
  • Apply words onto a piece of 3 1/4″ x 4 1/2″ white cardstock.
  • Remove transfer tape.

  • To give the card additional dimension…I added a piece of thin foam onto the back of the white cardstock.

  • Adhere the layers onto a 4 1/4″ x 5 1/2″ white card.

“This is a sponsored post.  As a member of the StyleTechCraft Design Team I have been provided product and compensation in exchange for my creative ideas.  The views and opinions are my own.

You can now find the full line of StyletechCraft online at ATSM.

DIY Christmas Blocks from Wood Scraps

Quick and Easy Christmas Decorations using Wood Scraps, Vinyl and Stencils.

Got any old wood scraps lying around?

My Dad used to keep a box of old wood scraps for the kids to build and play with.

I grabbed a few of the worn out blocks for my holiday projects.

To make the Holiday Blocks…

Shop Your Fav Brands at Scrapbook.com

*Disclosure:  This blog uses ads and affiliate links.  If you choose to make a purchase using one of the links, I receive a small commission (at no additional cost to you) that helps offset the costs of maintaining this blog.  Thanks for your support!

  • Use Vinyl Transfer Tape* to pick up and apply the word directly onto the block of wood.
  • Rub over the letters using a vinyl scraper tool to remove bubbles and help the vinyl cling to the wood surface better.
  • Remove transfer tape.

  • Tie a simple ribbon around holiday berries and glue it to the top of the painted wood block using a quick dry glue*.
  • I placed the block onto an old vintage metal base scrounged and saved from my Dad’s garage.  (I love reusing cool old vintage junk.)
  • The Stag and Merry Christmas images were also created using my Silhouette Cameo and applied the same way as the Believe block.)

really simple Holiday Décor.

StyleTechCraft Christmas Colors Bundle on Amazon*

If you don’t have access to an electronic die cutter you might want to try a little DIY stenciling.

  • The “Believe” wood block was painted with red acrylic paint and stenciled using the Believe stencil from DecoArts and a stencil brush*  

Another quick and easy Holiday DIY.

Need Stencils?  I have several DecoArts Stencils in my Etsy Shop.

“This is a sponsored post.  As a member of the StyleTechCraft Design Team I have been provided product and compensation in exchange for my creative ideas.  The views and opinions are my own.


Don’t Miss a Thing…Make Sure to Follow me

Create a Simple Vase Centerpiece

Washi Tape Vase and Flowers 2

Want to make a great impression but don’t have a lot of time? 

Here’s a quick and easy centerpiece project for your next party or gathering?

Washi Tape and Vase

I put together this simple vase using Washi Tape I received from Little B LLC

and an inexpensive dollar store cylinder vase.

TIP:  I drew a line with a permanent marker halfway down the vase to use as a starting point to keep everything neat and all my lines straight.  Simply wrap the vase with the washi tape.  (it’s that easy)    It only takes a few minutes to create an elegant look.

Washi Tape Vase Close Up

Next…I filled it with fresh flowers cut from my garden.

Or pick up a bouquet at the grocery store.

It would be great centerpiece vase for Weddings, Showers or any special gatherings.

It’s a temporary idea with elegant results. 

Here’s the list of the Little B Decorative Tape Used:

  • 100435 Silver Foil Black Pin Stripe
  • 100562 Gold Foil Hearts
  • 100047 Blk w/Sm Wht Polka Dots
  • 100443 Gold Foil Toile
  • 100344 Black and White Stripe
  • 100011 Damask Black/White
  • 100563 Gold Foil Love

Quick and Easy Stenciled Holiday Pillows

Stenciled Holiday Pillows 2422

Add a little warmth and coziness to your home with Quick and Easy DIY Holiday pillows.

Today’s pillow projects have a couple of unique twists to make these projects super easy.

Tea Staining Ikea Towel 2248

For the “Believe” pillow I started with a .79 dish towel that I picked up at IKEA.

Tea Staining the Towel

To give my towel a creamy vintage color…  I soaked my towel in a tub of hot tea.

I wanted my towel to stay light so I only left it in a minute or two.

Leave towel in longer for a darker brown color.

Rinse the towel in hot water and then throw in the dryer to set.

Stencil the Towel

  • Iron the towel to make crisp and stencil the towel using the 12″ Word Xmas Tree stencil from Clear Scraps and dark red acrylic paint.
  • Fold the towel in half, stenciled side in, stitched the towel together and fill with a soft stuffing.

Stenciled Holiday Pillows 2316

The Snowflake pillow is a No Sew Pillow.  (I really cheated with this pillow.)

Placemat Supplies 7385

  • I used a plain 14″ x 20″ canvas placemat from Canvas Corp Brands which I stenciled with the Snowflake stencil from Stencil 1 using Tattered Angels Chalkboard Mists.  Make sure to cover and mask any areas that you wouldn’t want sprayed.
  • Glue the ribbon, lace and buttons onto the placemat using Beacon Fabri-Tac Permanent Adhesive, 4-Ounce, tucking ends to backside of the placemat.
  • Glue place mat together and fill with a soft stuffing.
  • No Sewing Required.  (for decorative use only)

stenciled snowflake pillow from a placemat

Polka Dot Peppermint Parfait

A Quick and Easy Etched Glass Project

I picked up some sweet green parfait glasses at a estate sale awhile back.

I’ve been wanting to do something special with them and thought they’d look cute

with some polka dots.  (I mean who doesn’t like polka dots?)

The Polka Dot Parfait glass is a project you can make in under a half hour.

*FTC Disclosure… “This is a sponsored post.  I have been provided product and compensation in exchange for my creative ideas.  The views and opinions are my own.”

Here’s what you’ll need:

Shop Your Fav Brands at Scrapbook.com

*Disclosure… This blog uses ads and affiliate links.  If you choose to make a purchase using one of the links, I receive a small commission (at no additional cost to you) that helps offset the costs of maintaining this blog.  Thanks for your support!

etched polka dot parfait with maskEtched Polka Dot Parfait covered with Etching Creme

Directions:

  1. Measure the width of your parfait glass.  Cut the vinyl to fit around glass.
  2. Using a standard hole punch, punch random holes onto the vinyl to create a polka dot pattern.
  3. Wrap the vinyl around the side of the parfait glass.
  4. Make sure to burnish the vinyl to get out air bubbles and to make sure the all edges all down.
  5. Wrap additional areas around the glass with removable painters tape to protect the area from splatters.
  6. Apply a thick coat of Etchall® etching crème over the polka dots using the squeegee.  (more is better)
  7. Wait 15 minutes.  Scrape excess etching crème from the side of the glass and return extra etching crème back into the bottle. (it’s reusable)
  8. Rinse glass with warm water to clean.
  9. Remove Stencil and dry.
  10. Wash glass thoroughly before using.

For a Light and Festive Holiday Treat try adding crushed Candy Canes to vanilla ice cream. 

  • Place ice cream back into freezer to set up.
  • Don’t forget to save some crushed candy canes to sprinkle on top.

Holiday Diamond Art

Etched Snowflake Candy Jar

Quick and Easy Holiday Gift Idea

When it comes to the Holidays I love Quick and Easy Gift Ideas.

For the Snowflake Candy Jar…

I used a small canning jar etched with snowflakes and filled with candy.

It’s a project that I was able to put together in under a half hour.

Snowflake Candy Jar Supplies 1274

To make the Snowflake Candy JAR…                 

  1. Punch a strip of Snowflakes using etchmask™ vinyl and a snowflake punch.
  2. Carefully cover the jar with the vinyl.
  3. Make sure to burnish the vinyl to get out air bubbles and to make sure the all edges all down.
  4. Apply a thick coat of Etchall over the snowflake cut out using the squeegee.
  5. Wait 15 minutes.  Scrape excess etching crème from the side of the jar and return extra etching crème back into the bottle. (it’s reusable)
  6. Rinse jar with warm water to clean.
  7. Remove Stencil and dry.
  8. Add adhesive rhinestones to the center of each snowflake.
  9. Wrap craft stem around the neck of the jar and glue on a red button.

Snowflake Candy Jar Covered 1287

  • Cut a small circle from decorative scrapbook paper and adhere to lid of the jar.
  • Embellish jar with greenery stem, jingle and bow.

Snowflake Candy Jar 1472

   This would make a great Teacher, Hostess, Bunco, or Gift Exchange Gift.

This project was created for and sponsored by Etchall®.


Don’t Miss a Thing…Make Sure to Follow me.

Shop Your Fav Brands at Scrapbook.com

Disclaimer:  This blog uses ads and affiliate links.  If you choose to make a purchase using one of the links, I receive a small commission (at no additional cost to you) that helps offset the costs of maintaining this blog.  Thanks for your support!

Try Amazon Prime 30-Day Free Trial

Quick & Easy Washi Tape Make-Over

Quick & Easy Washi Tape Make Over 7015

Quick and Easy, Keep It Simple.  Sounds like a great DIY plan. 

With a little creativity you can transform plain into something fun and personal.

Deflecto Black Pencil Cup 6944

I started with a plain pencil cup from Deflecto.

With a little Washi Tape wrapped around the top and bottom of the cup, a couple of stickers and

accessories…  I now have a cute pencil cup to set on my desk.

I added a couple of my favorite pictures of my special guys from last year.  (boy have they grown)

Quick & Easy Washi Tape Make Over 7014

Need a couple “brownie points” for the upcoming back to school?

This would make a great teacher gift.

Just add the Teacher’s Name, Grade or “Welcome Back to School” along with a apple sticker or two.

Great for Dorm Rooms too.

“This is a sponsored post. As a member of the Deflecto Design Team I have been provided product in exchange for my creative ideas, views and opinions.”

 Featured on Hometalk.com