How to make a Farmhouse Garden Sign

How to make a Farmhouse Garden Sign

How to make a Personalized Farmhouse Garden Sign.

The “Garden sign” is a quick and easy Dollar Tree project.

Now that garden season is upon us, my mind is distracted with all things gardening.

I will start planting next week, and I can’t wait.

In anticipation of this year’s garden, I created a garden sign

using an inexpensive galvanized banner purchased at Dollar Tree*.

I made it with a traditional red, white, and blue color scheme.

How to make a Farmhouse Garden Sign

Materials Used:  (*affiliate links)

StyletechCraft products brought to you by ATSM Craft*

*Disclosure:  This blog uses ads and affiliate links.  If you choose to make a purchase using one of the links, I receive a small commission (at no additional cost to you) that helps offset the costs of maintaining this blog.  Thanks for your support!

How to make a Farmhouse Garden Sign

Directions:

Buy Your Crafting Supplies Now at Dollar Tree starting at $1.25!

How to make a Farmhouse Garden Sign

There are so many great colors of StyleTechCraft Glossy Craft Vinyl to choose from.

How to make a Farmhouse Garden Sign

How to make a Farmhouse Garden Sign

  • Remove the vinyl from its white protective layer and place onto the banner.
  • Rub over the vinyl with the scraper tool to transfer the vinyl onto the banner.
  • Gently lift the transfer paper from the vinyl.

FYI…the transfer paper is reusable.

How to make a Farmhouse Garden Sign

  • Line up the second layer over the first.

How to make a Farmhouse Garden Sign

  • Gently remove transfer paper from the banner.
  • Allow the vinyl to cure for 72 hours before using.

How to make a Farmhouse Garden Sign

The vinyl on the sign will hold up to the weather and looks great in my garden.

“This is a sponsored post.  As a member of the StyleTechCraft Design Team I have been provided product and compensation in exchange for my creative ideas.  The views and opinions are my own.

Preserving Flower Seeds in Fall

Preserving Flower Seeds in Fall

Sue’s Garden Tip…  

Preserve Flower Seeds in Fall for a Beautiful Garden Next Summer.

Fall is a great time to harvest flower seeds.

Now that the weather has started getting a little cooler, it’s a great time

to start thinking about harvesting your flower seeds for next year’s garden.

Preserving Flower Seeds in Fall

My dad enjoyed gardening…

and I think a little of his love may have rubbed off on me.

In the past, I’ve spent a lot of money at the garden shop purchasing flowers to fill

my flower beds.  As you know, it can be very costly.

In the Spring of 2020, not knowing if I would be able to visit my favorite garden shops,

I purchased seeds for planting and started them in early Spring.

I was pleased with the results.

And at the end of that Summer, I started collecting seeds for the following year.

DIY-Mini Greenhouse for Starting Seeds-Sue's Creative Workshop www.sueeldred.com

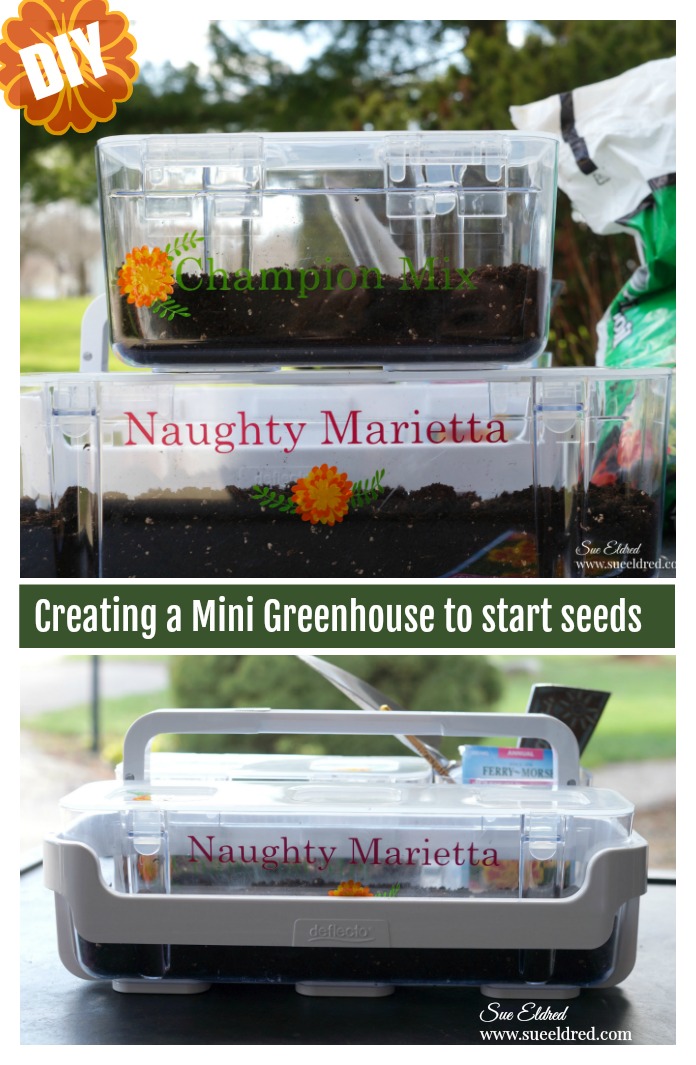
I even wrote a post called Creating a Mini Greenhouse for Starting Seeds.

Preserving Flower Seeds in Fall

When the cooler weather starts setting in…

and the summer blooms begin to fade,

I like to snip off the spent flowers to save for seeds.

It’s best to gather the seeds on a bright, dry, sunny day. 

If they’re not completely dry,

I put them in little glass jars until they finish drying.

I put a little paper bag in each jar with the color and type of flower inside.

Preserving Flower Seeds in Fall

Separate the seeds from the center of the flower and remove as much debris as possible.

I put the seeds in labeled bags until I can plant them next year.

(You can purchase mini bags on Amazon*.)

*Disclosure:  This blog uses ads and affiliate links.  If you choose to make a purchase using one of the links, I receive a small commission (at no additional cost to you) that helps offset the costs of maintaining this blog.  Thanks for your support!

Preserving Flower Seeds in Fall

Make sure to watch out for these little guys.  (Bees are bad in the fall.)

Preserving Flower Seeds in Fall

And while you are at it, don’t forget to put a few flowers in a vase to enjoy.

Preserving Flower Seeds in Fall

This is only one of my flower beds.

I have flowers in several locations around the house.

I get a lot of satisfaction from knowing that 90% of my flowers,

except for perennials and a few other summers favorites were all started by seed.

DIY Flower Pot Label

DIY Flower Pot Label

Summer Crafting with Unconventional Materials

Last year, for the first time, I collected seeds from various flowers in my garden.  

This year, once those seeds were planted, I needed a creative way to identify the flowers.  

Using plastic cut from a Milk Jug and Alcohol Ink, I created artsy flower pot labels.

DIY Flower Pot Label

Materials Used:              (*affiliate links)

*Disclosure:  This blog uses ads and affiliate links.  If you choose to make a purchase using one of the links, I receive a small commission (at no additional cost to you) that helps offset the costs of maintaining this blog.  Thanks for your support!

DIY Flower Pot Label

Directions:

  • Protect your work surface.  (this can be a messy project)
  • Cut the flat sides of the milk jug into 2 ½” x 3 ½” strips.
  • Fill the mini mister* with alcohol*.

DIY Flower Pot Labels

  • Drop several drops of alcohol ink* onto the plastic.
  • Spray the alcohol inks with the alcohol-filled mini mister to make the inks run and spread.
  • Use a straw to direct the spread of the inks.

DIY Flower Pot Label

  • Once the inks have dried, spray the plastic with a matte acrylic sealer to help weatherproof the label.

DIY Flower Pot Label.

DIY Flower Pot Label-Sue's Creative Workshop www.sueeldred.com 8823

I have several small pots of flowers growing.  I will eventually place some of them in the ground.  

The others I will leave in the pots.  I will harvest the seeds again in the fall.

This was a very cost-effective way to add beautiful blooms to my garden.  

A “Pear-fectly” Good Day.

The old pear tree in the side yard has always given us a lot of fruit.

This year it seemed abundantly overloaded.

We usually don’t do anything with the pears.

The kids, on occasion, have used them for batting practice.

Feeling inspired this year, I decided to make pear sauce and pear butter.

So, on a beautifully warm end of Summer day, I enlisted the help of my three grandsons

to pick pears. The boys enthusiastically agreed.  (can you find the third boy?)

It didn’t take long for them to fill three large buckets full of pears.

It takes approximately 30 pears for one batch.

After making one batch of pear sauce and two batches of pear butter, I remembered why

I don’t make it every year. Peeling pears is a lot of work.

After all the work that goes into canning the fruit, I needed pretty labels to put on the jars.

(I will be giving some away.)

Here’s what I used: (*affiliate link)

StyleTechCraft™ products brought to you by ATSM Craft 

*Disclosure:  This blog uses affiliate links.  If you choose to make a purchase using one of the links, I receive a small commission (at no additional cost to you) that helps offset the costs of maintaining this blog.  Thanks for your support!

Directions:

  • Measure and size the SVG label file so that the labels fit the side of the jar.
  • Cut the labels and the words using the Silhouette Cameo.
  • Use the vinyl pick tool to remove the excess vinyl inside and around the words.
  • Use the transfer tape to layer the words and the labels.
  • Apply the finished label onto the jar.

I used the Uchida Clever Lever Mega Circle Craft Punch* to punch a perfectly sized circle to fit under the canning ring.

Because little details make a difference…

I wrapped gold and white twine around the neck of the jar and attached a small tag.

“This is a sponsored post.  As a member of the StyleTechCraft Design Team I have been provided product and compensation in exchange for my creative ideas.  The views and opinions are my own.

PIN ME ↓

Creating a Mini Greenhouse for Starting Seeds

I was searching online for Mini Greenhouses when I came across an image of a container

for starting seeds that reminded me of the containers found in the

Deflecto Stackable Caddy Organizer*.

That image sparked an idea for creating a moveable mini greenhouse.

“This is a sponsored post.  As a member of the StyleTechCraft Design Team I have been provided product and compensation in exchange for my creative ideas.  The views and opinions are my own. 

Because everything’s a little better when you add vinyl…

I decided to personalize the containers.

I used a Silhouette Cameo Electronic Die Cutting Machine* to create and cut the flower

names out of Ruby and Apple Green Polished Metal adhesive vinyl from StyleTechCraft.

Using the weeding tool, carefully remove the negative spaces in and around the letters.

This blog uses affiliate links.  If you choose to make a purchase using one of the links, I receive a small commission (at no additional cost to you) that helps offset the costs of maintaining this blog.  Thanks for your support!

I also cut and weeded 4 graduating sizes of ruffled flowers using Yellow and Orange Polished

Metal Adhesive Vinyl and leaves made from Apple Green Polished Metal Vinyl.

Stager and layer the vinyl flowers to create a marigold-looking flower.

To apply the vinyl:

  • Cut a piece of transfer tape a little larger than the words.
  • Lay transfer tape over the words and give a gentle rub using a scraper tool.

  • Use the transfer tape* to apply the words onto the container.
  • Rub over the transfer tape with the scraper tool to help the letters stick.
  • Remove the transfer tape*.

The Deflecto Stackable Caddy Organizer* comes with three clear containers; small, medium,

and large.  I used the two larger containers to plant my seeds.

I took the lid off the smallest container and used it to hold my garden tools and seed packets.

  • Add a layer of potting soil to the bottom of the clear containers and sprinkle the top with seeds.
  • Add a thin layer of soil on top of the seeds and water.

The containers create a humidity dome which is great for keeping seeds moist and protected.

The seeds will start to sprout in a 5-10 days.

Old Weathered Flower Pots-Sue's Creative Workshop www.sueeldred.com

When the seedlings mature, I will transfer them into pots and then into the ground.

My Mini Greenhouse Seed Starter is easy to move around so I can take advantage of the best

sunshine.  A great project to do as a family.

(Watch the video for more information on the Deflecto Stackable Caddy Organizer*.)

Save

For more Family Fun you might also like…

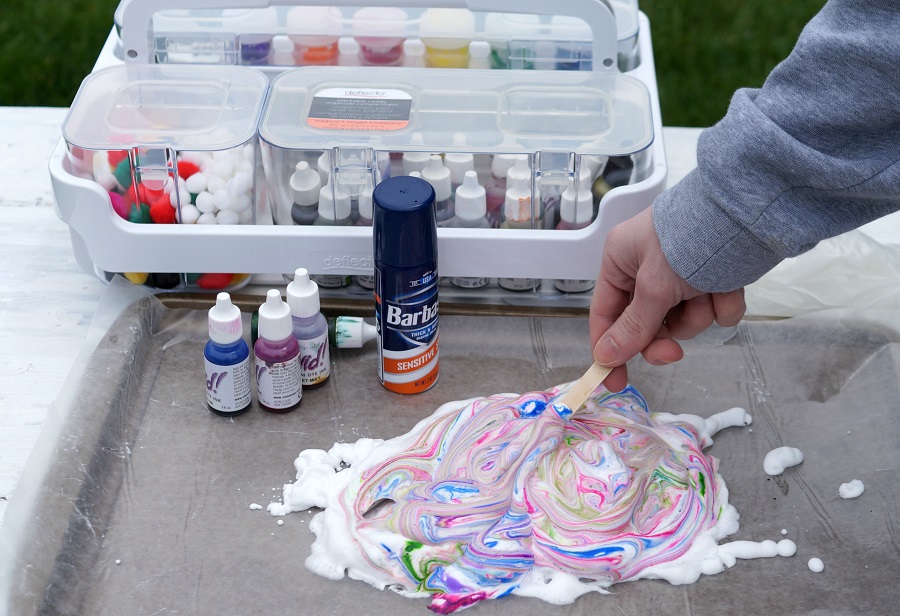
How to Make Shaving Cream Art.

Shaving Cream Art-Sue's Creative Workshop www.sueeldred.com 541

PIN ME↓

DIY-Mini Greenhouse for Starting Seeds-Sue's Creative Workshop www.sueeldred.com

Gnome Gardening with Kids

Gnome Gardening with Kids

One of our favorite Summer traditions is creating our annual Gnome Gardens.

The boys and I look forward to making them every year.

I started the tradition of Gnome Gardening several years ago when Nick was only 3.

You can see our first garden here.

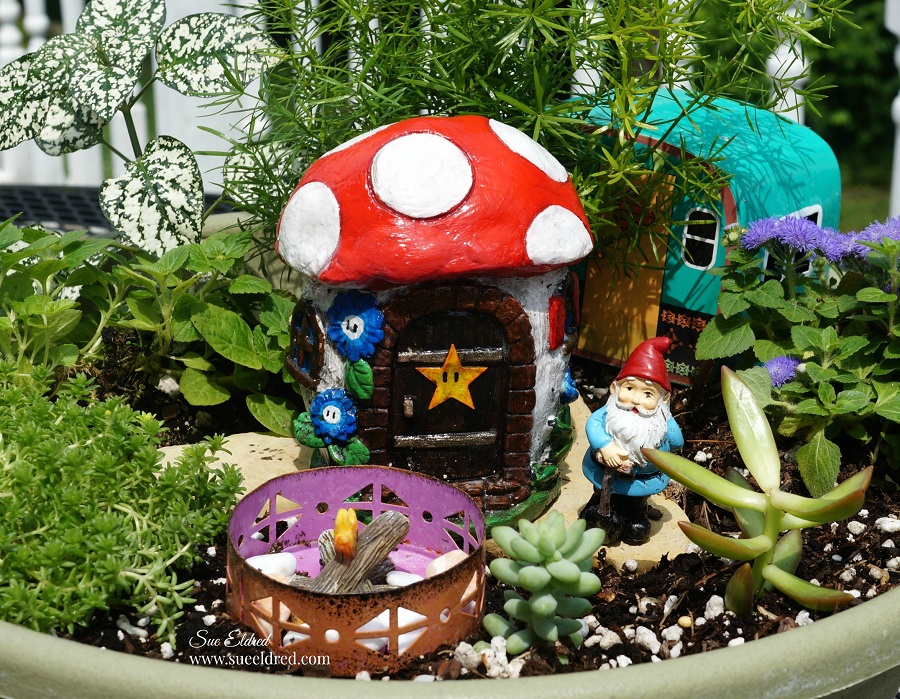
To create our gardens we use a variety of containers and objects we’ve picked up along the way.

For the plants, we use succulents and flowers that won’t grown too big.

I like using Asparagus Ferns to mimic trees.

As mini gardens grow in popularity… there several places you can find accessories

for your gardens.  We like to get something new for our gardens every year.

This year we added items picked up at  Dollar Tree*.

*Disclosure:  This blog uses ads and affiliate links.  If you choose to make a purchase using one of the links, I receive a small commission (at no additional cost to you) that helps offset the costs of maintaining this blog.  Thanks for your support!

This is Nick’s 6th year making Gnome Gardens so he’s pretty proficient with his garden.

Check out last years garden.  (always an adventure)

This is Warren’s 3rd year making a Gnome Garden.  

He lets me help him.   (maybe that’s why his is my favorite)

His garden is all about the house placement.

You can see Warren’s first Gnome Garden here.

I love seeing how much they’ve grown from their first gardens.

The extra credit award goes to my daughter-in-law (the boys mom). 

She found this little gnome house at Dollar Tree* and repainted it with a Mario inspired look.

The tiny Camper and firepit was from last years garden and is available at Leisure Arts, Inc.

Leisure Arts Mini Garden Supplies…        (*affiliate link)

This year was Emerson’s turn for his first Gnome Garden.

He always wants to do everything his big brothers are doing.

Water bottles are a great item to have when Gnome Gardening. 

It helps the boys control how much water goes on the garden, and they’re fun too.

This little stinker sprayed me as I stuck my head out the window for a quick pic.

(I may have sprayed him first.)

Creating mini Gnome Gardens is a fun and memorable project to make with kids.

We always have a good time.

It gives them something to take care of all summer long.

And…it adds a little whimsy to my front porch.

To create a Gnome Garden you’ll need:

  • Container for your garden. I like finding unusual items like the top of a broken wagon. It adds a little extra whimsy to the garden.
  • Good Potting Soil
  • Small Garden Tools
  • Gnome or Fairy Figures
  • Rocks, Twigs and other found objects
  • Store Bought Accessories such as the gnome houses
  • Succulents
  • Annuals that won’t grow too big or tall
  • I like to use Asparagus Ferns to mimic trees
  • Water Bottle
  1. Start the Gnome Garden by adding potting soil to your container.
  2. Allow the kids to loosen up the soil before adding plants.
  3. Small gardening tools are also fun to have.
  4. Add plants to the container before adding accessories.
  5. I like to add the largest plants first near the back of the container.
  6. Allow the kids to add their special pieces to the garden.
  7. Give the garden a good spray of water using the water bottles.

A Special Thanks to Leisure Arts, Inc. for providing the Mini Garden Supplies. 

Gnome kits

The Ugly Planter Box

It’s true…I have a soft spot in my heart for sweet old gentlemen. 

(and apparently, so does my husband)

While on a call, my husband met this nice older gentleman.

The two began to talk and one thing leads to another and my husband walks away

with this wood planter box that the gentleman had made.

“This is a sponsored post.  I have been provided product from Wagner and DecoArt in exchange for my creative ideas.  The views and opinions are my own.

Stenciled Wood Planter Box

As he unloaded it from the car he actually apologized.   (it’s like he doesn’t know me at all)

It was a little unique with the hand drawn pictures on the side.

But, I thought it was great.

All it needed was a couple coats of Farmhouse White Curb Appeal Paint from DecoArt*.

Shop Your Fav Brands at Scrapbook.com

*Disclosure:  This blog uses ads and affiliate links.  If you choose to make a purchase using one of the links, I receive a small commission (at no additional cost to you) that helps offset the costs of maintaining this blog.  Thanks for your support!

Earlier this year… I received the HomeRight Super Finish Max Extra Power Painter*

along with the HomeRight Large Spray Shelter* from the awesome folks at Wagner.

I’ve been wanting these for a while now and have been eagerly waiting  for the weather to turn

nice and the rain to stop so that I could use them.

With the exception of trying the sprayer at the Creativation Trade Show,

it was the first time I’d used a power sprayer.  It was super easy to use and clean up.

And…it comes with three sprayer tips for different uses.

The portable spray tent is great to use on days with a little breeze or even indoors.

I can’t wait to use it on even bigger projects.

Ok, I’ll admit, because of the marker drawings on the side it took more than a couple coats.

It really was easy to use and the Curb Appeal Paint dried really quick.

After all the coats of paint were dry I gave the box a light sanding to make it smooth.

The box looked a little too plain, so I decided to stencil a design on the sides.  

To stencil the design…

  • Position the stencil onto the box and tape down the edges with removable painter’s tape to keep the stencil from moving.  Use stipple brush to apply paint inside open stencil areas.
  • Carefully remove stencil from box.  Make sure their is no excess paint that’s seeped under the stencil before moving the stencil to the next area on the box.

Learn More 

  • I painted the edges of the box with a thin layer of “dolphin” paint.
  • After everything was completely dry I lightly sanded the box with a piece of extra fine sand paper.  The sand paper gives the box the worn and weathered look I was going for.

Now onto the fun part, the fruits of my labor.

I picked soft pink geraniums, vincas, pink coleus and vinca vines to fill my flower box.

I put the box on an old white bench and sat it in front of my window.

It’s one of the first things I see as I come down the stairs in the morning.

I love how soft and delicate the flowers look inside the box.

It’s a great addition to my front porch.  

And to think my husband apologized for bringing it home.  (I think it’s lovely.)


Don’t Miss a Thing…Make Sure to Follow me

If you liked this post you might like to read  A Trash to Treasure Love Story


Gnome Gardening with Boys

Gnome Gardening with boys can be kind of tricky.

You need to be extremely prepared and very patient.

It’s messy and everything moves real quickly.

Earlier this summer the boys and I created Gnome Gardens.

It’s our annual tradition.  (Nicholas and I’ve been doing this for 5 years)

Thanks to some wonderful supplies donated by Leisure Arts, Inc.

and a few left over items from previous gardens we had a wonderful time and a lot of fun.

Leisure Arts Mini Garden Supplies…        (*affiliate link)

LeisureArts.com has a fun selection to choose from.

For our Gnome Gardens I like to use succulents, plants specific for mini gardens

and plants that won’t get too big.  And of course good potting soil!

Spray bottles are also a must.  (beware you might WILL get wet!)

Making the Gnome Gardens are a fun way to spend time with the boys.

The boys get to plant, water, watch the plants grow and play with the gnomes.

It’s very educational.

Nick’s Gnome Garden

For Nick’s Gnome Garden we used an old broken down wagon. 

It’s fun to use unconventional items when Gnome Gardening.

Warren’s Gnome Garden

For Warren’s Gnome Garden we used a simple round planter bowl. 

I think it turned out real cute. 

I’m still on the look-out for something a little bit different for his garden next year.

All and all it’s fun, rewarding and hopefully something they’ll remember in the future.

Maybe, just maybe, I’m installing a love of gardening.

Emerson the Littlest Brother  (maybe next year)

Nick and Grandma’s very first mini garden (Read about it HERE!)

A Special Thanks to Leisure Arts for providing the Mini Garden Supplies. 

We think you’re awesome!

Shop Your Fav Brands at Scrapbook.com

*Disclosure:  This blog uses ads and affiliate links.  If you choose to make a purchase using one of the links, I receive a small commission (at no additional cost to you) that helps offset the costs of maintaining this blog.  Thanks for your support!

DIY Bloom Planters

“bloom where you are planted”

A little Inspiration for my Summer Flowers…

I’m not sure if it’s a subliminal message or a direct request.  (to my plants that is)

BLOOM!

I picked up these beautiful purple flowers over the week-end and decided to spruce up a couple

of plain pots into something special.

FYI…the name of the plant with Campanula, a partial shade loving perennial.

How to make a DIY Bloom planter…              (*affiliate link)

  1.  Paint terra cotta pot with 2 coats of white paint.
  2. Brush a thin layer of purple paint along top band.  (no need to be perfect)
  3. Lightly sand pot for a distressed look.
  4. Using a cut file and the Silhouette Cameo*, cut the saying out of the purple glitter vinyl.
  5. Apply the saying onto the pot using transfer paper.  Smooth into place and remove transfer paper.

Shop Your Fav Brands at Scrapbook.com

*Disclosure:  This blog uses ads and affiliate links.  If you choose to make a purchase using one of the links, I receive a small commission (at no additional cost to you) that helps offset the costs of maintaining this blog.  Thanks for your support!

The blue ceramic planter was plain and simple until I added stripes using the glitter vinyl,

and applied the light blue glittered vinyl words using a Vinyl Transfer Tape*.

Perfect decorative accent for my summer front porch.  (or a great gift idea)


Don’t Miss a Thing…Make Sure to Follow me


Ask for Self Adhesive Glitter Vinyl Sheets- by Styletech from Tape Technologies* at your local Scrapbook Store.

“This is a sponsored post.  As a member of the StyleTechCraft Design Team I have been provided product and compensation in exchange for my creative ideas.  The views and opinions are my own.


Sprucing Up with Holiday Greens

It doesn’t have to cost a lot to spruce up your home for the Holidays.

I took advantage of the beautiful warm December Day we had yesterday to spend time outside

sprucing up the front porch with some Holiday greenery.

This year…October and November was an extremely busy and stressful time for me.

And, even though I winterized and cleaned up most of the flowers in the flower beds.

The big pots on the front porch were ignored.

A little Holiday Love was needed.

I used my Fiskars Pruning Shears* and went around the yard and cutting sprigs of pine

branches from the large pine trees in my yard.  (lucky for me I have several)

I have a friend who buys an extra Christmas tree to chop up the branches to use for greenery.

After finishing cleaning out the pot…

I stuck the ends of the branches into the dirt filling up the pot making it look like a little tree.

I added a few pinecones for fun.

I tied a simple bow around the neck of a Solar Lamp* and added that to the pot.

So simple and easy.  But, what a difference it makes.

One for the other side of the stairs as well.

A little Holiday swag for the sled.

I love this vintage sled I picked up at a flea market last year for only $15… skates included.

I’m keeping it fairly simple again this year.

I’ll be honest, with losing my Dad last month, I’ve had a hard time decorating this year.

I’m giving myself grace to keep it simple.  Family is really all that matters.

Happy Holidays…from my house to yours


Holiday Gift Guide!

*Disclaimer:  This post uses ads and affiliate links.  If you choose to make a purchase using one of the links, I receive a small commission (at no additional cost to you) that helps offset the costs of maintaining this blog.  Thanks for your support!

Try Amazon Prime 30-Day Free Trial