How to make a Halloween Hauntings Treat Bag

Halloween Treat Bag 185

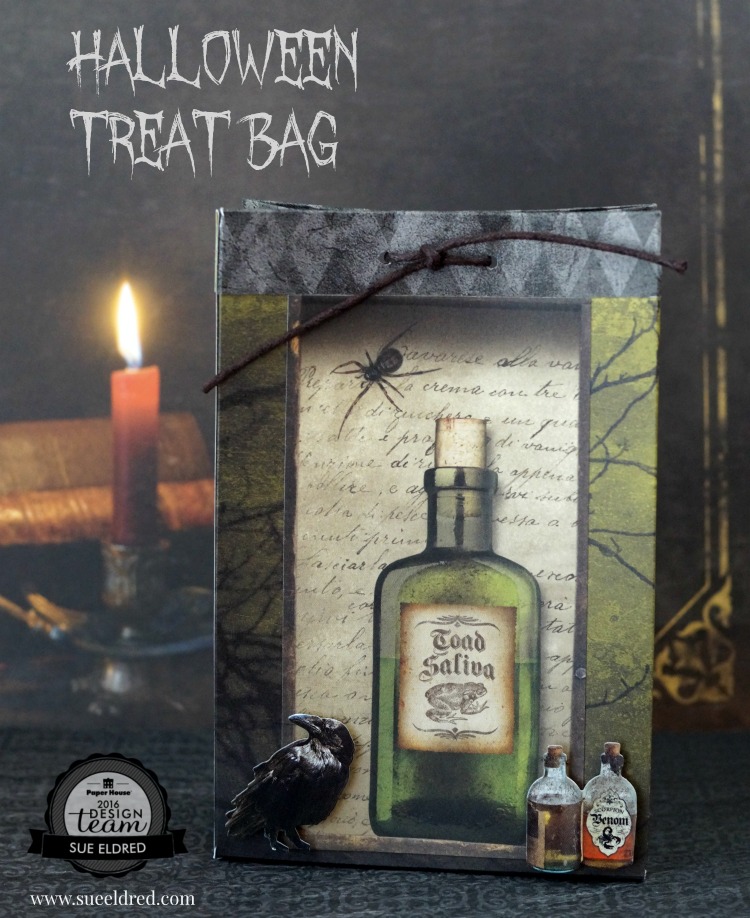
You can make a Spooky Halloween Treat bag using only one piece of 12″ x 12″ paper.

That is as long as you’re not afraid of a few measurements… it really is pretty easy.

How to make the Halloween Treat Bag

Here’s what you’ll need:

Directions:

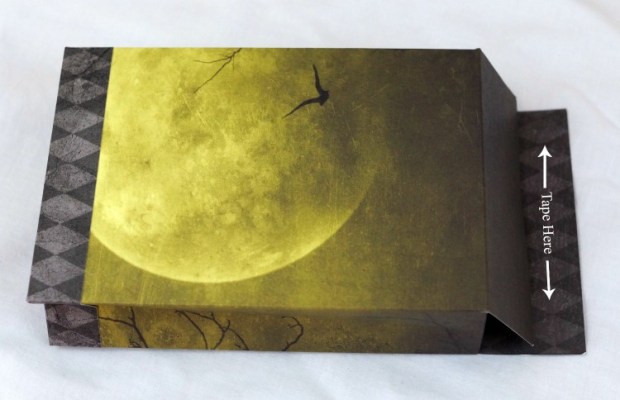
  1. Cut All Hallows Moon double sided Halloween paper to 8 1/4″ x 11 3/4″.
  2. Score the long width of the paper at 3/4″, 4 3/4″, 5 1/2″, 6 1/4″, 10 1/4″ and 11″.
  3. Score the top of the paper at 3/4″.
  4. Score the bottom 1 1/2″.
  5. Fold along score lines
  6. Cut away the first 3/4″ corner piece.
  7. Fold over the top 3/4″ and adhere in place.  (top diagram)
  8. Fold along lines to create a 4″ x 6″ box.
  9. Tape Side and bottom of the box.Taping the Bottom Flap 148
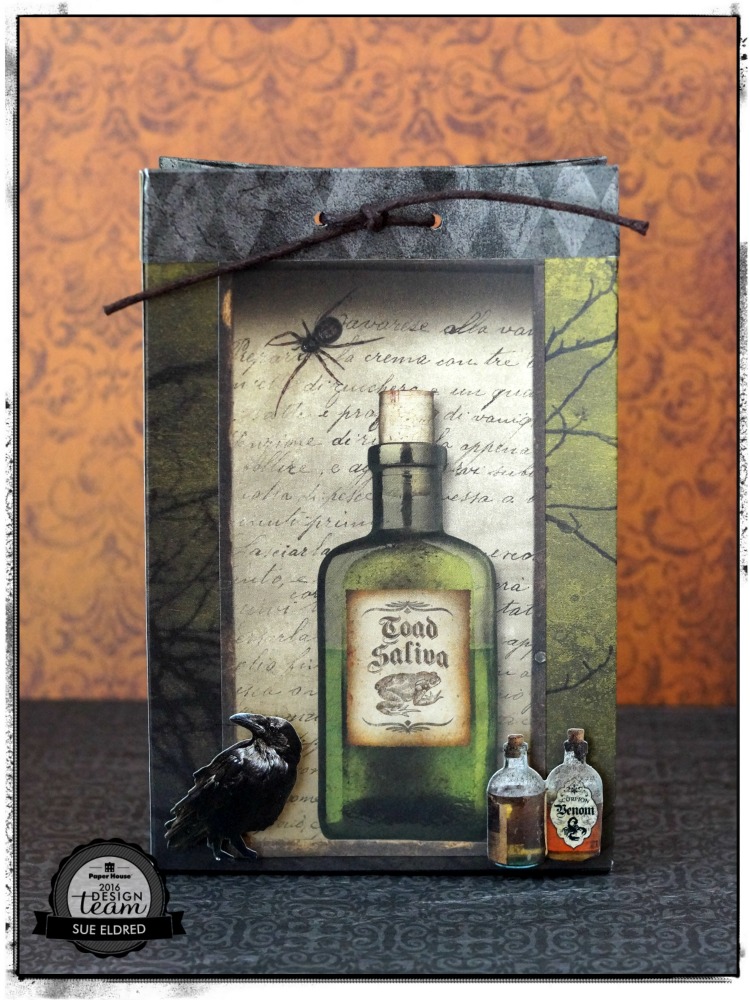
  10. Cut “toad saliva” bottle section from the Apothecary scrapbook paper and adhere to the front   of the bag.
  11. Add 3D foam mounting squares to the back of the “raven” and “bottles” stickers and use to embellish the bag.
  12. Punch two holes on the top of the bag.
  13. Fill with goodies (or NOT) and tie with a black cord.

Halloween Treat Bag 191

The Halloween Treat Bag was created for and sponsored by Paper House Productions.


How to Create a Birthday Card for the Football Fanatic in your Life…

Everyone has that one family member that really LOVES football.  (maybe it’s you?)

Here’s a card I created for Craft Ideas magazine’s Fall Issue.  (page 69)

A fun football themed birthday card for young and old.

Football Birthday Card 6376

How to make a Football Birthday Card…

Made with papers and stickers from Paper House Productions sports collections.

Supplies Used:

  • P-2058 MVP Tags 12” Double Sided Scrapbook Paper (Paper House Productions)
  • P-2060 All Star 12” Double Sided Scrapbook Paper (Paper House Productions)
  • P-2056 Footballs 12” Double Sided Scrapbook Paper (Paper House Productions)
  • STCX-1010 Football 12” Cardstock Stickers
  • Brown Cardstock
  • Black Cardstock
  • 3D Foam Mounting Squares
  • Double Sided Tape Runner
  • Paper Cutter
  • Scissors

Directions:

  1. Make a 4 1/4″ x 5 1/2″ top-fold card from brown cardstock.
  2. Cut a 4” strip of the green football sidelines border sticker and adhere to the bottom of the MVP tag.  Cut 3 ¾” x 5” panel  from  “All Star” scrapbook paper and adhere MVP tag off-centered as shown.  Adhere All Star panel onto 4″ x 5 1/4″ black cardstock panel.  Adhere all layers onto card front.
  3. Embellish card with letters and football stickers as shown. For added dimension, adhere “Go Team Go” sticker with 3D foam mounting squares.

Football Birthday Card Inside 6378On the inside of the card:

Cut a 3 ¾” x 5” piece of “Footballs” scrapbook paper. Layer it onto a 4” x 5 ¼” piece of black cardstock and adhere it in the inside of the card. Embellish with stickers.


craft-ideas-fall-2016

Make sure to check out Craft Ideas Magazine for Craft Ideas for Every Occasion, Every Skill Level.


How to create a cute little Party Ant for your BBQ

Party Ant 9648

Sometimes in the midst of all my creative endeavors and the business of everyday life,

when I need a break from all the seriousness.

I like to stop and make something fun and a little bit silly. 

It’s one of my ways of procrastinating.

Honestly, I would never invite real ants to a BBQ, but, this one is dressed up, too cute and

ready for a party.  (a great little conversation starter)

Party Ant Supplies 9537

To make a Party Ant you’ll need a few supplies…               (*Amazon Affiliate Links)


*Disclosure:  This post uses ads and affiliate links.  If you choose to make a purchase using one of the links, I receive a small commission (at no additional cost to you) that helps offset the costs of maintaining this blog.  Thanks for your support!

Painted Balls on Skewers 9544

  • Dip the end of the bamboo skewers into craft glue and insert into the balls.
  • Paint balls with black acrylic paint.
  • After the paint has dried, cut the ends of the skewers approx. 3/4″, dip into glue and attach body and head of the ant together.

Ant Feet 9552

  • Cut six 1″ pieces of wire, bend the ends as show, dip in craft glue and insert into body of the ant.
  • Cut two more 1″ pieces of wire and curl the top of the wire with wire tools before inserting them into the head of the ant for the antennas.

Ant Eyes

  • Add two black dots to the center of the adhesive pearls to use as the eyes.
  • Punch a 1″ circle from decorative scrapbook paper, cut a notch from the circle and glue together to form a party hat.  Glue onto the top of the ant.  Top off the hat with a teeny tiny pom pom.
  • Cut a strip of adhesive pearls to use as a necklace.

Party Ant 9637

Mine is fairly small, but, wouldn’t a giant one make a cute centerpiece?  (think real big!)

Join Amazon Kindle Unlimited 30-Day Free Trial

Craft Sticks… not just for Kids!

Stenciled Chalkboard Sign

Craft Sticks for Grown-ups?  

Who knew the craft medium we used as kids could produce a grown-up look.

I was messing around one day, looking for something different to stencil on.

Inspired by my favorite “Fixer Upper” show, I decided to create my own mini shiplap.

The projects below are the result of my “playtime”.

Learn More

Americana Sign

This one’s for anyone who loves Americana, old signs, topography and the look of old shiplap.

Or for anyone who loves playing with wood craft sticks.

How to make the Americana Sign:              (*Amazon Affiliate Links)

Finished Size: 6” x 6”

*Disclosure:  This blog uses ads and affiliate links.  If you choose to make a purchase using one of the links, I receive a small commission (at no additional cost to you) that helps offset the costs of maintaining this blog.  Thanks for your support!

Americana Sign Collage

Directions:

  1. Create a sign by gluing together 8 tongue depressors on the front and 4 tongue depressors on the back.
  2. Paint both sides of the sign with blue paint.
  3. Using select sections of the stencil, tape stencil in place using removable painters tape.
  4. Using a stencil brush, dip just the tip of your brush into the paint. Tap off excess paint before applying to prevent the paint from seeping under the edges of the stencil.
  5. Apply paint with stencil brush in a straight up and down motion called stippling.
  6. Drill small hole in the top corners and insert red twine to use as a hanger.
  7. Optional Step: For a distressed look, lightly sand the edges of the sign with extra fine sand paper.

Here’s a project I did a few years ago using a product called sticky sticks. 

Deck the Halls with Sticky Sticks  Sticky Stick Frame Basic Construction

The paint and stencils used in these projects were sponsored by DecoArts.

Shop Amazon Scrapbooking Supplies*

A little Americana for your front porch swing

The quickest way to spruce up the front porch swing for summer is with new pillows.

And if your a little bit handy and have a sewing machine why not try making a few of your own.

When it comes to sewing I’m very simple and it doesn’t get much easier than this.

A simple stenciled and stitched pillow.

Deco Arts has so many 12″ stencils in a variety of patterns, you’re sure to find one you’d love.

Supplies 270 2

DecoArts® Products Used:                           (*affiliate link)

  • ADS16 American Tribute Stencil*
  • Americana® Multi-Surface Satin Acrylics: Dark Scarlet, Cotton Ball, Night Sky
  • Splendid Gold Dazzling Metallics® Acrylic Paint

Additional Products:

Directions:

  1. Lay paper under muslin fabric before stenciling.
  2. Center and tape stencil onto muslin with removable painter’s tape so that the stencil won’t move.
  3. Work one color at a time and mask off with painter’s tape the areas that won’t be painted.
  4. Remove the “star section” of the flag using a craft knife and set aside.
  5. Stenciling is a “dry” brush technique. Using a stencil brush, dip just the tip of your brush into the paint. Tap off excess paint before applying to prevent the paint from seeping under the edges of the stencil.
  6. Apply paint with stencil brush in a straight up and down motion called stippling.
  7. Once you’ve added the red, blue and gold colors. Replace the star section of the flag back onto the stencil and stencil the stars with white paint.
  8. Create a simple pillow by sewing the muslin onto the red and cream ticking fabric.
  9. Stuff pillow with Poly-fil®.

God Bless America Pillow 572 2

This project was sponsored by DecoArts.

Disclosure:  This blog uses ads and affiliate links.  If you choose to make a purchase using one of the links, I receive a small commission (at no additional cost to you) that helps offset the costs of maintaining this blog.  Thanks for your support!

No. 14 How to age a Terra Cotta Pot with Chalky Finish Paint

It’s front porch sitting time…

Time for sitting on the porch swing, sipping a glass of iced tea and relaxing the evening away.

But before I can relax, I need to finish putting flowers in containers and I need to give a couple

of old boring terra cotta pots a little sprucing up with a little paint and stencils.

I decided to give this plain terra cotta pot an aged looked with

Americana Décor Chalky Finish Paint from DecoArt.

Terra Cotta Pot Close Up 7478

How to age a Terra Cotta Pot with Chalky Finish Paint

Supplies Used:                                                                (*affiliate link)

Terra Cotta Pot Collage

Directions:

  1. Paint the terra cotta pot with “yesteryear” (gray) chalky finish paint.  I gave the pot some white highlights with “everlasting” chalky finish paint.
  2. Wipe the pot with a clean soft damp cloth (or white paper towel) to remove some of the paint.
  3. To give the pot a mossy look… Dry brush “new life” (green) chalky finish paint around the base of the pot, under the ridge and on the top edge.  Soften the green paint by wiping with a damp cloth if needed.
  4. Apply reusable stick on stencils to painted pot.  Mask around the stencil with removable painter’s tape.  Use a stipple brush to apply “relic” Chalky Finish paint inside open stencil area.
  5. Remove stencil.
  6. Lightly sand pot with extra fine sand paper.
  7. Apply Americana® Décor “golden brown” crème wax over pot using a clean lint free cloth.  Wipe with cloth to create an aged look.

Shop Your Fav Brands at Scrapbook.com

Front Porch 2

This post was sponsored by the good folks at DecoArt.

Join Amazon Kindle Unlimited 30-Day Free Trial

Disclosure:  This blog uses ads and affiliate links.  If you choose to make a purchase using one of the links, I receive a small commission (at no additional cost to you) that helps offset the costs of maintaining this blog.  Thanks for your support!

Mini Floral Wreath

Mini Floral Wreath 7122

I get some of my best creative inspiration late at night…

I was planning on making a card using these 3-D puffy stickers from Paper House Productions

when a light bulb moment happened and I decided to make a wreath instead.

I’m really happy with the way it turned out, a little different and very easy to make.

Tip:  Use a good craft glue to adhere the stickers to the ribbon.

Mini Floral Wreath Collage

Paper House Productions Stickers Used:

Additional Supplies:

How to make a Mini Floral Wreath using 3D Puffy Stickers:

  1. Wrap wreath with satin ribbon.
  2. Start with the large pansy flowers and glue evenly around wreath.
  3. Fill in wreath by gluing on the smaller flowers, butterflies and leaves. (The leaves are from the lady bug sticker sheet.)
  4. Tie a thin silver ribbon around wreath to use as a hanger.
  5. Make a bow from the sheer ribbon and glue onto the top of the wreath.

This is a sponsored post. As a member of the Paper House Productions Design Team.

Join Amazon Kindle Unlimited 30-Day Free Trial

Disclaimer:  This blog uses ads and affiliate links.  If you choose to make a purchase using one of the links, I receive a small commission (at no additional cost to you) that helps offset the costs of maintaining this blog.  Thanks for your support!

Making Mini Resin Frames

Resin Frame and Magnet 2788

I had this idea that I’d been wanting to try…

to create little dimensional framed artwork using miniature frames filled with resin.

It really is pretty easy to do.  The only hard part for me was waiting for the resin to cure.

They would be great for weddings or parties.

Customize the frames to use for table numbers, centerpieces, desert tables and more.

There’s a lot of possibilities.

Resin Magnet Supplies 916

To Create a Mini Frame…

Materials:

Directions:

  1. Remove the backing and glass from frame.
  2. Apply Rose Gold Metallic Lustre or paint of choice onto frame.
  3. Adhere decorative paper onto mat-board.   Cut mat-board to fit frame back and adhere.
  4. Embellish the inside of the frame with computer generated words or small embellishments. Make sure embellishments inside the frame is lower than frame top.
  5. Measure and mix resin following manufacturer’s instructions. Pour mix into frame to cover embellishments. Blow air onto the resin using a thin straw to help remove bubbles. Let dry completely.

Resin Frame 0957

The Mr. & Mrs. and LOVE table frames were featured in Craft Ideas Spring Issue. (page 36)

Make sure to check out Craft Ideas Magazine for Craft Ideas for Every Occasion, Every Skill Level.

Craft Ideas Magazine Spring 2016

This project was created for and sponsored by Craft Ideas Magazine.

*This post uses Amazon Affiliate Links.  I am an Amazon Affiliate.

DIY Up-cycled Jar…a little trash to treasure

Ikea Toothbrush Holder

I was about to throw away this inexpensive toothbrush holder

(from IKEA) while cleaning my bathroom, when I got the idea.  I’m always looking for items

to use as a base on repurposed projects and thought this was perfect for a quick project.

Inspiration and ideas can be found anytime, anywhere…

even while cleaning your bathroom.
Upcycled Jar and Toothbrush Holder 3964Upcycled Jar and Toothbrush Holder 3988
Great Storage or Gift Idea.  So many ways to customize using items destined for the trash.

How to make an Up-Cycled Jar…

Materials Used:                                            (affiliate links)

Upcycled Jar Collage

Directions:
  1. Disassemble toothbrush holder.  Set aside the top portion of the holder for future projects.
  2. Paint the bottom of the holder, the lid of the jar and the cabinet knob with black semi-gloss spray paint.
  3. Glue the bottom of the jar to the painted base.
  4. Cut a circle from the decorative paper and adhere it to the top of the lid.
  5. Glue knob onto the center of the lid.
  6. Add chalkboard label to front of the jar.

craft-ideas-garden-2016

The DIY Up-cycled Jar was featured in  2016 Craft Ideas Garden Issue. (page 72)

This project was created for and sponsored by Craft Ideas Magazine.

Check out Craft Ideas Magazine for Craft Ideas for Every Occasion, Every Skill Level.

Join Amazon Kindle Unlimited 30-Day Free Trial*

Disclaimer:  This blog uses ads and affiliate links.  If you choose to make a purchase using one of the links, I receive a small commission (at no additional cost to you) that helps offset the costs of maintaining this blog.  Thanks for your support!

Party like it’s your Birthday

Party like it's your birthday 6158 4

My MUCH OLDER and wiser sister recently turned 60.

Being the sweet little sister that I am… I thought I’d embarrass her with a pair of fun

party glasses.  (since she a bit shy, I’m modeling them instead)

cutting the foam 6113

Supplies:

  • Smoothfoam Sheet
  • Computer Generated Clip Art
  • Craft Knife
  • Acrylic Paint and Paintbrush
  • Mod Podge
  • Glamour Dust
  • Wood Dowel

Here’s how I made the glasses:

  1. Print clip art numbers onto white printer paper and cut them out.
  2. Tape the number together before tracing them onto a Smoothfoam sheet.
  3. Cut numbers out with craft knife.
  4. Paint the numbers a lipstick pink.  (my preference)
  5. After the painted numbers have dried, coat the letters with Mod Podge and sprinkle with glamour dust.glittering the numbers 6130
  6. Decorate the glasses with white paper flowers.
  7. Paint a thin wood dowel with gold paint and insert into glasses as a handle.

60's glasses 6150 2

This project was created and sponsored by Smoothfoam™ The Crafter’s Foam.