How to Create a Wedding Memories Card Box

I am honored to have had my Wedding Memories Card Box featured as a special project in

DIY Wedding Magazine’s Holiday Issue.

Wedding Memories Keepsake Cards Box 1

The Wedding Memories Cards Box is a dual-purpose box to hold cards at the Reception

and then to be used later to store the Wedding Memories to be cherished for years to come.

Wedding Memories Card Box 8032

I started with a plain wood box from Walnut Hollow and Chalky Finish Paint from Deco Art to create a soft timeless finish.

Supplies Used:    (*amazon affiliate links)

Finished Size: 9” x 12” x 3 1/2”

Wedding Memories Card Box Collage

Directions:

  1. Paint the top portion of the cornice box with “Vintage” Chalky Finish paint and the bottom portion of the box with “Timeless” Chalky Finish paint. (Inside and out)
  2. Lightly sand the box to smooth out the finish.
  3. Position “Mod Quatrefoil” stencil over the top of the box. Secure the stencil in place with the painter’s tape to prevent slipping. Use stipple brush to apply “Whisper” Chalky Finish paint inside open stencil areas.
  4. Remove stencil.
  5. Position and stencil “Mod Quatrefoil” pattern onto the sides of box.
  6. Allow paint to dry for a few hours and lightly sand over the stenciled area to give a slightly worn look.
  7. Apply clear crème wax onto the inside and outside of the box.
  8. Wait one hour and buff box using a soft, clean rag.
  9. Measure and apply decorative paper onto the inside of the box.
  10. Tie a long length of Antique White Satin ribbon around the top of the box, tying a bow on the top.
  11. Cut cream cardstock into five 2 1/4” x 3 1/2” pieces.
  12. Stencil the letters to spell “CARDS” onto cream cardstock using the 3” Simple Script Alphabet.
  13. On the inside of the box: Clip the letters onto the ribbon using the mini clothespins.

Wedding Memories Card Box closed

This project was sponsored by Deco Arts and Walnut Hollow. 

Shop Handmade – The Wedding Store

Disclaimer:  This blog uses ads and affiliate links.  If you choose to make a purchase using one of the links, I receive a small commission (at no additional cost to you) that helps offset the costs of maintaining this blog.  Thanks for your support!

DIY Etching on a Mirror

Etched Mirror 4197

It all started with an inexpensive gold mirror that my daughter didn’t want anymore.

I had spray painted it red and left it like that for a couple of years.  (it was o.k.)

I took it off the shelf, while cleaning the other day, and decided it needed an immediate update.

Of course, I had to stop cleaning.  (when inspiration strikes)

Etched Mirror Collage

This is how I etched my mirror…                                                                       (*affiliate links)

  • I removed the mirror from the frame.  I gave the red frame a light sanding and then painted it with Tattered Angels Decor and DIY Paint, Ebony*.
  • I cut an oval mask using etchall etchmask*  vinyl and centered it on the mirror.  Make sure to burnish the vinyl to get out air bubbles and to make sure the all edges all down.
  • Apply a thick coat of etchall Etching Crème* over the sides of the mirror using the squeegee.  It’s important to get an even coat of etching crème to achieve a consistent even etch.  (remember more is better)
  • Wait 15 minutes.  Scrape excess etching crème from the mirror and return the extra etching crème back into the bottle. (it’s reusable)
  • Rinse mirror with warm water to clean.
  • Remove mask and dry.
  • Return the mirror back into the frame.  Apply the gold “love” rub-on onto the mirror.

Frosted Mirror Close UP 3711

New to Etching?  You might want to check out the video on the Etchall getting started page.

The Etched Mirror project was created for and sponsored by Etchall®.

*Disclosure:  This blog uses ads and affiliate links.  If you choose to make a purchase using one of the links, I receive a small commission (at no additional cost to you) that helps offset the costs of maintaining this blog.  Thanks for your support!

Shop Your Fav Brands at Scrapbook.com

Love You?

True story…

I occasionally submit cards and projects to various magazines for publication.

In return I sometimes get a small check.

Usually, the check comes several months later after I’ve completely forgotten all about it.

Love You Check Stub 3997

So…when I opened this check and saw the handwritten note on the stub,

I thought (gee) that’s kind of a personal message.

It had me scratching my head…

That was until I remembered the name of the card.  (silly me)

Craft Ideas Winter 2015-2016

My “Love Ya” Card was featured in Crafts Ideas Winter Edition.

Art Play Paintables Love You Card

“Love Ya” Card…

A sweet card for Valentine’s Day or any day you want to spread a little love.

Materials List:

  • Waterbrush
  • AdornIt Art Play Paintables: 22646 Love You Paintable
  • AdornIt Blender Basics: 22480 Blue Chevron 12 x 12
  • AdornIt Blender Basics: 22504 Red Chevron 12 x 12
  • Denim Fabric (Canvas Corp Brands)
  • Red and White Gingham Ribbon
  • Tim Holtz Distress Inks: Fired Brick, Victorian Velvet, Stormy Sky
  • Tombow Markers: #969 Chocolate, #553 Mist Purple, #850 Flesh, #800 Baby Pink
  • 1/8” Score Tape
  • Mini Glue Dots
  • Piece of Acetate

On the card, I used a simple watercolor technique that uses ink from markers and inkpads and uses a small piece of acetate as the palette. By scribbling directly onto the piece of acetate with the marker or by applying the ink directly from the pad, I have a variety of rich color to watercolor with. I simply color in the image using the water-brush.

Directions:

  1. Cut “love you” image from the Art Play Paintable Sheet leaving a thin white border.          (approx. 2 3/4” x 3 3/4”)
  2. Give the background of the image a light watercolor wash using ink from the Stonewashed Adirondack inkpad and the #553 Mist Purple marker.
  3. Watercolor the girl’s hair using the #969 Chocolate marker. Color in the face with #850 Flesh marker. Highlight the cheeks with #800 Baby Pink marker. Watercolor the leaves with Peeled Paint ink and color the center of the flower with #993 Chrome Orange.
  4. Watercolor the skirt with Victorian Velvet inkpad and the top and hearts with Fired Brick ink.
  5. Adhere image onto a 3 1/4” x 4 1/4” piece of the Red Chevron plain side.
  6. Adhere those layers onto a 3 1/2” x 4 1/2” Blue Chevron layer.
  7. Cut a piece of denim fabric 4” x 5 1/4”, adhere onto a 4 1/2” x 5 3/4” card using scoretape. Adhere layers onto denim using score-tape.
  8. Add four heart buttons to each side of the layers using mini glue dots.
  9. Tie a red gingham bow around the front of the card.

Snowball Fight

Snowball Fight 2

Ready for some good old fashioned fun?

How about a snowball fight?

Snowball Fight 3249

If you’re not loving the cold…

Here’s a snowball fight you can have while snuggling up inside.

Snowball Fight Supplies

Here’s what’s you’ll need:                            (*amazon affiliate link)

Directions:

  1. Cut the 2″ Smoothfoam ball in half.  Cut the top off the rounded side of one of the balls.
  2. Poke two holes into the bottom of the Snowman body using the craft pick.  Break a toothpick in half, dip ends into craft glue and insert in holes.  Attach the sliced ball onto the Snowman body.
  3. Apply Snow-tex with palette knife over the newly formed Snowman and the 6″ disc.  Allow both to dry fully.
  4. To Create a Snowball Wall… Poke holes into the 1″ balls with the craft pick.  Insert toothpick halves with craft glue on the ends into balls.   Build wall by sticking the balls together.
  5. Apply Snow-tex onto wall using the palette knife.  (Allow to dry.)
  6. Create scene by attaching snowman and wall onto the disc.  Reinforce the pieces with toothpicks and craft glue.
  7. For a shimmery snowy glow…paint all the pieces with Crystal Craft Twinkles paint.  (Allow to fully dry.)
  8. Add shadows to the snowman and snowballs by gently applying vintage photo ink using a stipple brush.
  9. To Create the Snowman Hat… Measure and cut fabric to fit around snowman head.  Fold over and glue one of the long edges of the fabric to create a brim.  Glue fabric ends together to create a tube.  Tie top of the tube with a piece of string, cut excess fabric off top of the tube and fray the ends by making small cuts with the scissors.  Glue to the top of the Snowman head.
  10. Add arms to the Snowman using small twigs.  Warm him up with a fabric scarf and mittens cut from the fabric scraps.
  11. For the Snowman’s Face… Use two small black micro brads inserted into the snowman face for the eyes.  Paint the tip of a bamboo skewer with orange paint, cut and insert into the face for the nose.  Add a smile to the snowman’s face using a extra fine black paint marker.
  12. Make a small snowball using a small pieced of paper wadded up and covered with Snow-tex.  Glue finished and dried snowball onto mitten.

Snowball Fight Close Up 3194

This project was created for and sponsored by Smoothfoam the crafter’s foam.

Shop Amazon Scrapbooking Supplies*

Disclaimer:  This blog uses ads and affiliate links.  If you choose to make a purchase using one of the links, I receive a small commission (at no additional cost to you) that helps offset the costs of maintaining this blog.  Thanks for your support!

Homespun Rag Ball Ornaments

This year, I wanted to do a small little tree for the dining room.

A simple homespun tree with strung cranberries and hand-made ornaments.

I had grand ideas and a galvanized pail.

But reality hit, a long with the cold and flu, which knocked me out for a week.

It took my creativity level down to a one.

And sad to say… My small little tree didn’t get done.

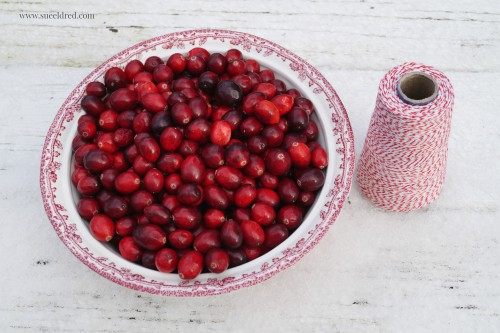
I did string the cranberries…  (a first for me)

They were so bright and colorful.  I loved the look and took lots of pictures.

After a week or so, the cranberries started getting a mushy.

So… I put them out on the tree in the front yard for the birds to eat.

It looks pretty out there too.

Next time, I’ll make them last minute.

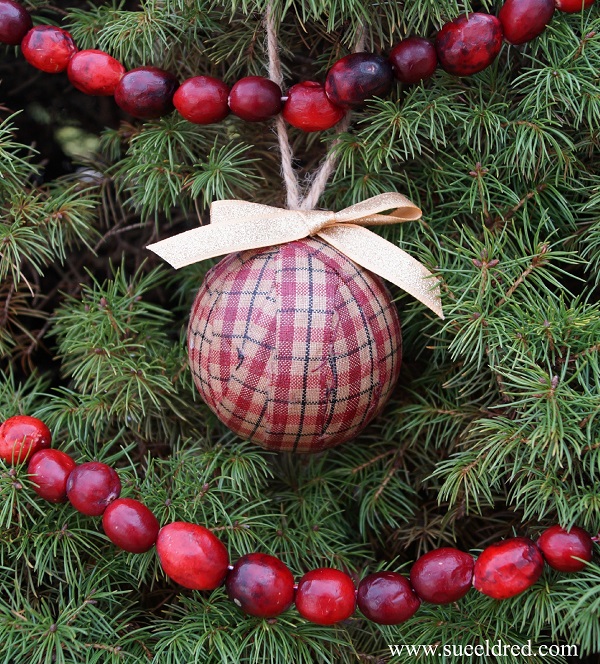
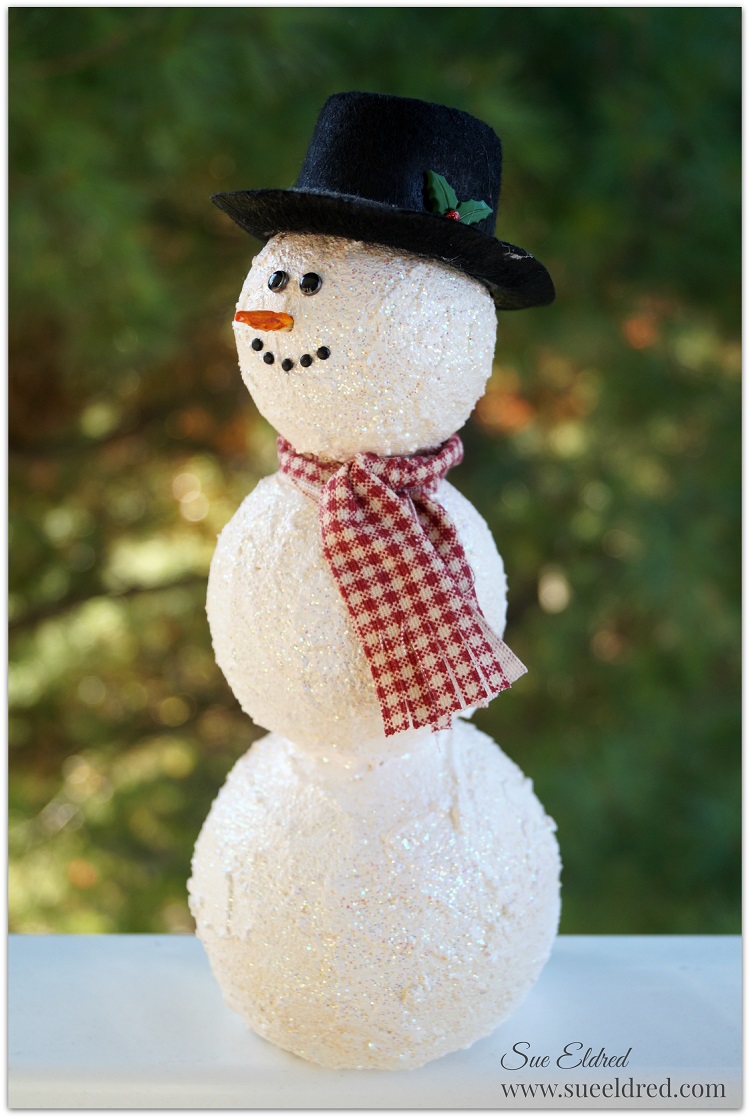
For the Rag Ball Ornaments…

Instead of just wrapping the strips of fabric until it formed a ball,

I made the rag ball using a Smoothfoam 2-Inch ball*.

Supplies used:                     (*affiliate link)

Shop Your Fav Brands at Scrapbook.com

Directions:

  1. Lightly sand the ridge around the ball.
  2. Cut the fabric into 3/4″ strips.
  3. Apply Mod Podge onto the back of the fabric and adhere to the ball.
  4. Continue until the ball is fully covered.
  5. Add an additional coat of Mod Podge over the ball to finish and seal.
  6. Poke a hole on the top of the ball and add a dab or glue into the hole.
  7. Insert twine into the hole to use as the ornament hanger.
  8. Embellish ornament by gluing a bow on top.

Wouldn’t a whole bowl of rag balls would be cute?  (maybe next year)

Shop Amazon Scrapbooking Supplies*

*Disclosure:  This post is sponsored by Smoothfoam and uses ads and affiliate links.  If you choose to make a purchase using one of the links, I receive a small commission (at no additional cost to you) that helps offset the costs of maintaining this blog.  Thanks for your support!

Christmas Brag Book

Christmas Brag Book

This year make a Christmas Brag Book for all your fun Holiday Memories.

For my brag book I used clear flexible pouches from Deflecto Craft Solutions and paper

from Canvas Corp Brands Farmhouse Christmas Collection for a Quick and Easy project.

A Great Gift Idea for the Grandparents.

Christmas Mini Album Stephanie and Zach 7413

A fun way to share Holiday Silliness and the Sweet Little Moments shared between generations.

Christmas Mini Album Inside Back Cover 7414

The Christmas Brag Book was created for Craft Ideas Magazine’s Holiday Issue

and has my Christmas photo’s from last year.

Craft Ideas Holiday 2015

Craft Ideas is a great magazine for creative inspiration.

Christmas Mini Album Inside Pages 7411

Finished Size: 3 1/4” x 6”

Christmas Mini Album Supplies 7388

Materials:

  • Deflecto 20019CR Flexible Pouch (1 package of 10)
  • Canvas Corp Brands CCP2827 Farmhouse Christmas Tags on Ivory 12 x 12 paper
  • Canvas Corp Brands CCP2826 Farmhouse Christmas Stripe on Ivory 12 x 12 paper
  • Canvas Corp Brands CCP2638 Red & Ivory Mini Dot Reverse 12 x 12 paper
  • Canvas Corp Brands CCP2639 Red & Ivory Ribbon Stripe 12 x 12 paper
  • Canvas Corp Brands Binding Ring-Small Antique Silver
  • Canvas Corp Brands Optical Lens Antique Brass
  • Canvas Corp Brands PaperTape: Christmas Wrap
  • Paper Source 5/8” Ivory/Red Striped Ribbon
  • Red Mini Rick Rack
  • Small Red Button
  • Photos
  • Black Cardstock

Basic Supplies:

  • Paper Cutter
  • 1 11/16” Circle Punch
  • Scissors
  • 1/8” Hole Punch
  • Double Stick Tape Runner
  • Glue Stick
  • Craft Glue
  • Thermo Web Mini Glue Dot

Directions:

  1. For the Cover: Cut a piece of black cardstock 3” x 5 1/4”. Cut “It’s the most Wonderful Time…” from the Farm House Christmas Tags just slightly smaller than 3” x 5 1/4” and adhere to the black cardstock. Add a 1/2” x 3” strip of Red and Ivory Dots to the left side of the tag. Glue a 3” piece of red mini rick rack onto the right side of the tag.
  2. On the Inside Front Cover: Cut a piece of black cardstock 3” x 5 1/4”. Cut a 3” x 5 1/4” piece of Red & Ivory Ribbon Stripe just slightly smaller than the 3” x 5 1/4” and adhere to the black cardstock. Adhere two strips of 1/2” x 5 1/4” Red and Ivory Dots to the top and bottom of the striped paper. Adhere “I’ll be Home…” from the Farmhouse Christmas Stripe layered on black cardstock onto the center of the striped paper.
  3. Insert Cover and Inside Front Cover into the Flexible Pouch.
  4. Add Paper Tape around the plain end of the Flexible Pouch.
  5. Punch a 1 11/16” Snowflake Circle from the Farmhouse Christmas Tags and glue onto the back of the Optical Lens by adding craft glue along the outside edges of the lens. Glue small red button onto front of the lens in the middle of the snowflake.
  6. Cut a 10” piece of Ivory Red Striped Ribbon. Tie onto front cover adding the Optical Lens.
  7. Choose pictures that can easily be cut down to 3” x 5 1/4”. Add to inside of flexible pouches.
  8. Create Back Cover using the Red & Ivory Mini Dot Paper, Red & Ivory Striped Paper and Farmhouse Christmas Strip.
  9. Add Paper Tape to each of the pouches.
  10. Mark and re-punch the holes using 1/8” hole punch on each of the pouches and gather the mini album together using a small book ring.

Christmas Mini Album Inside front cover 7412

Christmas Mini Album Back Cover 7417

This project was created for Craft Ideas and was sponsored by Deflecto Craft Solutions

and Canvas Corp Brands.

How to build a Snowman with Smoothfoam…

How to make a Snowman Using Smoothfoam balls and snowtex

Making a Snowman is pretty easy.  All it takes is a little patience and time.

(and a few ingredients)

Here’s what you’ll need to make a Snowman:                  (*amazon affiliate link)

*Disclosure:  This blog uses ads and affiliate links.  If you choose to make a purchase using one of the links, I receive a small commission (at no additional cost to you) that helps offset the costs of maintaining this blog.  Thanks for your support!

Shop Your Fav Brands at Scrapbook.com

Directions:

  1. Cut a small section off the bottom of the 4″ Smoothfoam ball so that it sits flat.
  2. Cut a couple of 3″ sections from the bamboo skewer.  Stick the skewer into the center of the 2″ and 3″ Smoothfoam balls.
  3. Add craft glue to the ends of the skewers before sticking the three balls together to form the snowman base.  (Allow glue to fully dry before continuing to the next step)
  4. Using a palette knife, smooth Snow-tex over Snowman base.  Here’s where the patience comes in… Allow a couple of hours for the Snow-tex to completely dry.
  5. Paint the entire Snowman base with white acrylic paint.  This fills in and helps cover any area missed by the Snow-tex.
  6. For a Frosty Look…paint the Snowman base with Craft Twinkles Glitter Paint.
  7. Cut a thin strip of grey felt and glue around the base of the hat to create a band.  Glue holly embellishment onto band to cover seam.  Glue to the top of the Snowman head.
  8. Cut a strip of gingham fabric and tie around neck.  Cut small slits into the ends of fabric for fringe.
  9. Use two small black brads inserted into the head for the eyes.  Use five micro black brads insert as the mouth.
  10. Cut the pointed end from a bamboo skewer and paint with orange paint.  Stick into head for the nose.

Here’s a Close up of Mr. Snowman.  Isn’t he Handsome?

This project was created for Smoothfoam and sponsored by Smoothfoam and DecoArt.

Love Snowmen?  Create your own “Snowball Fight” here.

Shop Amazon Scrapbooking Supplies*

Mini Ribbon Wreath Ornaments

Mini Ribbon Wreath Ornaments

No matter how you decorate for the Holidays…Shabby, Homespun, Country or Cute.

You can easily customize these Mini Ribbon Wreath Ornaments to fit your personal style.

Easy to make and sure to impress.

How To make Mini Ribbon Wreath Ornaments

Finished Size : 3”

Materials Used:

*Disclaimer:  This post uses ads and affiliate links.  If you choose to make a purchase using one of the links, I receive a small commission (at no additional cost to you) that helps offset the costs of maintaining this blog.  Thanks for your support!

Directions:

  1. Apply a strip of 1/8″ adhesive around the outside edge of the Smoothfoam wreath. This keeps the ribbon securely in place while wrapping.
  2. Wrap ribbon tightly around wreath. When you’ve wrapped the ribbon half way around wreath add the jump ring with jingle bell to ribbon so that it hangs on the bottom of the wreath and continue wrapping. When finished wrapping the ribbon, glue ribbon end onto back of wreath.
  3. Add metallic ribbon trim on top of the wreath as the ornament hanger.
  4. Glue mini bottle brush tree inside wreath.
  5. Glue a piece of burlap or scrapbook paper onto a piece of chipboard and cut into a circle that will cover the inside of the wreath and glue to the back of the wreath.
  6. Print a computer generated greeting on to a piece of cream card-stock. Cut down to size and notch out both ends to create a banner.
  7. Give the banner a quick wave using your fingers and glue onto the bottom of the wreath.
  8. Add adhesive pearls on to the wreath.
  9. Add bow on the top of the wreath to finish it off.

Try Amazon Prime 30-Day Free Trial

Etched Snowflake Candy Jar

Quick and Easy Holiday Gift Idea

When it comes to the Holidays I love Quick and Easy Gift Ideas.

For the Snowflake Candy Jar…

I used a small canning jar etched with snowflakes and filled with candy.

It’s a project that I was able to put together in under a half hour.

Snowflake Candy Jar Supplies 1274

To make the Snowflake Candy JAR…                 

  1. Punch a strip of Snowflakes using etchmask™ vinyl and a snowflake punch.
  2. Carefully cover the jar with the vinyl.
  3. Make sure to burnish the vinyl to get out air bubbles and to make sure the all edges all down.
  4. Apply a thick coat of Etchall over the snowflake cut out using the squeegee.
  5. Wait 15 minutes.  Scrape excess etching crème from the side of the jar and return extra etching crème back into the bottle. (it’s reusable)
  6. Rinse jar with warm water to clean.
  7. Remove Stencil and dry.
  8. Add adhesive rhinestones to the center of each snowflake.
  9. Wrap craft stem around the neck of the jar and glue on a red button.

Snowflake Candy Jar Covered 1287

  • Cut a small circle from decorative scrapbook paper and adhere to lid of the jar.
  • Embellish jar with greenery stem, jingle and bow.

Snowflake Candy Jar 1472

   This would make a great Teacher, Hostess, Bunco, or Gift Exchange Gift.

This project was created for and sponsored by Etchall®.


Don’t Miss a Thing…Make Sure to Follow me.

Shop Your Fav Brands at Scrapbook.com

Disclaimer:  This blog uses ads and affiliate links.  If you choose to make a purchase using one of the links, I receive a small commission (at no additional cost to you) that helps offset the costs of maintaining this blog.  Thanks for your support!

Try Amazon Prime 30-Day Free Trial

French Country Fall Stenciled Burlap Table Runner

French Country Fall Stenciled Burlap Table Runner 681 2

French Country Inspired Stenciled Burlap Table Runner for Fall.

This table runner is a Quick & Easy DIY project with no sewing involved.

Supplies 223

To make the table runner you’ll need:                                     *(affiliate links)

*Disclaimer:  This post uses ads and affiliate links.  If you choose to make a purchase using one of the links, I receive a small commission (at no additional cost to you) that helps offset the costs of maintaining this blog.  Thanks for your support!

Stenciling 269

Stenciled 380

Directions:

  1. Make sure to lay paper down before stenciling on burlap.
  2. Tape around stencil with removable painter’s tape so that the stencil won’t move.
  3. Using a stencil brush, dip just the tip of your brush into the paint.  Tap off excess paint.
  4. Stenciling is a “dry” brush technique.
  5. Apply paint with stencil brush in a straight up and down motion called stippling.
  6. Clean Stencil between each image.
  7. Glue lace trim onto each edge of the runner using Fabri Tac glue.
  • Burlap is a rough fabric.  You may want to add a layer of fabric or felt underneath the runner to protect the finish of your table.

Close UP 0666

Fall Display

Because I really liked how the table runner turned out…

I decided to create a pillow for the comfy chair in my dining room

I used muslin as a lining for the burlap and on the reverse side of the pillow.

(The pillow, of course, consisted of some sewing.)

Shop Amazon Scrapbooking Supplies*