How to make a Red Buffalo Plaid Frame


How to Make a Red Buffalo Plaid Frame
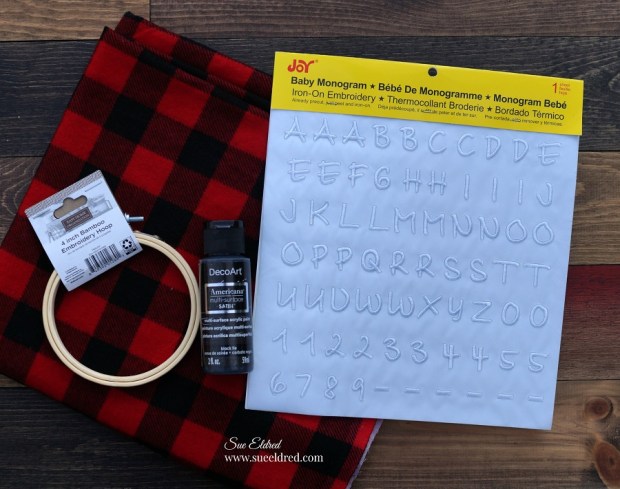
Products Used:

Shop Your Fav Brands at Scrapbook.com

*Disclosure:  This blog uses affiliate links.  If you choose to make a purchase using one of the links, I receive a small commission (at no additional cost to you) that helps offset the costs of maintaining this blog.  Thanks for your support!

Directions:

  • Add strips of painter’s tape onto the frame to make stripes.  Rub your finger over the tape to make sure that the tape is securely on the frame and has no gaps.
  • Paint inside the stripes with black paint.  Be careful not to apply the paint too thick.   Only one thin coat of paint is needed.

  • Remove painter’s tape.
  • Allow black paint to fully dry before continuing to the next step.

  • Rotate the frame and apply the tape in the opposite direction.  Make sure the tape is securely on the frame.
  • Paint additional stripes.

  • Lightly sand the frame after dry.  Sanding brings out the woodgrain and helps to hide any little imperfection.
  • Wipe the frame smooth with a clean cloth.
  • Apply the Carta Bella Christmas Market Chipboard Accents to front of frame.

The Red Buffalo Plaid Frame was made in Sue’s 2019 Holiday Workshop.

 The Carta Bella Christmas Market Collection*

Give the Gift of Amazon Prime*

Plaid Tidings Embroidery Hoop Ornament

Plaid Tidings Embroidery Hoop Ornament-Sue's Creative Workshop www.sueeldred.com 6361

How to make a Plaid Tidings Embroidery Hoop Ornament

I guess you might say I’ve gone a little overboard on the Buffalo Plaid this year.

How can I help myself, I just love it all.

I got a little inspired by a Christmas ad I saw for clothes and decided to make this ornament.

It’s another quick and easy Holiday Ornament to make.

A perfect little gift for your Plaid Loving friends like me.

Plaid Tidings Embroidery Hoop Ornament-Sue's Creative Workshop www.sueeldred.com 6340

Supplies Needed:                 (*affiliate link)

Disclosure:  This blog uses affiliate links.  If you choose to make a purchase using one of the links, I receive a small commission (at no additional cost to you) that helps offset the costs of maintaining this blog.  Thanks for your support!

Plaid Tidings Embroidery Hoop Ornament-Sue's Creative Workshop-www.sueeldred.com 6353

Directions:

  • Paint the embroidery hoop with black acrylic paint.
  • Cut a piece of flannel that is larger than the hoop.
  • Arrange the Joy® Baby Monogram Embroidered Iron On Letters shiny side down onto the flannel and inside the hoop to make sure they fit.
  • Set iron to cotton setting, approx. 350° or follow fabric care label.
  • Cover letters with a fine cloth.  With firm pressure iron cloth over the letters for 25 seconds.
  • Turn flannel over and iron the back of the letters for 25 seconds.
  • Allow 1 minute to cool before handling.

Plaid Tidings Embroidery Hoop Ornament-Sue's Creative Workshop www.sueeldred.com 6354

  • Insert the flannel into the embroidery hoop and tighten.
  • Trim the excess flannel from around the embroidery hoop.
  • Glue pine craft stem around the outside edge of the hoop.
  • Embellish the hoop with ribbon and jingle bell.
  • Add a piece of red twine to hang.

You can find a wide selection of Joy® embroidered iron-on letters and alphabet sheets in different sizes at your local craft stores!

“This is a sponsored post.  As a member of the Joy® Design Team I have been provided product and compensation in exchange for my creative ideas.  The views and opinions are my own.

How to make a Plaid Tidings Embroidery Hoop Ornament-Sue's Creative Workshop www.sueeldred.com

Give the Gift of Amazon Prime*

DIY Mini Ketchup Bottle Snow Globe from recycled materials

Creating a Snow Globe from a Mini Ketchup Bottle

A little Holiday up-cycling project for my fellow collectors (aka savers).

When you order room service at some hotels you get these little glass condiment jars.

When my husband used to travel he’d occasional bring them home.  (I’ve trained him well.)

Add in a few miscellaneous supplies and I had the start of a cute little snow globe.

There are several options to use as a base.  Old hardware pieces, vintage Jello molds.

Materials Used:

Disclosure:  This blog uses affiliate links.  If you choose to make a purchase using one of the links, I receive a small commission (at no additional cost to you) that helps offset the costs of maintaining this blog.  Thanks for your support!

To Make the Mini Ketchup Bottle Snow Globe:

  • I gave the brass piece and the lid of the ketchup bottle a light sanding and sprayed it with Rust-Oleum Spray Paint in Colonial Red*.  (my favorite red)  It might take a couple coats.
  • This was the hard part for me.  Allow the paint to fully dry before handling.  (trust me)
  • Using Super Glue*, glue a small bottle brush Christmas tree (found at most craft stores) on the inside of the ketchup bottle lid.  Make sure that the base of the tree is not larger than the opening of the bottle.
  • Glue large flat button to the bottom of the jar.  (or is it the top of the snow globe) Glue a decorative button to the white button to add height and extra prettiness.
  • Add a small amount of white glitter or fake snow to your bottle and screw on the lid with Christmas tree.
  • Glue ketchup bottle lid to painted brass base using  Super Glue*
  • Wrap a Craft Pine Stem* around the neck of the bottle and glue in place.
  • Tie a ribbon around neck of bottle.
  • Glue small snowflake embellishment.

If you liked my Mini Ketchup Bottle Snow Globe check out my Christmas in a Pickle Jar.


Don’t Miss a Thing…Make Sure to Follow me

This Christmas Give the Gift of Amazon Prime*

Always in my heart ❤️

A Christmas Ornament with Special Meaning.

The holidays are especially hard for people who have lost loved ones.

The year I lost my Dad, right before Christmas, I found it really hard to celebrate.

I found myself just going through the motions.

This year, I decided to make a special ornament to place on my tree to remind me

that my loved ones will always be in my heart.

At Christmas Time and Every Day.

To make my ornament…

I used a simple whitewashed wood ornament that I picked up at Michael’s.

I cut the words “Always in my Heart” using my Silhouette Cameo Electronic Die Cutting Machine* out of matte black self adhesive vinyl from Styletech Craft.

*Disclosure:  This blog uses affiliate links.  If you choose to make a purchase using one of the links, I receive a small commission (at no additional cost to you) that helps offset the costs of maintaining this blog.  Thanks for your support!

Directions:

  • Using an electronic die cutting machine, I cut the words.
  • Using a weeding tool carefully remove the negative spaces in and around the letters.
  • Place a piece of Vinyl Transfer Tape* over the letters.  Rub over the letters using a vinyl scraper tool to help the vinyl cling
  • Apply words onto the whitewashed wood heart.

A simple little ornament and a whole lot of love.

You can now find the full line of StyletechCraft online at ATSM.


“This is a sponsored post.  As a member of the StyleTechCraft Design Team I have been provided product and compensation in exchange for my creative ideas.  The views and opinions are my own.

A Merry Little Holiday House

How to make A Merry Little Holiday House.

A cute little holiday decoration using the Eileen Hull House Ornament Die.

Perfect for gift giving.  Just add a small battery operated tea light and see it glow.

A Merry Little House Supplies Used:            (*affiliate links)

*Disclosure:  This blog uses affiliate links.  If you choose to make a purchase using one of the links, I receive a small commission (at no additional cost to you) that helps offset the costs of maintaining this blog.  Thanks for your support!

Directions:

  • Cut two pieces of Red and Black Buffalo Plaid paper 6″ x 8″.
  • Run both pieces of paper design side up through the Xyron Creative Station*.  As the paper moves through the Creative Station it adds adhesive to the underneath side of the paper.  You get full and complete adhesive covering on the paper.
  • Cut two pieces of Mat Board* 6″ x 8″.
  • Adhere the buffalo plaid paper onto each one of the mat board.  (underneath will be plain)

  • Lay covered matboard on top of the house ornament die and sandwich it between two sizzix cutting plates.  Run the die, mat board and cutting plates through the Big Shot Die Cutting Machine*.  The Big Shot will cut out the house shape and two tiny houses that you can use on a later project.
  • Cut two houses shapes.

A Merry Little Holiday House bits and pieces.

  • Carefully fold on the scored lines.
  • Cut off the top tab with the two holes on both houses.  (This tab is used if you want to make it an ornament.)
  • You will also need to cut the bottom flap from one of the houses.
  • Use Super Glue to assemble the house. Glue all sides of the house together before gluing the roof tabs.  Leave bottom tab unglued so that you can add a small battery operated tea light.

  • For the Roof:  Cut a piece of Black Corrugated paper 2 1/2″ x 4″.  Fold in half and glue to top of the roof.
  • Place two small pieces of white matboard over the window section of the ornament house die and run through the big shot die cutting machine.  Trim around matboard to create two small windows.  Glue windows frames onto house.

  • Add the “Merry” chipboard sticker from the Christmas Market Chipboard Accents to the front of the house.
  • Make wreath out of a 6″ piece of the craft pine stem.
  • Create a small bow from the red twine and glue onto front of wreath.
  • Glue wreath to front of the house.

Carta Bella Christmas Market Collection*  (available on Amazon)

Give the Gift of Amazon Prime*

Creating a Mini Thanksgiving Room

Creating a Mini Thanksgiving Room…

Time to get your rooms ready for the Thanksgiving holiday.

I love making miniature rooms, especially for the Holidays.

I created this special little room for Xyron using the Xyron Creative Station*.

The Xyron Creative Station* is perfect for projects like this.  I wanted complete adhesive coverage on every corner and edge of the paper.  (No wrinkles, no bubbles, easy to use.)

Products Used:                                      ( *affiliate links)

*Disclosure:  This blog uses affiliate links.  If you choose to make a purchase using one of the links, I receive a small commission (at no additional cost to you) that helps offset the costs of maintaining this blog.  Thanks for your support!

To make the Mini Thanksgiving Room…

  • Cut chipboard into 4 pieces:  9″x7 1/2″, 5 3/4″ x 9″ and two 5 3/4″ x 7 1/2″
  • Cut woodgrain paper just 6″ x 9 1/4″ and run it through the Xyron Creative station design side up.   As the paper runs through the machine it adds adhesive under the paper.
  • Adhere the paper to the chipboard.  I like to cut my paper slightly wider than I need so I can trim the edges with a craft knife.
  • Gently sand edges with a extra fine sanding block for the perfect edge.

  • I cut the patterned paper half the size of the other three chipboard pieces and added a 1/2″ strip of  woodgrain paper to cover the seam.  (it looks like chair rail)
  • Using the Creative Station makes quick work of covering the walls.

  • I covered the back of my room with coordinating paper and added small strips of paper on the inside and back corners for added support.  Run those strips through the Xyron Creative Station* as well.

  • I picked up some inexpensive Doll furniture* at Dollar Tree* and painted them with black spraypaint.
  • I gave them a light sanding after they were dry with a sanding block to smooth.

  • I created additional furniture by cutting small pieces of chipboard and adhering them together.  (simple building construction)
  • A couple coats of black paint to finish the job.

  • To Make the tablecloth…Run a piece of lace through the Xyron Creative Station* and adhere the lace to the top of the table.  Trim around the edges of the lace with scissors.
  • I created a small vase with playdoh and painted it with acrylic paint after it was completely dried.  I added craft glue inside my vase and inserted snippets of artificial flowers.
  • I added a platter of turkey on the table. (don’t tell anyone but mine’s really a chicken)

A small little handmade bench for extra seating.

A shelf on the wall with special pewter pieces.

And a cute Turkey Decoration on top the sideboard to make the room more festive.

Happy Thanksgiving!

“This is a sponsored post.  As a member of the Xyron Makers Program I have been provided product in exchange for my creative ideas.  The views and opinions are my own.

If you liked the Thanksgiving Room you’ll like the Christmas Magic Room I made last year.

So Plaid You Came…

Thank you to everyone who came and participated in Sue’s Holiday Workshop.

This year’s plaid themed Holiday Workshop was one for the books.

Even though there were a few hiccups (like bad super glue), everyone had fun.

Some of you I only get to see once a year, which makes it feel more like my Christmas party.

I really enjoy laughing with you all and especially all the hugs.

I wish I would have gotten everyone’s picture.

Until next year!

Thank You I’m So Plaid You Came!!!

Buffalo Plaid Potholders

Crisp air, falling leaves, and a big pot of soup to warm you up…

Just a few of the reasons I love Fall.

So while you’re warming things up…

Warm up your plain potholder and add a little personality with Joy Iron-On Embroidered letters.

Supplies needed:

  • Joy Iron-On Embroidered Letters
  • Cotton Potholders
  • Iron
  • Pressing Cloth

Directions:

  1. Remove letters from the sheet.
  2. Position letters shiny side down on potholder.
  3. Cover letters with a clean cloth.
  4. With firm pressure iron cloth over the letters for 30 seconds.
  5. Turn potholder over and iron the reverse side for an additional 30 seconds.
  6. Allow to cool 1 minute before using.

 You can find a wide selection of Joy® embroidered iron-on letters and alphabet sheets in different sizes at your local craft stores!

“This is a sponsored post.  As a member of the Joy® Design Team I have been provided product and compensation in exchange for my creative ideas.  The views and opinions are my own.

Shop Your Fav Brands at Scrapbook.com

*Disclosure:  This blog uses ads and affiliate links.  If you choose to make a purchase using one of the links, I receive a small commission (at no additional cost to you) that helps offset the costs of maintaining this blog.  Thanks for your support!

DIY Holiday Inspiration Station

Holiday Inspiration Station

Tis the Season to be Crafting…. 

It’s November, time to turn on the Holiday movies and start making your lists.

Christmas is my favorite time of the year to be creative.

Inspire Creativity…

It’s easy to promote creativity over the Holidays with a DIY Holiday Inspiration Station.

Set up a little spot in the house to spark a little inspiration for the whole family.

I used the large Deflecto 3 Drawer Organizer* as the center of my station.

It’s large enough to hold full sheets of 12″ x 12″ paper and room for tags, ribbon and more.

It’s stackable for even more creativity.

This is one of my new favorites for organizing embellishments.

The Caddy Storage Tray* from Deflecto.

And best of all it fits into the large compartment of the Deflecto Stacking Caddy Organizer*.

Disclosure:  This blog uses affiliate links.  If you choose to make a purchase using one of the links, I receive a small commission (at no additional cost to you) that helps offset the costs of maintaining this blog.  Thanks for your support!

Brown paper packages tied up in string.

It’s easy to make your gifts look special when everything’s right at your fingertips. 

Disclosure…“This is a sponsored post.  As a member of the Deflecto Design Team I have been provided compensation and product in exchange for my creative ideas.  The views and opinions are my own.

Holiday Diamond Art

Country Christmas Pocket Notebook

Country Christmas Pocket Notebook.

Being a friend and a big fan of the creative dies that Eileen Hull designs for Sizzix…

I was happy to jump on the band wagon with Eileen Hull’s Design Team and Educators

to create an album using Eileen Hull’s NEW Pocket Notebook Die from Sizzix*.

You’ll just flip at the amazing things these ladies have come up with.

Make sure to read to the end of this post to see the full list of designers.

*Disclosure… This blog uses ads and affiliate links.  If you choose to make a purchase using one of the links, I receive a small commission (at no additional cost to you) that helps offset the costs of maintaining this blog.  Thanks for your support!

Is it too early to start thinking Christmas?

Once I saw the Simple Stories– Country Christmas 6 x 8 paper pad* I knew it would make

a cute little album for Christmas using Eileen Hull’s Pocket Notebook Die*.

To create the album you’ll need to cut out the pieces from matboard.

The Sizzix Little Sizzles Mat Board* is the perfect size to use with the XL Sizzix dies.

I like to use my Xyron Creative Station* to add adhesive to the back of the paper.

You can do this before or after you cut the die.

The Pocket Notebook Die* cuts the cover (you will need 2), a pen-loop and latch and pages for

the book.  The page size is adjustable and the spine of the book can be any size from 3/8″ to 2″.

I kept the cover and inside of  my album pretty simple, I’ll embellish it more as I add pictures.

The spine has pre-cut holes for gathering the inside pages.

I folded several of the 6″ x 8″ paper from the pad to make little page groupings.

Each one is held together with an elastic loop with I tied on the outside of  the spine.

I created a couple pocket pages in the center of one of the page groupings.

There’s a lot of possibilities and potential when using the Pocket Notebook die.

Country Christmas Pocket Notebook Products Used:

Welcome to the Pocket Notebook Release Party!

Eileen’s Inspiration and Educator teams have combined to show us their amazing Pocket Notebook ideas. Please follow the Blog Hop to see all of the fabulous projects, techniques and videos!

There are also two GIVEAWAYS– the Pocket Notebook die and a gift certificate for Eileen’s Etsy store. To enter to win, leave a comment on each of the posts. Winners will be announced on Tuesday, October 8 on Eileen’s Facebook Live show.

Thanks for hopping along with us today!

*Disclosure… This blog uses ads and affiliate links.  If you choose to make a purchase using one of the links, I receive a small commission (at no additional cost to you) that helps offset the costs of maintaining this blog.  Thanks for your support!