How to create a cute little Party Ant for your BBQ

Party Ant 9648

Sometimes in the midst of all my creative endeavors and the business of everyday life,

when I need a break from all the seriousness.

I like to stop and make something fun and a little bit silly. 

It’s one of my ways of procrastinating.

Honestly, I would never invite real ants to a BBQ, but, this one is dressed up, too cute and

ready for a party.  (a great little conversation starter)

Party Ant Supplies 9537

To make a Party Ant you’ll need a few supplies…               (*Amazon Affiliate Links)


*Disclosure:  This post uses ads and affiliate links.  If you choose to make a purchase using one of the links, I receive a small commission (at no additional cost to you) that helps offset the costs of maintaining this blog.  Thanks for your support!

Painted Balls on Skewers 9544

  • Dip the end of the bamboo skewers into craft glue and insert into the balls.
  • Paint balls with black acrylic paint.
  • After the paint has dried, cut the ends of the skewers approx. 3/4″, dip into glue and attach body and head of the ant together.

Ant Feet 9552

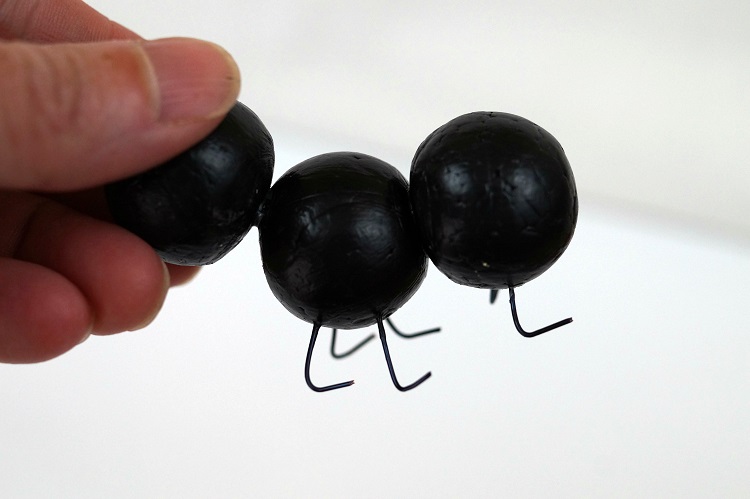
  • Cut six 1″ pieces of wire, bend the ends as show, dip in craft glue and insert into body of the ant.
  • Cut two more 1″ pieces of wire and curl the top of the wire with wire tools before inserting them into the head of the ant for the antennas.

Ant Eyes

  • Add two black dots to the center of the adhesive pearls to use as the eyes.
  • Punch a 1″ circle from decorative scrapbook paper, cut a notch from the circle and glue together to form a party hat.  Glue onto the top of the ant.  Top off the hat with a teeny tiny pom pom.
  • Cut a strip of adhesive pearls to use as a necklace.

Party Ant 9637

Mine is fairly small, but, wouldn’t a giant one make a cute centerpiece?  (think real big!)

Join Amazon Kindle Unlimited 30-Day Free Trial

Merry Christmas Gift Bag

Merry Christmas Gift Bag 1186

Make your Christmas Gift Bags a little more special with iron-on letters from Joy.

Merry Christmas Gift Bag Supplies

Start with a plain drawstring bag.  (Mine was from Canvas Corp.)

Replace the drawstring cording on the bag with red and white gingham ribbon and add iron-on

letters in red and neon yellow.  (in person the neon yellow looked lime to me)

Merry Christmas Gift Bag Flat 1140

Glue white lace, rick rack, buttons and a small wreath to the front of the bag.

For a truly personalized gift add a name instead of Merry Christmas.


This project was created for and sponsored by Joy SA.

Polka Dot Peppermint Parfait

A Quick and Easy Etched Glass Project

I picked up some sweet green parfait glasses at a estate sale awhile back.

I’ve been wanting to do something special with them and thought they’d look cute

with some polka dots.  (I mean who doesn’t like polka dots?)

The Polka Dot Parfait glass is a project you can make in under a half hour.

*FTC Disclosure… “This is a sponsored post.  I have been provided product and compensation in exchange for my creative ideas.  The views and opinions are my own.”

Here’s what you’ll need:

Shop Your Fav Brands at Scrapbook.com

*Disclosure… This blog uses ads and affiliate links.  If you choose to make a purchase using one of the links, I receive a small commission (at no additional cost to you) that helps offset the costs of maintaining this blog.  Thanks for your support!

etched polka dot parfait with maskEtched Polka Dot Parfait covered with Etching Creme

Directions:

  1. Measure the width of your parfait glass.  Cut the vinyl to fit around glass.
  2. Using a standard hole punch, punch random holes onto the vinyl to create a polka dot pattern.
  3. Wrap the vinyl around the side of the parfait glass.
  4. Make sure to burnish the vinyl to get out air bubbles and to make sure the all edges all down.
  5. Wrap additional areas around the glass with removable painters tape to protect the area from splatters.
  6. Apply a thick coat of Etchall® etching crème over the polka dots using the squeegee.  (more is better)
  7. Wait 15 minutes.  Scrape excess etching crème from the side of the glass and return extra etching crème back into the bottle. (it’s reusable)
  8. Rinse glass with warm water to clean.
  9. Remove Stencil and dry.
  10. Wash glass thoroughly before using.

For a Light and Festive Holiday Treat try adding crushed Candy Canes to vanilla ice cream. 

  • Place ice cream back into freezer to set up.
  • Don’t forget to save some crushed candy canes to sprinkle on top.

Holiday Diamond Art

Christmas in a Pickle Jar

Christmas in a Pickle Jar 1127

Christmas Crafting with Repurposed and Recycled Items…

Sometimes you have to find and save something for awhile before their purpose is revealed.

Like the base used on my Christmas in a pickle jar.  (the inspiration for this project)

This past summer we had a new ceiling fan installed in my son’s room.

It was flush mounted to the ceiling, so, they didn’t use all of the parts that came with the kit.

I came across the unused parts in the garbage and decided to save them.

FYI…It’s not hoarding if you use them.  (I’m just saying.)

Because I wanted to be informative when writing this post,

I emailed my brother for the correct name of the part.  I am told it is called a canopy.

I glued the canopy onto the jar using Beacon Glass, Metal & More Premium Glue*.

Here’s what I used for my Christmas in a Pickle Jar:  

*Disclaimer:  This post uses ads and affiliate links.  If you choose to make a purchase using one of the links, I receive a small commission (at no additional cost to you) that helps offset the costs of maintaining this blog.  Thanks for your support!

I painted the pickle jar lid and the old knob with semi gloss black spray paint.

I added a circle cut from a decorative scrapbooking paper and glued it onto my lid before

gluing on the knob.  (I could have added a hole and screwed on the knob, this was easier.)

I spruced up the plain little wreath by adding a new bow and jingle bell and a small holly

berry embellishment.  I added the ribbon to the neck of the jar before gluing on the wreath.

The little wood deer would of looked fine just as it came.

Instead, I decided to rub brown ink onto the deer to give it a stained look.

I used Vintage Photo Distress Inkpad* with a Ink Applicator & Blending Tool* (*affiliate link)

To make installing the deer a little easier, I glued the finished deer onto the front of one

of the trees before I placed it in the jar.

The Cream Bottle Brush Trees* come with a little wood base.

I added a super sticky craft glue dot under the base of each Cream Bottle Brush Tree*

before adding to my jar.

You can use a liquid glue instead of the sticky glue dots.  (this was just faster and easier for me)

Next, I added Epson Salts into my jar for snow.

A great Holiday Gift Idea.   

Shop Your Fav Brands at Scrapbook.com

Join Amazon Kindle Unlimited 30-Day Free Trial

Etched Snowflake Candy Jar

Quick and Easy Holiday Gift Idea

When it comes to the Holidays I love Quick and Easy Gift Ideas.

For the Snowflake Candy Jar…

I used a small canning jar etched with snowflakes and filled with candy.

It’s a project that I was able to put together in under a half hour.

Snowflake Candy Jar Supplies 1274

To make the Snowflake Candy JAR…                 

  1. Punch a strip of Snowflakes using etchmask™ vinyl and a snowflake punch.
  2. Carefully cover the jar with the vinyl.
  3. Make sure to burnish the vinyl to get out air bubbles and to make sure the all edges all down.
  4. Apply a thick coat of Etchall over the snowflake cut out using the squeegee.
  5. Wait 15 minutes.  Scrape excess etching crème from the side of the jar and return extra etching crème back into the bottle. (it’s reusable)
  6. Rinse jar with warm water to clean.
  7. Remove Stencil and dry.
  8. Add adhesive rhinestones to the center of each snowflake.
  9. Wrap craft stem around the neck of the jar and glue on a red button.

Snowflake Candy Jar Covered 1287

  • Cut a small circle from decorative scrapbook paper and adhere to lid of the jar.
  • Embellish jar with greenery stem, jingle and bow.

Snowflake Candy Jar 1472

   This would make a great Teacher, Hostess, Bunco, or Gift Exchange Gift.

This project was created for and sponsored by Etchall®.


Don’t Miss a Thing…Make Sure to Follow me.

Shop Your Fav Brands at Scrapbook.com

Disclaimer:  This blog uses ads and affiliate links.  If you choose to make a purchase using one of the links, I receive a small commission (at no additional cost to you) that helps offset the costs of maintaining this blog.  Thanks for your support!

Try Amazon Prime 30-Day Free Trial

How to make a Holly Jolly Flip Album…

Holly Jolly Flip Book

I wanted to share with you today one of my favorite projects from my Holiday Workshop

last Saturday.  It is the “Holly Jolly Flip Album” using paper from Canvas Corp Brands

Farmhouse Christmas Collection and a 5″ x 7″ Black Acrylic Frame from Deflecto Craft Solutions.

It’s a fairly simple project and the ladies were able to complete the album in just a couple of hours.

Farmhouse Christmas Flip Book Front Cover7638  Farmhouse Flip Book Supplies 07392

Holly Jolly Flip Album

Here’s the complete supply list:

Directions:

  1. Mark and measure hole placement on black acrylic frame.
  2. Drill 3/8” holes into frame.
  3. Cut a 7” x 9” piece of Red & Kraft Ribbon Stripe paper and insert into frame.
  4. Album Cover: Cut the “Holly Jolly Christmas” section from the Better Not Pout Tags on Kraft. Layer it onto black cardstock, kraft corrugated paper and then another back cardstock layer.
  5. Cut a 4 3/4” x 6 3/4” piece of Red & Black Stitched Diamonds and adhere it onto a piece of 5” x 7” Red Cardstock layer. Add a 3/4” x 4 3/4” strip of Red & Kraft Ribbon Stripe. Adhere “Holly Jolly” layers onto the Red & Black Stitched Diamonds.
  6. Punch a 1 11/16” circle from the Better Not Pout Tags and glue onto the back of the Optical lens by adding craft glue along the outside edges of the lens. Add jump ring to Optical Lens.
  7. Mark and measure holes to line up with black acrylic frame on the Album Cover and punch holes. Add eyelets to holes with the Crop-a-dile.
  8. Tie a piece of gold ribbon around the front of the album cover.
  9. Cut several pieces of black 5” x 7” cardstock layers to use as the pages of the album. Decorate album pages using additional scrapbook paper layers, strips, flips, pockets, trim, cords, tickets and mini bags.
  10. Align, measure and punch holes in the top of the album pages.
  11. Add album cover and pages to the black acrylic frame using medium book rings. Add Optical lens to ring.
  12. Embellish the stand by adding gold decorative trim with Fabri-Tac glue.

Pg. #4 Farmhouse Christmas Flip Book Special Delivery Side view 07658    Pg #1 Farmhouse Christmas Flip Book Made with Love Pocket Page 7646


“This is a sponsored post.  As a member of the Deflecto Design Team I have been provided product in exchange for my creative ideas, views and opinions.”

How to make a Frosted Pinecone Wreath

Frosted Pinecone Wreath

Autumn has come to the Midwest bringing with it crisp air and colorful leaves. 

I’ve even given up my flip flops for socks and shoes…

I like Autumn.

Really I do.  (If only it’d turn right back into Summer.)

Now that I’ve given up on Summer, I thought I’d better start with my Fall Decorations.

I like making projects that serve more than one purpose.

Like this Pinecone wreath.   After I’m done with my Fall Decorations…

I plan on adding red berries and re-making it into a Christmas Wreath.

How to Make a Frosted Pine Cone Wreath…

You’ll need:

  • 14″ Smoothfoam Wreath
  • Assortment of Pinecones
  • White Spray Paint
  • Craft Moss
  • Craft Glue
  • Hot Melt Gun and Glue
  • Ribbon and Raffia
  • Thin Wire

Directions:

  1. Gather an assortment of various sizes of pinecones.
  2. Spray one side of the pinecones with white spray paint.
  3. Glue Moss onto Smoothfoam Wreath.   (leave the outside of the wreath bare)
  4. Hot Glue and wire larger pinecones onto the wreath first.
  5. Fill in the Wreath with the smaller pinecones.
  6. Tie Ribbon around the outside of the wreath.
  7. Add raffia bow.

*Disclaimer:  This post uses ads and affiliate links.  If you choose to make a purchase using one of the links, I receive a small commission (at no additional cost to you) that helps offset the costs of maintaining this blog.  Thanks for your support!

This project was created for and sponsored by Smoothfoam.

Try Amazon Prime 30-Day Free Trial

Creating a Garden Stepping Stone

Creating a Garden Stepping Stone 08274

Every one in my family thinks of me when they see Red Toile dishes.

It’s my thing.  (one can never have too many right?)

So… when my daughter saw a set of Red Toile dishes on clearance for $25 at her local thrift store

she immediately called me to see if I wanted them.   (um, yes!)

While packing the car for their visit home, my son in law picked up the box to rearrange the car

and the bottom fell out.  Most of the dishes survived.  Five of the large plates did not.

Broken China 08190

Deciding to turn lemons into Lemonade…

I kept the broken plates to make a few garden stones.

Nick and I making Garden Stones 2

I enlisted the help of my little buddy.  He was eager to lend a hand.  (with gloves of course)

Laying out the pieces in the pan 8187

Creating a Garden Stepping Stone:

  • Cover the sides and bottom of an old cake pan with Petroleum Jelly for easy removal.
  • Arrange the pieces of the broke china pattern side down in the bottom of the pan.  Make sure to use the flattest pieces.
  • Add glass stones in between the pieces for added color and interest.

Smoothing out the cement 8199

  • Mix a quick setting cement according to the directions on the package.
  • Fill pan with cement approx. an 1″ thick.
  • Shake pan a little to fill in the gaps and smooth.
  • Allow a couple hours for the stones to set.
  • Remove stepping stones from the pans and clean excess cement from the top of the stones with a stiff wire brush and water.
  • Allow a few days for the cement to cure before sitting outside in your garden.

close up of stone 8267

*Disclaimer:  This blog uses ads and affiliate links.  If you choose to make a purchase using one of the links, I receive a small commission (at no additional cost to you) that helps offset the costs of maintaining this blog.  Thanks for your support.

my flowers 8329

Any content on this website is created for inspiration purposed only.  Creating with my suggested methods, products used, and tools is under your own risk.


Try Amazon Prime 30-Day Free Trial

Creating a Decorative Display Board for all my Little Pretties

Smoothfoam Display Board 07114

My project started as a Memo Board and… 

While I was looking for some push pins I stumbled across a collection of little pretties.

Tucked away in a cabinet along with a lot of other embellishments were these little

metal frames.  Something that I’d been hoarding since my K & Company days.

I added those frames along with some other little pretties onto my board.  (Love!)

Memo Board Products

To make my Memo/Display Board I used:            (*amazon affiliate link)

Directions:

  1. Paint wood frame with cream acrylic paint.
  2. Cut the Smoothfoam sheet a 1/4″ larger than the center opening of the frame.
  3. Apply spray adhesive to the front of the Smoothfoam and lay onto the fabric.
  4. Wrap and glue the fabric around the back of the Smoothfoam.
  5. Glue the frame onto the front of the covered Smoothfoam.
  6. Decorate the top and bottom of the frame with dimensional flowers.

*My little pretties are stuck into the display board with decorative garment pins.

A really fast and easy project.

This project was created for and sponsored by Smoothfoam.

Shop Amazon Scrapbooking Supplies*

Disclaimer:  This blog uses ads and affiliate links.  If you choose to make a purchase using one of the links, I receive a small commission (at no additional cost to you) that helps offset the costs of maintaining this blog.  Thanks for your support!

Glittered Bunny Egg

Are you ready for Spring?

Warm Weather, Pretty Flowers and Sweet Little Bunnies and Easter Eggs.

My project today is a Sweet Glittery Little Bunny made from a Smoothfoam Egg.

Bunny Parts and Supplies 3178 Glittered Bunny Egg 3224

To Make the Glittered you’ll need:        (*affiliate links)

  1. Cut two bunny ears from the smoothfoam sheet
  2. Lightly sand Smoothfoam egg and bunny ears.
  3. Glue ears onto Smoothfoam egg.
  4. Paint with cream paint.  Paint inside of the bunny ears pink.
  5. Cover the entire bunny with a thin coat of mod podge and sprinkle with glitter.
  6. Insert micro brads for the eyes and heart brad for the nose.
  7. Draw small mouth with fine black marker.

This project was created for and sponsored by Smoothfoam.

Shop Your Fav Brands at Scrapbook.com

*Disclosure:  This blog uses ads and affiliate links.  If you choose to make a purchase using one of the links, I receive a small commission (at no additional cost to you) that helps offset the costs of maintaining this blog.  Thanks for your support!