
How to Create a Flower Garden Notecard Folio
To Celebrate Spring and all things Flowers, I decided to make a Notecard Folio using paper from
Carta Bella’s Flower Garden Collection and Eileen Hull’s New Folio Journal Die from Sizzix*.


Materials Used: (*Affiliate Links)
- Eileen Hull’s New Folio Journal Die from Sizzix*
- Little Sizzles 6″ x 13″Matboard*
- Big Shot Die Cutting Machine*
- Xyron Creative Station*
- Xyron Tape Runner*
- Paper Cutter*
- CBGA130003 Carta Bella Flower Garden: 3″ x 4″ Journaling Cards*
- CBGA130002 Carta Bella Flower Garden: Lovely Floral*
- CBGA130004 Carta Bella Flower Garden: Love You Tags*
- Carta Bella Farmhouse Market Collections Stickers*
- Imagine’s Tear It! Double Sided Crafter’s Tape*
- OLFA 6″x8″ Cutting Mat*
- X-Acto Craft Knife*
- Crop-A-Dile Power Punch*

*Disclosure: This blog uses affiliate links. If you choose to make a purchase using one of the links, I receive a small commission (at no additional cost to you) that helps offset the costs of maintaining this blog. Thanks for your support!
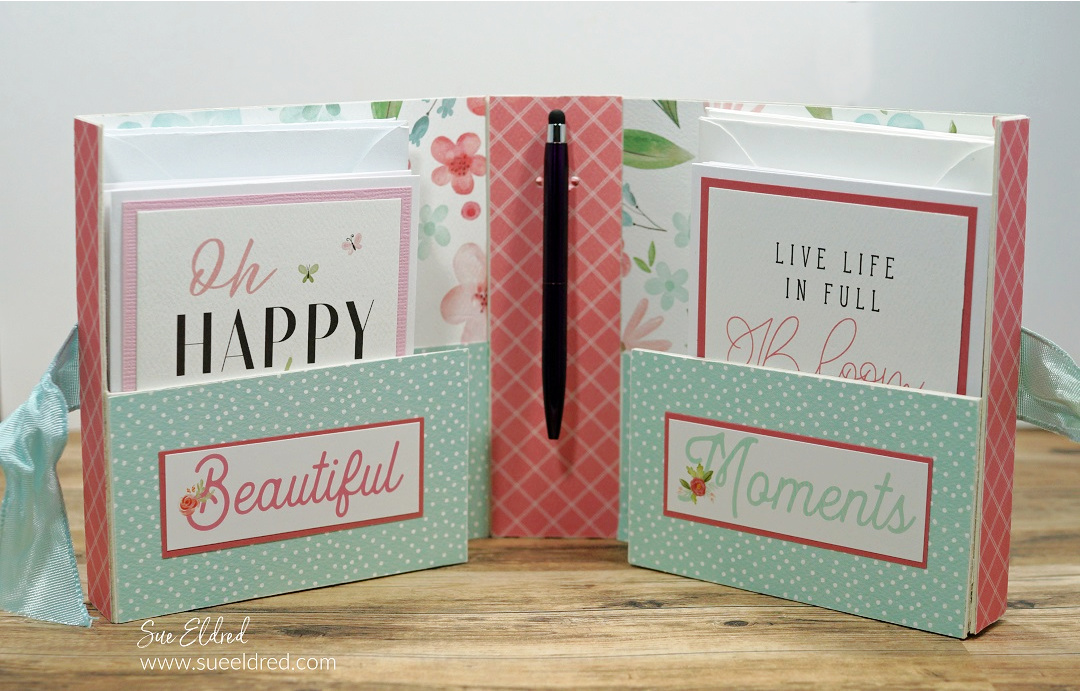
Album Details:
- The album pieces are die-cut using Sizzix White Matboard Sheets*, which is the perfect size for cutting long pieces. (You will need to cut the album pieces twice.)
- There is a smaller rectangle die-cut piece that comes with the die. (cut two) You will use the piece to create a pocket with the outer flap.
- Align and adhere both ends of the spine together using Tear It! Double-Sided Crafter’s Tape*.
- Cover the front and inside of the album with decorative scrapbook paper. (see album making tip below)
- Album Making Tip: I use my Xyron Creative Station*
to add adhesive to my paper before sticking it onto the matboard. It adds a complete adhesive layer without puckering or wrinkles.
- Using a craft knife and cutting mat, I cut both ends of the flaps down to create 2 1/2″ pockets. Adhere the “pocket pieces” (the small scored pieces that come with the die) to finish the bottom of the pockets.
- I used Carta Bella Farmhouse Market Collections Stickers* to embellish the pocket fronts.


- Create simple 3 1/2″ x 4 1/2″ layered cards using the Carta Bella Flower Garden: 3″ x 4″ Journaling Cards*.
- After using one of the Journaling Cards for my front and back cover and another section for my green spine, I was able to create 8 small notecards to fill my notecard folio.

- The ribbon was added around the album before adding the front and back cover.
- I created a small chipboard tag for the spine and punched the holes using a Crop-A-Dile Power Punch*.
- On the inside center binding, I hung a pen on the loop of ribbon that was added for the tag.

Wouldn’t this make a nice Birthday or Mother’s gift for someone special?


So pretty Sue! That paper works perfectly… Also I love the layout of your blog ❤
Thank you Eileen.
Love how this turned out…..love the colors and cutting the inside pocket down to make the holder for the stationary…
Thank You. It was a fun album to make.
Just got my die! Gonna have to try this!
your gonna love this die.