Polka Dot Peppermint Parfait

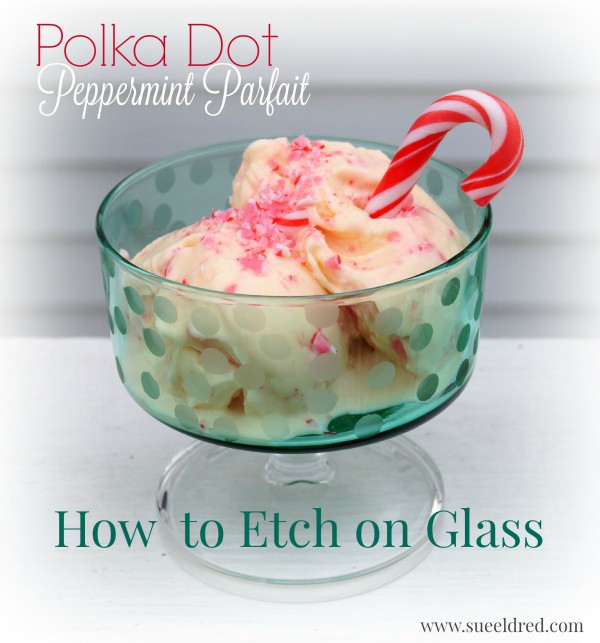
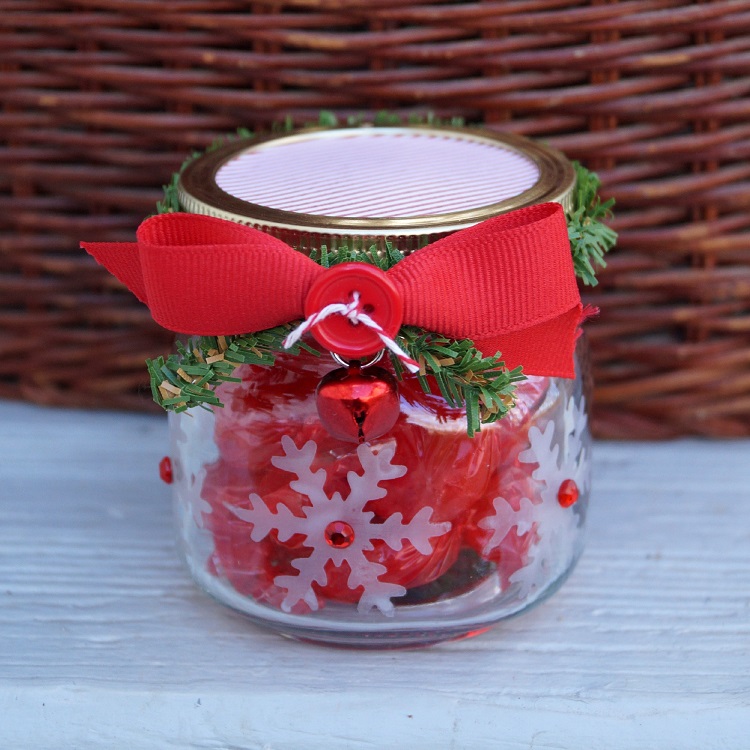
A Quick and Easy Etched Glass Project

I picked up some sweet green parfait glasses at a estate sale awhile back.

I’ve been wanting to do something special with them and thought they’d look cute

with some polka dots.  (I mean who doesn’t like polka dots?)

The Polka Dot Parfait glass is a project you can make in under a half hour.

*FTC Disclosure… “This is a sponsored post.  I have been provided product and compensation in exchange for my creative ideas.  The views and opinions are my own.”

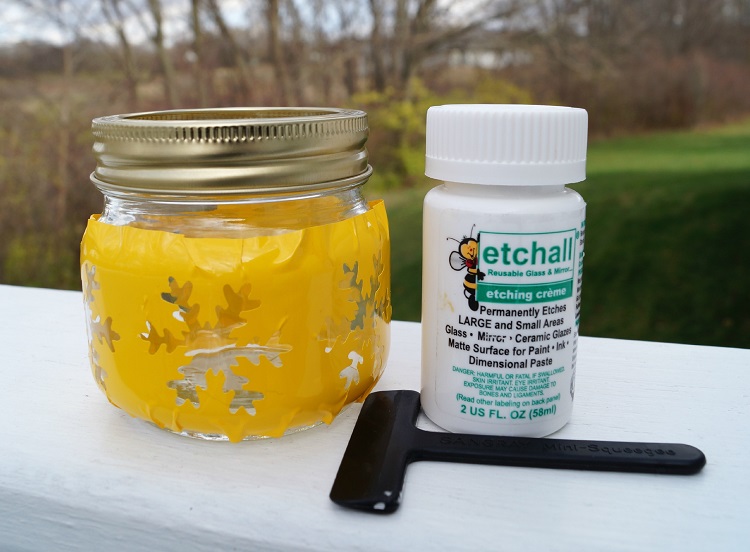
Here’s what you’ll need:

Shop Your Fav Brands at Scrapbook.com

*Disclosure… This blog uses ads and affiliate links.  If you choose to make a purchase using one of the links, I receive a small commission (at no additional cost to you) that helps offset the costs of maintaining this blog.  Thanks for your support!

etched polka dot parfait with maskEtched Polka Dot Parfait covered with Etching Creme

Directions:

  1. Measure the width of your parfait glass.  Cut the vinyl to fit around glass.
  2. Using a standard hole punch, punch random holes onto the vinyl to create a polka dot pattern.
  3. Wrap the vinyl around the side of the parfait glass.
  4. Make sure to burnish the vinyl to get out air bubbles and to make sure the all edges all down.
  5. Wrap additional areas around the glass with removable painters tape to protect the area from splatters.
  6. Apply a thick coat of Etchall® etching crème over the polka dots using the squeegee.  (more is better)
  7. Wait 15 minutes.  Scrape excess etching crème from the side of the glass and return extra etching crème back into the bottle. (it’s reusable)
  8. Rinse glass with warm water to clean.
  9. Remove Stencil and dry.
  10. Wash glass thoroughly before using.

For a Light and Festive Holiday Treat try adding crushed Candy Canes to vanilla ice cream. 

  • Place ice cream back into freezer to set up.
  • Don’t forget to save some crushed candy canes to sprinkle on top.

Holiday Diamond Art

Christmas in a Pickle Jar

Christmas in a Pickle Jar 1127

Christmas Crafting with Repurposed and Recycled Items…

Sometimes you have to find and save something for awhile before their purpose is revealed.

Like the base used on my Christmas in a pickle jar.  (the inspiration for this project)

This past summer we had a new ceiling fan installed in my son’s room.

It was flush mounted to the ceiling, so, they didn’t use all of the parts that came with the kit.

I came across the unused parts in the garbage and decided to save them.

FYI…It’s not hoarding if you use them.  (I’m just saying.)

Because I wanted to be informative when writing this post,

I emailed my brother for the correct name of the part.  I am told it is called a canopy.

I glued the canopy onto the jar using Beacon Glass, Metal & More Premium Glue*.

Here’s what I used for my Christmas in a Pickle Jar:  

*Disclaimer:  This post uses ads and affiliate links.  If you choose to make a purchase using one of the links, I receive a small commission (at no additional cost to you) that helps offset the costs of maintaining this blog.  Thanks for your support!

I painted the pickle jar lid and the old knob with semi gloss black spray paint.

I added a circle cut from a decorative scrapbooking paper and glued it onto my lid before

gluing on the knob.  (I could have added a hole and screwed on the knob, this was easier.)

I spruced up the plain little wreath by adding a new bow and jingle bell and a small holly

berry embellishment.  I added the ribbon to the neck of the jar before gluing on the wreath.

The little wood deer would of looked fine just as it came.

Instead, I decided to rub brown ink onto the deer to give it a stained look.

I used Vintage Photo Distress Inkpad* with a Ink Applicator & Blending Tool* (*affiliate link)

To make installing the deer a little easier, I glued the finished deer onto the front of one

of the trees before I placed it in the jar.

The Cream Bottle Brush Trees* come with a little wood base.

I added a super sticky craft glue dot under the base of each Cream Bottle Brush Tree*

before adding to my jar.

You can use a liquid glue instead of the sticky glue dots.  (this was just faster and easier for me)

Next, I added Epson Salts into my jar for snow.

A great Holiday Gift Idea.   

Shop Your Fav Brands at Scrapbook.com

Join Amazon Kindle Unlimited 30-Day Free Trial

Christmas Brag Book

Christmas Brag Book

This year make a Christmas Brag Book for all your fun Holiday Memories.

For my brag book I used clear flexible pouches from Deflecto Craft Solutions and paper

from Canvas Corp Brands Farmhouse Christmas Collection for a Quick and Easy project.

A Great Gift Idea for the Grandparents.

Christmas Mini Album Stephanie and Zach 7413

A fun way to share Holiday Silliness and the Sweet Little Moments shared between generations.

Christmas Mini Album Inside Back Cover 7414

The Christmas Brag Book was created for Craft Ideas Magazine’s Holiday Issue

and has my Christmas photo’s from last year.

Craft Ideas Holiday 2015

Craft Ideas is a great magazine for creative inspiration.

Christmas Mini Album Inside Pages 7411

Finished Size: 3 1/4” x 6”

Christmas Mini Album Supplies 7388

Materials:

  • Deflecto 20019CR Flexible Pouch (1 package of 10)
  • Canvas Corp Brands CCP2827 Farmhouse Christmas Tags on Ivory 12 x 12 paper
  • Canvas Corp Brands CCP2826 Farmhouse Christmas Stripe on Ivory 12 x 12 paper
  • Canvas Corp Brands CCP2638 Red & Ivory Mini Dot Reverse 12 x 12 paper
  • Canvas Corp Brands CCP2639 Red & Ivory Ribbon Stripe 12 x 12 paper
  • Canvas Corp Brands Binding Ring-Small Antique Silver
  • Canvas Corp Brands Optical Lens Antique Brass
  • Canvas Corp Brands PaperTape: Christmas Wrap
  • Paper Source 5/8” Ivory/Red Striped Ribbon
  • Red Mini Rick Rack
  • Small Red Button
  • Photos
  • Black Cardstock

Basic Supplies:

  • Paper Cutter
  • 1 11/16” Circle Punch
  • Scissors
  • 1/8” Hole Punch
  • Double Stick Tape Runner
  • Glue Stick
  • Craft Glue
  • Thermo Web Mini Glue Dot

Directions:

  1. For the Cover: Cut a piece of black cardstock 3” x 5 1/4”. Cut “It’s the most Wonderful Time…” from the Farm House Christmas Tags just slightly smaller than 3” x 5 1/4” and adhere to the black cardstock. Add a 1/2” x 3” strip of Red and Ivory Dots to the left side of the tag. Glue a 3” piece of red mini rick rack onto the right side of the tag.
  2. On the Inside Front Cover: Cut a piece of black cardstock 3” x 5 1/4”. Cut a 3” x 5 1/4” piece of Red & Ivory Ribbon Stripe just slightly smaller than the 3” x 5 1/4” and adhere to the black cardstock. Adhere two strips of 1/2” x 5 1/4” Red and Ivory Dots to the top and bottom of the striped paper. Adhere “I’ll be Home…” from the Farmhouse Christmas Stripe layered on black cardstock onto the center of the striped paper.
  3. Insert Cover and Inside Front Cover into the Flexible Pouch.
  4. Add Paper Tape around the plain end of the Flexible Pouch.
  5. Punch a 1 11/16” Snowflake Circle from the Farmhouse Christmas Tags and glue onto the back of the Optical Lens by adding craft glue along the outside edges of the lens. Glue small red button onto front of the lens in the middle of the snowflake.
  6. Cut a 10” piece of Ivory Red Striped Ribbon. Tie onto front cover adding the Optical Lens.
  7. Choose pictures that can easily be cut down to 3” x 5 1/4”. Add to inside of flexible pouches.
  8. Create Back Cover using the Red & Ivory Mini Dot Paper, Red & Ivory Striped Paper and Farmhouse Christmas Strip.
  9. Add Paper Tape to each of the pouches.
  10. Mark and re-punch the holes using 1/8” hole punch on each of the pouches and gather the mini album together using a small book ring.

Christmas Mini Album Inside front cover 7412

Christmas Mini Album Back Cover 7417

This project was created for Craft Ideas and was sponsored by Deflecto Craft Solutions

and Canvas Corp Brands.

How to build a Snowman with Smoothfoam…

How to make a Snowman Using Smoothfoam balls and snowtex

Making a Snowman is pretty easy.  All it takes is a little patience and time.

(and a few ingredients)

Here’s what you’ll need to make a Snowman:                  (*amazon affiliate link)

*Disclosure:  This blog uses ads and affiliate links.  If you choose to make a purchase using one of the links, I receive a small commission (at no additional cost to you) that helps offset the costs of maintaining this blog.  Thanks for your support!

Shop Your Fav Brands at Scrapbook.com

Directions:

  1. Cut a small section off the bottom of the 4″ Smoothfoam ball so that it sits flat.
  2. Cut a couple of 3″ sections from the bamboo skewer.  Stick the skewer into the center of the 2″ and 3″ Smoothfoam balls.
  3. Add craft glue to the ends of the skewers before sticking the three balls together to form the snowman base.  (Allow glue to fully dry before continuing to the next step)
  4. Using a palette knife, smooth Snow-tex over Snowman base.  Here’s where the patience comes in… Allow a couple of hours for the Snow-tex to completely dry.
  5. Paint the entire Snowman base with white acrylic paint.  This fills in and helps cover any area missed by the Snow-tex.
  6. For a Frosty Look…paint the Snowman base with Craft Twinkles Glitter Paint.
  7. Cut a thin strip of grey felt and glue around the base of the hat to create a band.  Glue holly embellishment onto band to cover seam.  Glue to the top of the Snowman head.
  8. Cut a strip of gingham fabric and tie around neck.  Cut small slits into the ends of fabric for fringe.
  9. Use two small black brads inserted into the head for the eyes.  Use five micro black brads insert as the mouth.
  10. Cut the pointed end from a bamboo skewer and paint with orange paint.  Stick into head for the nose.

Here’s a Close up of Mr. Snowman.  Isn’t he Handsome?

This project was created for Smoothfoam and sponsored by Smoothfoam and DecoArt.

Love Snowmen?  Create your own “Snowball Fight” here.

Shop Amazon Scrapbooking Supplies*

Countdown to Christmas

Hello December Christmas Countdown

I had this idea to make a Countdown to Christmas using a small wood clipboard.

I’d been thinking about it and planning it in my head for a while.

When I went to the store all I could find were bright colored acrylic ones.

I knew if I kept searching I could find a wood one…

But, I really didn’t want to go running around to more stores so I picked one up

and decided I would change my plan.

Christmas Countdown Clipboard

The more I looked at this neon clipboard, I knew I wasn’t happy.

So… I decided to improvise.

I lightly sanded both sides of the clipboard with a fine grit sanding block.

Next, I gave the clipboard a couple of coats of Red Chalky Finish Paint.

After it was completely dried, I masked off an area with removable painter’s tape

and painted the inside of the masked area with black chalkboard paint.

Christmas Countdown Close Up

 “Hello December” is from a sheet of scrapbook paper from Simple Stories “Claus & Co.” Collection.

I embellished the clipboard with a silver ribbon, jingle bell and sparkly red berries.

Christmas Countdown 2

I’m never satisfied with my own handwriting on these things…

so I added letter stickers on the bottom.  (now I’m happy!)


Here’s what I used:

These products available at your local craft stores or online on amazon.com*

*Disclosure:  I am a Amazon Affliate.

Mini Ribbon Wreath Ornaments

Mini Ribbon Wreath Ornaments

No matter how you decorate for the Holidays…Shabby, Homespun, Country or Cute.

You can easily customize these Mini Ribbon Wreath Ornaments to fit your personal style.

Easy to make and sure to impress.

How To make Mini Ribbon Wreath Ornaments

Finished Size : 3”

Materials Used:

*Disclaimer:  This post uses ads and affiliate links.  If you choose to make a purchase using one of the links, I receive a small commission (at no additional cost to you) that helps offset the costs of maintaining this blog.  Thanks for your support!

Directions:

  1. Apply a strip of 1/8″ adhesive around the outside edge of the Smoothfoam wreath. This keeps the ribbon securely in place while wrapping.
  2. Wrap ribbon tightly around wreath. When you’ve wrapped the ribbon half way around wreath add the jump ring with jingle bell to ribbon so that it hangs on the bottom of the wreath and continue wrapping. When finished wrapping the ribbon, glue ribbon end onto back of wreath.
  3. Add metallic ribbon trim on top of the wreath as the ornament hanger.
  4. Glue mini bottle brush tree inside wreath.
  5. Glue a piece of burlap or scrapbook paper onto a piece of chipboard and cut into a circle that will cover the inside of the wreath and glue to the back of the wreath.
  6. Print a computer generated greeting on to a piece of cream card-stock. Cut down to size and notch out both ends to create a banner.
  7. Give the banner a quick wave using your fingers and glue onto the bottom of the wreath.
  8. Add adhesive pearls on to the wreath.
  9. Add bow on the top of the wreath to finish it off.

Try Amazon Prime 30-Day Free Trial

Etched Snowflake Candy Jar

Quick and Easy Holiday Gift Idea

When it comes to the Holidays I love Quick and Easy Gift Ideas.

For the Snowflake Candy Jar…

I used a small canning jar etched with snowflakes and filled with candy.

It’s a project that I was able to put together in under a half hour.

Snowflake Candy Jar Supplies 1274

To make the Snowflake Candy JAR…                 

  1. Punch a strip of Snowflakes using etchmask™ vinyl and a snowflake punch.
  2. Carefully cover the jar with the vinyl.
  3. Make sure to burnish the vinyl to get out air bubbles and to make sure the all edges all down.
  4. Apply a thick coat of Etchall over the snowflake cut out using the squeegee.
  5. Wait 15 minutes.  Scrape excess etching crème from the side of the jar and return extra etching crème back into the bottle. (it’s reusable)
  6. Rinse jar with warm water to clean.
  7. Remove Stencil and dry.
  8. Add adhesive rhinestones to the center of each snowflake.
  9. Wrap craft stem around the neck of the jar and glue on a red button.

Snowflake Candy Jar Covered 1287

  • Cut a small circle from decorative scrapbook paper and adhere to lid of the jar.
  • Embellish jar with greenery stem, jingle and bow.

Snowflake Candy Jar 1472

   This would make a great Teacher, Hostess, Bunco, or Gift Exchange Gift.

This project was created for and sponsored by Etchall®.


Don’t Miss a Thing…Make Sure to Follow me.

Shop Your Fav Brands at Scrapbook.com

Disclaimer:  This blog uses ads and affiliate links.  If you choose to make a purchase using one of the links, I receive a small commission (at no additional cost to you) that helps offset the costs of maintaining this blog.  Thanks for your support!

Try Amazon Prime 30-Day Free Trial

French Country Fall Stenciled Burlap Table Runner

French Country Fall Stenciled Burlap Table Runner 681 2

French Country Inspired Stenciled Burlap Table Runner for Fall.

This table runner is a Quick & Easy DIY project with no sewing involved.

Supplies 223

To make the table runner you’ll need:                                     *(affiliate links)

*Disclaimer:  This post uses ads and affiliate links.  If you choose to make a purchase using one of the links, I receive a small commission (at no additional cost to you) that helps offset the costs of maintaining this blog.  Thanks for your support!

Stenciling 269

Stenciled 380

Directions:

  1. Make sure to lay paper down before stenciling on burlap.
  2. Tape around stencil with removable painter’s tape so that the stencil won’t move.
  3. Using a stencil brush, dip just the tip of your brush into the paint.  Tap off excess paint.
  4. Stenciling is a “dry” brush technique.
  5. Apply paint with stencil brush in a straight up and down motion called stippling.
  6. Clean Stencil between each image.
  7. Glue lace trim onto each edge of the runner using Fabri Tac glue.
  • Burlap is a rough fabric.  You may want to add a layer of fabric or felt underneath the runner to protect the finish of your table.

Close UP 0666

Fall Display

Because I really liked how the table runner turned out…

I decided to create a pillow for the comfy chair in my dining room

I used muslin as a lining for the burlap and on the reverse side of the pillow.

(The pillow, of course, consisted of some sewing.)

Shop Amazon Scrapbooking Supplies*

How to make a Holly Jolly Flip Album…

Holly Jolly Flip Book

I wanted to share with you today one of my favorite projects from my Holiday Workshop

last Saturday.  It is the “Holly Jolly Flip Album” using paper from Canvas Corp Brands

Farmhouse Christmas Collection and a 5″ x 7″ Black Acrylic Frame from Deflecto Craft Solutions.

It’s a fairly simple project and the ladies were able to complete the album in just a couple of hours.

Farmhouse Christmas Flip Book Front Cover7638  Farmhouse Flip Book Supplies 07392

Holly Jolly Flip Album

Here’s the complete supply list:

Directions:

  1. Mark and measure hole placement on black acrylic frame.
  2. Drill 3/8” holes into frame.
  3. Cut a 7” x 9” piece of Red & Kraft Ribbon Stripe paper and insert into frame.
  4. Album Cover: Cut the “Holly Jolly Christmas” section from the Better Not Pout Tags on Kraft. Layer it onto black cardstock, kraft corrugated paper and then another back cardstock layer.
  5. Cut a 4 3/4” x 6 3/4” piece of Red & Black Stitched Diamonds and adhere it onto a piece of 5” x 7” Red Cardstock layer. Add a 3/4” x 4 3/4” strip of Red & Kraft Ribbon Stripe. Adhere “Holly Jolly” layers onto the Red & Black Stitched Diamonds.
  6. Punch a 1 11/16” circle from the Better Not Pout Tags and glue onto the back of the Optical lens by adding craft glue along the outside edges of the lens. Add jump ring to Optical Lens.
  7. Mark and measure holes to line up with black acrylic frame on the Album Cover and punch holes. Add eyelets to holes with the Crop-a-dile.
  8. Tie a piece of gold ribbon around the front of the album cover.
  9. Cut several pieces of black 5” x 7” cardstock layers to use as the pages of the album. Decorate album pages using additional scrapbook paper layers, strips, flips, pockets, trim, cords, tickets and mini bags.
  10. Align, measure and punch holes in the top of the album pages.
  11. Add album cover and pages to the black acrylic frame using medium book rings. Add Optical lens to ring.
  12. Embellish the stand by adding gold decorative trim with Fabri-Tac glue.

Pg. #4 Farmhouse Christmas Flip Book Special Delivery Side view 07658    Pg #1 Farmhouse Christmas Flip Book Made with Love Pocket Page 7646


“This is a sponsored post.  As a member of the Deflecto Design Team I have been provided product in exchange for my creative ideas, views and opinions.”

How to make a Frosted Pinecone Wreath

Frosted Pinecone Wreath

Autumn has come to the Midwest bringing with it crisp air and colorful leaves. 

I’ve even given up my flip flops for socks and shoes…

I like Autumn.

Really I do.  (If only it’d turn right back into Summer.)

Now that I’ve given up on Summer, I thought I’d better start with my Fall Decorations.

I like making projects that serve more than one purpose.

Like this Pinecone wreath.   After I’m done with my Fall Decorations…

I plan on adding red berries and re-making it into a Christmas Wreath.

How to Make a Frosted Pine Cone Wreath…

You’ll need:

  • 14″ Smoothfoam Wreath
  • Assortment of Pinecones
  • White Spray Paint
  • Craft Moss
  • Craft Glue
  • Hot Melt Gun and Glue
  • Ribbon and Raffia
  • Thin Wire

Directions:

  1. Gather an assortment of various sizes of pinecones.
  2. Spray one side of the pinecones with white spray paint.
  3. Glue Moss onto Smoothfoam Wreath.   (leave the outside of the wreath bare)
  4. Hot Glue and wire larger pinecones onto the wreath first.
  5. Fill in the Wreath with the smaller pinecones.
  6. Tie Ribbon around the outside of the wreath.
  7. Add raffia bow.

*Disclaimer:  This post uses ads and affiliate links.  If you choose to make a purchase using one of the links, I receive a small commission (at no additional cost to you) that helps offset the costs of maintaining this blog.  Thanks for your support!

This project was created for and sponsored by Smoothfoam.

Try Amazon Prime 30-Day Free Trial