Message in a Bottle Shaker Tags

In continuing with the Beach Theme for July…

I’ve got a couple of cute projects using the Message in a Bottle Stamp and Die Set from

The Maker’s Movement to share with you.

MSD222 Message in a Bottle Stamp and Die Set  

*FTC Disclosure… “This is a sponsored post for The Maker’s Movement.  I have been provided product and compensation in exchange for my creative ideas.  The views and opinions are my own.”

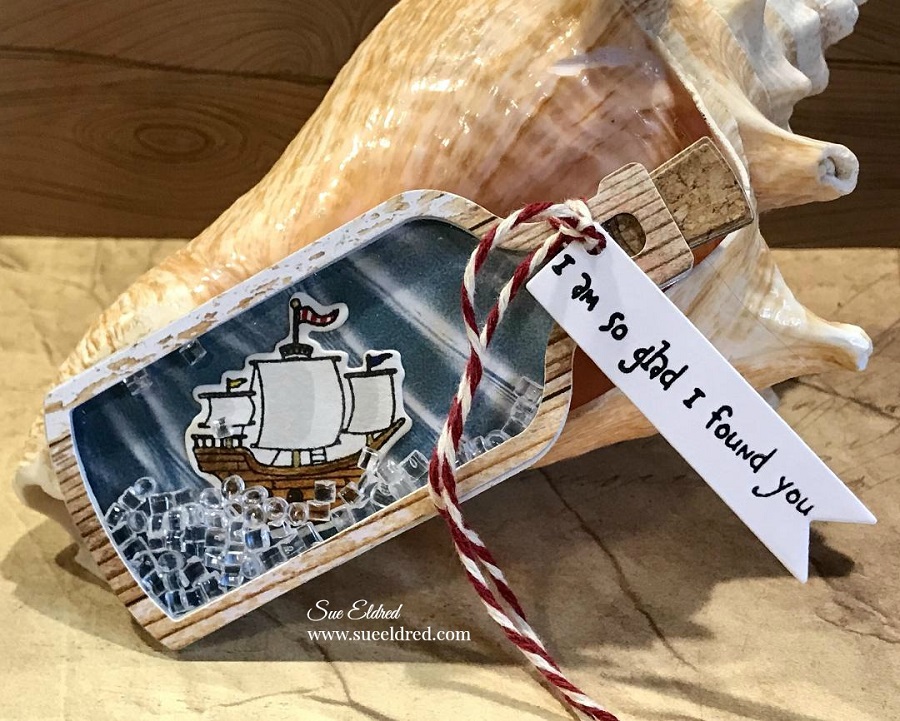
Message in a Bottle Pirate Ship Shaker Tag Directions:

  • Stamp the ship on white watercolor cardstock.
  • Color the ship with Tombow Art  Markers.

*Disclosure:  This blog uses ads and affiliate links.  If you choose to make a purchase using one of the links, I receive a small commission (at no additional cost to you) that helps offset the costs of maintaining this blog.  Thanks for your support!

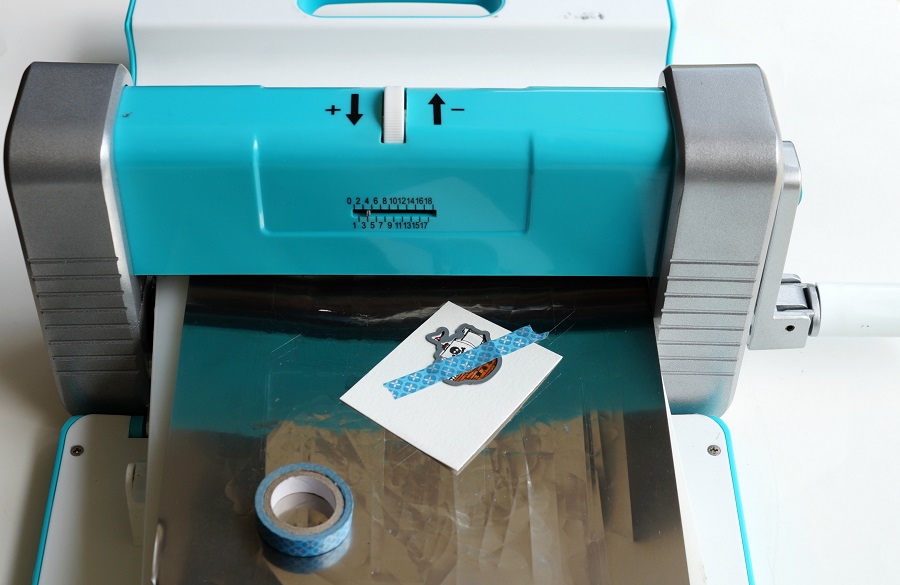
  • Align the ship die over the ship image.  Place a piece of washi tape or removable tape over the die to keep it in place.  Run the die through the Crossover II Die Cutting Machine* to cut out the image.

Aren’t these are the cutest little ships?

You can add a skull and crossbones to the sail, or a sweet little heart. (included in the set)

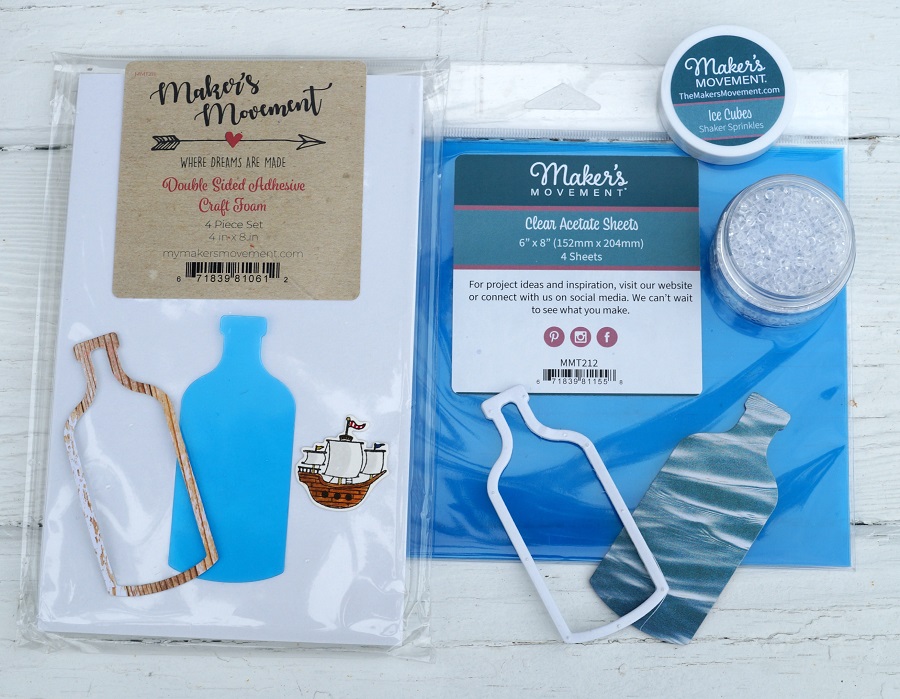
You will need to cut out several pieces to create the Message in a Bottle Shaker Tag.

  • Cut a bottle shape out of clear acetate and a wavy-look scrapbook paper.
  • Place a small piece of distressed woodgrain look scrapbook paper into the Xyron Create-A-Sticker, Sticker Maker* to add adhesive to the backside of the woodgrain paper. Die-cut the woodgrain paper using the Bottle Frame Die. Creating a paper bottle frame sticker makes it easier to use when it comes time to place on the acetate.
  • Cut a second Bottle Frame using the double-sided adhesive foam sheet.

  • Remove one side of the protective blue coating from the acetate bottle.
  • Align and stick bottle frame sticker onto the acetate.
  • Remove the second side of the protective blue coating from the acetate.
  • Use a dryer sheet and rub on the blue wavy bottle die-cut to eliminate static created from the acetate.
  • Align and stick craft foam bottle frame onto the blue bottle die-cut.
  • Adhere die-cut ship in the center of the bottle.

I found a paper that replicated the look of cork.  I used that paper and cut several layers using the cork shaped die and glued them together to create a thick dimensional cork. I made the cork the same thickness of the foam.

  • Cut a piece off the top of the craft foam bottle to make room to place the cork.
  • Add Ice Cube Sprinkles (from the mixed drinks shaker sprinkles) into the well of the bottle frame.
  • Remove the protective coating of the craft foam frame and carefully place the acetate frame over the bottle.

  • Stamp your message on a piece of white cardstock and cut out using the banner die.
  • Punch a small hole at the end. Tie the banner die cut around the neck of the bottle with a piece of red and white twine.

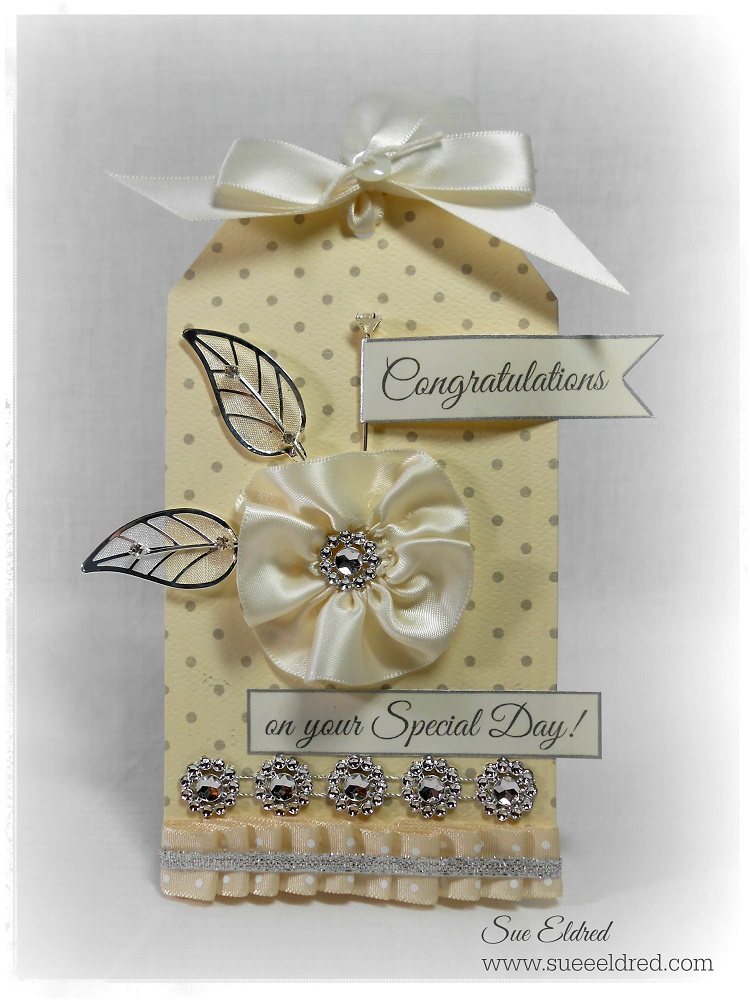
If you’re not into Pirates and Pirate Ships…

the Message in a Bottle Die also makes a perfect Congratulations tag.

Use it for a Wedding, Anniversary, New Home, or Retirement.

How to Create a Beaded Bridal Pouch

A Gift for that special Bride…

Create a special pouch for the Bride-to-be to keep her wedding day jewelry safe while in

transport.  Personalize it with Joy Iron On Embroidered letters.

To make the Bridal Pouch here’s what you’ll need:

Shop Your Fav Brands at Scrapbook.com
Directions:
  1. Fold over one end of the felt approx. 4″.
  2. Sew along the edge of each side to create the pouch.
  3. Iron the beaded trim onto the opposite end of the felt by laying a fine cloth over the trim and ironing over it for 25 sec.
  4. Cut excess felt around the top of the beaded trim to create a scalloped edge.
  5. Position the letters spelling “Bride” onto the front of the pouch with the shiny side down.
  6. Cover letters with a fine cloth.
  7. With firm pressure iron cloth over the letters for 25 seconds.
  8. Turn flap of the pouch over and iron the back for an additional 25 seconds.
  9. Add Velcro to the flap to keep the pouch closed.

You can also use the beaded-iron on trim to make into a bracelet, belt or headband.

For the beaded bracelet…

  • Measure the size of your wrist.
  • Cut a piece of  felt approx. 3/4″ longer than your trim.
  • Arrange trim onto felt so that only one end has the extra felt.
  • Lay a clean soft cloth over trim and iron onto the felt.
  • Cut excess felt around the beaded trim to create a scalloped edge.
  • Add hook and loop tabs* to the end of the felt.

This project was sponsored by Joy SA.

Shop Handmade – The Wedding Store

*Disclaimer:  This post uses ads and affiliate links.  If you choose to make a purchase using one of the links, I receive a small commission (at no additional cost to you) that helps offset the costs of maintaining this blog.  Thanks for your support!

Craft Ideas Magazine: Dreams Come True Card

craft-ideas-magazine-spring-2017-sues-creative-workshop

The newest issue of Craft Ideas Magazine arrived in the mail this week.

Even though I knew it was going to be in there, it’s still exciting to see one of your cards in print.

My dreams come true card using paper and stickers from Paper House Productions

is on page 71.   With Spring Fever setting in big time this week, it was the perfect time to

receive the Spring Issue.

craft-ideas-spring-2017

Make sure to pick up an issue for yourself.

dreams-come-true-card-sues-creative-workshop

Dreams Come True

A simple and elegant card perfect for weddings.

Finished Card Size:  5” x 7”

Supplies Used:

  • P-2007 Love 12” Double Sided Scrapbook Paper  (Paper House Productions)
  • STCX-1001 Wedding Day Cardstock Stickers  (Paper House Productions)
  • STDM-0024 Just Married 3D Stickers  (Paper House Productions)
  • Cardstock: Kraft and Cream
  • 5/8” Sheer Ribbon
  • 3D Foam Mounting Square (Scrapbook Adhesives by 3L)
  • Double Sided Tape Runner

Tools:

  • Paper Cutter
  • Scissors

dreams-come-true-sues-creative-workshop

Directions:

  1. Cut the top left corner of the paper 4 ½ ” x 6 ½ ”. (“dreams come true”)
  2. Add the “lace” border sticker to the bottom of the paper.
  3. Embellish the bottom right corner with the leaves sticker and the 3D white flowers.
  4. Add a foam mounting square under the “heart” and add heart and 3D butterfly to the embellishments,
  5. Adhere onto a 4 3/4” x 6 3/4” kraft cardstock layer and then onto a cream 5” x 7” card.
  6. Add simple ribbon bow to top of the card.

dreams-come-true-close-up-sues-creative-workshop

Create a Simple Vase Centerpiece

Washi Tape Vase and Flowers 2

Want to make a great impression but don’t have a lot of time? 

Here’s a quick and easy centerpiece project for your next party or gathering?

Washi Tape and Vase

I put together this simple vase using Washi Tape I received from Little B LLC

and an inexpensive dollar store cylinder vase.

TIP:  I drew a line with a permanent marker halfway down the vase to use as a starting point to keep everything neat and all my lines straight.  Simply wrap the vase with the washi tape.  (it’s that easy)    It only takes a few minutes to create an elegant look.

Washi Tape Vase Close Up

Next…I filled it with fresh flowers cut from my garden.

Or pick up a bouquet at the grocery store.

It would be great centerpiece vase for Weddings, Showers or any special gatherings.

It’s a temporary idea with elegant results. 

Here’s the list of the Little B Decorative Tape Used:

  • 100435 Silver Foil Black Pin Stripe
  • 100562 Gold Foil Hearts
  • 100047 Blk w/Sm Wht Polka Dots
  • 100443 Gold Foil Toile
  • 100344 Black and White Stripe
  • 100011 Damask Black/White
  • 100563 Gold Foil Love

How to Create a Wedding Memories Card Box

I am honored to have had my Wedding Memories Card Box featured as a special project in

DIY Wedding Magazine’s Holiday Issue.

Wedding Memories Keepsake Cards Box 1

The Wedding Memories Cards Box is a dual-purpose box to hold cards at the Reception

and then to be used later to store the Wedding Memories to be cherished for years to come.

Wedding Memories Card Box 8032

I started with a plain wood box from Walnut Hollow and Chalky Finish Paint from Deco Art to create a soft timeless finish.

Supplies Used:    (*amazon affiliate links)

Finished Size: 9” x 12” x 3 1/2”

Wedding Memories Card Box Collage

Directions:

  1. Paint the top portion of the cornice box with “Vintage” Chalky Finish paint and the bottom portion of the box with “Timeless” Chalky Finish paint. (Inside and out)
  2. Lightly sand the box to smooth out the finish.
  3. Position “Mod Quatrefoil” stencil over the top of the box. Secure the stencil in place with the painter’s tape to prevent slipping. Use stipple brush to apply “Whisper” Chalky Finish paint inside open stencil areas.
  4. Remove stencil.
  5. Position and stencil “Mod Quatrefoil” pattern onto the sides of box.
  6. Allow paint to dry for a few hours and lightly sand over the stenciled area to give a slightly worn look.
  7. Apply clear crème wax onto the inside and outside of the box.
  8. Wait one hour and buff box using a soft, clean rag.
  9. Measure and apply decorative paper onto the inside of the box.
  10. Tie a long length of Antique White Satin ribbon around the top of the box, tying a bow on the top.
  11. Cut cream cardstock into five 2 1/4” x 3 1/2” pieces.
  12. Stencil the letters to spell “CARDS” onto cream cardstock using the 3” Simple Script Alphabet.
  13. On the inside of the box: Clip the letters onto the ribbon using the mini clothespins.

Wedding Memories Card Box closed

This project was sponsored by Deco Arts and Walnut Hollow. 

Shop Handmade – The Wedding Store

Disclaimer:  This blog uses ads and affiliate links.  If you choose to make a purchase using one of the links, I receive a small commission (at no additional cost to you) that helps offset the costs of maintaining this blog.  Thanks for your support!

DIY Wedding Projects Day #5: Gift Tag

DIY Wedding Project Day #5 Wedding Tag

Congratulations on your Special Day!

Weddings, Anniversaries, Birthdays… customize a tag to fit the celebration.

I hope you enjoyed my DIY Wedding Projects this week and feel inspired to make

a few DIY projects of you own.

For me… The joy is in the making.  (and the giving, of course)

Shop Handmade – The Wedding Store

Wedding Tag Supplies Needed:

Directions for Wedding Tag:

  1. Cut a 3 1/2” x 6 1/4” tag out of scrapbook paper.
  2. To create the pleated ribbon you will need 12” of the Pierre Ivory ribbon. Fold 1/2” end of the ribbon under and secure with a mini glue dot.
  3. Turn ribbon over and create pleats by folding and gluing each fold inside and under securing with mini glue dot.
  4. Glue pleated ribbon onto bottom of the tag.
  5. For added detail, glue Galena 1/8” silver ribbon over pleated ribbon.
  6. Glue Design Chain Tracy-Silver onto tag above pleated ribbon.
  7. Cut 12” of Antique White 7/8” ribbon.
  8. Using the needle and thread with a long tail, make a simple running stitch down one side of the ribbon.
  9. Gather ribbon together with thread and tie in the center to form the ribbon rosette flower.
  10. Glue a gem cut from the Design Chain Tracy onto the center of the flower.
  11. Create and print computer generated greetings on to cream card-stock.
  12. Cut greetings down and edge card-stock with silver leaf pen.
  13. Adhere first greeting to tag using double stick tape runner, allowing part of the greeting to hang over edge of the tag.
  14. Glue Ribbon Flower onto tag above first greeting.
  15. Glue Gleaming leaves under flower.
  16. Add second greetings to the Deco Ice stick pin. Leave enough room on the card-stock greeting to fold around the pin and adhere.
  17. Stick Deco Ice pin into the glued flower.
  18. Insert remaining 7/8” Antique White Satin Ribbon into top hole on tag.
  19. Fold 5/8” Antique White Satin Ribbon to form a bow. Tie and knot around the center of the bow with the cream twine.
  20. Tie bow around 7/8” ribbon and secure.
  21. Thread small cream button on ends of the twine and secure on the front of the bow with a knot.

Disclaimer:  This blog uses ads and affiliate links.  If you choose to make a purchase using one of the links, I receive a small commission (at no additional cost to you) that helps offset the costs of maintaining this blog.  Thanks for your support!

DIY Wedding Projects Day #4: Wedding Album

Wedding Album 2

Preserve your memories from weddings, anniversaries, and more, in this beautiful burlap covered scrapbook or photo album. Embellish the cover with ribbon, gems, twine and more for a personalized look you will love.

Supplies Needed:

  • 1 yd. Gazette 2” Ribbon: Raw Silk
  • ½ yd. Antique White Double Faced Satin 7/8”
  • ½ yd. Lucy Ivory Lace
  • 2 Gems from Design Chain Tracy-Silver
  • Twine
  • Chic Silver Leaves
  • Pre-Made 5” x 7” Burlap Covered Scrapbook Album
  • 3” Chipboard Heart
  • Beacon Fabri-Tac Permanent Adhesive*  (affiliate link)
  • Needle and Thread

Wedding Album Directions:

  1. Cut approx. 16-18” of Gazette Raw Silk Ribbon. Using the needle and thread with a long tail, make a simple running stitch down one side of the ribbon.
  2. Gather ribbon together with thread and tie in the center to form the ribbon rosette.
  3. Create a second ribbon rosette using 12” of 7/8” Antique White Double-Faced Satin Ribbon.
  4. Glue Antique White rosette onto the center of the Raw Silk rosette.
  5. Cut a gem from the Design Chain Tracy-Silver and glue to the center of the rosette flower.
  6. Wrap 12” piece of Gazette Raw Silk Ribbon with the ends meeting centered on the front of the album. Glue ends to the album.
  7. Wrap a 12” piece of Lucy Ivory Lace around album, again meeting centered on the front of the album. Glue ends to album.
  8. Glue Ribbon flower onto front of the album cover the ends of the lace and ribbon.
  9. Bend slightly the ends of the Chic Silver Leaves and glue onto the album with the ends underneath the flower.
  10. Wrap twine around the chipboard a couple of times and tie with a bow.
  11. Glue a small gem cut from the Design Chain Tracy-Silver onto the center of the twine bow.
  12. Glue chipboard heart onto the front of the album.

Shop Handmade – The Wedding Store

Disclaimer:  This blog uses ads and affiliate links.  If you choose to make a purchase using one of the links, I receive a small commission (at no additional cost to you) that helps offset the costs of maintaining this blog.  Thanks for your support!

DIY Wedding Projects Day #3: Wedding Votive

DIY Wedding Votive

Make a statement with Soft and Elegant candle lights on each table. 

This frosted votive will make quite the impact and will fit with several types of wedding décor.

It’s super quick and easy to make.

Tip…Pair with the DIY Vase Table Maker from Day #1

DIY Wedding Votive Supplies Needed:                                       (*Affiliate Link)

Time Needed for Completion: 1 hour plus drying time

Shop Your Fav Brands at Scrapbook.com

*Disclosure:  “This is a sponsored post.  I have been provided product in exchange for my creative ideas.  The views and opinions are my own.”  This blog uses ads and affiliate links.  If you choose to make a purchase using one of the links, I receive a small commission (at no additional cost to you) that helps offset the costs of maintaining this blog.  Thanks for your support!

wedding votive applying glue

  • Generously apply Tacky Glue around the side of the jar. Do not put glue on the top neck or bottom of jar.

Wedding Votive Applying Epson Salt

  •   Cover jar with Epson Salt. Allow to dry.

Directions for decorating the votive:

  1. Thread two Blingella Beads onto a length of Quasar ribbon. Tie ribbon around neck of the jar with a knot. Trim and knot ends of Quasar ribbon to hold the beads in place. A little bit of glue on the ends of each knot will add extra security to the beads.
  2. Tie Pierre Ivory Ribbon around the neck of the jar with a knot. Trim ends.
  3. Cut approx. 12” of Antique White Satin ribbon.
  4. With the needle and thread with long tail, make a simple running stitch down one side of the ribbon.  (*see basic flower assembly picture)
  5. Gather ribbon together with thread and tie in the center to form the ribbon rosette.
  6. Glue gem to center of ribbon flower and glue finished flower onto the knot of the Pierre Ribbon.
  7. Glue gleaming leaf behind flower.
  8. Add Tea Light Candle.

Basic Flower Assembly from Wedding Frame (Day #2)

Make sure to check all the 5 days of the DIY Wedding Projects.

Shop Handmade – The Wedding Store

This project was sponsored by Offray Ribbon.

FREE Shipping & FREE Returns Every Day on Fine Art Prints & Wall Murals
with code SHIPFREE at Minted!


DIY Wedding Projects Day 2: Love Frame

Offray Wedding Frame 2056

 Make a special frame for a wedding day gift or another special event.

This DIY frame has a soft, shabby chic feel that is perfect for a spring or summer wedding.

Supplies Needed

Wedding Love Frame Directions:

  1. Paint the Plain Wooden Frame with Antique White acrylic paint. Once the frame is dry, lightly sand the edges of the frame to give a distressed look.
  2. Spray paint chipboard letters with Cream Spray paint.
  3. Adhere chipboard letters to the frame with Fabri Tac Glue.
  4. Cut approx. 18” of Gazette Raw Silk Ribbon. With the needle and thread with long tail, make a simple running stitch down one side of the ribbon. Ribbon Flower Assembly 2123
  5. Gather ribbon together with thread and tie in the center to form the ribbon rosette.
  6. Create a second ribbon rosette using 12” of 7/8” Antique White Double Faced Satin Ribbon.
  7. Glue Antique White rosette onto the center of the Raw Silk rosette.
  8. Glue Dazzle Radiance Pin onto the center of both flowers.
  9. Wrap 25” piece of Gazette Raw Silk Ribbon around the frame, meeting the two ends near the top of the frame. Glue ends to the frame.
  10. Glue Flower onto ribbon cover the two ends of the wrapped ribbon.
  11. Adhere Design Chain Tracy-Silver down center of the ribbon and underneath the flower.  Glue Gleaming Leaves Dazzle onto frame.

Click on the pictures below for links of Offray Products Used:

gazette_rawsilkdfs_antiquewhiteradiance

gleaming_leaves_24karatdesignchain_tracy

Shop Handmade – The Wedding Store

Disclaimer:  This blog uses ads and affiliate links.  If you choose to make a purchase using one of the links, I receive a small commission (at no additional cost to you) that helps offset the costs of maintaining this blog.  Thanks for your support!

DIY Wedding Projects Day #1: Vase Table Marker

Offray Wedding Vase 2

Make your own table markers for your wedding day or another special event.

This DIY table marker features a pretty butterfly theme that is perfect for a

Spring or Summer wedding.

Butterfly 2255  Wedding Table Marker Vase

Supplies Needed:

Wedding Vase Instructions:

  1. Measure the distance around the top of your jar. Cut and remove the wire from the Natural Jute Cord.
  2. Apply a little bit of glue on each end of the Jute Cord to prevent fraying.
  3. Glue cord around top of the jar. Glue on gem to cover seam.
  4. Thread two Blingella Beads onto a length of Quasar ribbon. Tie ribbon around neck of the jar with a knot. Trim and knot ends of Quasar ribbon to hold the beads in place. A little bit of glue on the ends of each knot will add extra security.
  5. Tie Gazette Ribbon around the center of the vase with a knot. Add a small amount of glue underneath the knot to hold the ribbon in place.
  6. Glue small gem onto knot.
  7. Print a computer generated table number or greeting onto cream card-stock.
  8. Trim and cut card stock. Cut the end with a “v” to create the banner. Leave enough card-stock on the left side of the banner so that it can be folded around the Deco Ice stick pin.
  9. Attach banner around the Deco Ice stick pin and insert into the Gazette Ribbon knot.
  10. Fill vase with flowers and add the Fabrique Butterfly.

Shop Handmade – The Wedding Store

Disclaimer:  This blog uses ads and affiliate links.  If you choose to make a purchase using one of the links, I receive a small commission (at no additional cost to you) that helps offset the costs of maintaining this blog.  Thanks for your support!