Fall Crafting with StyleTechCraft Vinyl

There are so many creative ways to use StyleTechCraft vinyl.

Every month, I’m blown away at the amazing projects the StyleTechCraft Design Team creates.

But this month, they really hit it out of the park with their ideas and designs.

Here’s a Round-Up of the Fall Design Team Projects:

Make sure to visit their blogs for more information on the projects.

Styletech Craft products brought to you by ATSM Craft 

How to make a Buffalo Plaid Wood Slice Pumpkin

Buffalo Plaid Wood Slice Pumpkin

Buffalo Plaid Wood Slice Pumpkin…

Nothing says warm and cozy Fall Décor like Buffalo Plaid and Pumpkins.

Add them together for a cute Fall Home Décor project.

Shop $1 Fall Decor at Dollar Tree!

Buffalo Plaid Wood Slice Pumpkin-Sue's Creative Workshop www.sueeldred.com 5376

I love using wood slices in projects.

If you’re lucky, and you have lots of trees, chances are you may have a log or two that you

could cut off a slice. If not, with the popularity of wood slices* you can easily find them online,

or in the craft department of your favorite store.

Buffalo Plaid Wood Slice Pumpkin

Featured Storage:  Deflecto Stackable Caddy Organizer*

If you follow me much at all, you know I love my Deflecto Stackable Caddy Organizer*.

I can easily customize the Caddy by removing the lids, and adding a

Deflecto Interlocking Marker Organizer* for paintbrushes and glue sticks.

Once I fill my Caddy with supplies, I can easily take it outside to work on a lovely day.

Disclosure:  “This is a sponsored post. As a member of the Deflecto Design Team I have been provided product and compensation in exchange for my creative ideas, views and opinions.”

Buffalo Plaid Wood Slice Pumpkin-Sue's Creative Workshop www.sueeldred.com 5590

Materials used to make the Buffalo Plaid Pumpkin:

*Disclosure:  This blog uses ads and affiliate links.  If you choose to make a purchase using one of the links, I receive a small commission (at no additional cost to you) that helps offset the costs of maintaining this blog.  Thanks for your support!

Buffalo Plaid Wood Slice Pumpkin

  • To get the color I wanted for the base of my pumpkin. I mixed Orange Twist and Jack-O-Lantern acrylic paint.
  • Paint just to the inside edge of the pumpkin slice. Leave the outer bark showing.

How to make a Buffalo Plaid Wood Slice Pumpkin

  • Add strips of painter’s tape onto the pumpkin to make stripes.  Rub your finger over the tape to make sure that the tape is securely on the pumpkin and has no gaps.
  • Paint inside the stripes with a thin coat of white birch acrylic paint.  Be careful not to apply the paint too thick.   Only one thin coat of paint is needed.
  • Remove painter’s tape.
  • Allow paint to fully dry before continuing to the next step.

How to make a Buffalo Plaid Wood Slice Pumpkin

  • Rotate the frame 180° and apply the tape in the opposite direction. Make sure the tape is securely down.
  • Paint additional stripes with a light coat of dolphin (light gray) acrylic paint.

How to make a Buffalo Plaid Wood Slice Pumpkin

  • Remove the painter’s tape. Allow the paint to dry.
  • Lightly sand the wood slice. Sanding brings out the wood-grain and helps to hide any little imperfections.
  • Wipe with a clean cloth.

How to make a Buffalo Plaid Wood Slice Pumpkin

  • Cut a small 2″ piece from a tree branch to use for the stem.
  • I also used a “home” wood word picked up at the craft store for my pumpkin.
  • Hot glue the stem onto the top of the pumpkin.  Hot glue the word “Home” on the front of the pumpkin.

How to make a Buffalo Plaid Wood Slice Pumpkin

  • To give my Pumpkin a little extra support while sitting on my mantel, I hot glued a small wood piece (cut from an old scrabble tray) to the back of the pumpkin.  Because the wood slice is not perfectly round, you may have to offset it a bit.
  • Tie raffia around the stem and hot glue a small button bow with faux fall berries onto the pumpkin.  You can find instructions on how to make a button bow here.

Loved the Wood Slice Pumpkin?
Click here for the Wood Slice Snowmen tutorial.

DIY Wood Slice Snowmen


Don’t Miss a Thing…Make Sure to Follow me

Save

Save

Dog Treats for the First Day of School

Yesterday was Dexter’s First Day of School.

Dexter is our 9-month Shichon puppy.  He is a sweet, loving, energetic ball of fluff.

We adopted him two days before Valentine’s Day and about a month before everything

went nuts.  He’s not a quarantine puppy, but he’s sure been a bright spot during that time.

I’ve been on more walks and talked to more neighbors because of him.  He loves everyone!

Anyway…

In the list of instructions for the first day of class was to bring dog treats.  (lots of treats)

So, I decided to decorate a little jar for his treats.

I found the little plastic jar at Dollar Tree* and used vinyl to decorate it.

*Disclosure:  This blog uses affiliate links.  If you choose to make a purchase using one of the links, I receive a small commission (at no additional cost to you) that helps offset the costs of maintaining this blog.  Thanks for your support!

Here’s what I used to make my treat jar:

StyleTechCraft™ products brought to you by ATSM Craft 

Directions:

  • Using a “Dog Bone Treats” SVG file from the Silhouette Store and the Silhouette Cameo Electronic Die-Cutting Machine*, cut out the images using StyletechCraft Transparent Vinyl in Sunflower and Brown.
  • Use the vinyl pick to remove the letters from dog bone, leave the inside pieces of the letters.
  • Cut a piece of Vinyl Transfer Tape* to fit over the vinyl image.  Gently rub over the transfer paper using the squeegee tool.  Remove the vinyl image from the white liner.
  • Overlay the brown bone onto the large orange bone silhouette.

  • Carefully apply the vinyl to the jar.  Give the vinyl a gentle rub using the squeegee to make sure everything has transferred and remove the transfer tape.
  • Add paw prints randomly around the jar using the transfer tape.
  • Tie with a paw print ribbon and fill with dog treats.

FYI…The First Day of School Sign was made by painting a small wood sign with black chalkboard paint and applying words created with StyleTechCraft White Craft Vinyl*.

Dexter is such a smart, sweet little boy. 

He’s our first dog and, he’s been a great addition to our family.  He brings a lot of smiles.

And by the way…he did really great during his first class!

“This is a sponsored post.  As a member of the StyleTechCraft Design Team I have been provided product and compensation in exchange for my creative ideas.  The views and opinions are my own.

Easy DIY Football Themed Party Ideas

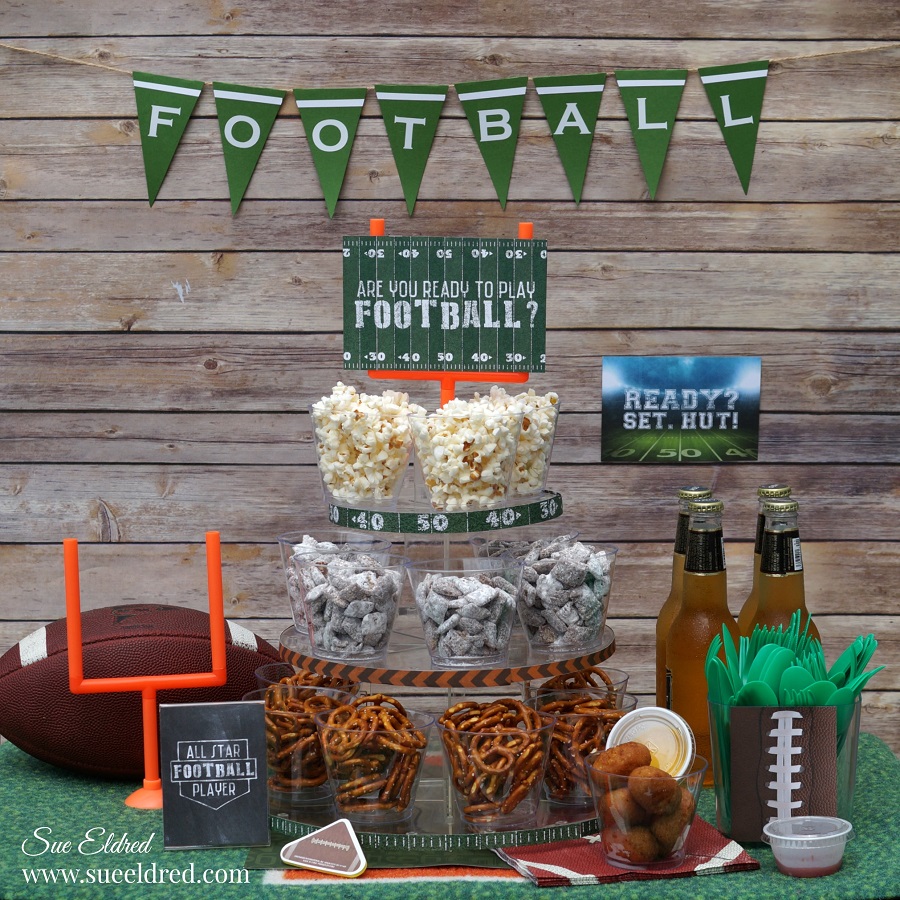
Fall Football and Fun…

Fall is right around the corner, and with that comes Football Season.

Whether you’re watching the NFL, College or High School, a few simple football snacks

are always welcomed by the fans.

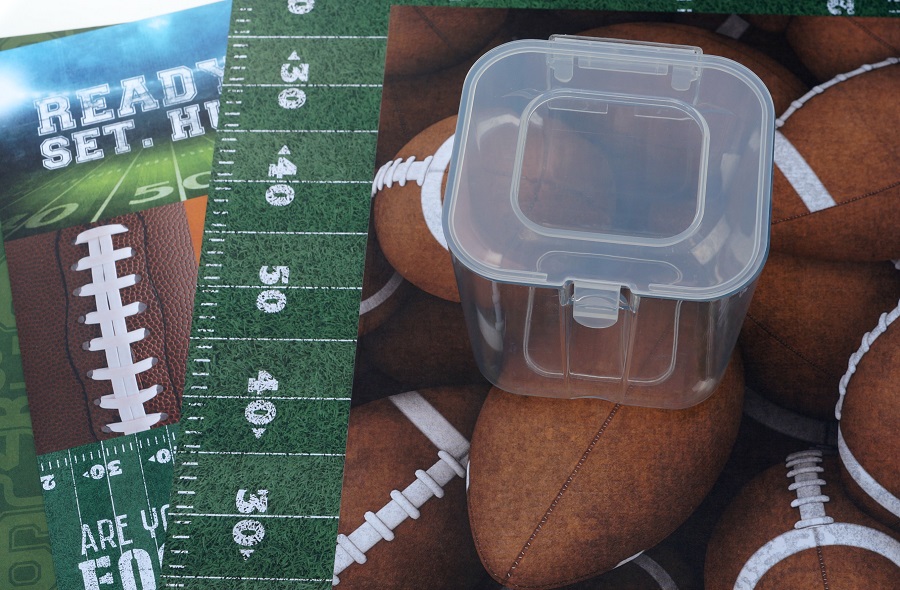
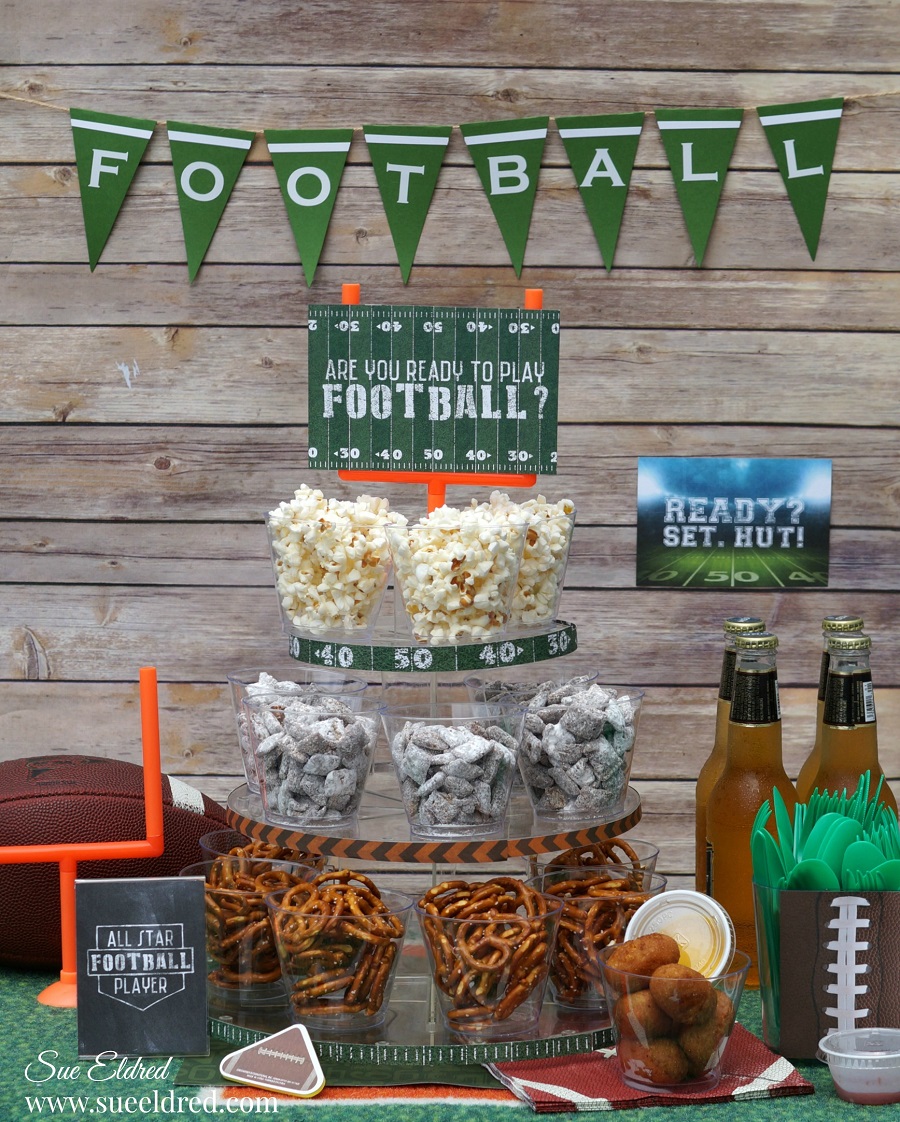
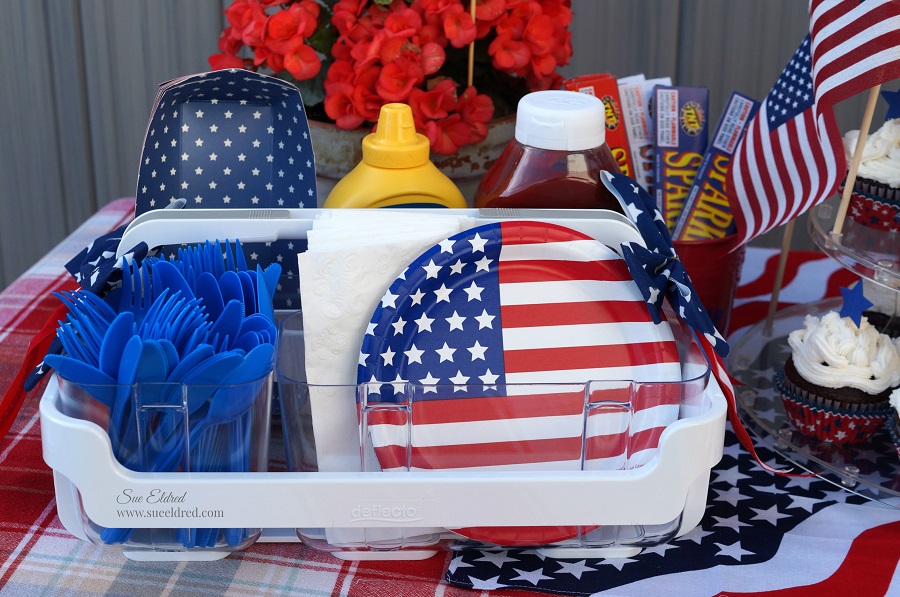
To keep the decorating easy, I used a few sheets of Football themed scrapbook paper.

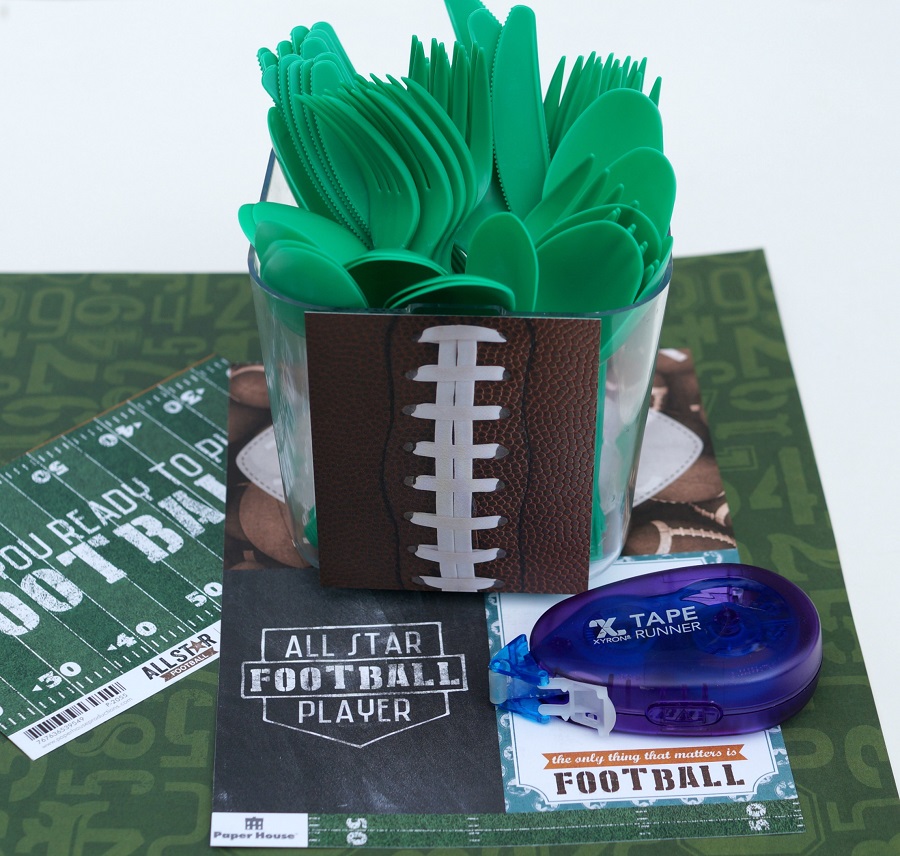
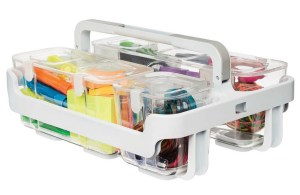
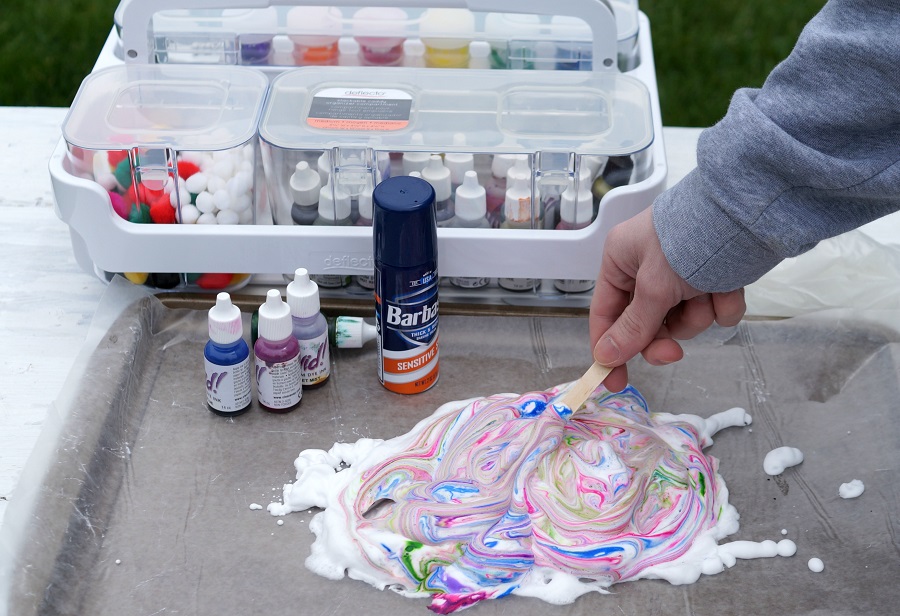
I used one of the 3″ x 4″ sections and attached it to the front of a small caddy container

(from the Deflecto Stackable Caddy Organizer*) with repositionable tape to make a

silverware holder.

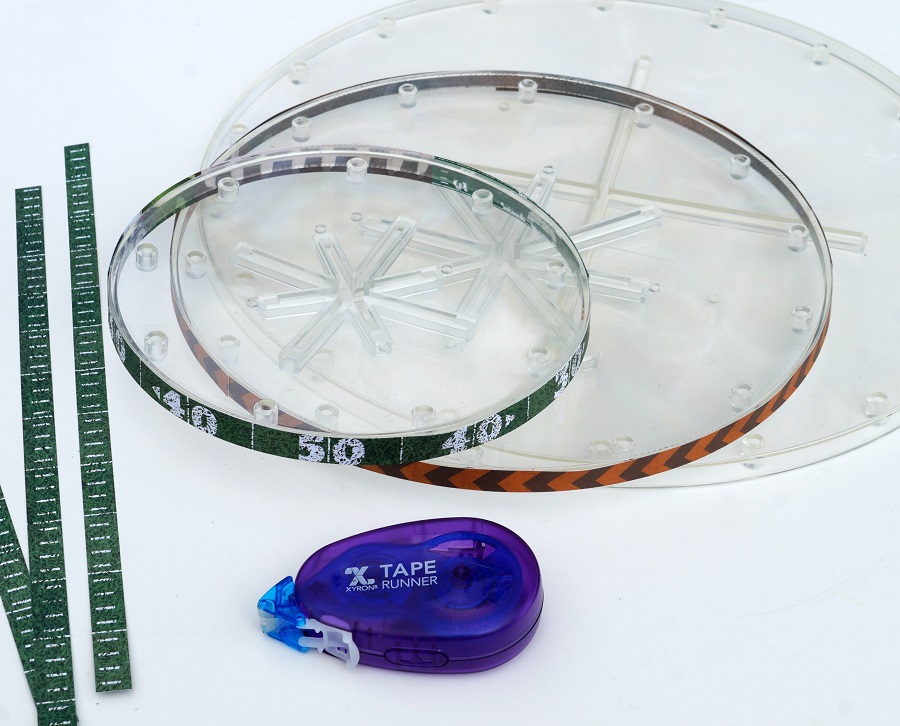
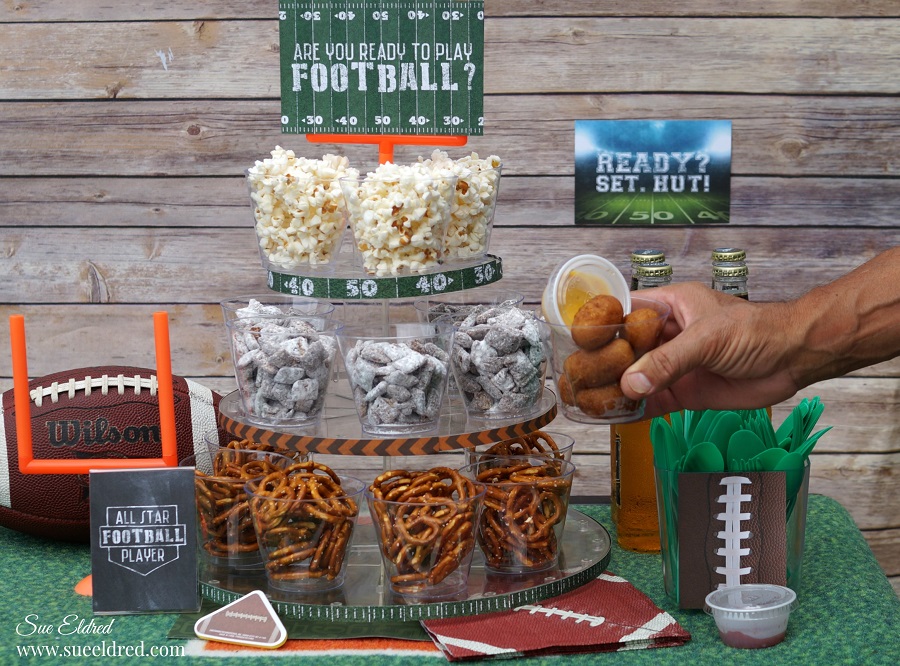
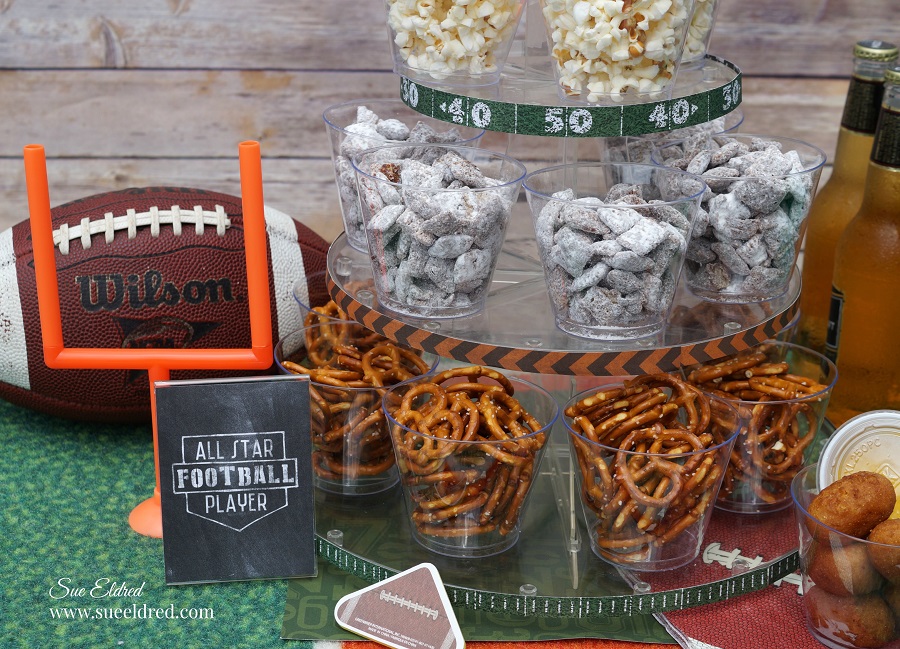
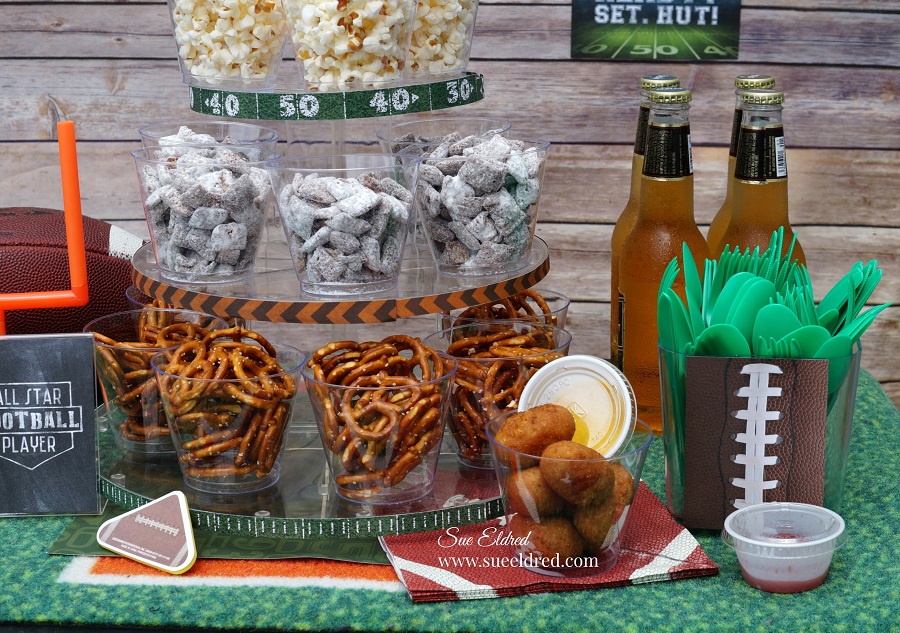
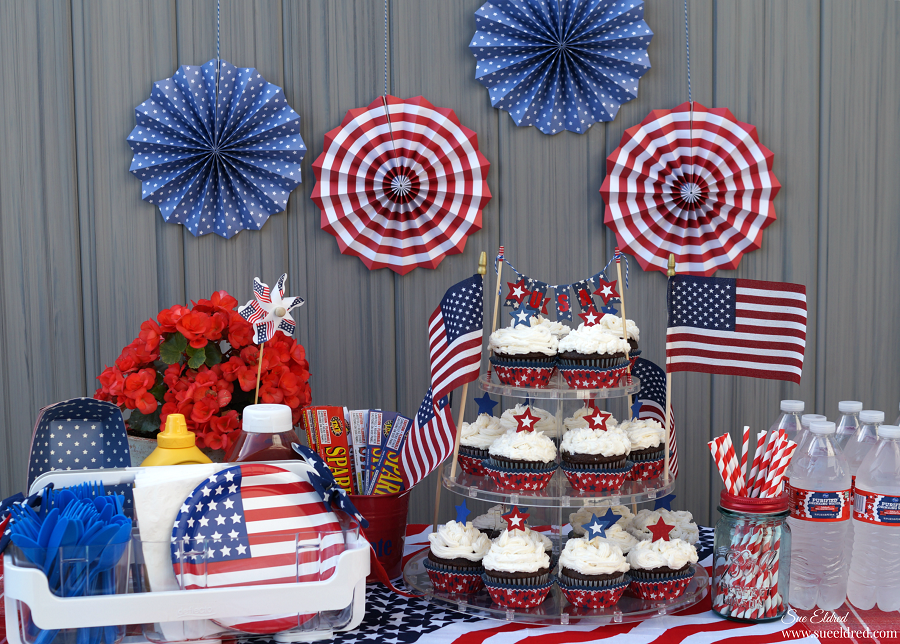
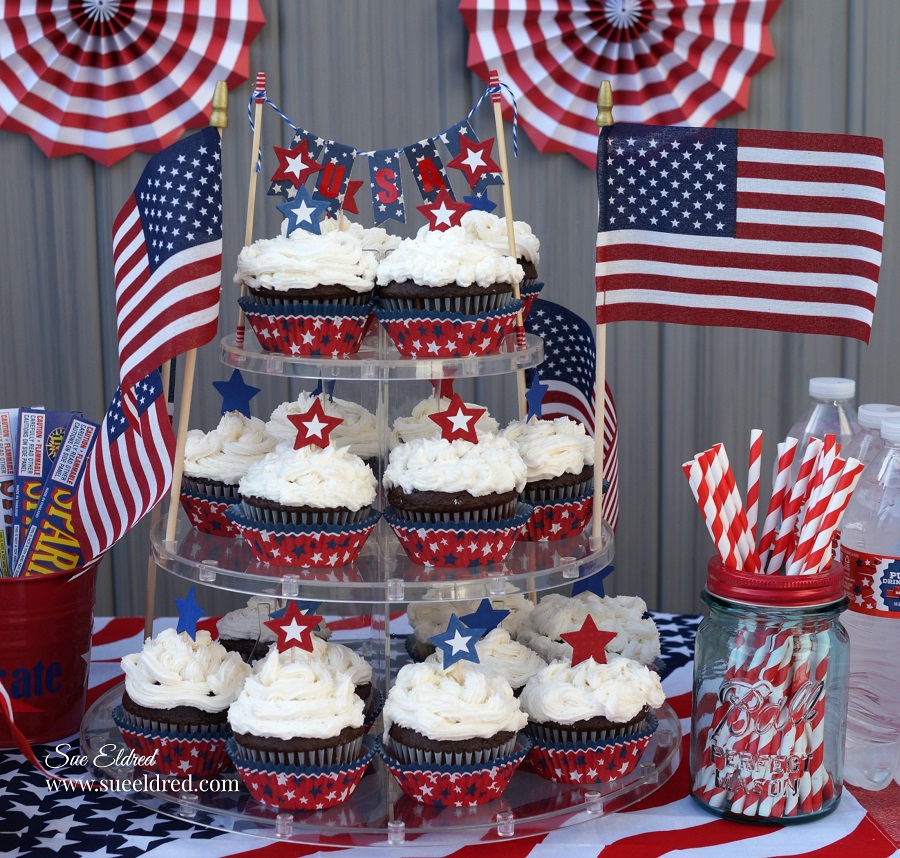
I used the Deflecto 3 Tier Dessert Stand* to hold my snacks.

The stand is the perfect tailgating companion.

It is easy to put together and folds flat for compact storing and transporting.

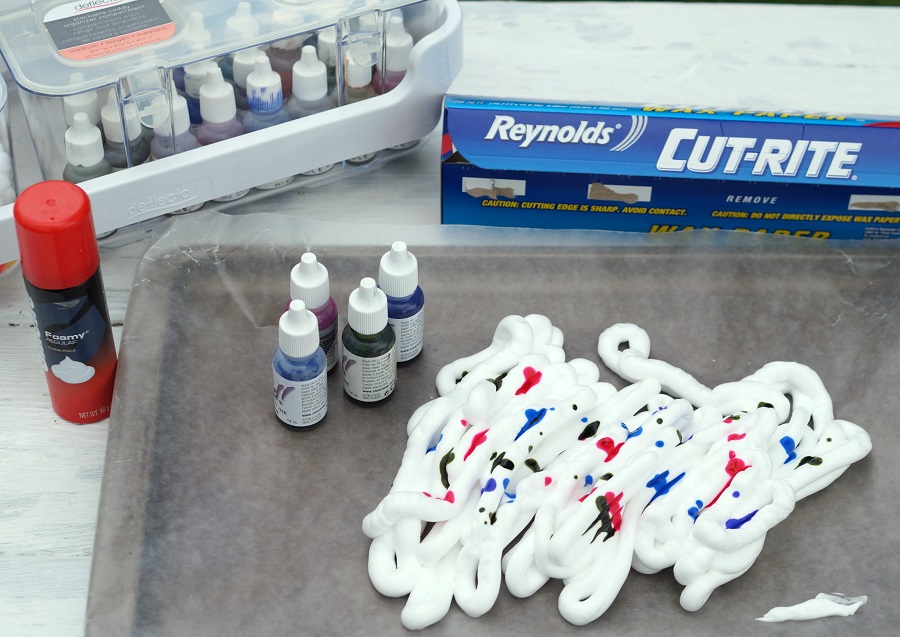
Use football-themed washi tape or strips of cut paper and adhere it around the edges

of the tiers for added fun.  (Make sure to use repositionable adhesive. )

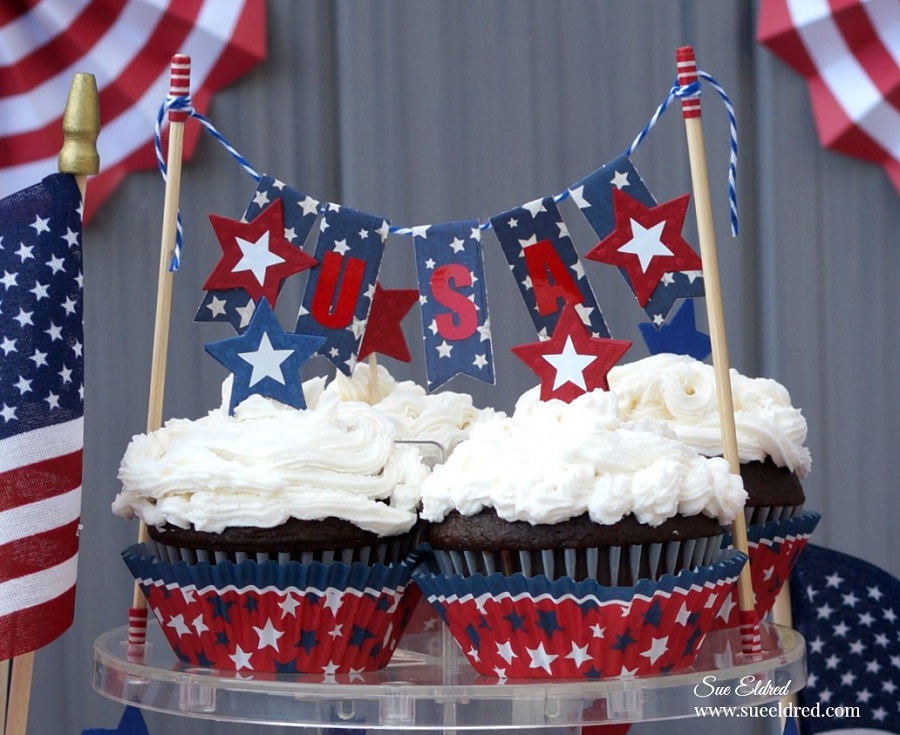
Create a banner to hang on the wall using colored cardstock or construction paper in your

favorite team colors.  I created the letters using white craft vinyl from StyleTechCraft and cut

them out using my  Silhouette Cameo Electronic Die Cutting Machine*.

You could also use letter stickers to spell out your words.

I picked up clear cups, napkins, condiment cups and silverware at Dollar Tree.

Entertaining doesn’t have to cost a fortune.

*Disclosure:  This blog uses ads and affiliate links.  If you choose to make a purchase using one of the links, I receive a small commission (at no additional cost to you) that helps offset the costs of maintaining this blog.  Thanks for your support!

Having everything in clear cups makes for easy grab and go snacking.

I also found this cute little Football Game at Dollar Tree. 

It makes a great prop and sign holder.

Popcorn, Muddy Buddy, Pretzels, Mini Corn Dogs and Beer.  Oh My!

Now we’re ready for some Football!

Disclosure:  “This is a sponsored post. As a member of the Deflecto Design Team I have been provided product and compensation in exchange for my creative ideas, views and opinions.”

Easy Peasy Upcycled Container

I love a good upcycled, recycled project.

Creating a useful item from something that would be thrown away or put in the recycling bin.

This project was made using an empty Nesquik container.

I have been drinking chocolate milk for as long as I can remember. My dad used to use the Nesquik containers in his garage to store nuts and bolts and lots of other small items. We found several vintage cans out in his garage when we were going through it.

I LOVE making things using craft vinyl and my Silhouette Cameo Electronic Die Cutting Machine*  There are so many things you can make and decorate.

Tip:  If you don’t have access to these products, you can still UPCYCLE/RECYCLE a container like the Nesquik Can using decorative paper, contact paper or stickers to personalize and embellish.  (Below are the directions and materials on how I upcycled my container.)

For my Easy Peasy Lemon Squeezy Up-cycled Container I used:

StyletechCraft products brought to you by ATSM Craft

*Disclosure:  This blog uses affiliate links.  If you choose to make a purchase using one of the links, I receive a small commission (at no additional cost to you) that helps offset the costs of maintaining this blog.  Thanks for your support!

Directions:

  • Measures and cut two pieces of  vinyl to wrap around the container.  (I used one long piece and one shorter piece.)
  • Use the printed graphics on the side of the container to line up your edge.  Slowly wrap the vinyl around the container smoothing as you go to reduce the air bubbles.

  • Use the squeegee tool to smooth the vinyl.  If you can’t get rid of the air bubble with the squeegee tool you can use a small pin to poke a hole in the vinyl to release the air.

You can find the Easy Peasy Lemon Squeezy SVG file at the Silhouette Design Store.

  • Use the vinyl pick to remove the letters from the vinyl lemon, leave the inside pieces of the letters.

  • Cut a piece of Vinyl Transfer Tape* to fit over the vinyl image.  Gently rub over the transfer paper using the squeegee tool.
  • Remove the vinyl from the white liner, center the image on the front of the can.
  • Gently rub over the Vinyl Transfer Tape* to make sure all the image has transferred.   Remove the transfer tape.
  • Repeat the process with the stem and leaf.

A fun little upcycled project, great for many different uses.  (not just in the garage)

Place several cans side by side for a cute and creative way to store supplies.

“This is a sponsored post.  As a member of the StyleTechCraft Design Team I have been provided product and compensation in exchange for my creative ideas.  The views and opinions are my own.

If you liked this post you might also like Organizing the Kids Craft Cabinet.

Pin ME↓

Save

Just for Fun- DIY Golf Menu Board

DIY Golf Menu Board…

It started as a joke.

Last month, as my husband was painting the floor of the deck, I opened the window,

stuck my head out and asked if he wanted anything to drink.

He said we should put in a counter at the window so we could take orders.

I wanted a Pool Snack Bar, he really wanted the 19th Hole.

This is our compromise.

  • I painted a thin hardboard panel with several coats of DecoArt Americana Decor Black Satin Enamel Paint.
  • I gave the painted board a light sanding with steel wool to make it smooth.

Supplies Needed:

Directions:

  • Using an SVG Cut File purchased from the Silhouette Store, size and cut all the pieces using the Cameo Die-Cutting Machine.
  • Use the Vinyl Tools to “weed” out the negative spaces around your image.

StyletechCraft products brought to you by ATSM Craft

*Disclosure:  This blog uses affiliate links.  If you choose to make a purchase using one of the links, I receive a small commission (at no additional cost to you) that helps offset the costs of maintaining this blog.  Thanks for your support!

  • Apply transfer tape over the image and give a gentle rub with using vinyl scraper tool to transfer the image to the tape.
  • Gently lift up to remove the image off white backing.

  • Align and place the image onto the board.
  • Give a rub with the vinyl scraper tool to transfer the vinyl onto the board.

My husband loves the board.  (I wonder if I can get him to pay?)

“This is a sponsored post.  As a member of the StyleTechCraft Design Team I have been provided product and compensation in exchange for my creative ideas.  The views and opinions are my own.

How to make a Beach Inspired Windchime

A Beach Inspired Windchime for those us that LOVE the beach.

If you’re one of the lucky ones that live on the ocean or have a Beach House.

Here is a simple project to make that you can hang on the back porch.

Or if you don’t live on the beach or have a beach house.

The Windchime is a fun reminder of trips to the ocean,

and a great way to use some of those shells you collected. 

How to Make a Beach Inspired Wind Chime.

Disclosure:  “This is a sponsored post. As a member of the Deflecto Design Team I have been provided product and compensation in exchange for my creative ideas, views and opinions.”

Supplies Used:                 (*affiliate link)

Featured Storage:


*Disclosure:  This blog uses ads and affiliate links.  If you choose to make a purchase using one of the links, I receive a small commission (at no additional cost to you) that helps offset the costs of maintaining this blog.  Thanks for your support!

Gather Your Supplies…

The Caddy Storage Tray* is so handy to use. It’s perfect for sorting the various sizes of wood beads. And it fits into the large container of the Deflecto Stackable Caddy Organizer*.  I used the Deflecto Interlocking Marker Organizer* in the caddy to hold my paintbrushes.  I put all my supplies in the caddy and took it onto the deck, where I worked on the wind chime under my umbrella on a beautiful Summer day.  (and wished I was on the beach)

Faux Driftwood…

Because I didn’t have an actual driftwood stick from the beach.  I used a stick found in the yard and broke it down to size.

  • Scrape the bark off the stick.  (I used an old table knife.)
  • Paint the stick with white acrylic paint and a couple of stripes of pale blue and aqua.
  • Give the stick a light sanding with fine-grit sandpaper to rough it up and make it look more natural.

  • Cut five pieces of twine approximately 24″ long.
  • Tie a knot on one end of the twine.
  • Wrap a small piece of blue removable painters tape on the other end of the twine to keep the twine from fraying.
  • String Wood Beads onto the twine.

  • Tie beaded twine to the painted stick.
  • On the center of the stick, I glued a medium-sized Starfish purchased at a Beach Gift Shop.
  • Add a couple of beads to a piece of twine. Tie twine to each end of the stick to use as a hanger.
  • Stick the loose ends of the twine through the beads to hide.

Don’t Miss a Thing…Make Sure to Follow me


For more DIY Beach Inspired projects from Sue’s Creative Workshop.↓


PIN ME ↓

Save

Patriotic Themed Summer Party

Celebrate the Red, White, and Blue!

No matter if your party is big or small.

It’s easy to throw together a Red, White, and Blue Patriotic Themed Summer Party.

Gather up some hotdogs, burgers, and brats for the perfect Summer BBQ Get-Together.

Here are a few Ideas to make the Summer Holidays fun and special.

Grab and Go Party Ware.

Bring Deflecto to your next party.

I used a Deflecto Stackable Caddy Organizer* to hold my tableware and condiments

for easy grab and go.

Disclosure:  “This is a sponsored post. As a member of the Deflecto Design Team I have been provided product and compensation in exchange for my creative ideas, views and opinions.”

Bold Stripes and Bright Stars

Every party needs a few yummy desserts.

The 3-Tier Dessert Stand* is perfect for displaying cupcakes and other goodies.

It is easy to put together and folds flat for compact storing.

*Disclosure:  This blog uses ads and affiliate links.  If you choose to make a purchase using one of the links, I receive a small commission (at no additional cost to you) that helps offset the costs of maintaining this blog.  Thanks for your support!

A cute little banner for the top of the stand.

How to make the Banner…

  • Cut two bamboo skewers* 6″ each.  Wrap the ends with decorative washi tape*.  The washi tape helps keep the skewers securely in place when inserting in the stand.
  • Die-cut or hand-cut 5 banners out of decorative scrapbook paper.
  • Tie a piece of blue and white twine on each end of the bamboo skewers.
  • Fold banners and adhere to the twine.
  • Apply letter stickers on the front of the banners.
  • I used StyleTechCraft Red Glitter Vinyl* and my silhouette die-cutting machine* to create the words USA to apply to my banners.
  • Stick on each side of the top tier in the holes made to hold cake pops.

StyletechCraft products brought to you by ATSM Craft*

Little details make everything more festive.

Don’t forget to make a few star picks to stick into the cupcakes.

This is a fun project that the kids can help you make.

  • Create the picks by punching or die-cutting several blue and red stars.
  • Add adhesive to the back of the star and place a toothpick in the center.
  • Adhere a second star on the back.
  • For quick and easy work, I used the Xyron Create-A-Sticker* to add adhesive to the stars.
  • Decorative the stars with additional small foil stars.

Add a touch of Vintage Americana with Blue Ball mason jars*. 

They are great for storing straws, and they also make great drinking glasses.

And when the sun starts going down, don’t forget the sparklers and glow in the dark novelties.

Summer Fun Party Decorations Ideas:  (*affilate links)

←PIN ME

Products Used for your convenience…

Save

The Pool is Calling Drink Holder

It feels like Summer is here now that the pool is officially open.

A few more bright and sunny days, and I’ll be ready to jump in.

Who am I kidding?  I’m either under the umbrella or on my pool float relaxing.

And since we’re not allowed to have glass items by the pool, (my rule) I made myself

a cute drink container using an expensive stainless steel tumbler found at Dollar Tree*.

*Disclosure:  This blog uses affiliate links.  If you choose to make a purchase using one of the links, I receive a small commission (at no additional cost to you) that helps offset the costs of maintaining this blog.  Thanks for your support!

For my drink holder, I used Iridescent Opal Vinyl* from StyleTechCraft to create the words.

I love the way the Opal Vinyl shimmers and changes with the light.

StyleTechCraft Opal Vinyl* comes in nine different colors for a lot of fun options.

While taking pictures of the products for this post, one of the pieces flew into the pool.

I thought it was ironic, so I took a picture.  (opal vinyl holds up in water)

Here’s what I used to create my drink holder:            (*affiliate links)

StyletechCraft products brought to you by ATSM Craft*

Directions:

  1. Wipe the surface of the tumbler with the alcohol wipe to remove any oils.
  2. Use the Silhouette Electronic Die Cutting Machine to cut the words “the Pool is Calling!” out of Opal and White Craft Vinyl
  3. The cut file I used came with an outline for the word “Pool”.  I cut it out of white glossy craft vinyl to make the word “Pool” stand out.
  4. Use a small piece of transfer paper, place onto the individual letters that spell the word “Pool”.  Place letters one by one on the white outline.
  5. Cut a piece of transfer paper slightly larger than the white vinyl outline.
  6. Apply transfer tape over the outline. Give the transfer tape a gentle rub.
  7. Apply the word “Pool” onto the tumbler.
  8. Apply additional words onto the tumbler.
  9. Allow the vinyl to cure on the tumbler for 4 days before using. (Hand wash Only)

“This is a sponsored post.  As a member of the StyleTechCraft Design Team I have been provided product and compensation in exchange for my creative ideas.  The views and opinions are my own.

Shaving Cream Art

Create Unique One of a Kind Art with Shaving Cream.

Shaving Cream Art is a fun project that the whole family can participate in.

How to Create Shaving Cream Art

Materials Needed:

I use the Deflecto Stackable Caddy Organizer* to hold my ink refills and other crafty supplies.

*Disclosure:  This blog uses ads and affiliate links.  If you choose to make a purchase using one of the links, I receive a small commission (at no additional cost to you) that helps offset the costs of maintaining this blog.  Thanks for your support!

Shaving Cream Art can get a little messy so a little prep work is necessary.

  • For easy clean up…Place a piece of wax paper* over a large baking sheet.
  • Add shaving cream onto wax paper.
  • Add several drops of ink onto the shaving cream.

  • Use a craft stick* to swirl the ink into the shaving cream.
  • Do not over stir or the shaving cream will become muddy.

  • Place card-stock directly onto the shaving cream and lightly Smoosh.

  • Carefully lift the card-stock from the shaving cream.

  • Use the scraper tool* to scrape the excess shaving cream from the card-stock.

  • Without re-stirring the shaving cream, you can repeat the process several more times.
  • The first one will be the most vibrant and will get subtly lighter each time.

Each one will be different and will lighten as they dry.

You can use this process to create even larger pieces of art. 

Shaving Cream Art also makes a great background for card-makers.

Disclosure:  “This is a sponsored post. As a member of the Deflecto Design Team I have been provided product and compensation in exchange for my creative ideas, views and opinions.”


Don’t Miss a Thing…Make Sure to Follow me

If you liked the Shaving Cream Post you might like Gnome Gardening with Boys.

Save

Save

Save

PIN ME↓