
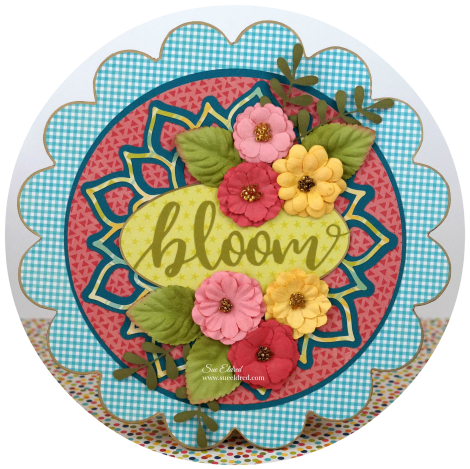
Bloom into Spring with this DIY Bloom Floral Plaque.
I admit it…I’m an adhesive snob.
There’s nothing worse than spending hours on a project and then it comes undone
from using the wrong adhesives.
I tell people all the time “not all adhesives are created equal”.

That’s one reason why I was so excited to be on the Xyron 2018 Design Team.
Xyron has Good Adhesive!
The DIY Bloom Floral Plaque is the first of many projects to come using Xyron.
DIY Bloom Floral Plaque Products Used: (*Affiliate Links)
- *Xyron Creative Station, 9″
- Xyron Acid-Free Permanent Adhesive Refill Cartridge*
- Xyron Sticker Maker 1.5 inch*
- XYRON Adhesive Eraser*
- Electronic Die Cutting Machine*
- Scrapbook Paper and Cardstock
- Paper Flowers*
and Leaves*
- 8″ Wood Flower Shaped Plaque
- Sanding Block*
- Craft Knife*
and Craft Cutting Mat*
- Gold Paint Pen*
*Disclosure: This blog post uses affiliate links. If you choose to make a purchase using one of the links, I receive a small commission (at no additional cost to you) that helps offset the costs of maintaining this blog. Thanks for your support!

How to make a DIY Bloom Floral Plaque…
- Lay a piece of a 8 1/2″ x 8 1/2″ piece of decorative scrapbook paper (design side up) on the Xyron Creative Station, 9″*
crank the handle to run the paper through the machine. As it moves through the Xyron Creative Station it adds adhesive to the back side of the paper.
- Easy to use and it doesn’t need any electricity.
You get complete coverage, no gluing, no wrinkling, no bubbles!

- Lay Wood Flower Shaped Plaque onto the adhesive side of the paper.
- Carefully cut around the wood shape with a craft knife and craft cutting mat.

- Gently sand away rough-cut edges on the paper using an extra fine sanding block.

- I used my electronic die cutting machine and cut files to create pieces for my background. The Xyron Creative Station* is great for adding adhesive to the back of intricate pieces.

- After the layers are adhered together, I use the XYRON Adhesive Eraser*
to remove any extra adhesive from the edges of my pieces. Remember to use a gentle touch.
The XYRON Adhesive Eraser* is one of my favorites must have tools. I keep it on my desk at all times.
I think every paper crafter should carry one in their supply box.

- For smaller pieces, like the word “bloom”, I used the Xyron Sticker Maker 1.5 inch*
.
- Easy to use and no waste. Just rub and peel.
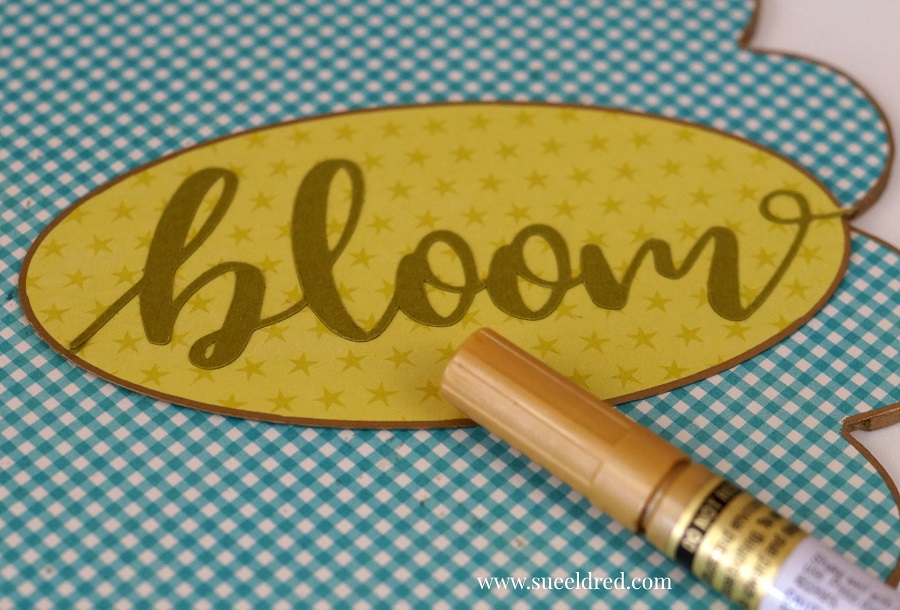
- For added detail…use a gold paint pen to edge around the outside of the Wood Flower Shaped Plaque and the decorative scrapbook paper oval.

- My Xyron Creative Station* makes quick work of assembling all the pieces of my DIY Bloom Floral Plaque.
- Finish embellishing the plaque with a few paper flowers glued into place with craft glue.

![]()
“This is a sponsored post. As a member of the Xyron Design Team I have been provided product and compensation in exchange for my creative ideas. The views and opinions are my own.”


