Upcycled Brass Christmas Ornament

Simple Christmas Ornament Makeover

A Simple Christmas Ornament Make Over.

I ran across a couple of brass Christmas Ornaments from several years ago.

I was cleaning out my excess Christmas decorations when I found them.

I first threw them away before retrieving them from the trash.

They’re not especially valuable.

Simple Christmas Ornament Makeover

They were a 1982 Norman Rockwell promotional ornament from McDonald’s.

Because 1982 was a significant year (for me) I couldn’t throw them away.

So, I decided to try painting them.  (I had nothing to lose.)

Spring Baking Cups

*Disclosure:  This blog uses ads and affiliate links.  If you choose to make a purchase using one of the links, I receive a small commission (at no additional cost to you) that helps offset the costs of maintaining this blog.  Thanks for your support!

Simple Christmas Ornament Makeover

Here’s what I did to update the ornament:

  • Lightly sand the ornament with an extra fine sanding block* to remove dirt and grim.
  • The sanding smoothed the ornament and removed the brassy gold finish. Sanding also made the ornament silver, which I liked better.
  • Paint the ornament with a multi-Media paint* that will adhere to the metal.
  • I used Deco Art’s Multi-Media Paint in Birch.
  • Once the paint dries, lightly sand the ornament to expose the details.
  • While sanding, I made sure not to remove all the white paint from the face of the ornament. I like the “snowy look” of the white.
  • It’s also probably a good idea to spray the ornament with a matte spray sealer*.

Now the ornament looks great and compliments the other decorations on my Christmas Tree.

Buy Your Crafting Supplies Now at Dollar Tree starting at $1.25!

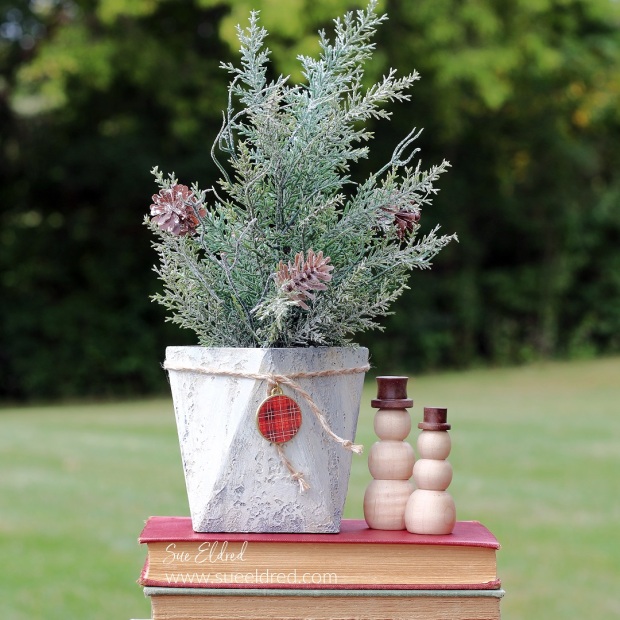
Faux Stone Geometric Box

Faux Stone Geometric Box

Add a little dimension to your paper crafting projects this Holiday Season.

The Faux Stone Geometric Box was made with Eileen Hull New Geometric Box Die by Sizzix*,

Sizzix Matboard* and Deco Arts Dimensional Effects Texture Paste*.

*Disclosure:  This blog uses ads and affiliate links.  If you choose to make a purchase using one of the links, I receive a small commission (at no additional cost to you) that helps offset the costs of maintaining this blog.  Thanks for your support!

666046 Sizzix Geometric Box Die by Eileen Hull

How to make a Faux Stone Geometric Box:

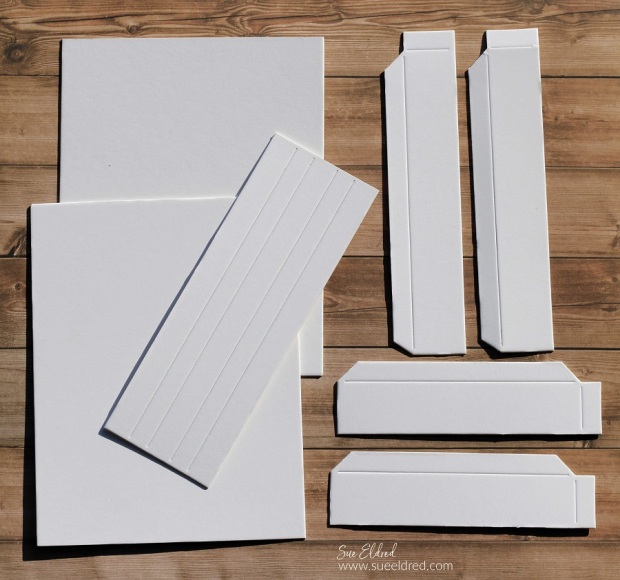
  • The Geometric Box Die goes together really easily and is also expandable.
  • Die-cut the box* using mat board* and a Big Shot Die-Cutting Machine*
  • You will need to cut two pieces of the middle section of the box.  
  • Carefully fold the box on the score lines.
  • Assemble the box with the tabs on each side of the box. I like to use Rapid Fuse Adhesive* to glue the box. It dries and holds in 30 seconds.

DIY Faux Stone Geometric Box

How to make a Faux Stone Geometric Box

  • Use dark gray acrylic paint to paint the entire box. (inside and out)
  • Use a dry brush with a small amount of paint to apply lighter coats of paint over the outside of the box. I painted from dark to light. I used a combination of the dry brush technique with stippling to get my desired look.

How to make a Faux Stone Geometric Box

  • For my Holiday Embellishment, I used a 1″ gold pendant blank for jewelry making and a 1″ plaid scrapbook paper circle glued in the center.
  • Tie the gold pendant around the top of the box using a piece of braided twine.

How to make a Faux Stone Geometric Box.

Add a small faux Christmas Tree for a sophisticated Holiday Decoration.

Eileen Hull Educator Logo

Disclosure:  This is a sponsored post.  As a member of the Eileen Hull Educator Team, I have been provided product in exchange for my creative ideas.  The view and opinions are my own. 

Amazon Fall Rug Event

Materials Used:    (*affiliate links)

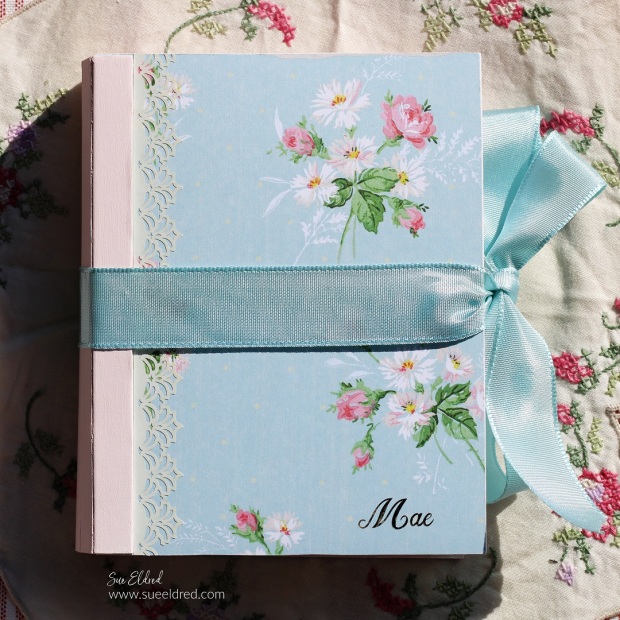
Mae’s Treasure Box

Mae's Treasure Box made using Eileen Hull Sizzix XL Scoreboard Book Box Die

I wanted to share a little more about how I made Mae’s Treasure Box.

I am getting my first granddaughter, Mae, sometime in May.

(To say I’m excited is a bit of an understatement.)

Mae’s Treasure Box is a little box that her mom can slip into the top drawer

of her dresser and add all the little snippets of babyhood that she wants to save.

Mae's Treasure Box made using Eileen Hull Sizzix XL Scoreboard Book Box Die

As some of you may know…

I currently have three adorable, sweet, and loving grandsons in my life.

I wouldn’t trade them for the world.  But after all the trucks and blue stuff,

I’m excited that I’m finally getting a little “pink” in my life.

Mae's Treasure Box made using Eileen Hull Sizzix XL Scoreboard Book Box Die

The “treasure box” was made using Eileen Hull’s New Book Box Die*.

I dug deep into my hoard of paper and found this sweet blue and pink floral paper.

It reminds me of Vintage Florals from the ’40s or ’50s.

Mae's Treasure Box made using Eileen Hull Sizzix XL Scoreboard Book Box Die

To make the treasure box:  

Mae's Treasure Box made using Eileen Hull Sizzix XL Scoreboard Book Box Die

  • I used the Xyron Creative Station* to add adhesive to the back of my paper before sticking it to the matboard.  (Usually, I adhere the paper to the matboard before die-cutting.)

*Disclosure:  This blog uses ads and affiliate links.  If you choose to make a purchase using one of the links, I receive a small commission (at no additional cost to you) that helps offset the costs of maintaining this blog.  Thanks for your support!

Mae's Treasure Box made using Eileen Hull Sizzix XL Scoreboard Book Box Die

Mae's Treasure Box made using Eileen Hull Sizzix XL Scoreboard Book Box Die

Mae's Treasure Box made using Eileen Hull Sizzix XL Scoreboard Book Box Die

  • Apply adhesive to the bottom tabs.

Mae's Treasure Box-Sue's Creative Workshop www.sueeldred.com 2039

  • Glue the sides to the bottom rectangle.

Mae's Treasure Box made using Eileen Hull Sizzix XL Scoreboard Book Box Die

  • I added an extra piece of Mat Board* covered with matching paper to fit inside the box to cover up the side tabs.
  • I glued a pink glittery chipboard letter M on the inside corner of the box.

Mae's Treasure Box made using Eileen Hull Sizzix XL Scoreboard Book Box Die

Eileen Hull Educator Logo

Disclosure:  This is a sponsored post for Eileen Hull and Sizzix.  As an Eileen Hull Educator, I have been provided product in exchange for my creative ideas.  The view and opinions are my own. 

Crafty IKEA Cabinet Makeover

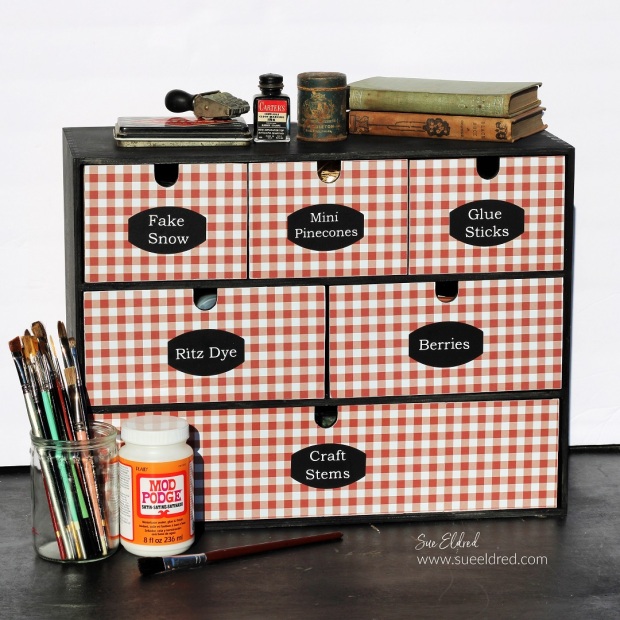
Crafty IKEA Cabinet Makeover

Give a basic IKEA storage cabinet a little personality with a crafty makeover.

I’m a little bit of a neat freak.  I geek out when I find a good storage piece.

I found this IKEA Moppe Mini Storage Chest* on a recent IKEA trek.

The mini cabinet was the perfect solution to replace an old decrepit plastic one.

“This is a sponsored post.  As a member of the StyleTechCraft Design Team I have been provided product and compensation in exchange for my creative ideas.  The views and opinions are my own.

Crafty IKEA Cabinet Makeover

If you don’t have an IKEA store close, you can get the IKEA Moppe Cabinet*

on Amazon for a bit more.

The IKEA MOPPE mini chest with drawers is a true classic with its many drawers

and timeless style.  It’s made of untreated wood that you can paint and

decorate as you like, over and over again.

Crafty IKEA Cabinet Makeover

Here’s what I used Used:   (*affiliate links)

*Disclosure:  This blog uses ads and affiliate links.  If you choose to make a purchase using one of the links, I receive a small commission (at no additional cost to you) that helps offset the costs of maintaining this blog.  Thanks for your support!

Crafty IKEA Cabinet Makeover

Directions:

  • Lightly sand the surface of the cabinet with a Sanding Block* to smooth away any rough spots.
  • Paint the cabinet and drawers with Classic Black Deco Art Americana Decor® Satin Enamels*.
  • You may need to give it a second coat. (I didn’t paint the inside of the cabinet or drawers.)
  • Lightly sand over the paint to smooth the grain of the cabinet.
  • Wipe the cabinet with a clean, soft rag to remove any dust.

Crafty IKEA Cabinet Makeover

Crafty IKEA Cabinet Makeover

Crafty IKEA Cabinet Makeover

  • I used Red Gingham Paper* to cover the front of my cabinet. The red gingham matches the decor in my craft room and is a simple pattern to match. (This is important if you want to line up your design.)
  • Brush a coat of Mod Podge Satin Decoupage Glue* over the drawer front. Make sure to get the Mod Podge to the edges of the drawer.
  • Lay the paper onto the drawer and smooth. Allow the Mod Podge to dry.

Crafty IKEA Cabinet Makeover

  • Place the drawer onto a cutting mat and cut away the excess paper using a craft knife.

Crafty IKEA Cabinet Makeover

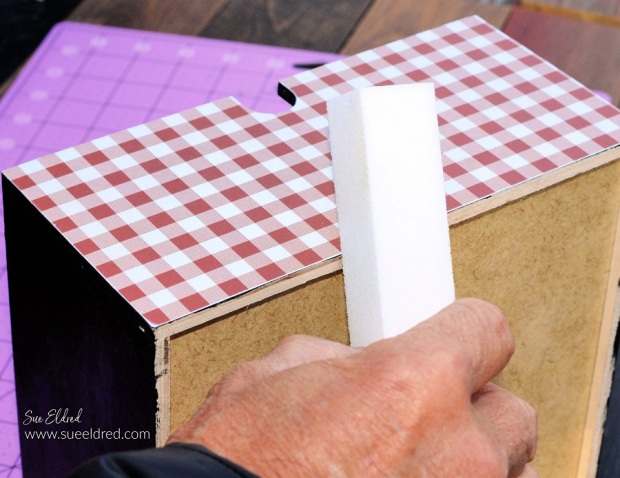
  • Sand away any rough-cut edges using a sanding block on the edge of the drawers.

Crafty IKEA Cabinet Makeover

  • A small nail file is great for getting into small to reach places.

Crafty IKEA Cabinet Makeover

Place the labels onto the drawer fronts and fill them with all your goodies.

Crafty IKEA Cabinet Makeover

Don’t judge me for my weird categories.

Crafters have a lot of random stuff to store, and this cabinet holds a lot of stuff.

Crafty IKEA Cabinet Makeover

You could use wallpaper, stencils, metal hardware to customize this into the perfect organized cabinet. 

Don’t Miss a Thing…Make Sure to Follow me

Vintage School Desk Make-Over Before and After-Sue's Creative Workshop


How to make a Holiday Door Hanger

How to make a Holiday Door Hanger

Welcome your guests this Winter Season with a Snowflake Door Hanger

that you can leave up until Spring.

How to make a Holiday Door Hanger

The White Snowflake Welcome Door Hanger measures 10″ and is happy hanging as a

Holiday Welcome on your front door or just hanging out on the wall.

Add it to the center of a wreath for even more pizazz.

How to make a Holiday Door Hanger

Materials Used:      (*affiliate link)

*Disclosure:  This blog uses ads and affiliate links.  If you choose to make a purchase using one of the links, I receive a small commission (at no additional cost to you) that helps offset the costs of maintaining this blog.  Thanks for your support!

How to make a Holiday Door Hanger

Directions:

  • Cut the Welcome Snowflake out of StyleTechCraft White Ultra Metallic Vinyl* using the Welcome Snowflake SVG file and a Silhouette Cameo Electronic Die Cutting Machine*.
  • Remove the excess vinyl from in and around the snowflake and cut letters.
  • Paint the 10” Unfinished Wood Circle* with one or two coats of black acrylic paint.
  • Lightly sand over the painted area with a Sanding Block* to smooth the grain.
  • Drill a small hole in the top of the wood circle for hanging.
  • Trim the paper around the vinyl snowflake and lay it onto the wood circle to determine the placement of the red stripe. Line the tip of the snowflake with the top hole.
  • Place a pencil mark on each side of the first double line. Draw a line between the two pencil marks.  Measure two inches down from the first pencil marks and draw a second line.
  • Place Removable Painters Tape* above and below the pencil lines.
  • Paint the area within the two-inch strip with red acrylic paint.
  • Lightly sand over the red paint to smooth.

How to make a Holiday Door Hanger

  • Cut a 10” x 10” piece of gridded vinyl transfer paper*. Remove the backing from the transfer paper and place it over the vinyl snowflake welcome.  Rub over the transfer paper* with a vinyl scraper tool to make sure that the vinyl has transferred.  (You can use a bone folder or credit card to rub over it if necessary.)  Remove transfer paper.
  • Add the piece of natural twine through the top hole for hanging.

How to make a Holiday Door Hanger

  • To make the bow, you’ll need approximately 24” of ribbon.
  • Fold the ribbon in thirds.

How to make a Holiday Door Hanger

  • Gather and wrap red twine around the center of the ribbon a couple of times and tie tightly. Add jingle bell to the twine and tie again.
  • Using a hot glue gun, glue the bow to the top of the wood sign, glue greenery under the bow.

Red Snowflake Welcome 10" Wood Door Hanger

The Red Snowflake Welcome is another example of what you can make.

I used a walnut stain on the wood base and a dark red metallic snowflake for a completely different look.

“This is a sponsored post.  As a member of the StyleTechCraft Design Team I have been provided product and compensation in exchange for my creative ideas.  The views and opinions are my own.

Hello Fall Pumpkin Wreath

Hello Fall Pumpkin Wreath

Spruce Up an existing Wreath with StyleTechCraft Vinyl and Fall Dollar Tree finds.

I have a simple boxwood wreath* that I purchased a few years ago that I love.

The best thing about the wreath is I can leave it plain (which I do a lot of the year).

Or, I can change it with the seasons.

Hello Fall Pumpkin Wreath

Hello Fall Pumpkin Wreath

Here’s how I changed my wreath for the Fall Season.

Not counting the wreath, acrylic paint, and vinyl that I had on hand,

I spent a total of $7 at Dollar Tree*  to Change Up the Wreath for Fall.


Everything always $1 at Dollar Tree – Shop Now

*Disclosure:  This blog uses ads and affiliate links.  If you choose to make a purchase using one of the links, I receive a small commission (at no additional cost to you) that helps offset the costs of maintaining this blog.  Thanks for your support!

Hello Fall Pumpkin Wreath

I found this cute pumpkin cut-out* at Dollar Tree* and wasn’t sure what I would do with it.

But I knew I better pick it up while I was there. (those things seem to sell out real fast)

It turned out to be the perfect accent for my Hello Fall Pumpkin Wreath.

Supplies Used:                  (*affiliate links)

“This is a sponsored post.  As a member of the StyleTechCraft Design Team I have been provided product and compensation in exchange for my creative ideas.  The views and opinions are my own.

Hello Fall Pumpkin Wreath

Directions:

Hello Fall SVG Image

Hello Fall SVG Image is available at The Silhouette Design Store.

Hello Fall Pumpkin Wreath-Applying Vinyl with Transfer Tape-Sue's Creative Workshop www.sueeldred.com 3327

  • Place the words onto the pumpkin using transfer tape*.
  • Rub over the words with a vinyl scraper tool to make sure “the words” have transferred.

Hello Fall Pumpkin Wreath

  • To make the Dollar Tree Mini Pumpkin Clips* match the painted wood pumpkin, I decided to paint them using the same acrylic paint colors.
  • Remove the stem and the metal clip from the pumpkin.
  • Because the mini pumpkins have a slick surface, I needed to prime the pumpkins with multi-media paint first.
  • For ease of painting, place a bamboo skewer* in the mini pumpkin. Paint with multi-media paint. After the paint has dried, paint with the same colors used on the wood pumpkin.
  • Reinsert the stem. Glue the clip in place using the glue gun*.

Hello Fall Pumpkin Wreath

Hello Fall Pumpkin Wreath

Hello Fall Pumpkin Wreath

  • Create a simple bow using Ribbon and Twine and glue it onto the pumpkin.

Hello Fall Pumpkin Wreath

  • Tie the finished pumpkin to the top of the wreath with twine.
  • Clip-on Mini Pumpkin Clips and insert fall picks.

Fall Crafting with Vinyl

Fall Crafting with Vinyl…

If you don’t need a new wreath, the finished pumpkin would also look great in a Fall Display.

Fall Crafting with Vinyl

Hello Fall Mini Candle Cup

I found this cute little ceramic cup on a recent trip to Hobby Lobby.

As adorable as it was, it looks even better with StyleTechCraft Vinyl on it.

In my opinion, adding a little vinyl makes most things a little better.

Fall Crafting with Vinyl

At first, I thought about saving the mini cup for my grandsons. 

I knew they’d get a kick out of the tiny cup.

Who wouldn’t love a mini cup of hot chocolate with marshmallows?

Then I figured I’d spend too much time constantly refilling it.

So I thought again. (sometimes, you got to think these things through)

Buffalo Plaid Wood Slice Pumpkin

How to make a Buffalo Plaid Wood Slice Pumpkin, another Easy Pumpkin Project.  


Don’t Miss a Thing…Make Sure to Follow me!


Check out what’s new at acherryontop.com!

Using Stazon Ink on Acrylic

Using Stazon Ink on Acrylic

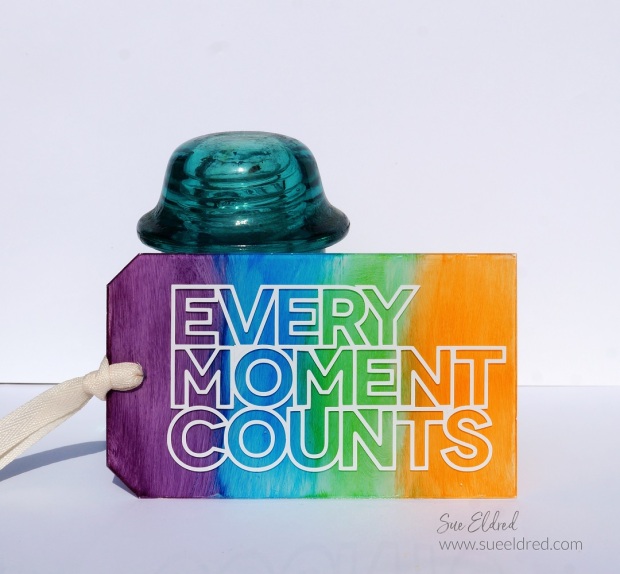
How to Create a Multi-colored Acrylic Tag using StazOn Ink.

I tried this technique last year and have been wanting to recreate another project

so that I could share the process with you all.  (I’m not sure what took me so long.)

And with so many different acrylic sizes and shapes available, the ideas are endless.

Every Moment Counts Acrylic Tag

StazOn Ink is a permanent ink that is archival-quality.

It dries very quickly and can be used on porous (cardstock) and non-porous (glossy paper, vinyl, glass, acrylic) surfaces.

Using Stazon Ink on Acrylic

Materials Used:     (*affiliate links)

*Disclosure:  This blog uses ads and affiliate links.  If you choose to make a purchase using one of the links, I receive a small commission (at no additional cost to you) that helps offset the costs of maintaining this blog.  Thanks for your support!

How to use Stazon Ink on Acrylic

Directions:

  • Most acrylic pieces usually come with a thin protective covering on both sides of the acrylic.  Remove protective covering off only one of the sides.  You will be working on one side at a time so only remove the protective cover off one side.  If your acrylic doesn’t have a protective covering you’ll need to make sure to protect the other side.
  • Give the acrylic piece a quick once over with a sanding block.  This helps ensure that everything adheres.
  • Rub the StazOn ink pad directly onto the acrylic to add the first color.

How to use Stazon Ink on Acrylic

  • Continue adding additional colors to the tag.  
  • You can experiment with different swipes and swirls to find the pattern you like.

Using Stazon Ink on Acrylic

  • Paint one or two coats of light multi-surface acrylic paint over the ink.  The multi-surface paint is perfect for surfaces like acrylic.  The paint makes the colors of the ink pop and not as translucent.

Using Stazon Ink on Acrylic

  • For added protection and a scratch-resistant tag, I sprayed the tag with a matte acrylic sealer. (the color won’t be coming off my tag)
  • After everything has fully dried, turn the tag over and remove the second piece of protective covering from the acrylic.

Using Stazon Ink on Acrylic

For the other side of the tag.  

  • I created a saying using an SVG file from the Silhouette Store and cut it out of white glossy adhesive craft vinyl using my Silhouette Electronic Die-Cutting Machine*.
  • I used the vinyl tools to remove the excess vinyl in and around the letters.
  • Cut a piece of Clear Transfer Tape* slightly larger than the word.
  • Using the vinyl scraper tool, gently rub over the letters to make sure they have transferred.
  • Lift the word off the white backer paper.

Apply Craft Vinyl to Acrylic Tag

  • Center and position the words over your acrylic tag and gently rub over the transfer paper with the vinyl scraper tool.
  • Carefully remove transfer paper from the acrylic tag.
  • Add ribbon or twine through the hole of the tag.

Makes a great inspirational bag tag.

Every Moment Counts Acrylic Tag

Interested in the Products Used on the Every Moment Counts Tag?

Click on Images below for Amazon Ordering.

Amazon Audible Promo    Amazon Audible Free Trial*

Pretty in Pink Mixed Media Canvas

Pretty and Sweet, Delicate and Petite, a mixed media project made simple.

Every once in awhile, I like to do something I little different from my usual projects.
This mixed media canvas is one of those projects.
It reminds me of a crackling wall found in an old cottage.

How to make a Pretty in Pink Mixed Media Canvas

Materials Used:

*Disclosure:  This blog uses affiliate links.  If you choose to make a purchase using one of the links, I receive a small commission (at no additional cost to you) that helps offset the costs of maintaining this blog.  Thanks for your support!

Directions:

  • Prepare the canvas with a painted coat of Gesso.
  • Apply Crackle Paste onto the entire canvas using a palette knife.

  • Using a stipple brush*, rub rose-colored ink onto the canvas, giving it a subtle hint of pink.

  • Create a delicate scroll frame using white adhesive glitter vinyl, an SVG cut file, and an electronic die cutting machine.
  • Use Transfer paper to align and place the frame onto the mirror.
  • Center and glue mirror onto the canvas with DAP Rapid Fuse All Purpose Adhesive*.

  • The mantle was created by layering, stacking and gluing cut pieces of chipboard with craft glue. (nothing fancy just basic construction)
  • Paint it with white acrylic paint.
  • Glue the mantle onto the mirror using DAP Rapid Fuse All Purpose Adhesive*.

  • For added stability, glue the small floral scrapbook paper pieces onto the chipboard.
  • Decorate the mantle with a small jar filled with pink pearl beads, a miniature pewter pitcher and saucer, and the floral scrapbook pieces.
  • Adhere floral embellishments around the top and bottom corner of the mirror.

For another DIY Mixed Media project, click on the link below.  ↓

         Little Birdie Mixed Media Canvas

Just for Fun- DIY Golf Menu Board

DIY Golf Menu Board…

It started as a joke.

Last month, as my husband was painting the floor of the deck, I opened the window,

stuck my head out and asked if he wanted anything to drink.

He said we should put in a counter at the window so we could take orders.

I wanted a Pool Snack Bar, he really wanted the 19th Hole.

This is our compromise.

  • I painted a thin hardboard panel with several coats of DecoArt Americana Decor Black Satin Enamel Paint.
  • I gave the painted board a light sanding with steel wool to make it smooth.

Supplies Needed:

Directions:

  • Using an SVG Cut File purchased from the Silhouette Store, size and cut all the pieces using the Cameo Die-Cutting Machine.
  • Use the Vinyl Tools to “weed” out the negative spaces around your image.

StyletechCraft products brought to you by ATSM Craft

*Disclosure:  This blog uses affiliate links.  If you choose to make a purchase using one of the links, I receive a small commission (at no additional cost to you) that helps offset the costs of maintaining this blog.  Thanks for your support!

  • Apply transfer tape over the image and give a gentle rub with using vinyl scraper tool to transfer the image to the tape.
  • Gently lift up to remove the image off white backing.

  • Align and place the image onto the board.
  • Give a rub with the vinyl scraper tool to transfer the vinyl onto the board.

My husband loves the board.  (I wonder if I can get him to pay?)

“This is a sponsored post.  As a member of the StyleTechCraft Design Team I have been provided product and compensation in exchange for my creative ideas.  The views and opinions are my own.

How to make a Beach Inspired Windchime

A Beach Inspired Windchime for those us that LOVE the beach.

If you’re one of the lucky ones that live on the ocean or have a Beach House.

Here is a simple project to make that you can hang on the back porch.

Or if you don’t live on the beach or have a beach house.

The Windchime is a fun reminder of trips to the ocean,

and a great way to use some of those shells you collected. 

How to Make a Beach Inspired Wind Chime.

Disclosure:  “This is a sponsored post. As a member of the Deflecto Design Team I have been provided product and compensation in exchange for my creative ideas, views and opinions.”

Supplies Used:                 (*affiliate link)

Featured Storage:


*Disclosure:  This blog uses ads and affiliate links.  If you choose to make a purchase using one of the links, I receive a small commission (at no additional cost to you) that helps offset the costs of maintaining this blog.  Thanks for your support!

Gather Your Supplies…

The Caddy Storage Tray* is so handy to use. It’s perfect for sorting the various sizes of wood beads. And it fits into the large container of the Deflecto Stackable Caddy Organizer*.  I used the Deflecto Interlocking Marker Organizer* in the caddy to hold my paintbrushes.  I put all my supplies in the caddy and took it onto the deck, where I worked on the wind chime under my umbrella on a beautiful Summer day.  (and wished I was on the beach)

Faux Driftwood…

Because I didn’t have an actual driftwood stick from the beach.  I used a stick found in the yard and broke it down to size.

  • Scrape the bark off the stick.  (I used an old table knife.)
  • Paint the stick with white acrylic paint and a couple of stripes of pale blue and aqua.
  • Give the stick a light sanding with fine-grit sandpaper to rough it up and make it look more natural.

  • Cut five pieces of twine approximately 24″ long.
  • Tie a knot on one end of the twine.
  • Wrap a small piece of blue removable painters tape on the other end of the twine to keep the twine from fraying.
  • String Wood Beads onto the twine.

  • Tie beaded twine to the painted stick.
  • On the center of the stick, I glued a medium-sized Starfish purchased at a Beach Gift Shop.
  • Add a couple of beads to a piece of twine. Tie twine to each end of the stick to use as a hanger.
  • Stick the loose ends of the twine through the beads to hide.

Don’t Miss a Thing…Make Sure to Follow me


For more DIY Beach Inspired projects from Sue’s Creative Workshop.↓


PIN ME ↓

Save